Customer Picking Orders

Overview

  • Customer Picking Orders

    Outbound Customer Picking Orders:

    An outbound process that generates by default charges by the case pick, and/or charges by the full pallet case pick.     

    Outbound Pick Process: 

    1. Order Creation and Release 
    2. Picking 
    3. Verifying 
    4. Manifesting 
    5. Invoicing

Order Creation and Release

  • Key Information

    Inventory Specifications:


    Specified Lots/Pallets/Manual Ids: Once an item has been selected for an order, preferred lots, pallets or manual ids can be specified for allocation/picking 


    Note: Specified manual ids and lots cannot be provided together.  


    Weight Requirements:


    Take Weights: When checked, forces weights to be collected for an item that is not defined as catch weight.  Once taken, weights will be printed on outbound documentation (Order Confirmations, Proforma, and Invoices), but will serve as informational only, and will have no effect on order pricing.


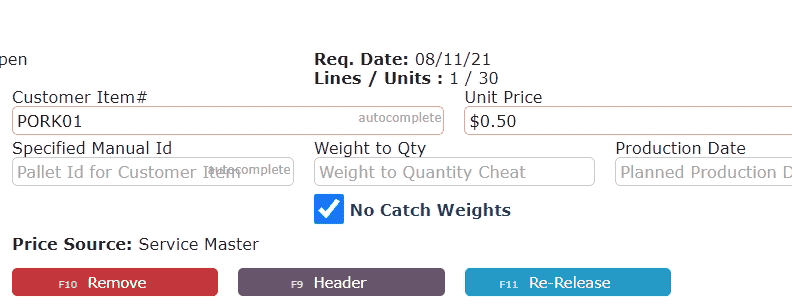
    No Catch Weights: When checked, allows a catch weight item to be manifested out with no catch weights taken.  


    Note:
    The same Item within an order multiple times must have the same selection for the Take Weights or No Catch Weights options.  Separate orders must be used otherwise.  

    Weight to Quantity: Once an item has been selected for an order, enter the total weight if known, tab to the next field, and the appropriate quantity will be prefilled in.
  • Creating a Customer Pick Order
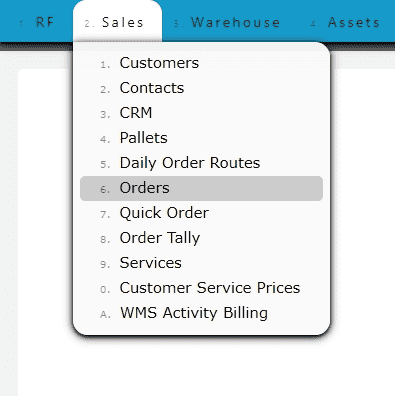
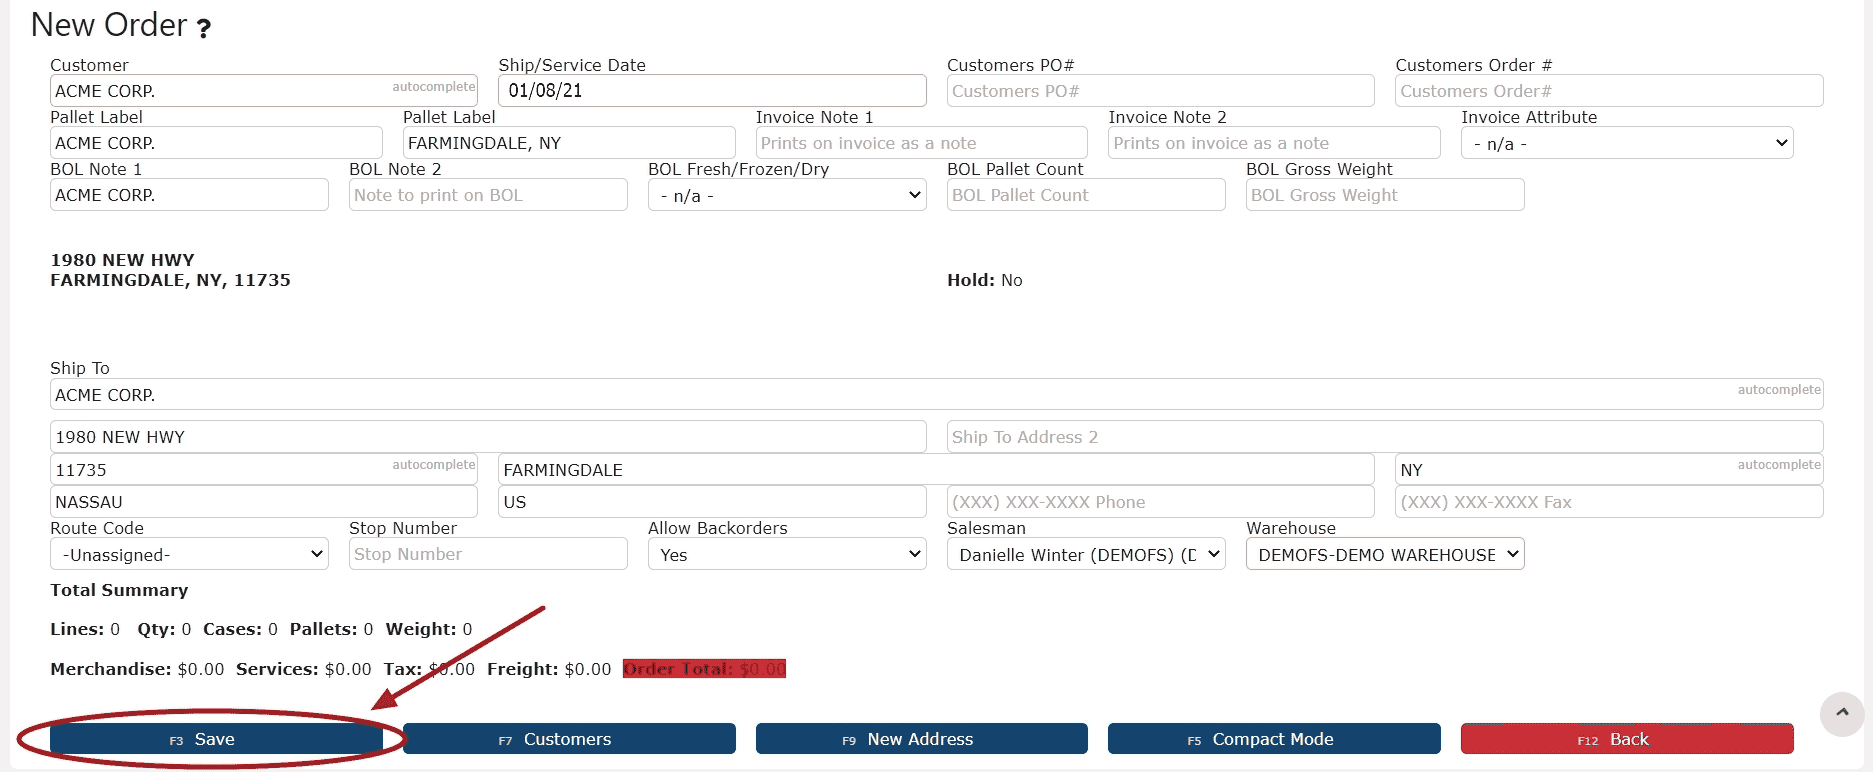
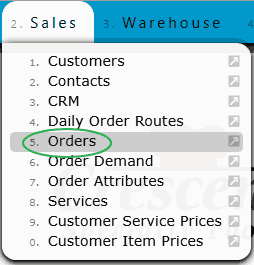
    1. Go to the Sales Menu and click on the Orders Sub-Menu


    2. Click on the Add New Order Button 


    3. Fill out all of the necessary information on the Header Form, then click on the Save Button 


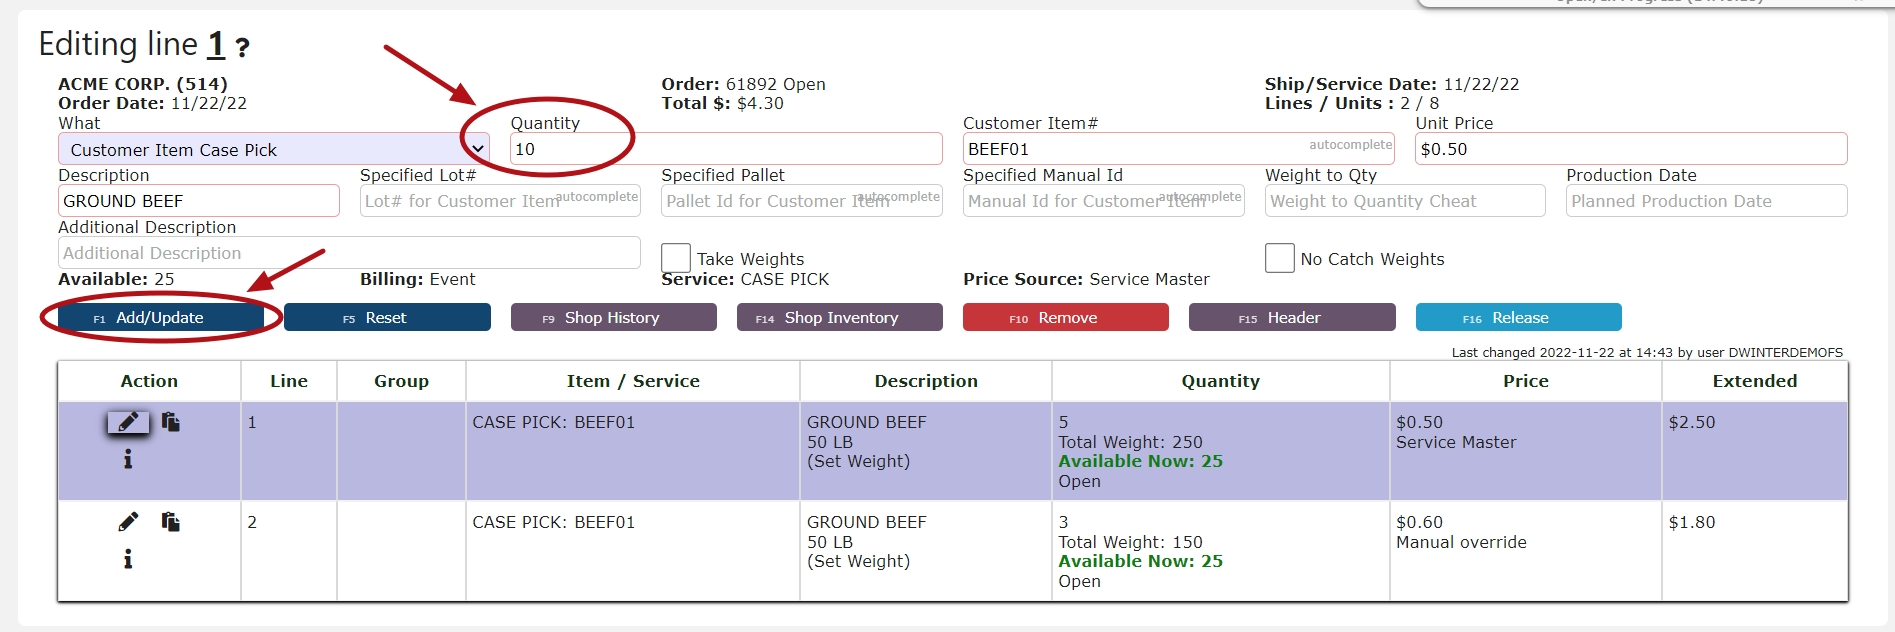
    4.  You are now editing the Order Details.  Proceed to add items and service details as necessary (Fill in all the relevant information, then click the Add/Update Button to add the item or service detail line to the order) 


    5. Once all items/services have been added to the order, it is ready for release
  • Scheduling a Customer Pick Order
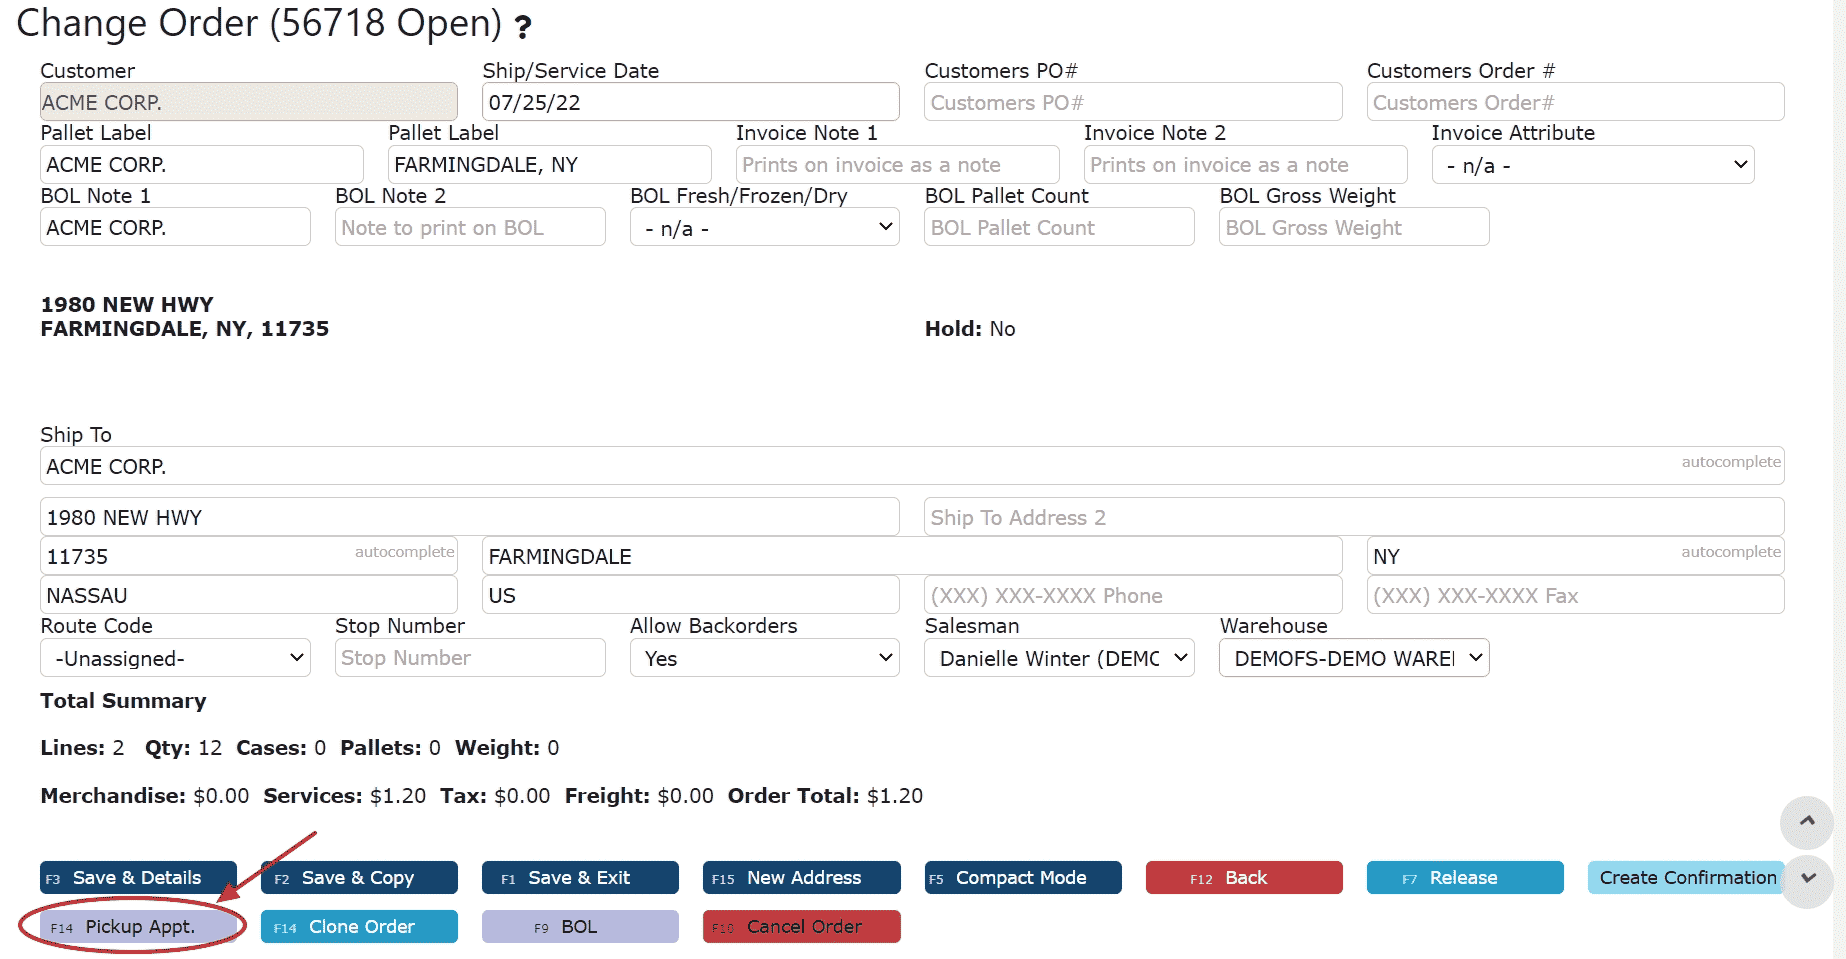
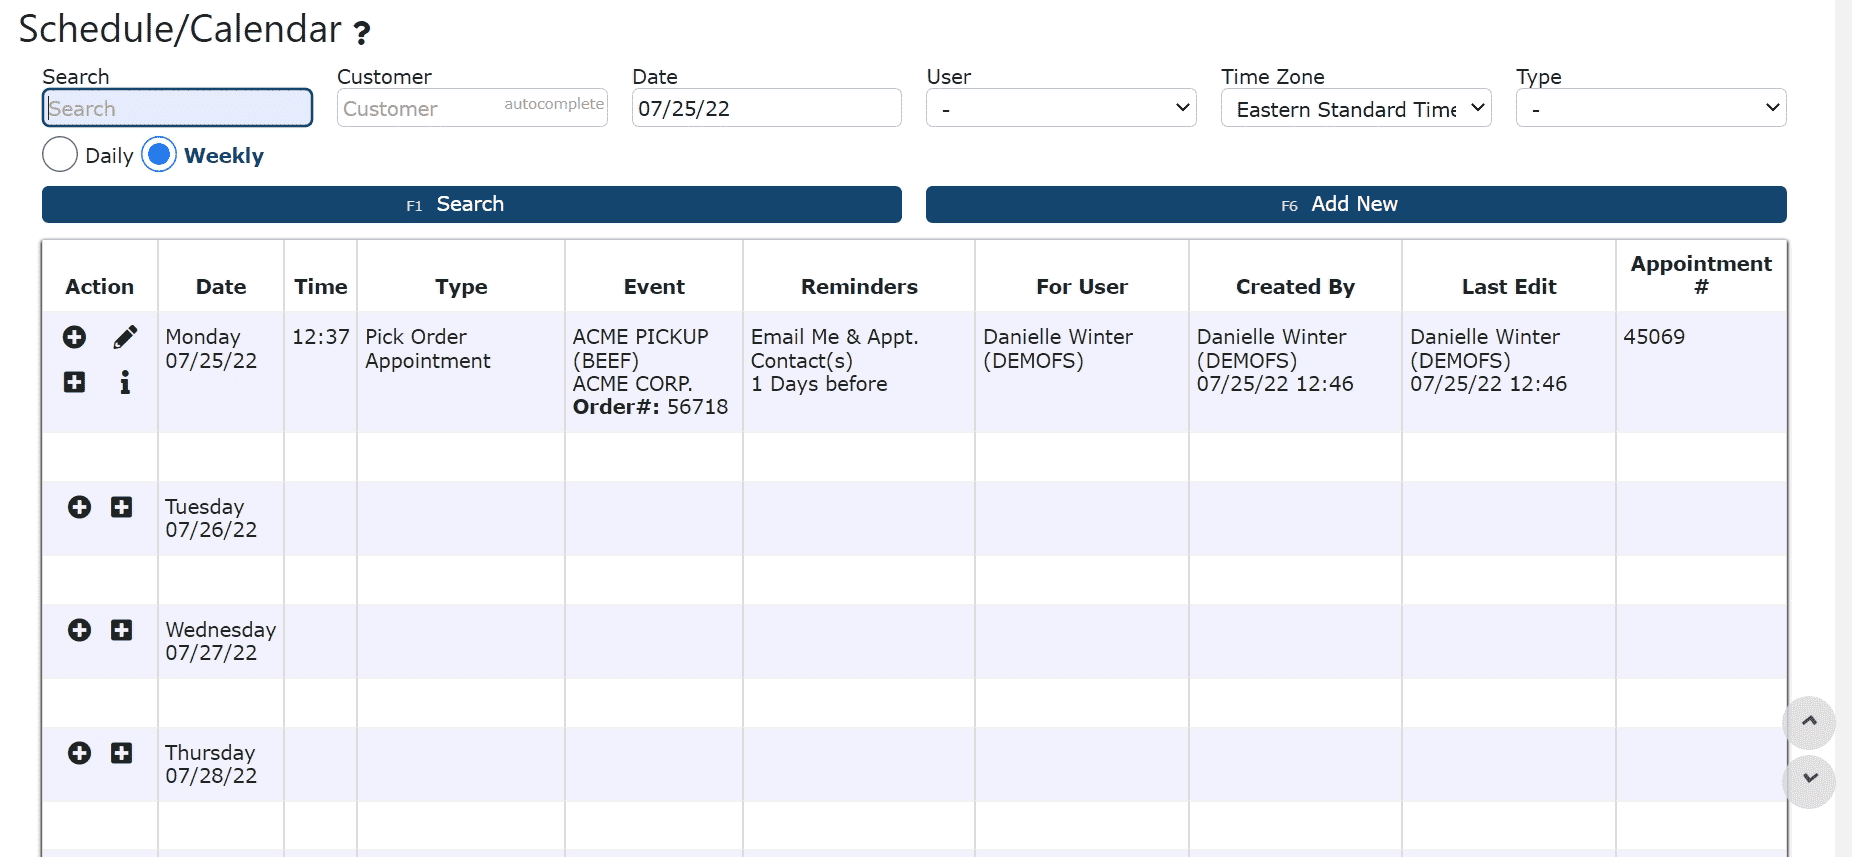
    Add pickup orders to the Schedule/Calendar for easy visibility (Optional).   


    1. Click on the Pickup Appt. Button 


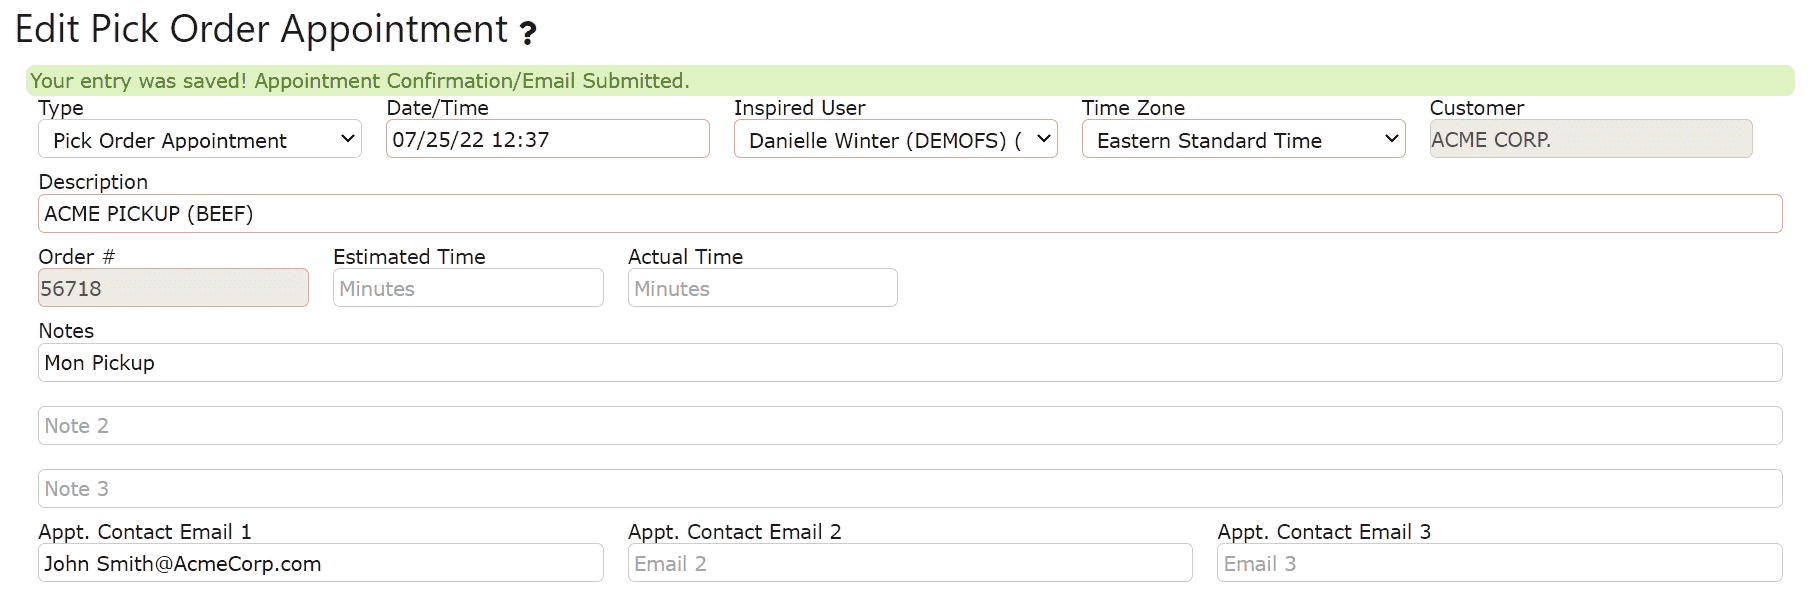
    2. Enter a Description and any relevant Notes 


    3. If applicable, enter Contact Email Addresses and specify Alert(s)  


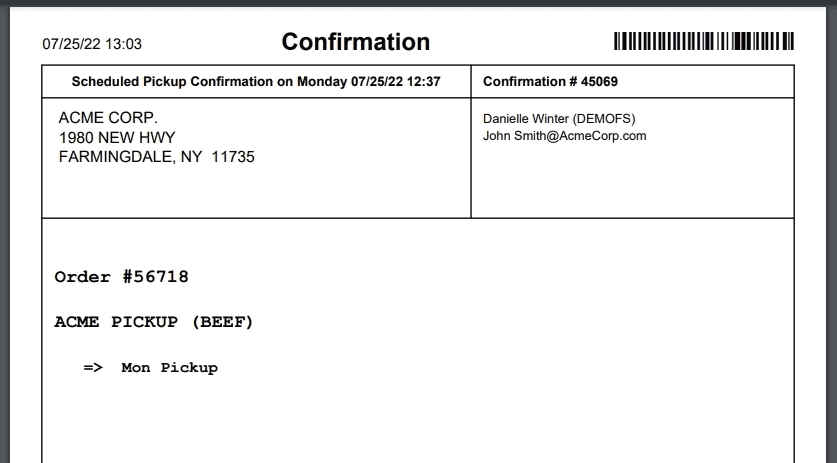
    4. Click on the Create Confirmation Button to generate and email a Pickup Confirmation form (Optional) 

    Note: Once generated, a copy of the Pickup Confirmation will be automatically emailed to all Appt. Contacts. 


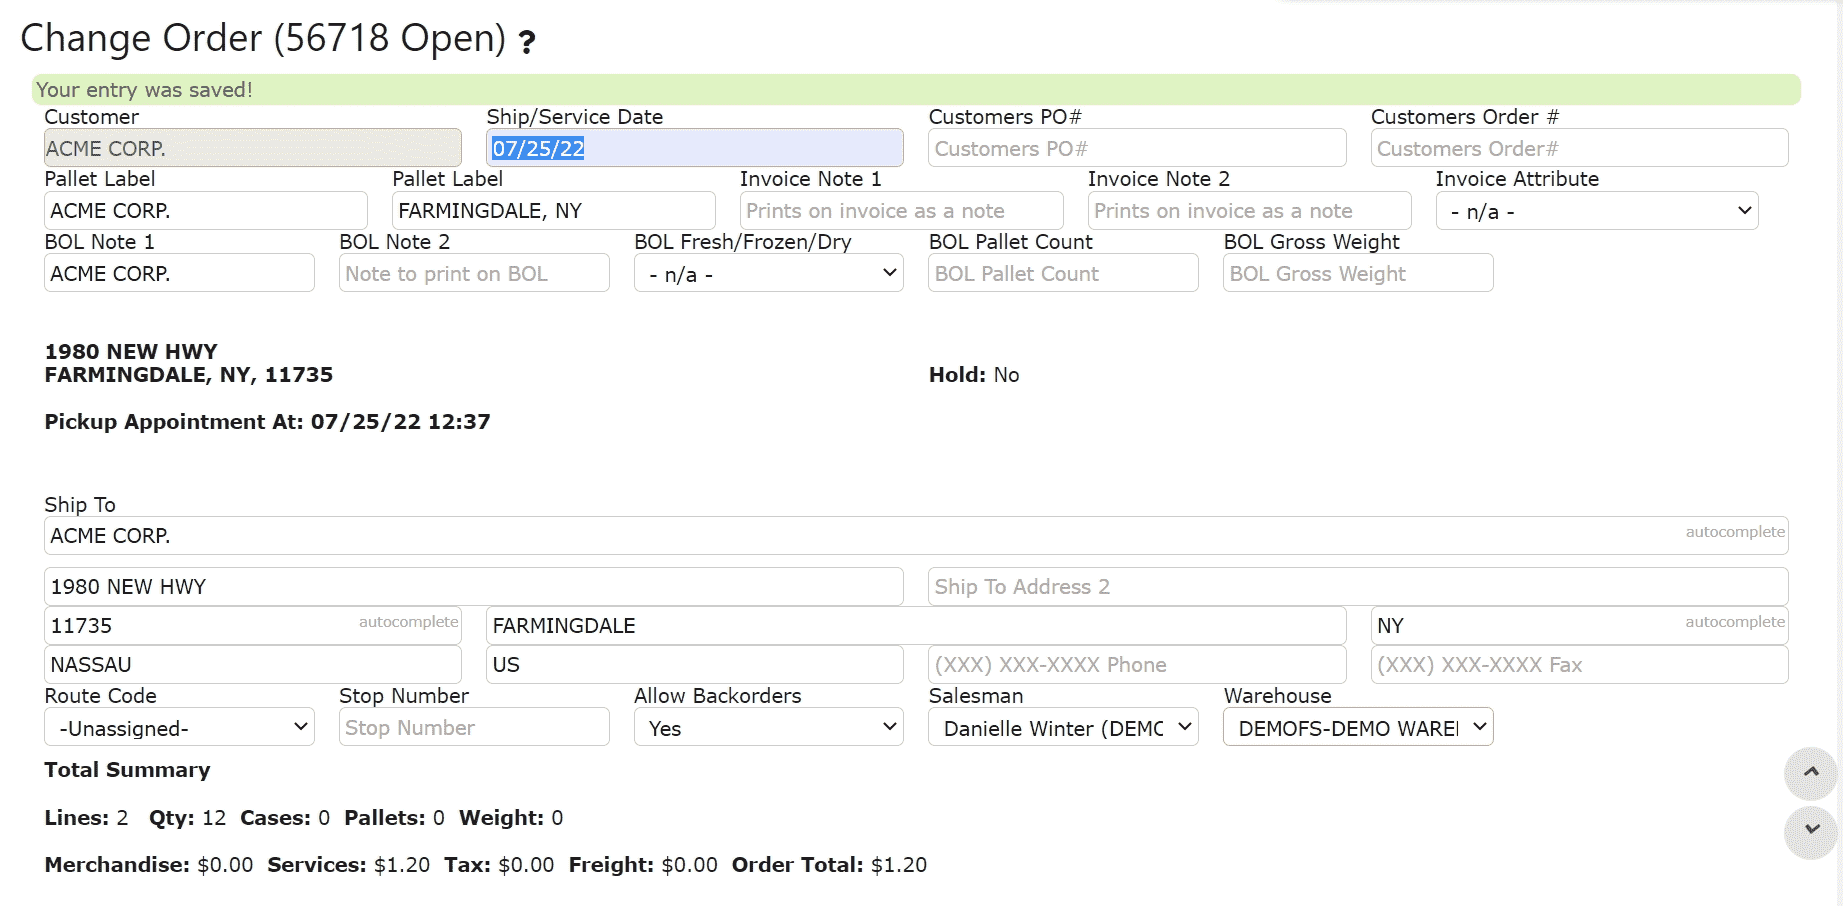
    5. Once finished, click on the Save & Exit Button


    6. The pickup order has now been officially added to the Schedule


    7. View and edit the pickup order appointment on the Schedule/Calendar 


    8. View the pickup confirmation form 


  • Releasing a Customer Pick Order

    Release Icon: 


    1. Use the Release Icon next to any un-released customer pick order to release it for picking  


    Release Buttons: 


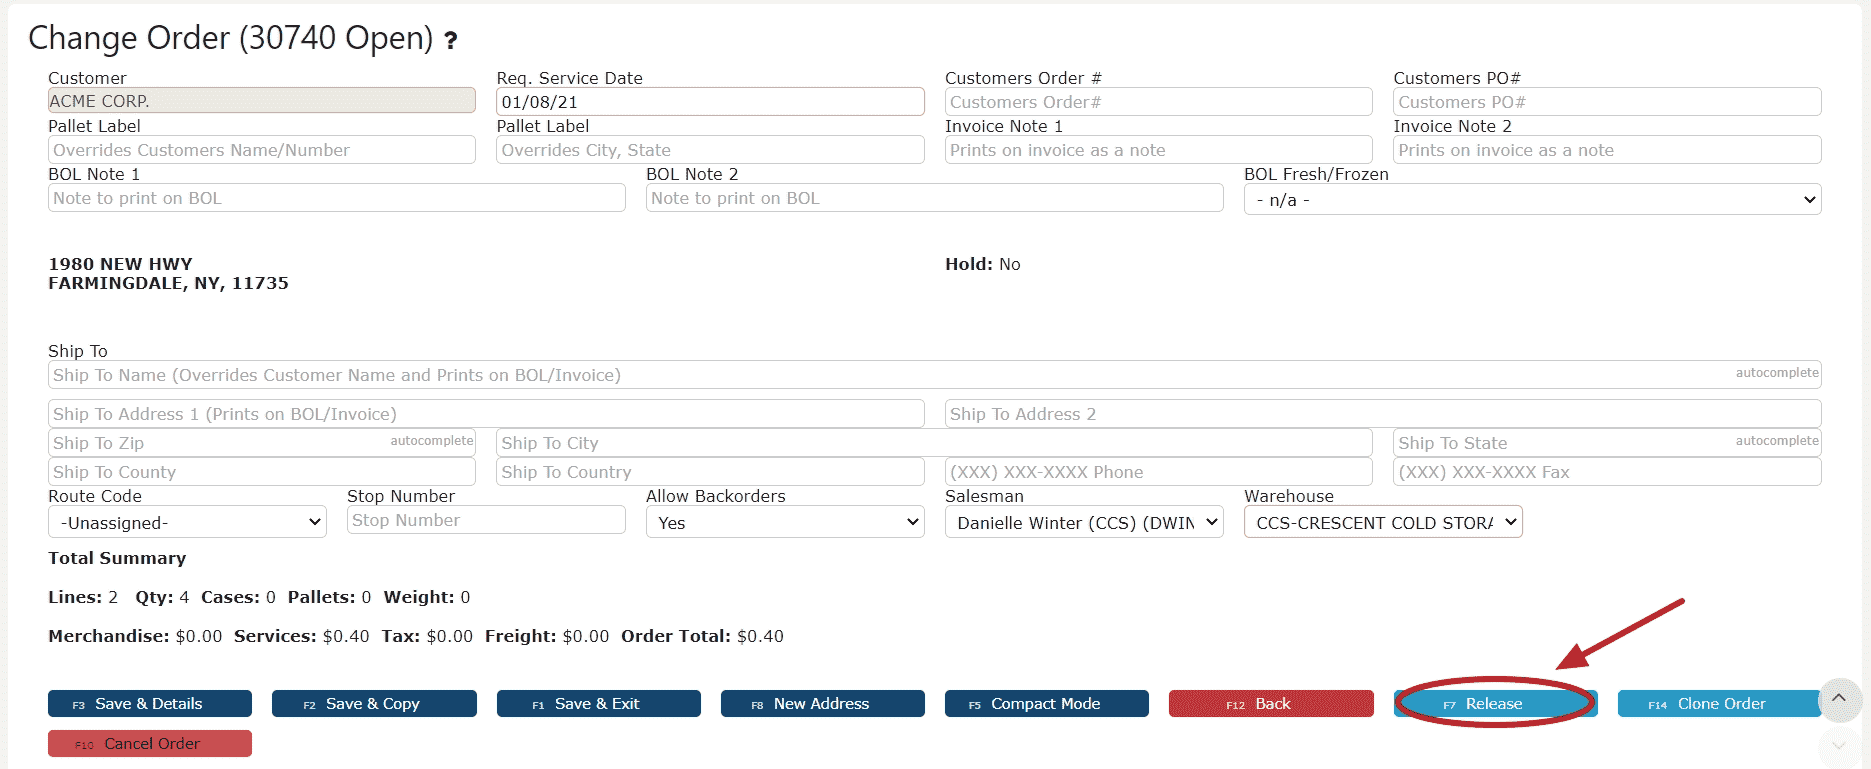
    Order Header: 

    1. Use the Release Button on the Order Header page to release the customer pick order for picking 


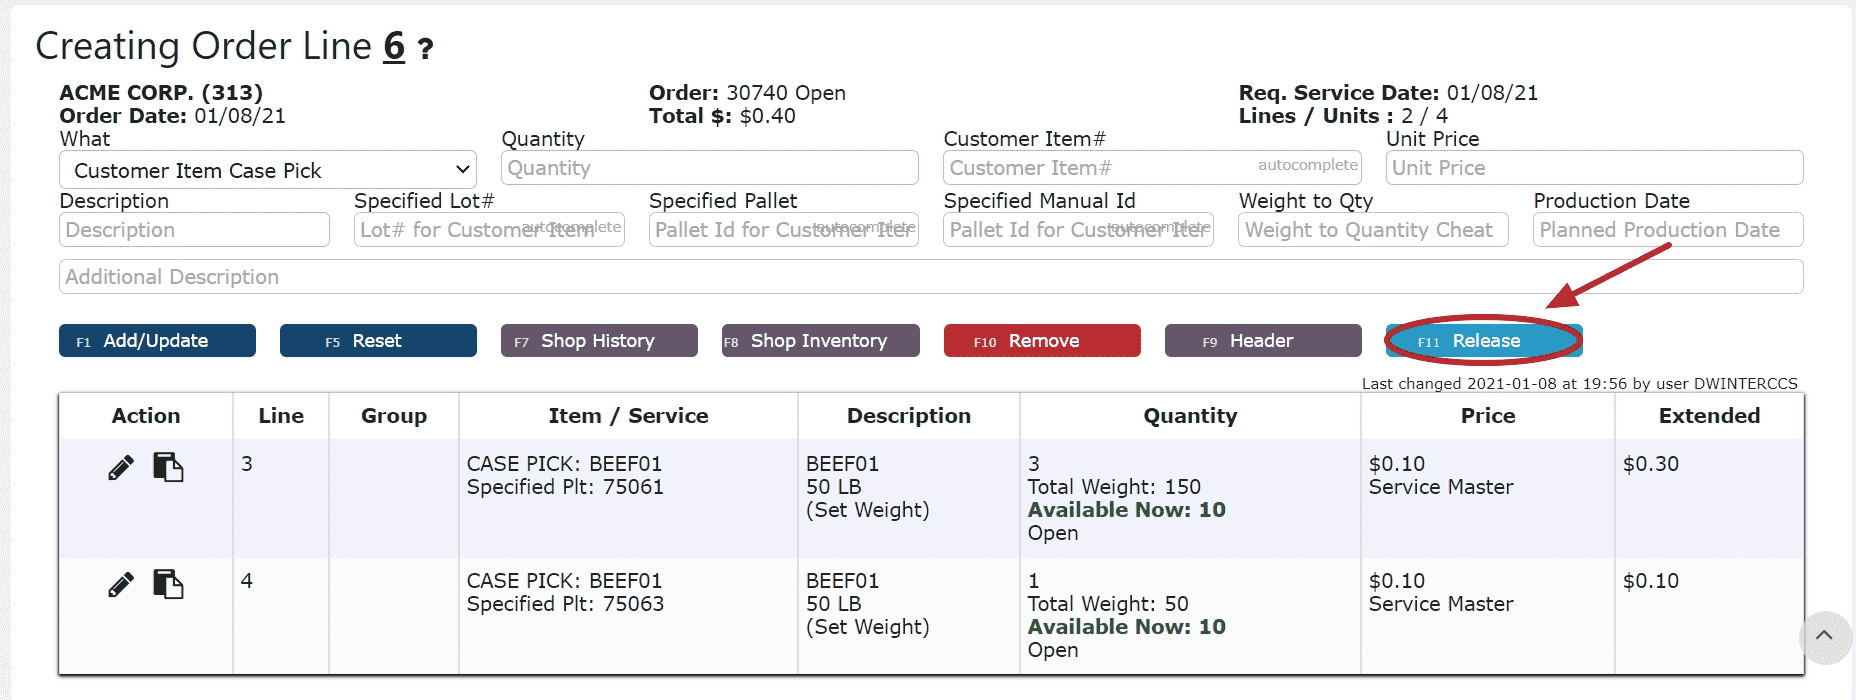
    Order Details:
     

    1. Use the Release Button on the Order Details page to release the customer pick order for picking


    Note: Orders that are released allocate, and essentially "lock down" the inventory pertaining to that order.  Released orders can either be added immediately to the Pick Queue and be available for pickers to start picking, or they can be added to the Wave Queue first, to then later be "Waved" to pickers when the time is right. 

    Contact I.T. to enable Waving.    

Waving

  • Waving a Customer Pick Order
    Our Cloud ERP WMS System supports the use of Wave Picking in order to expedite the picking process. 

    Orders can be released to allocate the corresponding inventory, and then placed in a Wave Queue until ready for picking.
     
     
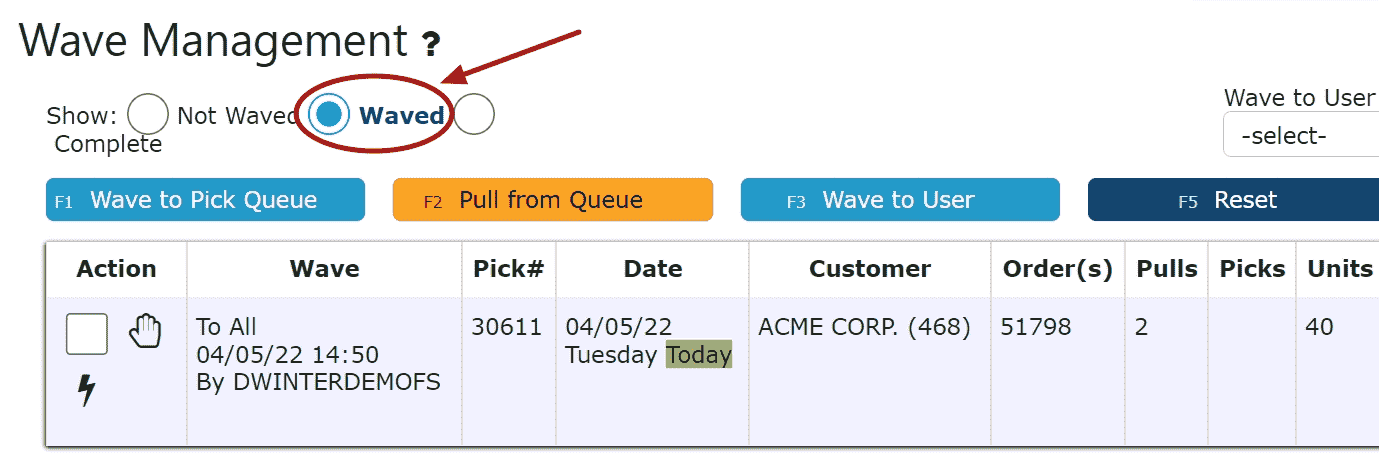
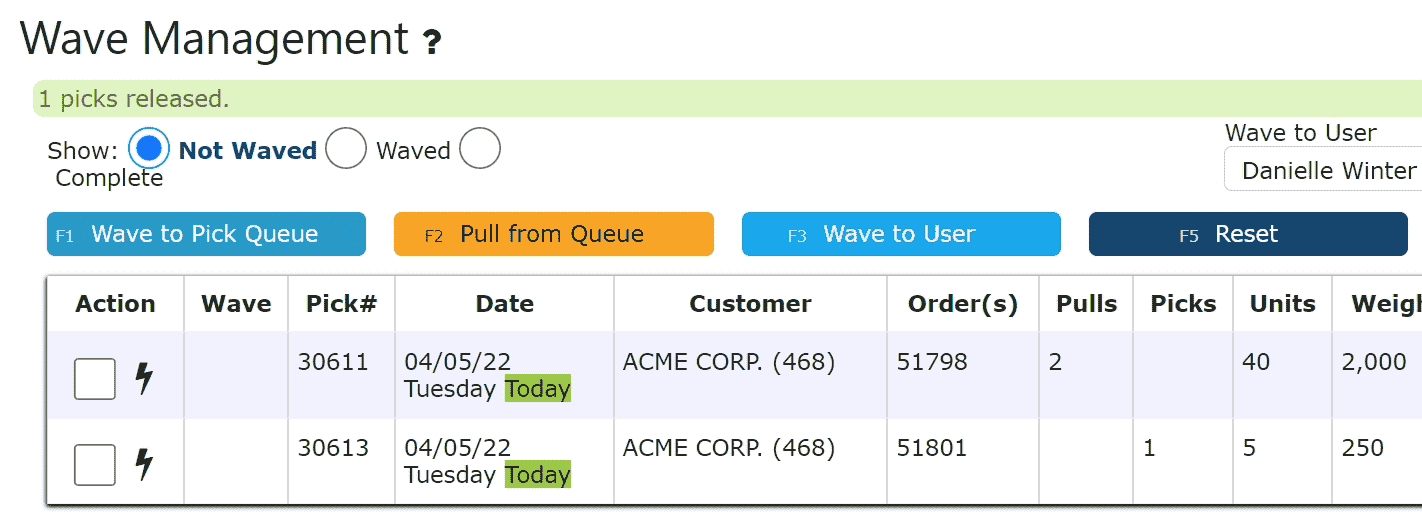
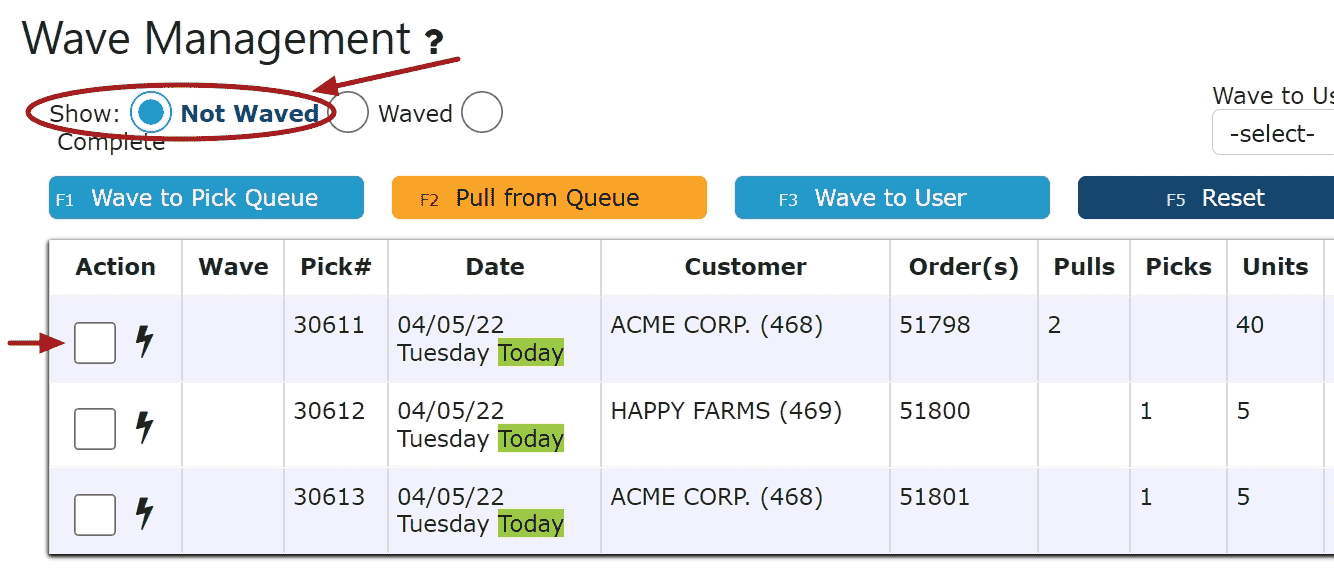
    Wave Picking to All: Wave orders to the pick queue for any picker to pick
     
    Note: Orders must be released first before waving to the pick queue
     
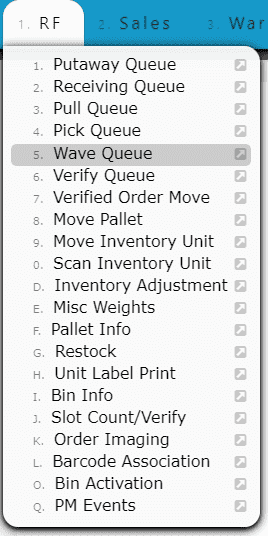
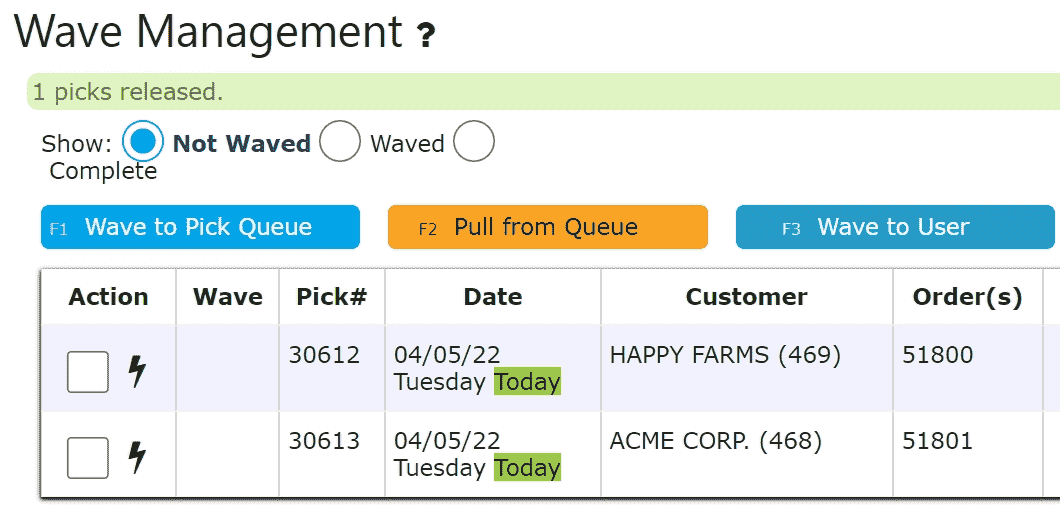
    1. Go to the RF Menu and click on the Wave Queue Sub-Menu  
     
     
    2. Check the box next to each pick to be waved and click on the Wave to Pick Queue Button 


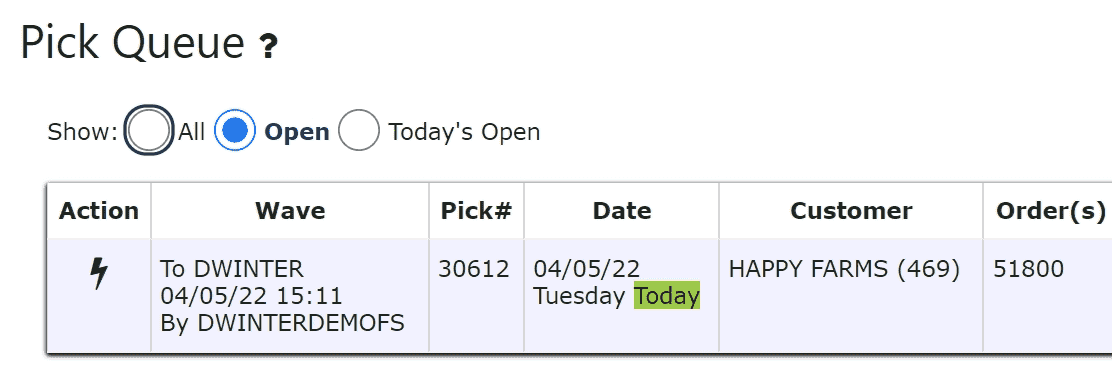
    Note: Once Waved, the picks will now be available in the Pick Queue 


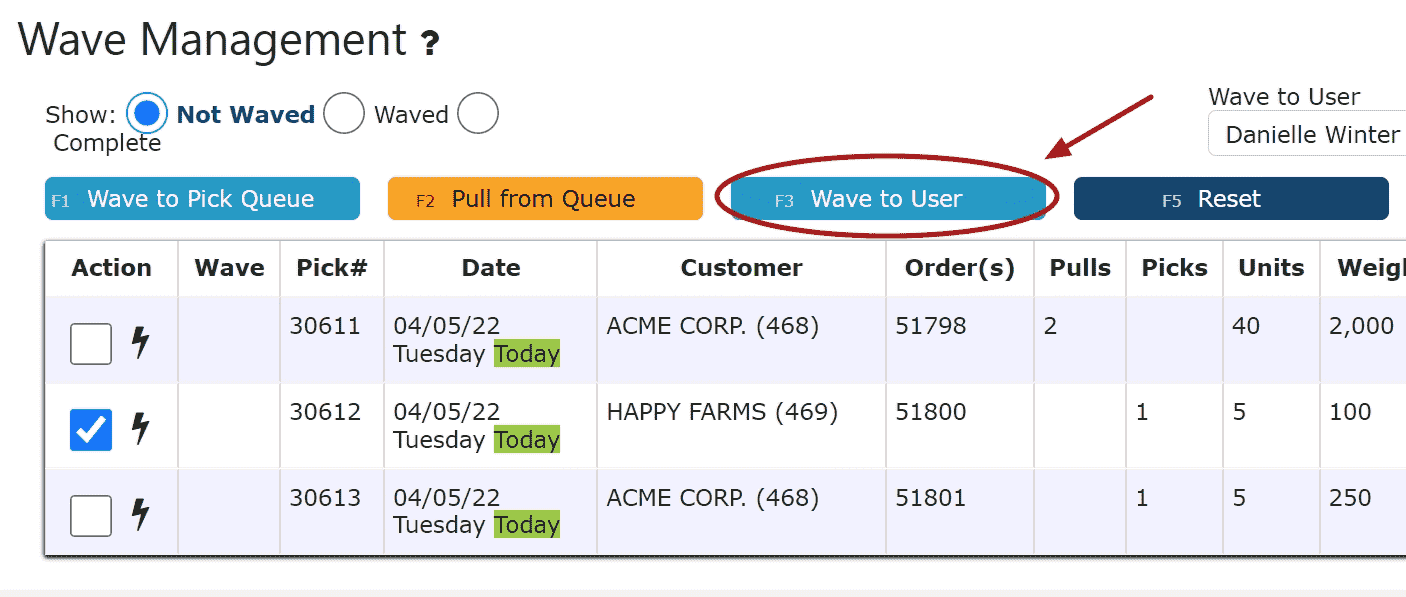
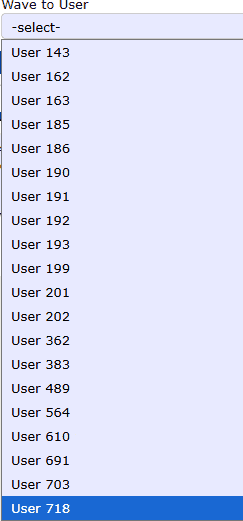
    Wave Picking to User: Wave orders to the pick queue for a specific user to pick 
     
    Note: Orders must be released first before waving to the pick queue
     
    1. Go to the RF Menu and click on the Wave Queue Sub-Menu
     
     
    2. Select a user to wave the pick(s) to 
     
     
    3. Check the box next to each pick and click on the Wave to User Button


    Note: Once Waved, the picks will now be available in the Pick Queue for that user to pick only


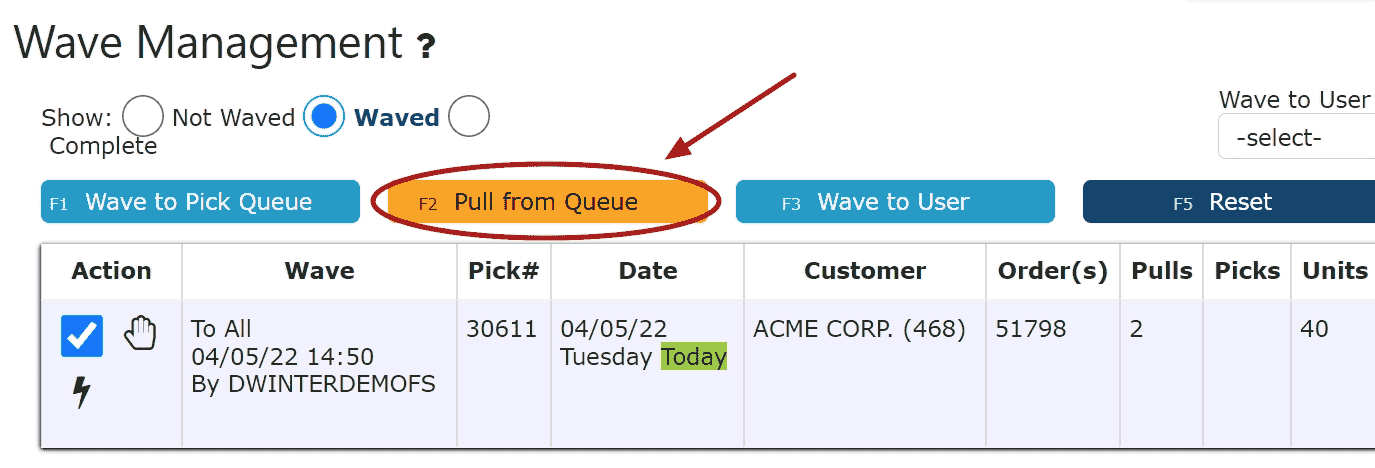
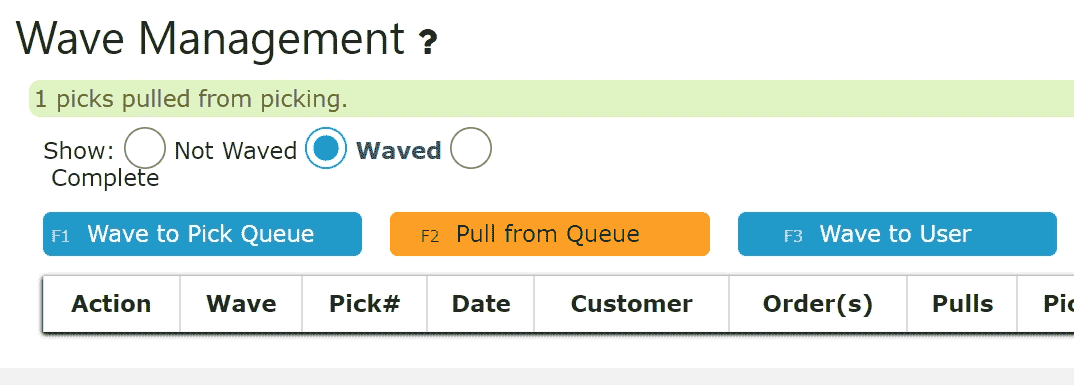
    Pull  Back from Queue: Remove the pick from the Pick Queue 
     
    1. Go to the RF Menu and click on the Wave Queue Sub-Menu  
     
     
    2. Check the box next to each pick to be pulled back and click on the Pull from Queue Button 


    Note: Once pulled back, the pick is no longer available in the Pick Queue until it is waved again 
     

Picking

  • Key Information
    Key Information:
    Picking is the first step in physically fulfilling a customer order and is performed from the RF → Pick Queue screen. Pallets, items, and quantities are all scanned or entered to maintain accuracy and inventory traceability. The system guides users through pallet selection, pick sequencing, and label printing, while enforcing rules for case pick order and Full Pallet Case Picks (FPCPs), when applicable.

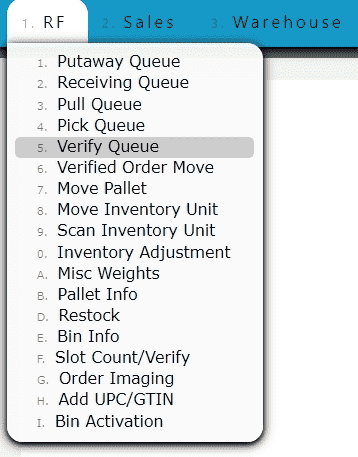
    • Access the pick queue by going to the top menu, hovering over RF, & choosing the Pick Queue dropdown option.

    • Begin the pick process by clicking the Initiate Pick hand icon once inside the RF → Pick Queue.

    • Pallet, item, lot number (if applicable), and quantity must be scanned or entered for each line item.

    • Full Pallet Case Picks (FPCPs), when enabled, must always be completed before standard case picks.

    • Once picking is complete, click Label to print pallet labels (if necessary).

    • While the system may suggest a pallet based on availability or allocation, users are free to override and pick from any eligible pallet not fully reserved for another order.

    • Picked product will be moved to the bin selected during receipt creation. If the gray Floor button is used, the product will default to the floor location. Bin assignments can also be updated manually at any time via RF → Move Pallet.
  • Picking a Customer Order

    Picking from the Order Listing: 


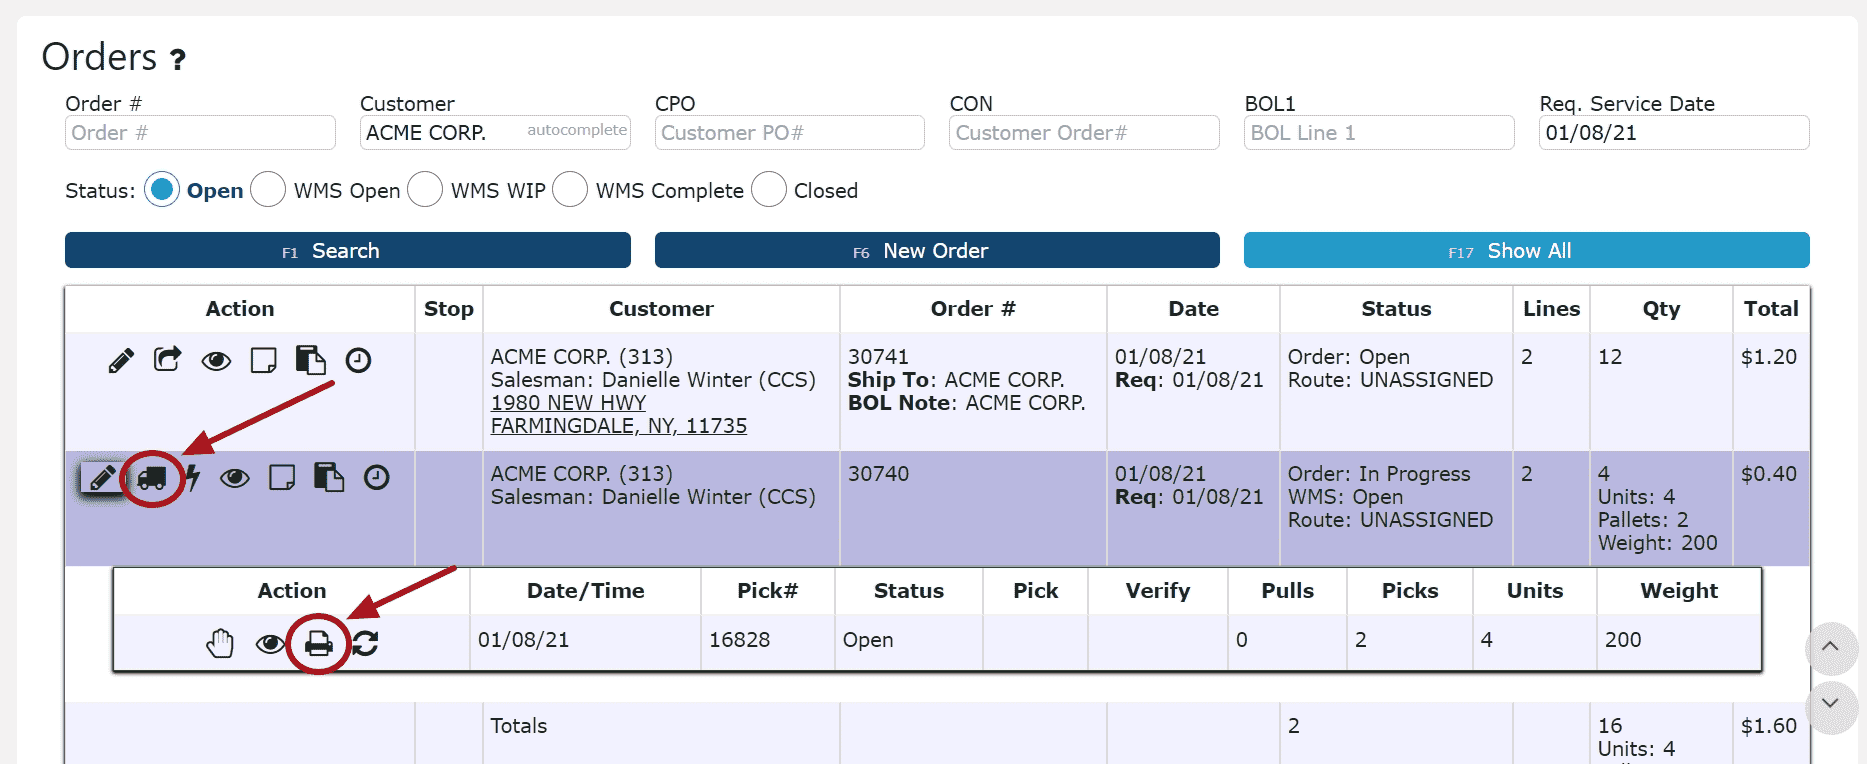
    1. Click on the WMS Tickets Icon next to the order to be picked and click on the Print Document Icon (Printer) to print the pick ticket (if necessary) 


    2. Click on the Go to Pick Queue Icon (Hand) to be automatically redirected to the selected order's pick entry in the pick queue


    5. Click on the Initiate Pick Icon (Hand) to start picking 


    6. Start picking 

    a) Picking to a new pallet:

    Note: Fresh case picks will automatically by default go onto a new pallet, unless a pallet of the same area has already been picked

    (1) Enter or scan the pallet the cases are coming from (Either follow and enter/scan the pallet that's prompted for on the screen, or enter/scan a different pallet to pick instead.  Any pallet that suits the criteria and is not fully allocated to another order can be picked from, even if not allocated to this particular order itself.) 


    Note:
    While full pallets and case picks can generally be picked in any order sequence, if multiple case picks exist from the same pallet (different items, different lots etc. from the same pallet), those case picks must be done in the order determined by the system.  If the customer is setup to pick FPCPs (Full Pallet Case Picks), those must be done ahead of any case picks.    


    (2) Enter or scan the item to be picked from the pallet 


    (3) Enter or scan the lot number (if applicable)


    (4)  Enter and confirm the number of units being picked 


    (5) Continue picking until all units from the order have been picked 

    Note: Any order that contains multiple picks from multiple pallets within the same area, will automatically use the first pallet picked as the pallet that all remaining case picks will be picked to.  To bypass this and select a different pallet, click the New Pallet Button to pick to a new pallet, or click the Back Button and enter in the pallet to pick to.  This must be done before entering the From Pallet.  


    (6) Once the last pick is completed, click on the Done/Label Button to print out order labels (if necessary)  

    Note: All units picked will automatically be placed in the floor location 

Verifying

  • Key Information
    Key Information:
    Verifying is a required quality control step that confirms all picked product matches the original order before shipment. Whether using the Verify Whole Ticket flag icon or processing through the RF → Verify Queue, the system supports both blind and non-blind verification workflows. Each pick ticket must be verified individually, ensuring traceability and compliance with customer and company requirements.

    • Pick tickets can be verified directly from the Sales → Orders page by clicking the WMS Tickets (Truck) icon, then selecting the Verify Whole Ticket (Flag) icon next to the order.

    • Alternatively, navigate to RF → Verify Queue to initiate verification using either the Blind Verify (Flag) or Verify Each Pick/Pull (Lightning Bolt) icon. Once clicking on the lightning bolt, this will show the flag icon under each pick, and each pick can be verified as a single line.

    • During blind verify, users enter the pallet number, item code, lot code (if applicable), and unit quantity to confirm accuracy without seeing what was picked.

    • If BOLs are configured in Company Setup, they can easily be printed after completing verification.

    • Non-blind verification allows users to cross-check each pick line using the system’s displayed data before confirming.

    • Every pick ticket must be verified one at a time—batch or bulk verification is not supported.
  • Verifying a Customer Pick Order

    Verifying from the Order Listing: 


    1. Click on the WMS Tickets Icon (Truck) and then the Verify Whole Ticket Icon (Flag) next to the order to be verified 


    2. The selected pick ticket has now been successfully verfied 

    Note: Each pick ticket must be verified individually 


    Verifying from the Verify Queue: 


    1. Go to the RF Menu and click on the the Verify Queue Sub-Menu 


    (a) Initiate Blind Verify Icon: 

    i.  Click on the Blind Verify Icon (Flag) next to the order to pick ticket to verify 


    ii. Enter the pallet to verify and check Order Labels and/or BOL (if applicable) 

    Note: Post Verification Labels and BOLs if selected can be generated and printed automatically based on Company Setup


    Click the Next Step Button and procced to blindly verify the rest of the pick ticket 

    iii. Enter the Item Code 
    iv. Enter the Lot Code 
    v. Enter and confirm the unit count 
    iv. The selected pick ticket has now been successfully verfied

    Note: Each pick ticket must be verified individually 

    (b) Verify Each Pick/Pull (Not blind) Icon: 

    i. Click on the Activity Icon (Lightening Bolt) next to the pick ticket to verify
    ii. The selected pick ticket has now been successfully verfied 

    Note: Each pick ticket must be verified individually

Manifesting

  • Key Information
    Key Information:
    Manifesting a customer pick order is the final step in confirming that product has officially left inventory. Whether you're using the RF → Verified Order Move or the Manifest Order button, the result is the same: pallets are assigned to a dock bin and recorded as shipped. Both methods require entering audit data and pallet-level details to ensure full traceability and proper outbound handling. Once completed, these pallets will no longer appear in inventory and are ready for transport or customer pickup.

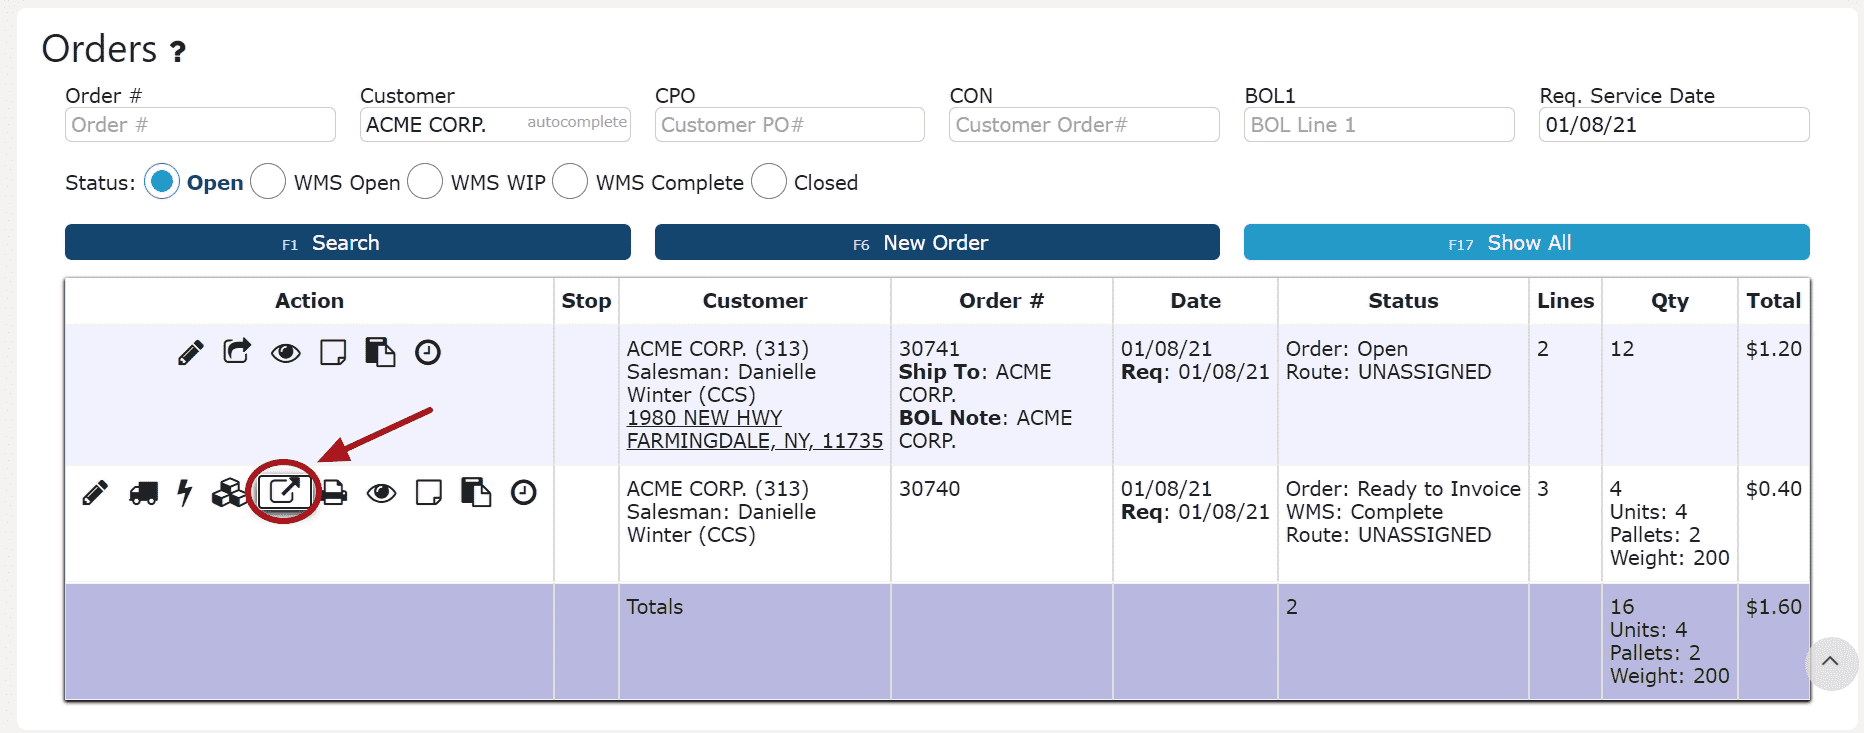
    • Orders are manifested through the RF → Verified Order Move screen or by finding the sales order in Sales → Orders & clicking the manifest button (square with upward arrow icon) under the action tab.

    • Clicking Manifest prompts the entry of outbound audit information, such as carrier name and product temperature, as well as the pallets and their destination dock bins.
     
    • Each pallet must be entered individually unless you choose to use the Repeat For All function, which applies the same dock bin to all remaining pallets.
     
    • Once all pallets are entered and saved, they are officially moved out of inventory and will reflect as shipped in the system.
     
    • Pallets manifested through either method will be unavailable for any further warehouse operations.
  • Manifesting a Customer Pick Order

    Verify Order Move Icon:

     1. Click on the Verify Order Move Icon next to the order to manifest 

    2. Click on the Manifest Button to fill in the Outbound Audits 

    3. Enter the pallet to manifest 

    4. Enter the dock/manifest bin the pallet is being moved into 

    5. Repeat this process with each pallet as necessary (Use the Repeat For All Button to move all remaining pallets to the first pallet's chosen dock bin)  

    6. The pallet(s) have now been successfully moved out of inventory 

    Manifest Button: 

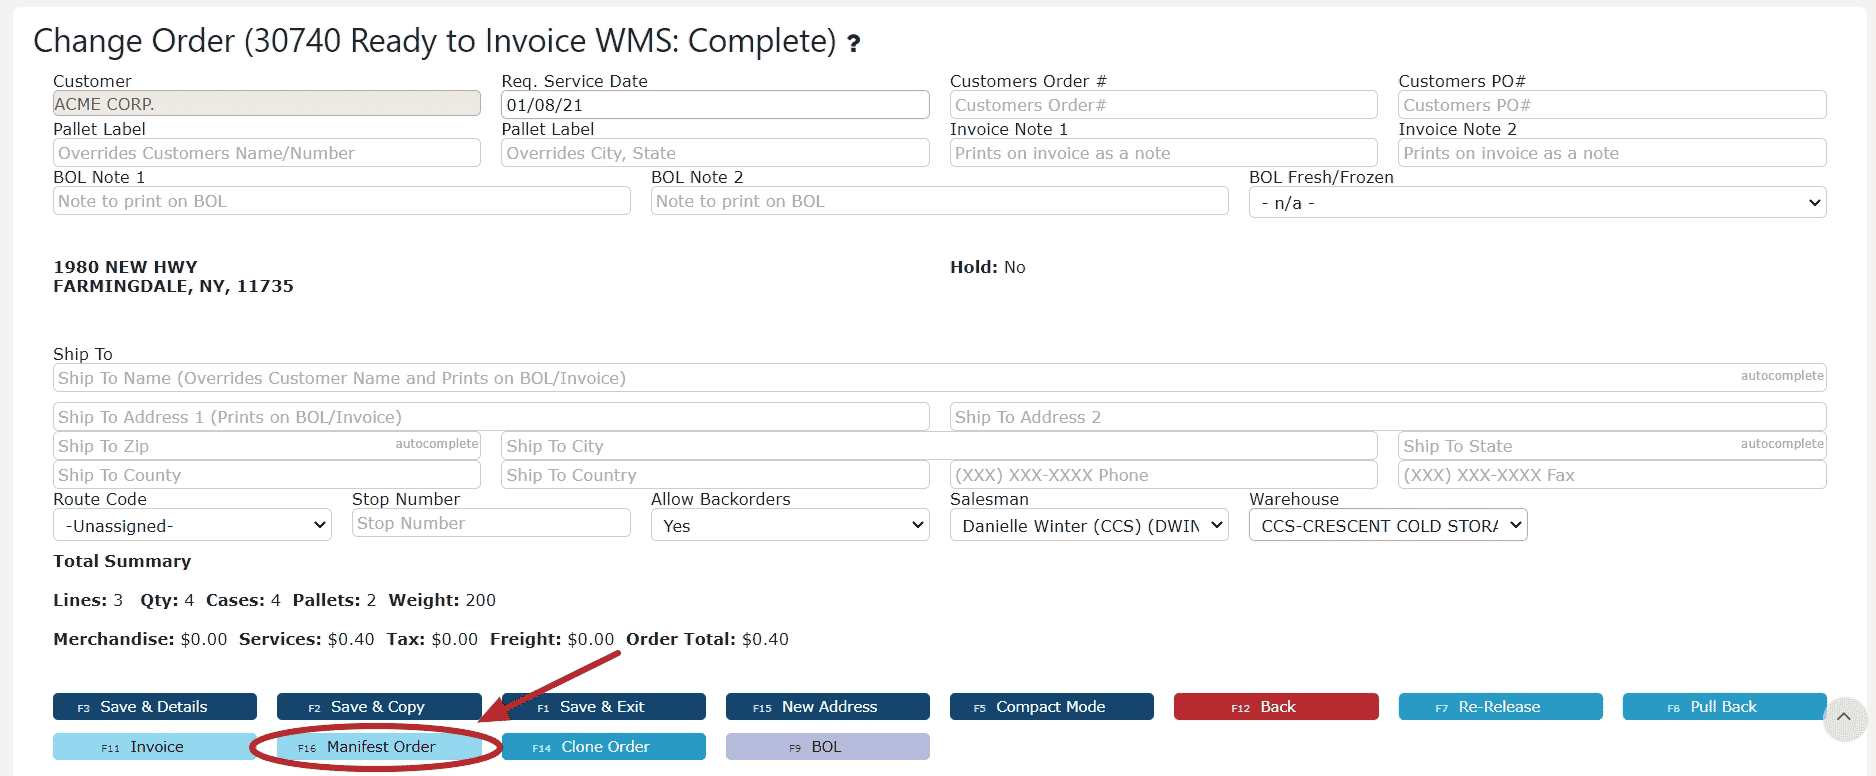
    1. Click on the Edit Order Icon (Pencil) next to the order to manifest

    2. Click on the Manifest Order Button 

    3. Click on the Manifest Button to fill in the Outbound Audits 

    4. Enter the pallet to manifest 

    5. Enter the dock/manifest bin the pallet is being moved into 

    6. Repeat this process with each pallet as necessary (Use the Repeat For All Button to move all remaining pallets to the first pallet's chosen dock bin)  

    7. The pallet(s) have now been successfully moved out of inventory

Invoicing

  • Key Information
    Key Information:
    The Invoicing function in Inspired ERP is used to finalize a customer sales order and generate an official invoice. This process confirms that the order is complete, billed, and ready for financial reporting. Once an order is invoiced, it is permanently closed and cannot be modified or reopened.

    • Invoicing is initiated by clicking the Edit Order icon (pencil) next to the desired pick order, then selecting the Invoice button.

    • Once the order is invoiced, a PDF invoice document is automatically generated and can be accessed by clicking the View Invoices icon (paper with two lines) from the Sales → Orders screen. This icon opens the invoice attachment details for the order.

    Important: Invoicing an order is a final action—once completed, it cannot be reversed.

    • Invoiced orders are considered closed and will no longer be editable or available for additional fulfillment.

    Use this feature to ensure timely and accurate billing for customer shipments, while maintaining clean financial and fulfillment records in the system.
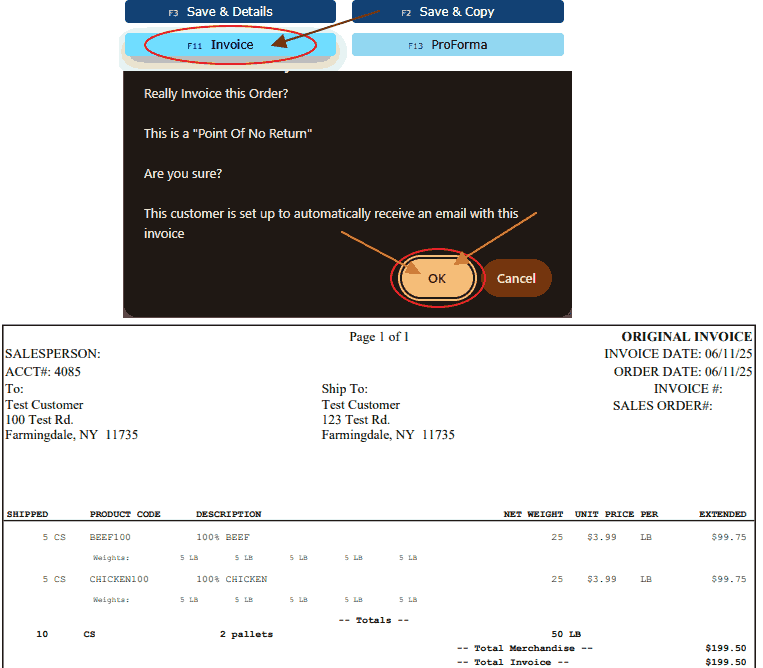
  • Invoicing a Customer Pick Order
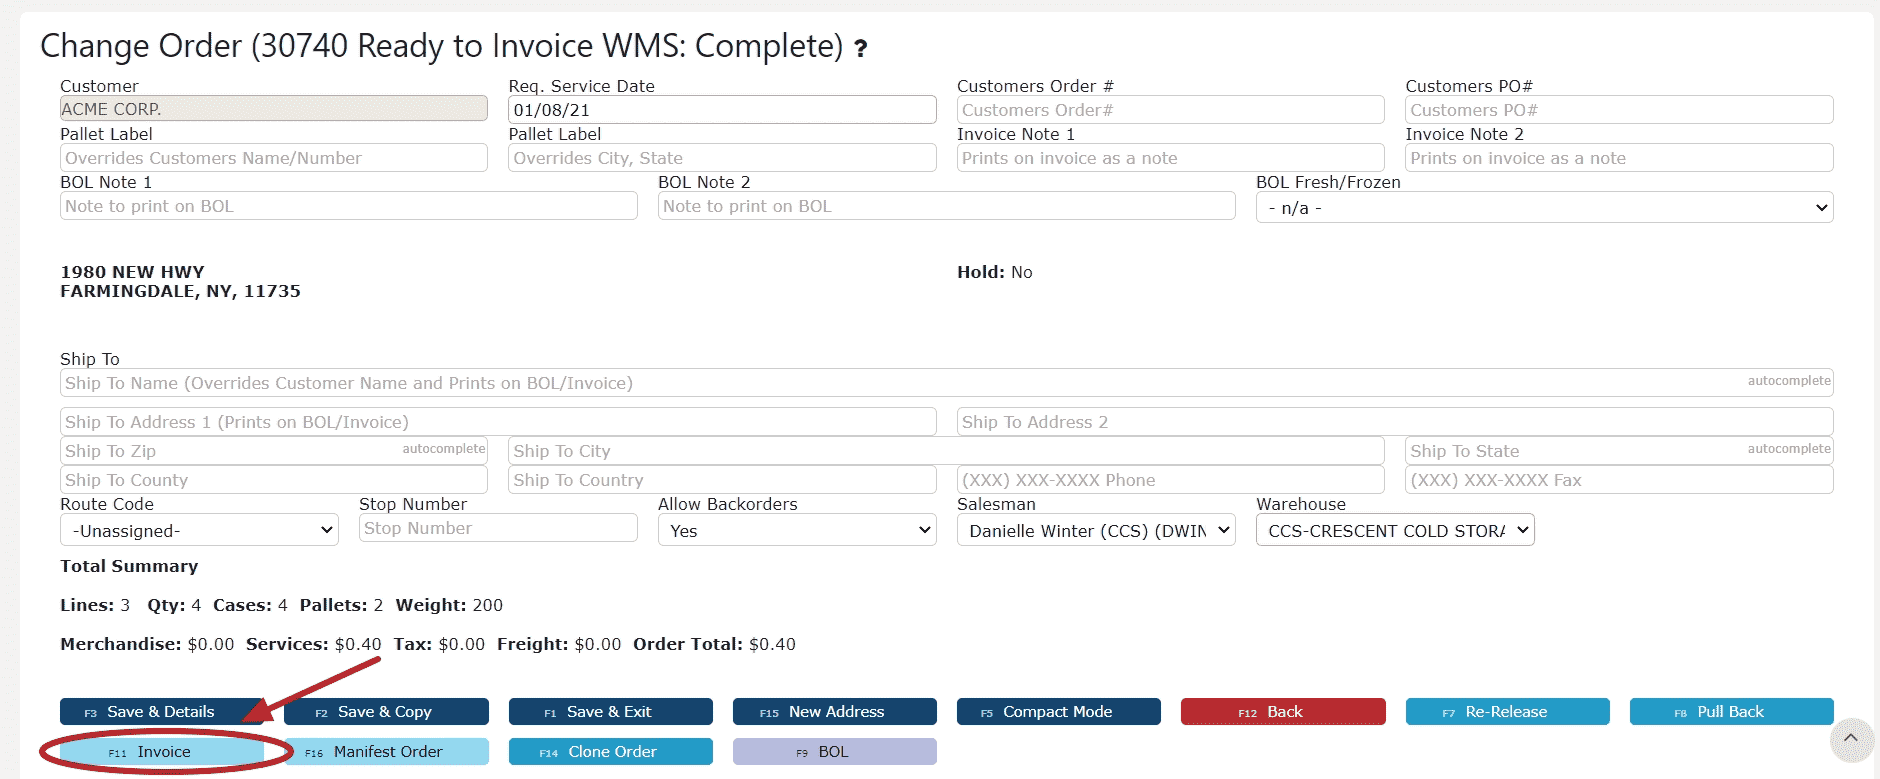
    1. Click on the Edit Order Icon (Pencil) next to the order to invoice 


    2. Click on the Invoice Button 

    Note: Invoicing orders cannot be undone 


    3. The order is now officially invoiced and an invoice document has been generated.  Click on the View Invoices Icon (Paper) to view the invoice document

    Note: The order is now closed and cannot be reopened 

Applying Payment

  • Key Information
    Key Information:
    The AR Cash Receipts screen in Inspired ERP allows users to quickly apply customer payments to open sales orders, also known as pick orders. Payments can be applied in full or partially, and multiple invoices can be updated within the same transaction. This process ensures accurate receivables tracking and streamlines your month-end accounting workflow.
     
    • Payments are recorded against open sales orders using the AR Cash Receipts screen in the Accounting module.

    • Both full and partial payments can be distributed across one or more invoices tied to the selected customer.

    • Once distributed, payments can be reviewed before posting, helping to reduce errors and ensure data accuracy.

    • Once posted, the cash receipt appears under the Posted view in the AR Cash Receipts screen via the Show dropdown menu, allowing users to confirm successful posting and review recent entries.

    • This functionality supports seamless reconciliation between warehouse activity and customer billing.

    Use this feature to apply real-time payments to active customer accounts, keep financials clean, and maintain confidence in your AR reporting.
  • Applying a Cash Receipt
    Applying a Cash Receipt:
    A simple, step-by-step guide to applying a cash receipt to a sales order.

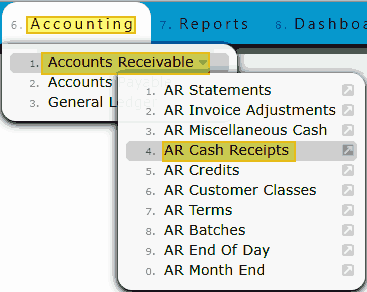
    1. Start by navigating to the Accounting menu. From there, go to Accounts Receivable, and select AR Cash Receipts.


    2. You’ll be taken to the AR Cash Receipts screen. To initiate a new cash receipt entry, click the Add New button located at the top of the page.


    3. This will take you to the New Cash Receipt screen. Enter the total payment amount, payment date, payment method, and the customer associated with the receipt. Once all required fields are completed, click the dark blue "Distribute $" button to proceed.


    4. You will now be directed to the Distribution of Payment screen. If a customer was entered earlier, a list of that customer's outstanding invoices will be displayed. On the left-hand side, under the Action column, you’ll notice two icons next to each unpaid invoice.

    • Clicking the money sign icon will automatically allocate the full payment amount to the selected invoice.


    • Clicking the plus icon allows you to manually enter a specific payment amount, enabling partial payments or distribution of funds across multiple invoices.

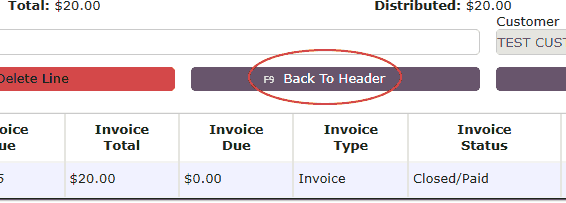
    5. Once you’ve finished allocating the payment—whether to a single invoice or across multiple customers—click the dark purple "Back to Header" button located at the top of the screen to return to the main receipt summary.


    6. You’ll now be returned to the main New Cash Receipt screen. With the payment distribution completed, click the light blue "Close Payment" button near the top of the page to finalize the receipt.


    7. You’ll be redirected back to the AR Cash Receipts screen, where you’ll see the status updated to Ready to Post. To complete the process, click the orange "Post" button located at the top right. A confirmation prompt will appear—select OK to officially post the cash receipt.


    8. Once posted, a confirmation message will appear at the top of the screen indicating that the batch has been successfully submitted. To verify the posting, navigate to the Show dropdown menu on the right side of the screen, select Posted, and locate the most recent entry. Your newly posted cash receipt should appear at the top of the list, displaying the associated amount and customer details.

Daily Deliveries and Pickups

  • Key Information
    Delivery and Pickup Routes: 

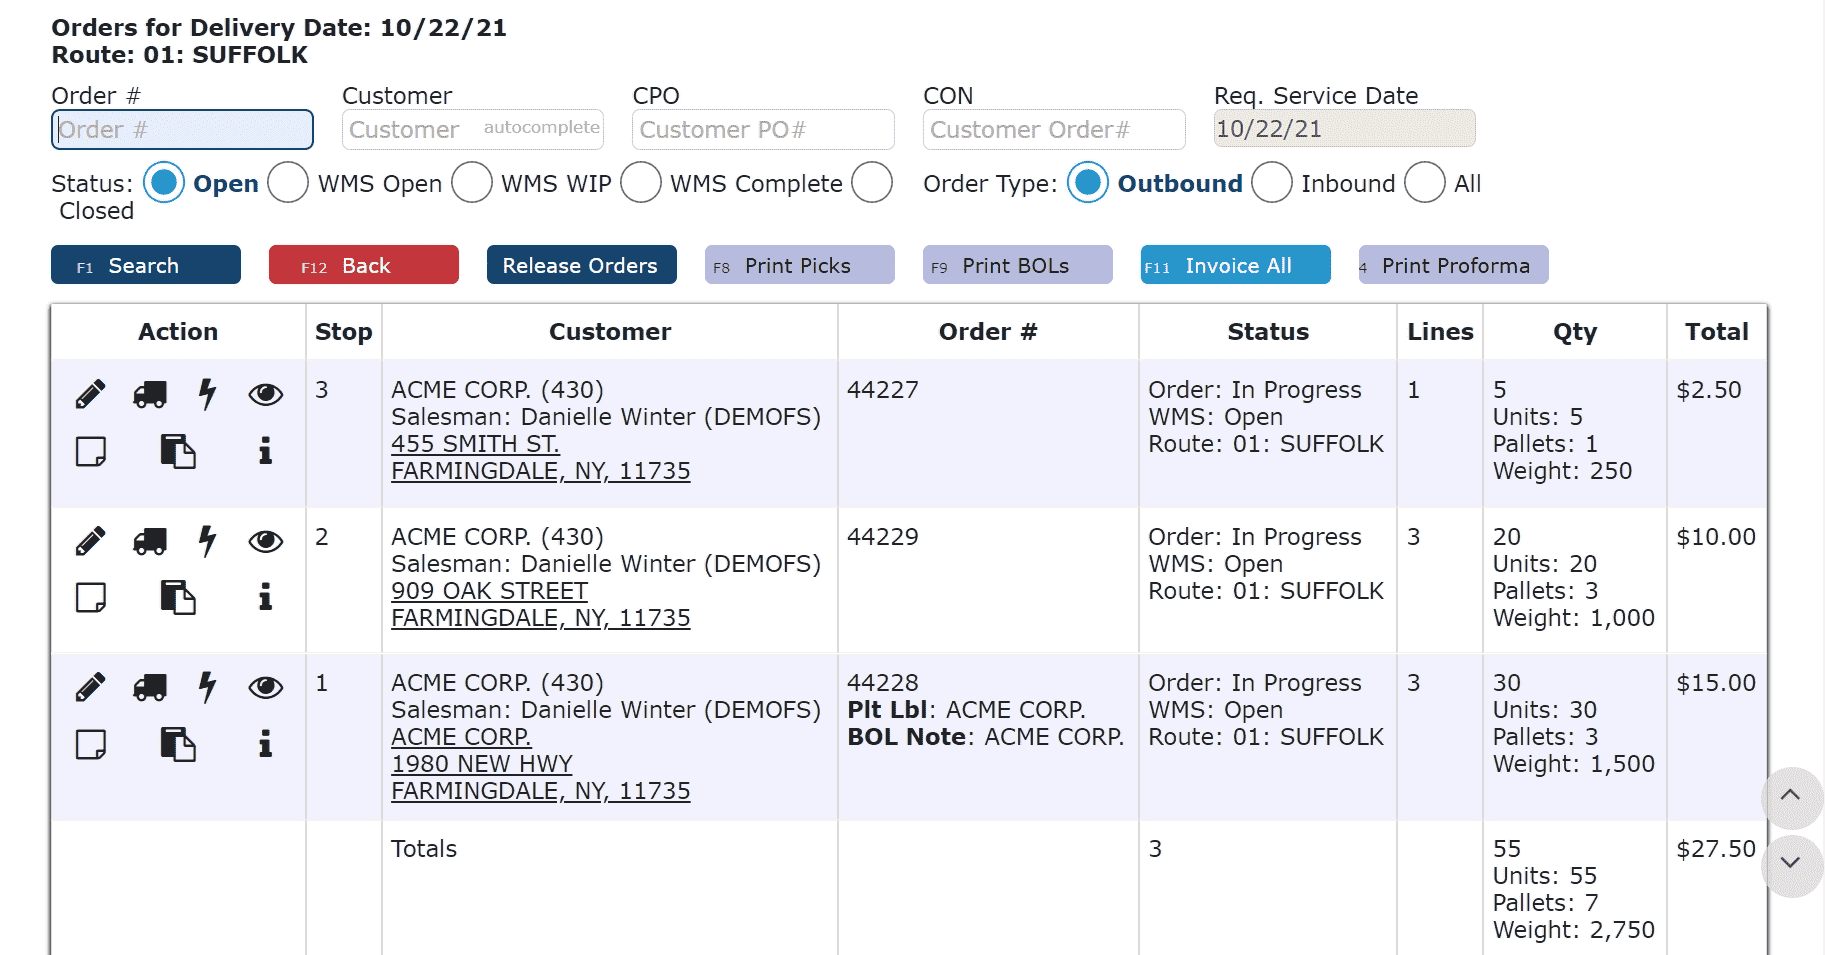
    Create and maintain your own order routes and assign them to outbound orders.


    Orders by Route: 

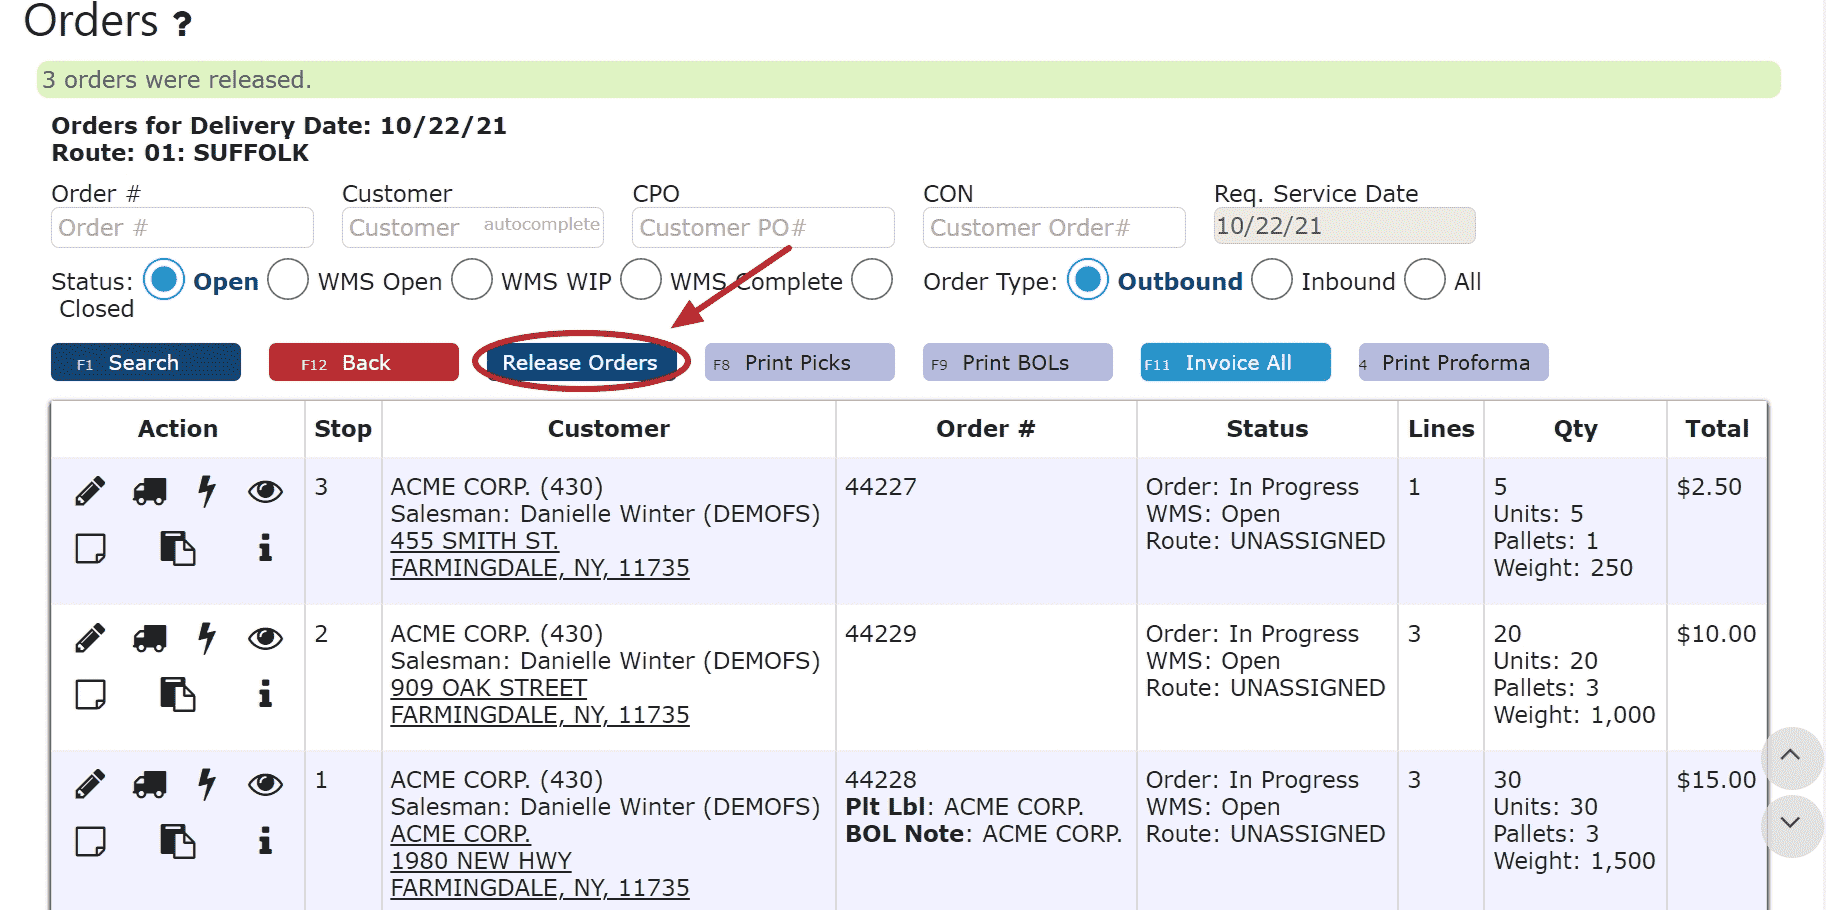
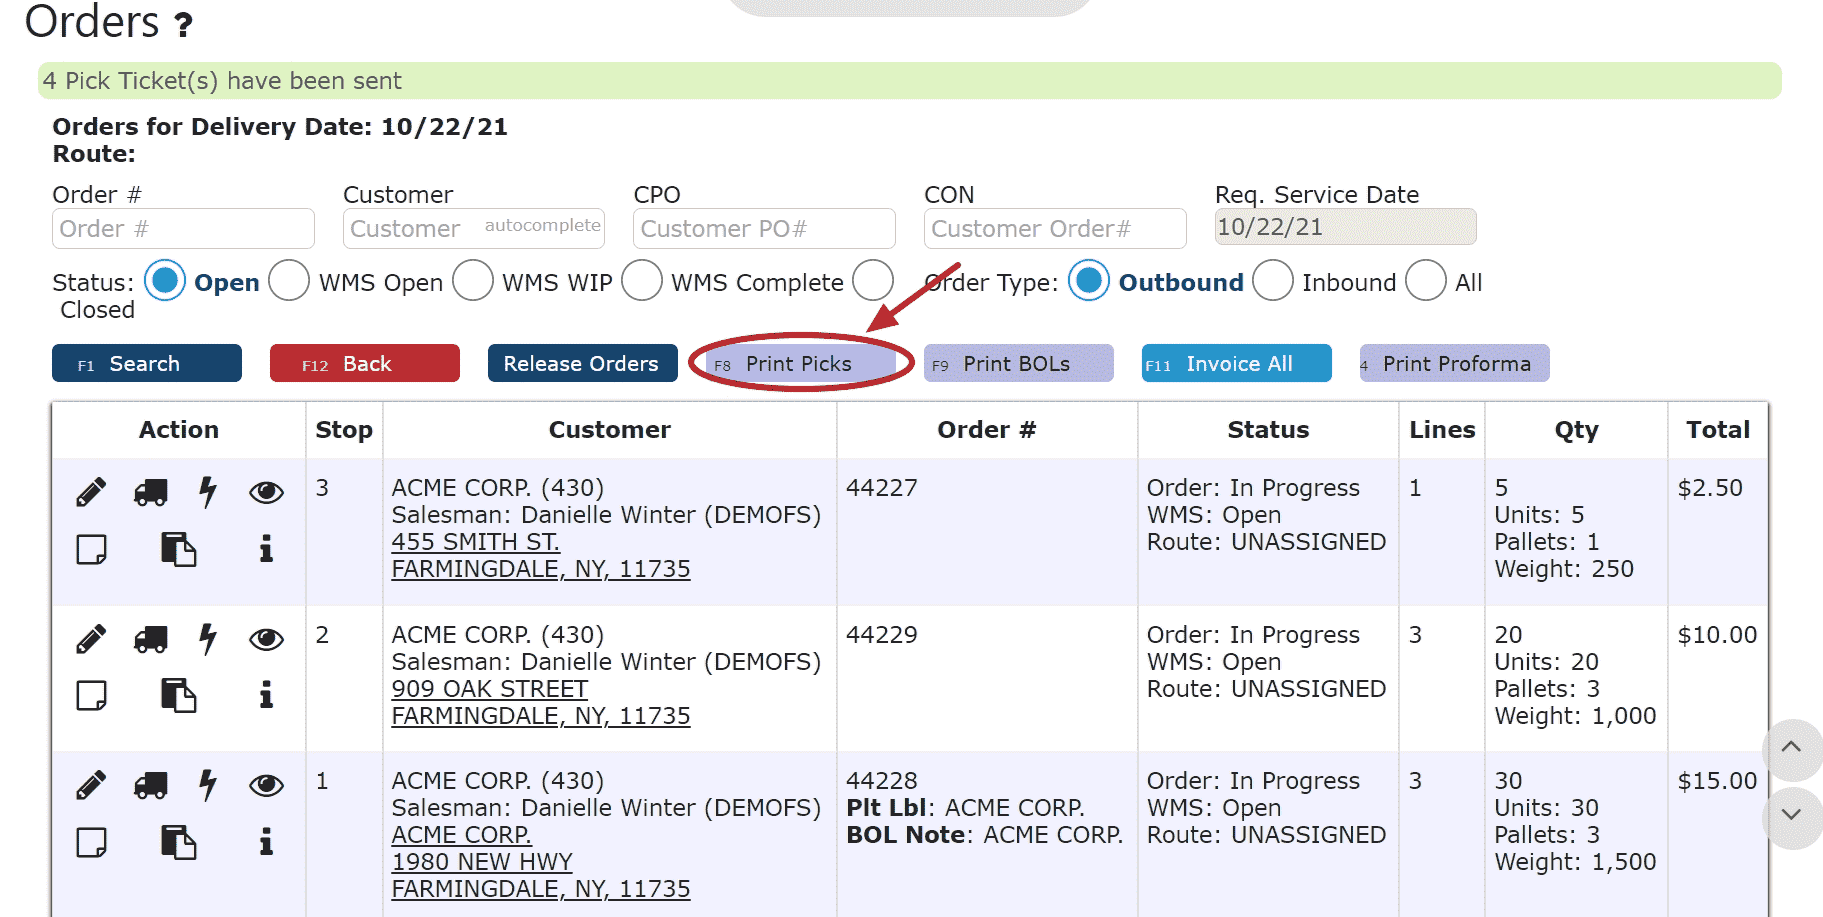
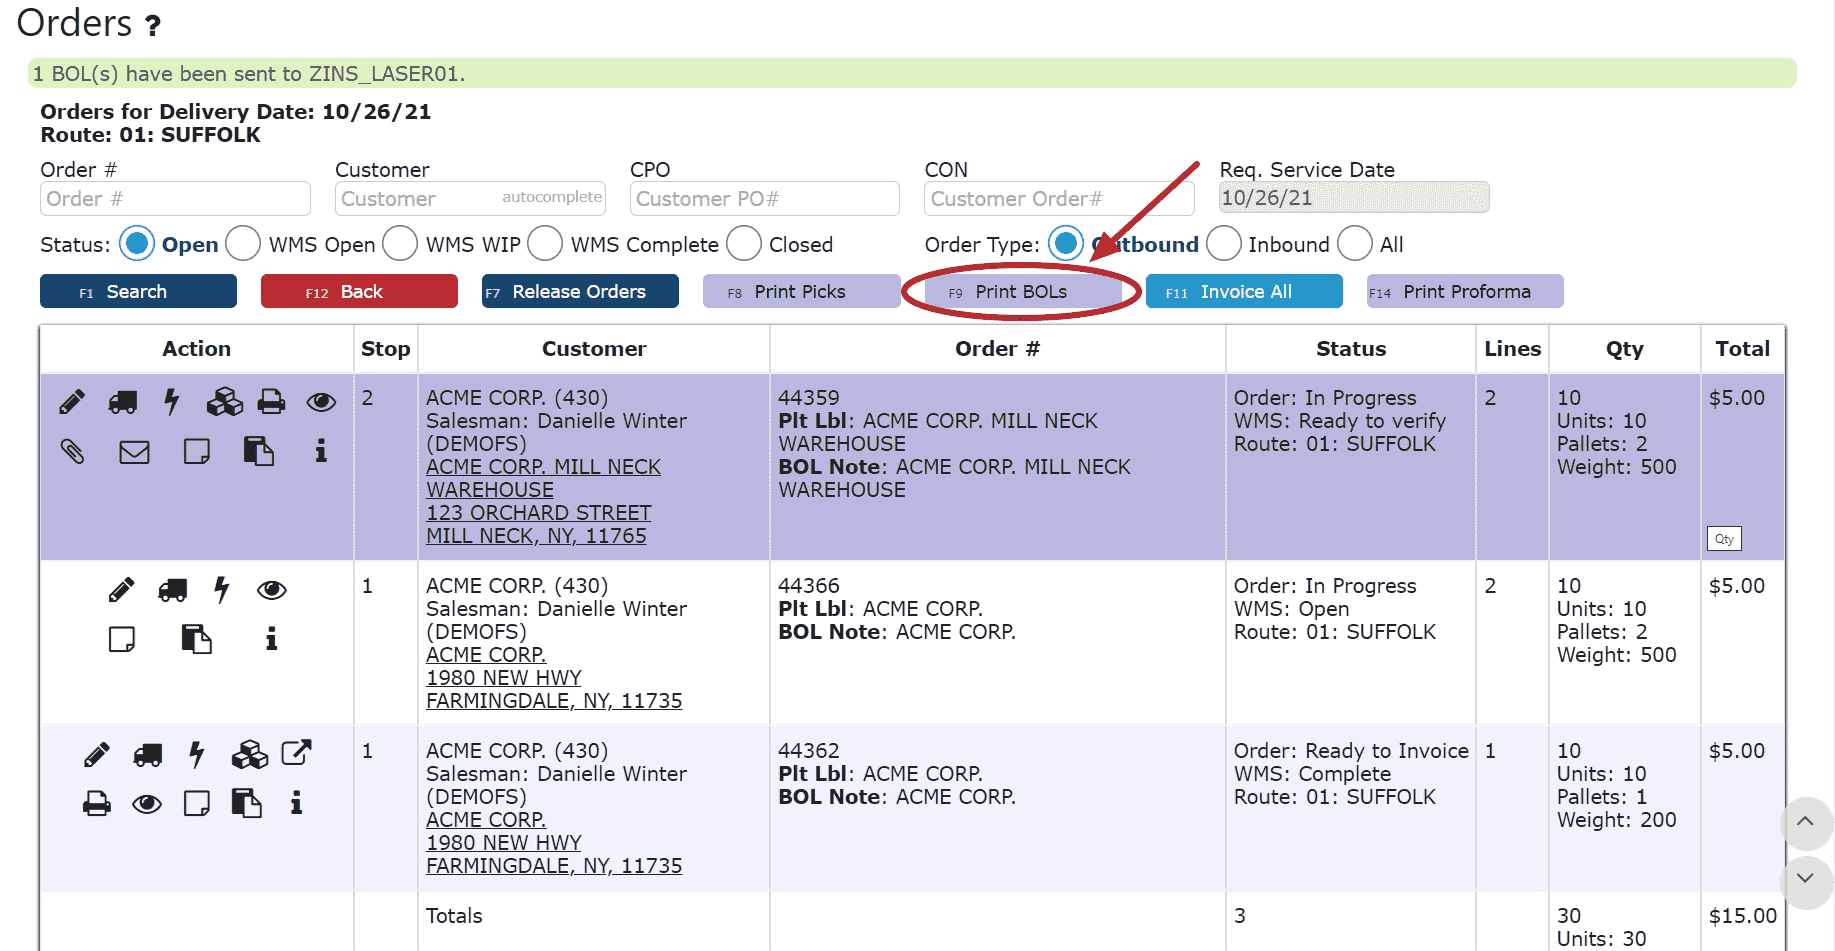
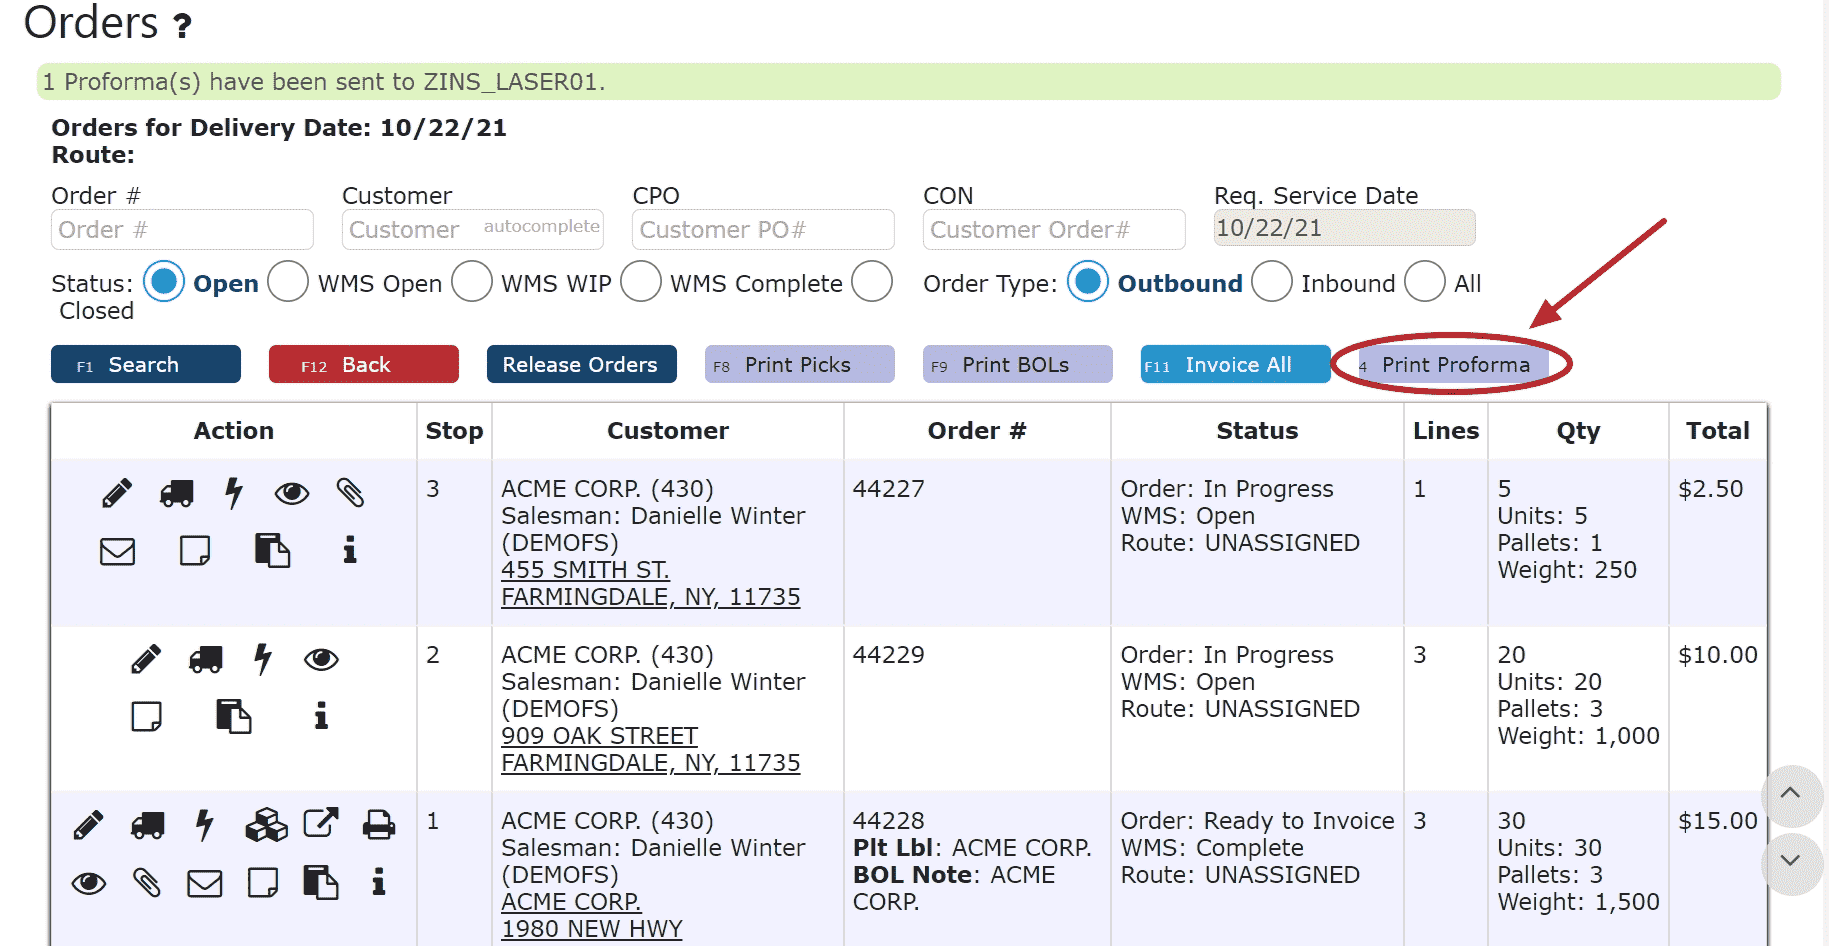
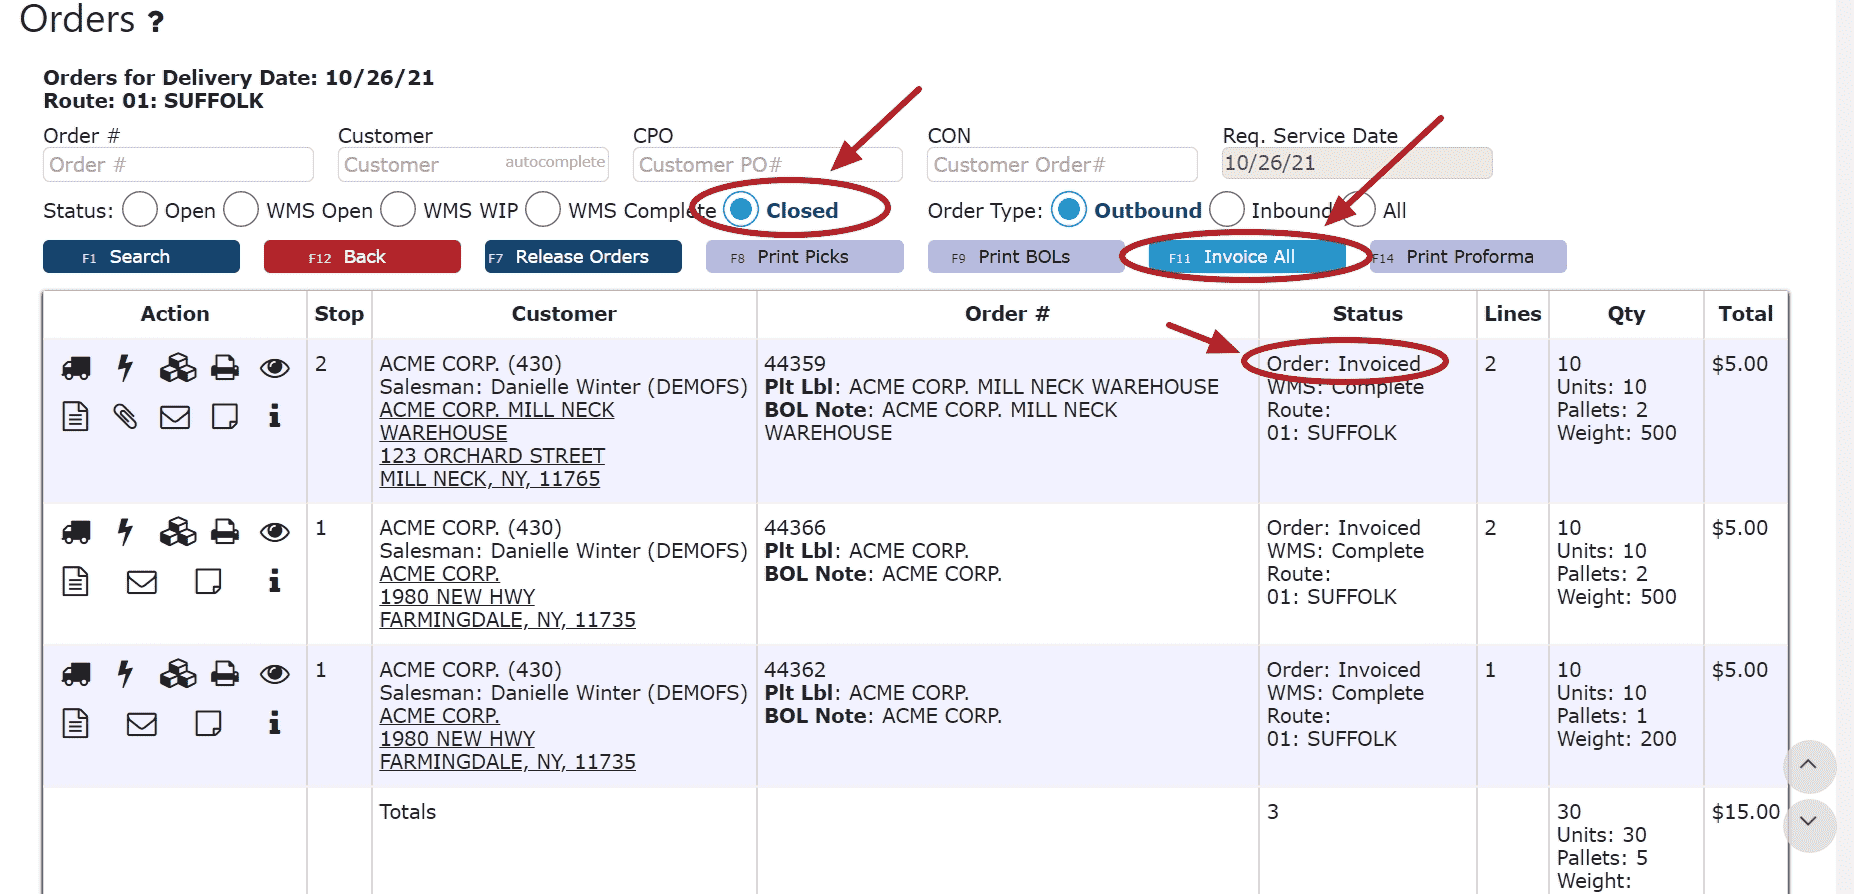
    By route, view all outbound orders and perform functions across all orders within a route, including releasing all orders, printing pick tickets, BOLs and Proformas, as well as invoicing all orders.  


    Daily Order Routes: 

    View all scheduled deliveries and pickups for the day by route, including the total number of orders, stops, units, pallets and weight the route consists of. 

  • Delivery and Pickup Routes
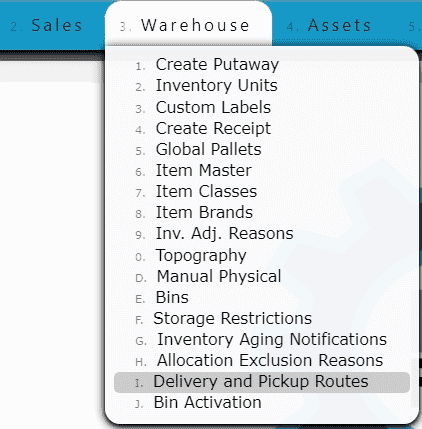
    1. Go to Warehouse Menu and click on the Delivery and Pickup Routes Sub-Menu 


    2. Click on the Add New Button 


    3. Enter a Route Code and a description for the route, then click one of the Save options 

    Note: The route code can be any combination of letters and/or numbers 


  • Orders By Route
    1. Go to the Sales Menu and click on the Orders Sub-Menu 


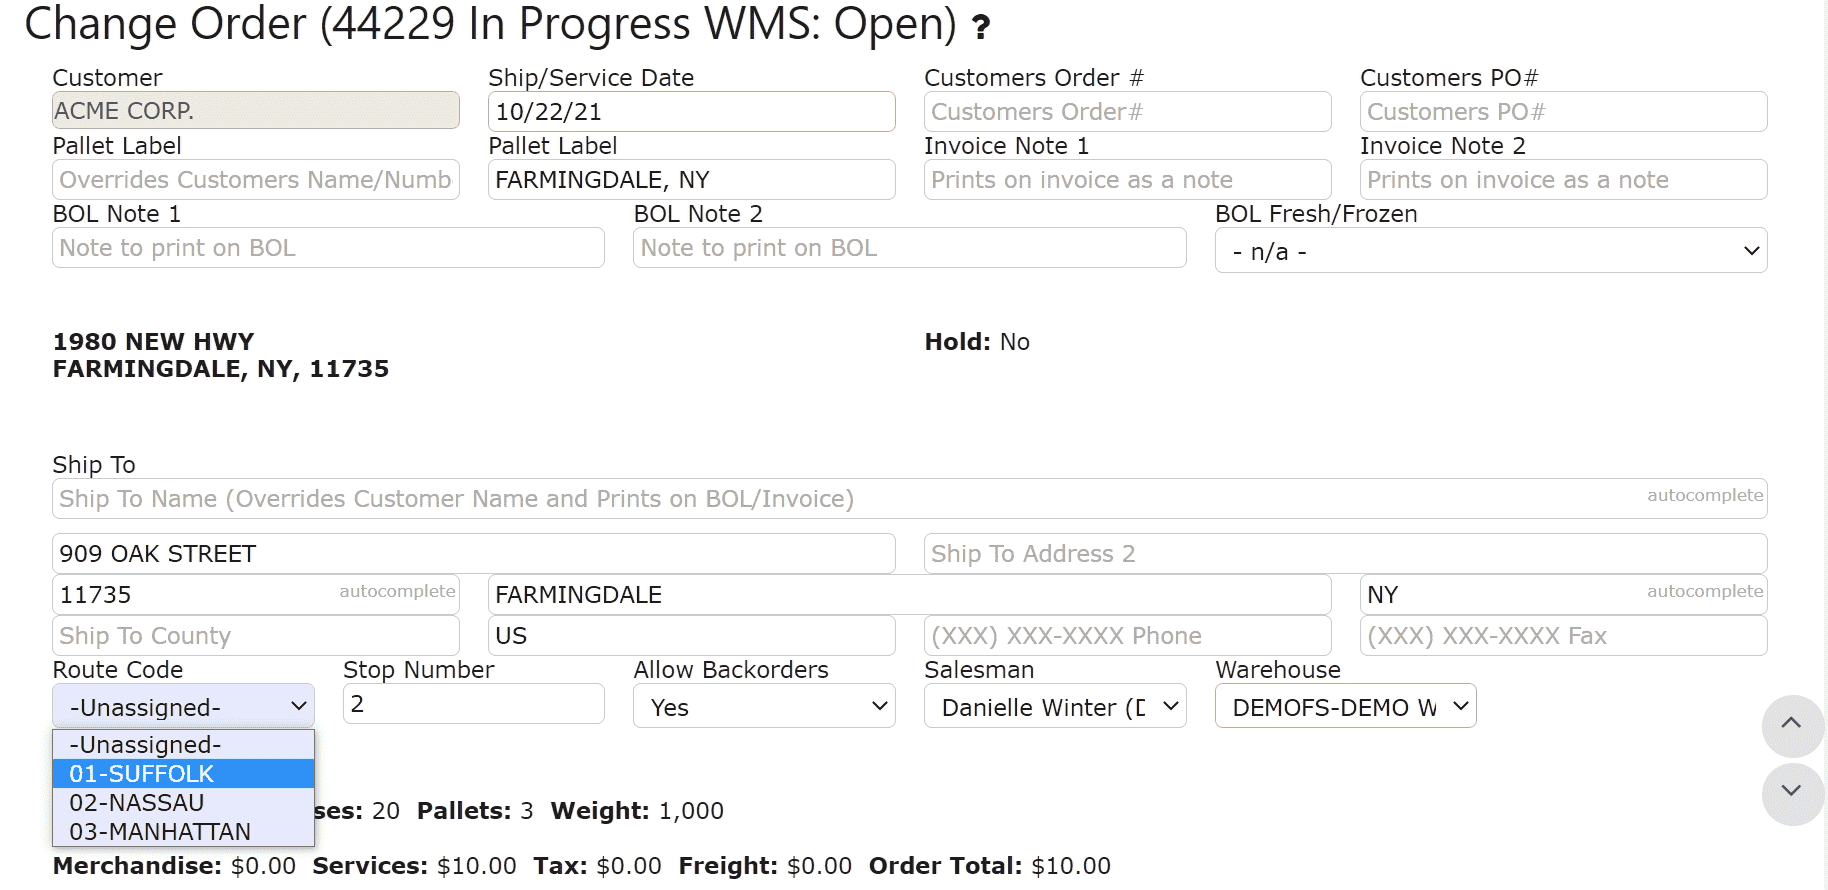
    2. On the Order Header Screen, select a Route Code, then click on one of the Save options 


  • Daily Order Routes
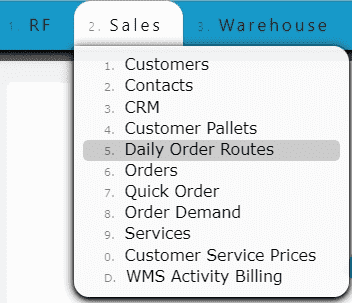
    1. Go to the Sales Menu and click on the Daily Order Routes Sub-Menu 


    2. Click on the View Icon to view all outbound orders that pertain to a specific route 


    Releasing Orders


    Note: Only orders that are not currently released will be released.  Orders that are already released, will not be re-released.  Use the Re-Release Button on the Order Header or Order Detail Screen to re-release an order if changes to it have been made.  

    Printing Pick Tickets, BOLs and Proformas 


    Note: A document printer must be setup under your user profile to print documents from the system.  Only those documents that have been generated, and have not yet been printed will print.  To reprint, regenerate the document, then print again.    

    Invoicing Orders 

Managing a Customer Pick Order

  • Key Information

    Key Information:
    Customer pick order management in Inspired ERP follows a structured workflow to ensure accurate order fulfillment and inventory tracking. This process typically involves releasing the order, waving it to the pick queue, completing the pick in the warehouse, and verifying the items before moving forward to manifesting.

    Releasing a Pick Order
    • In the Sales → Orders screen, locate the order to be picked and click the Release (square with arrow) icon under the Action column.

    • Releasing sends the order to the next stage in warehouse processing.

    • If order waving is enabled, the released order will enter the wave staging area before reaching the pick queue.

    • If waving is not enabled but required for your company, contact your IT administrator to have the feature activated.

    Waving the Order (if enabled)
    • After release, navigate to the RF → Wave Queue screen to group the order into a picking wave.

    • Once waved, the order will move to the Pick Queue for assignment to a warehouse worker.

    • You can also choose to either wave the sales order to a certain warehouse worker, or to all users.


    Picking from the Pick Queue
    • Access the Pick Queue from the RF menu and locate the waved order.

    • Click the Pick (hand icon) button to initiate the picking process.

    • The system may guide pallet selection based on your warehouse’s picking rules (e.g., FIFO – First In, First Out, which selects the oldest pallet first).

    • Follow the prompts to scan or confirm each pallet and quantity being picked.

    Verifying the Pick
    • After picking, proceed to the Verify step to confirm the accuracy of the picked items by going to RF → Verify Queue.

    • Verification ensures that quantities, weights (if applicable), and pallet details match the order requirements.

    • Once verified, the order is ready to proceed to manifesting, or invoicing, depending on your workflow.

    Additional Notes
    • Orders must be fully verified before they can be manifested or invoiced.

    • Picking rules, bin assignments, and FIFO logic are controlled by your warehouse configuration in Inspired ERP.

    • Any discrepancies found during verification should be corrected before moving the order forward.

  • Editing a Customer Pick Order

    Pre-Release:

    1. Click on the Edit Order Icon 


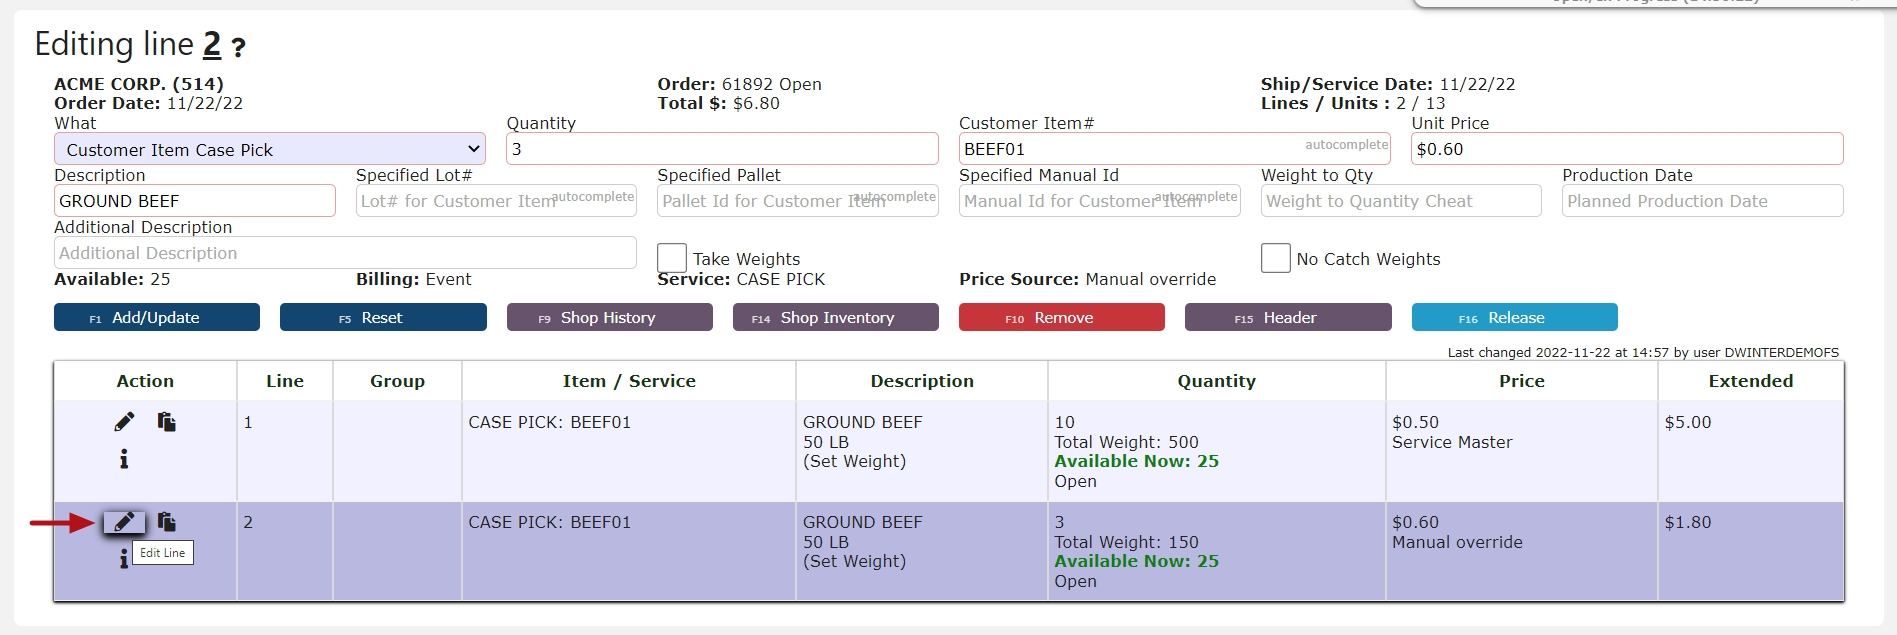
    Editing a Line: 


    2. Click on the Edit Line Icon


    3. Make any necessary changes, and then click the Add/Update Button to save those changes 

    Note: All information for a particular line is editable only before release.  Once the line has been released, only the price and descriptions will be allowed to be changed unless the line is pulled back.   


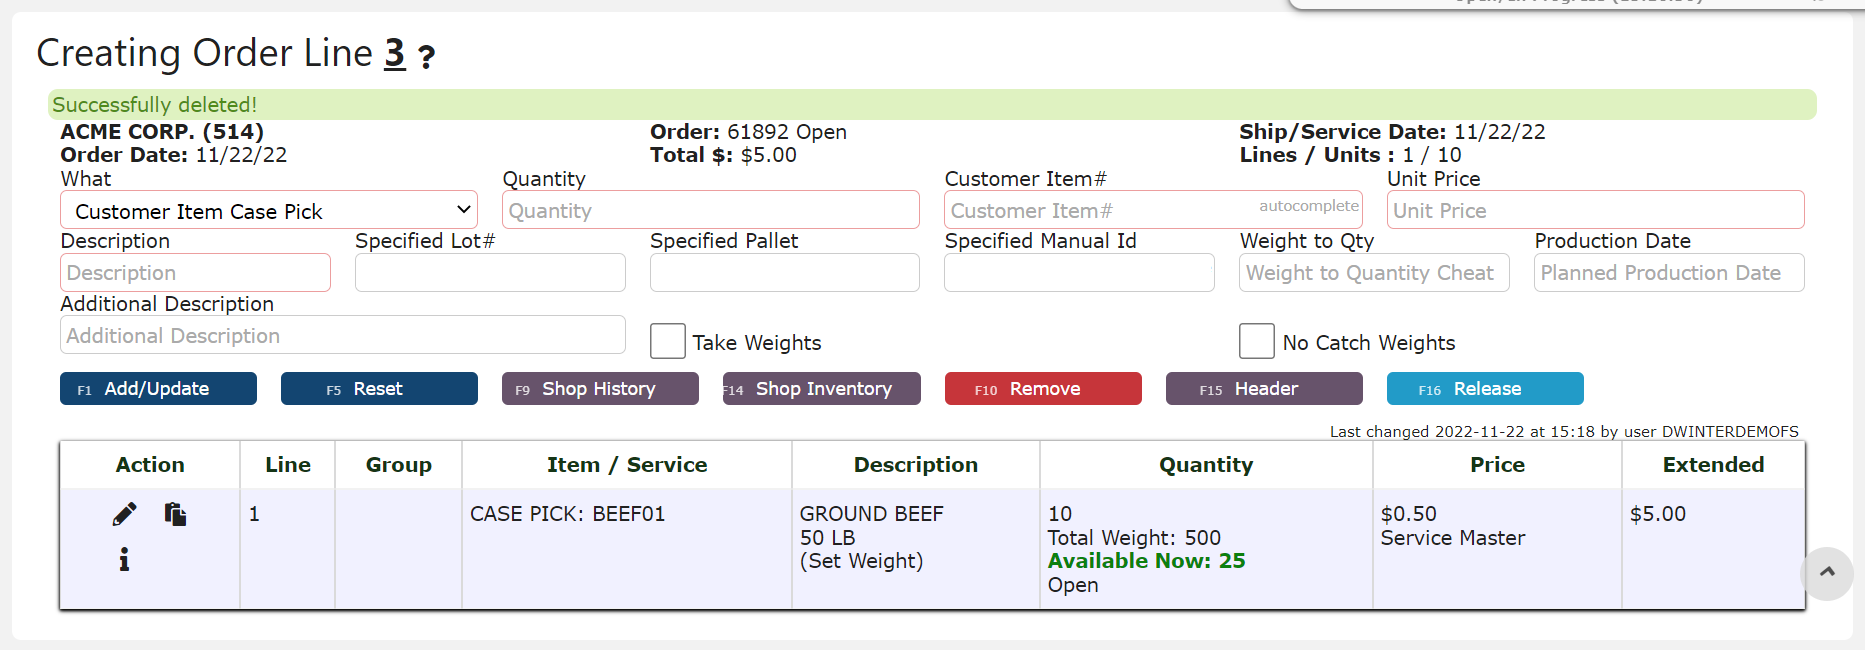
    Deleting a Line: 

    2. Click on the Edit Line Icon 


    3. Click on the Remove Button, and then click OK on the pop-up prompt 


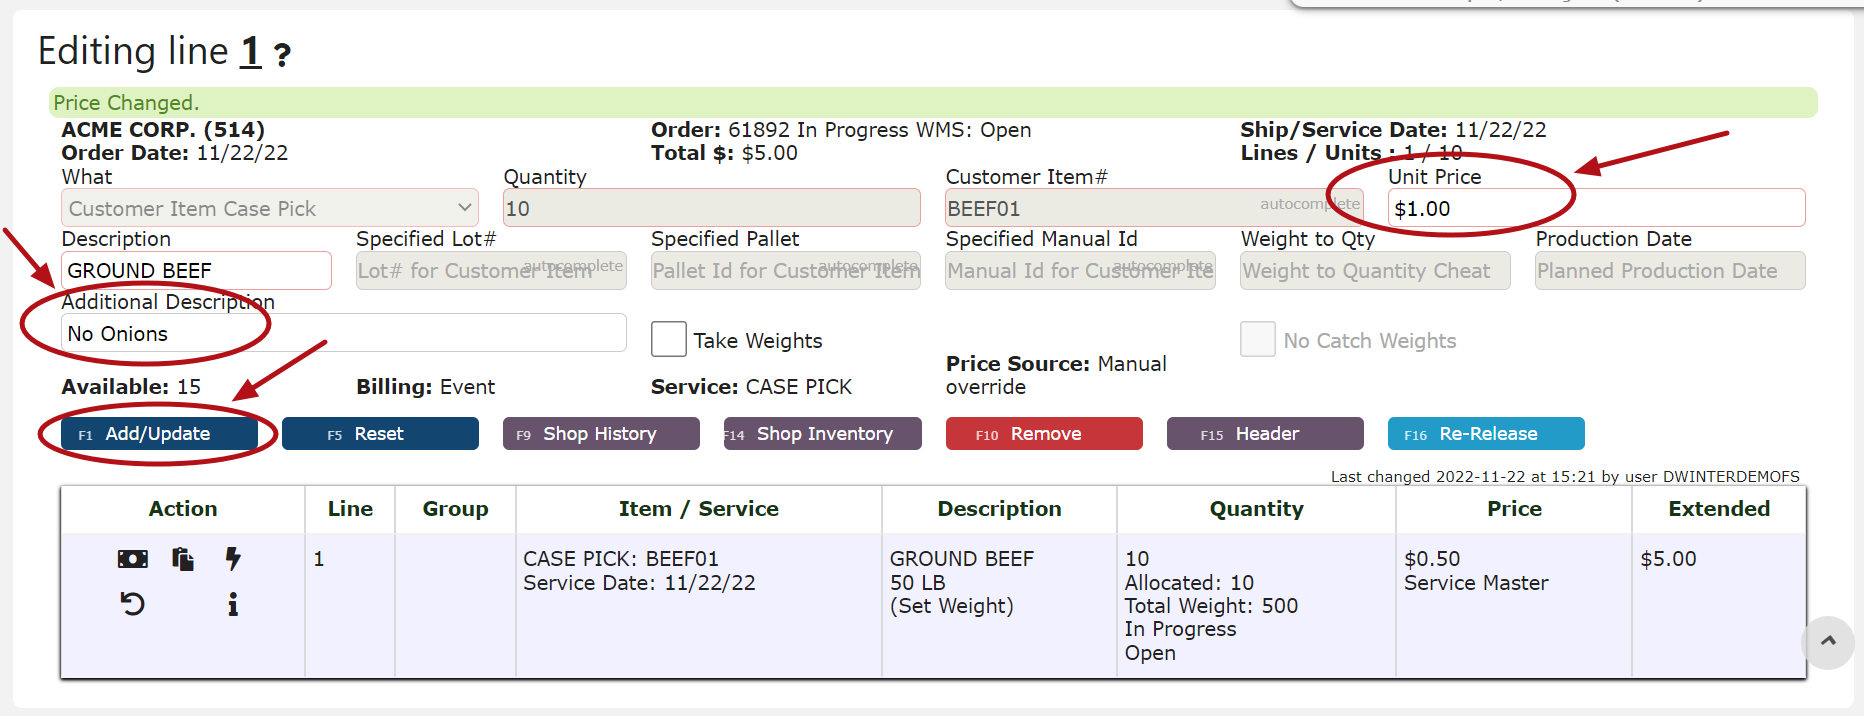
    Post-Release:

    1. Click on the Edit Order Icon 


    Editing a Price: 


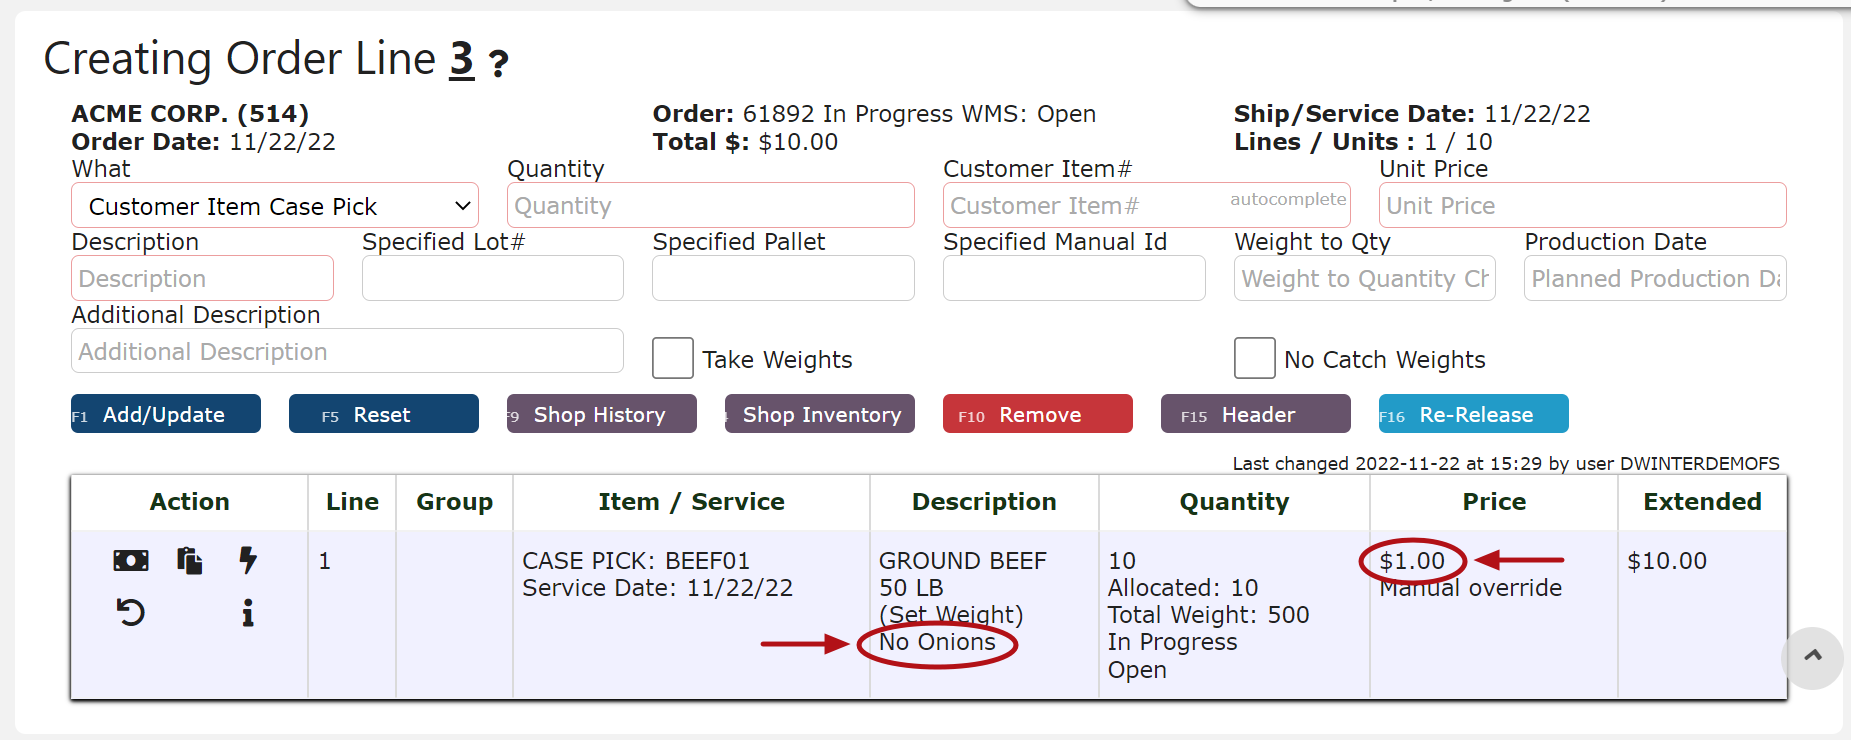
    2. Click on the Edit Price Icon 


    3. Make any changes, and then click the Add/Update Button to save those changes  

    Note: All information for a particular line is editable only before release.  Once the line has been released, only the price and descriptions will be allowed to be changed unless the line is pulled back.


  • Restocking
    Restocking:
    A quick & super simple guide on what the restock queue is, what it is for, and how it works.

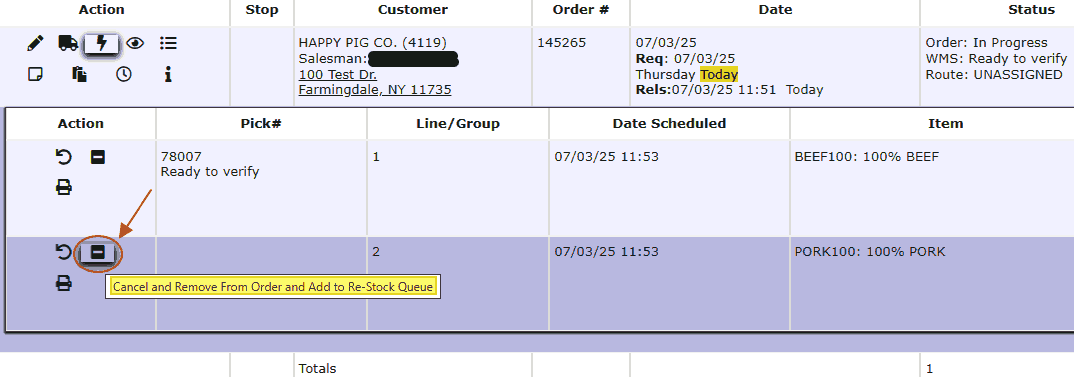
    The restock queue is used when an item that has already been picked, released, or verified on a sales order is fully removed from the order. Once the line is deleted using the designated action, the system automatically places the item into Inspired ERP’s restock queue for further handling.

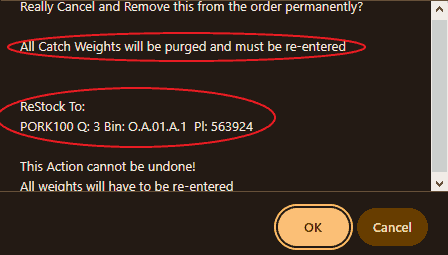
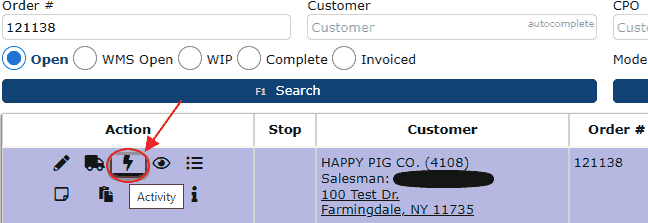
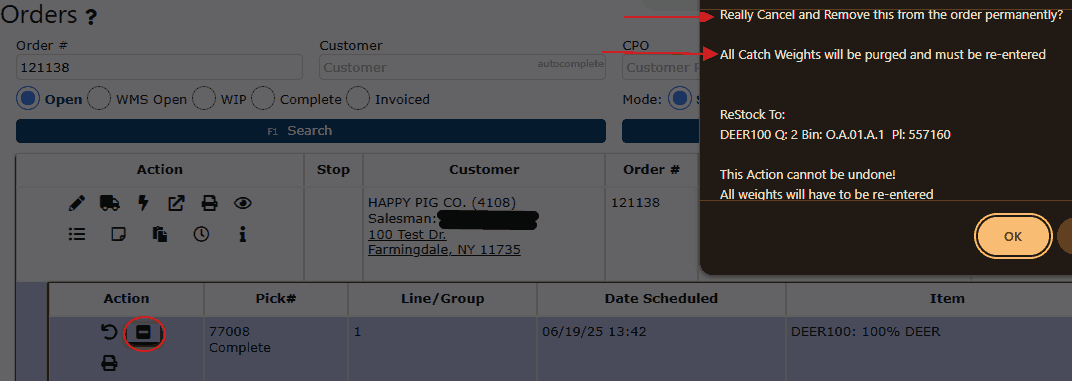
    To completely remove a picked line from a sales order and automatically send the item to the restock queue, navigate to Sales → Orders, locate the order, and click the lightning bolt icon. Then, select the black square icon with a minus sign, which is used to cancel and restock the selected line.


    Clicking this icon and confirming your selection will immediately remove the line from the sales order and place it into the restock queue. If the item is catch weight, you will need to re-weigh it while processing it from the restock queue.


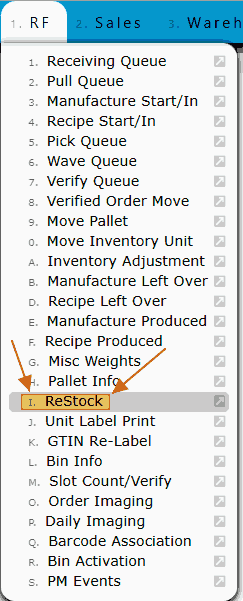
    Take note that the restock queue confirmation message displays the bin location where the items will be returned within the Inspired ERP system. This is typically the original bin the product was stored in before being added to the sales order. Once you confirm the line removal and the item’s return to the restock queue, you can proceed with reintroducing the product into inventory. To begin this process, navigate to the RF menu and select the ReStock submenu option.


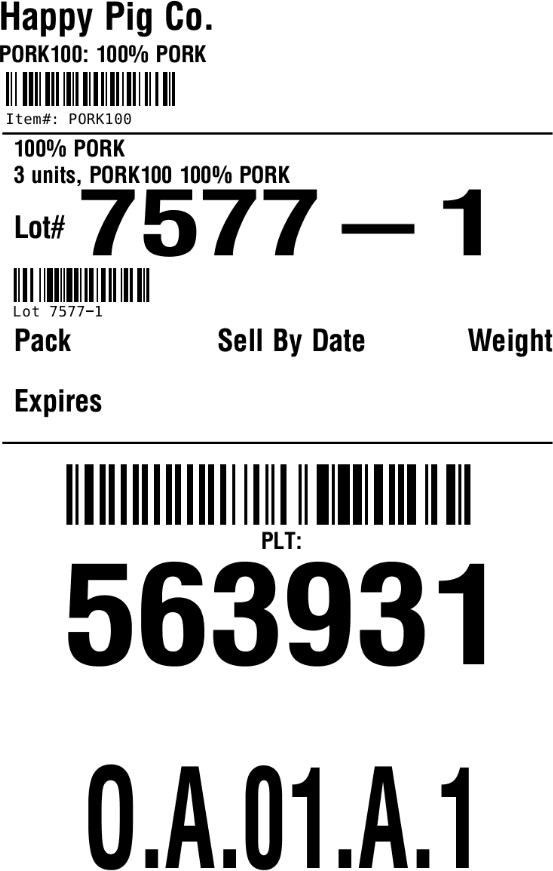
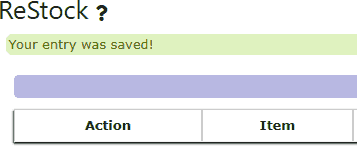
    Once you're on the Restock Queue page, you'll see the pallets containing the item(s) you need to reallocate back into inventory. At the top of the screen, there's a light purple Print All New Labels button. Clicking this will generate new pallet labels for all items currently in the restock queue. However, if labels are printed before the items are properly reallocated, the system may use the current pallet number instead of the original pallet the product was pulled from. This same behavior applies when using the individual printer icon in the Action column next to a specific item.


    A review of what the pallet labels look like:


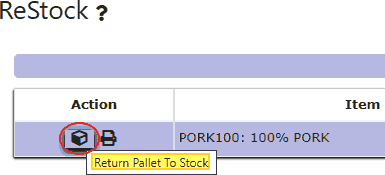
    To begin returning your restock queue pallets to their original bins, click the box icon. When hovered over, this icon will display the tooltip "Return Pallet To Stock".


    This action will bring you to the restocking screen, where the process begins. You’ll first be prompted to enter the "To Bin"—this is the bin where the items will be returned to inventory. The original bin the pallet came from will be displayed at the top of the screen, allowing you the option to place the pallet back into its original location if preferred.


    After this, you’ll then be prompted to confirm the bin one final time. After confirming, the restock pallet will be officially moved into the selected bin within the Inspired system.

  • Pulling Back a Customer Pick Order
    Pulling Back a Customer Pick Order:
    A quick and simple tutorial on how to pull back a customer pick order in the Inspired system.

    Note: Make sure your sales order has NOT been manifested, or the system will not let you pull back the order line. To un-manifest a pallet, navigate to RF → Verified Order Move and enter the sales order number. From the list of pallets displayed, identify the one you wish to un-manifest and type its ID into the Pallet textbox. You’ll then be prompted to enter a bin. To move the pallet out of the dock bin, either click the Floor button or manually enter the bin number where you want to relocate the pallet.
     
    1. Begin by hovering over the Sales menu at the top of the screen, then select the Orders tab from the dropdown.


    2. Once you're on the Orders screen, this will display any active orders. To narrow down your search to just the order you wish to pull back, type in your order number in the Order # textbox at the top of the page.


    3. Once you do this, the order you want to pull back should pop right up. Under the Actions tab, click the lightning bolt icon.


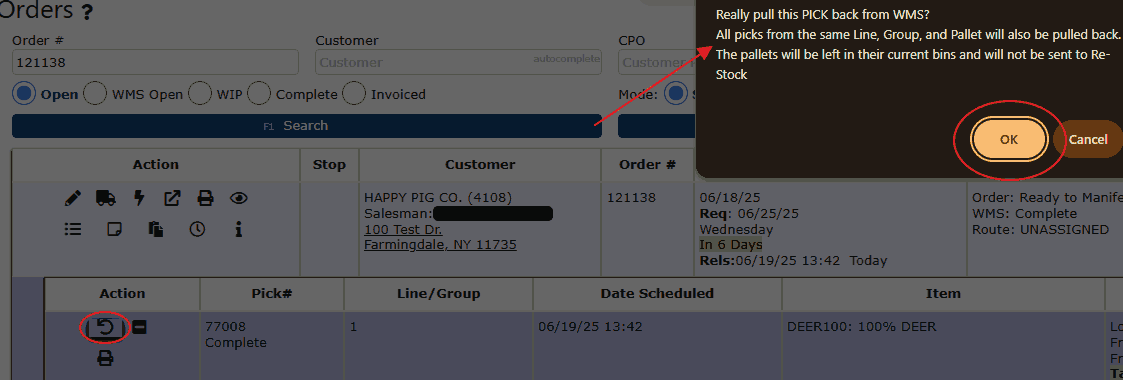
    4. Once you have clicked on the lightning bolt icon, this should open an expansion of every item in the sales order along with information being what pallet they are on, what pallet they came from, their current bins, and their lot numbers (if applicable). Under the Actions column, you’ll see three icons: a circular arrow, a black square with a minus sign, and a printer icon.


    4a. The printer icon allows you to print a single pallet label for the specific item line you’ve selected.

    4b. The circular arrow icon is used to pull the selected line back and unreleases it from WMS. The item line will remain on the sales order, and all pallets will stay in their current bin locations.

    4c. The black square with the minus sign icon cancels and removes the selected item line entirely from the sales order. Once removed, that line will be sent to the Restock Queue for further handling. To put the item back in inventory afterwards, go to RF → ReStock & click the box icon which begins the action of returning your pallet to stock. Once you click the icon, the system will display the item's original bin location and prompt you to enter the new bin. You’ll then be asked to confirm the updated bin assignment. NOTE: If you remove a line from the sales order and send it to the Restock Queue, you will need to re-enter the weights (if applicable) when that product is reprocessed.

    5. Both pullback options will prompt a confirmation message before proceeding. When the "Are you sure?" pop-up appears, review carefully to ensure this is the correct line you intend to pull back. Click OK to confirm. Depending on which option was selected, the line will either be pulled back and unreleased or fully removed and sent to the Restock Queue.


  • Canceling a Customer Pick Order
    Canceling a Customer Pick Order:
    A quick and easy guide on how to cancel a customer pick order.

    NOTE: Before proceeding, ensure the sales order is still in Open status. If the order has already been manifested, you must un-manifest it first by moving the pallets back to floor bins via RF → Verified Order Move, then pull the order back from warehouse release. If you skip this step, the system will display a red error message and prevent the cancellation.

    1. First, navigate to the Sales → Orders page from the top menu.


    2. In the Order # search field at the top, enter the sales order number you wish to cancel, then press Enter or click the dark blue Search button.


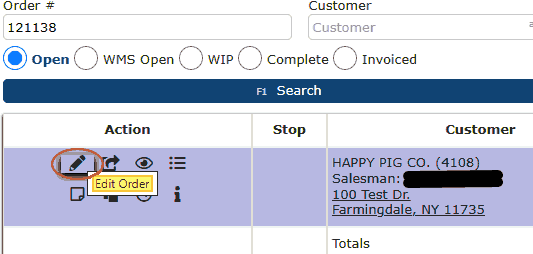
    3. Once the order appears in the list, click the pencil icon under the Action column to open it for editing.


    4. You'll be taken to the order lines screen. To continue, click the dark purple Header button near the top to access the header section where the Cancel option is located.

    5. You should now be on the Header section of the sales order. Scroll to the bottom of the page where you’ll see two red buttons. Click the one labeled Cancel Order.

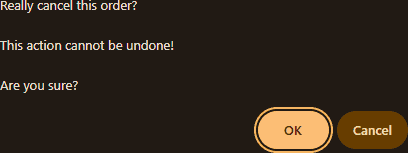
    After clicking, a confirmation prompt will appear, notifying you that this action is permanent and cannot be undone. Select OK to confirm the cancellation. Once confirmed, the order will be officially canceled.


Customer Order Documents

  • Key Information
    Key Information:
    Customer Order Documents in Inspired ERP provide organized, easily accessible records for sales orders, ensuring teams have accurate and timely documentation to support order fulfillment, customer communication, and financial reconciliation.

    • Proforma:
    Proforma documents are preliminary invoices generated before the official sales invoice. They offer a preview of order details and pricing, useful for international shipments or customer pre-approvals. These documents are not considered final and do not affect accounting balances.

    • Invoices:
    Invoices are finalized billing documents that reflect the goods or services provided to the customer. Once a sales order is invoiced, it is locked and posted in the system—ensuring accounting accuracy and consistency. These documents are critical for both revenue tracking and accounts receivable processes.

    • Statements:
    Statements provide a summarized view of a customer’s account activity, including open balances, recent payments, and past-due invoices. Statements are often sent monthly and serve as a tool for both customers and accounting departments to maintain accurate account reconciliation.

    • Attachments:
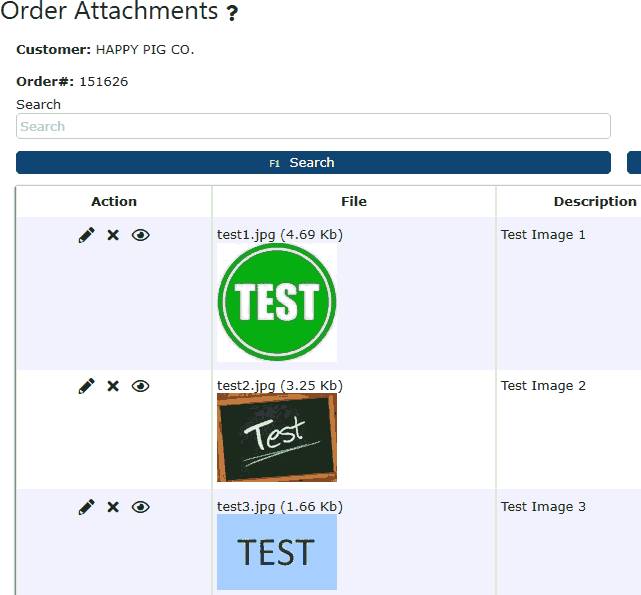
    Attachments allow you to store supporting documents with each order, such as signed delivery slips, proof of service, customer correspondence, or scanned purchase orders. Having everything centralized within the sales order improves documentation trails and enhances audit readiness.

    These customer order document types ensure clarity, compliance, and communication throughout the order lifecycle. Inspired ERP continues to enhance this functionality by supporting new formats, improving document visibility, and optimizing access—helping you maintain accurate records and drive informed decision-making.
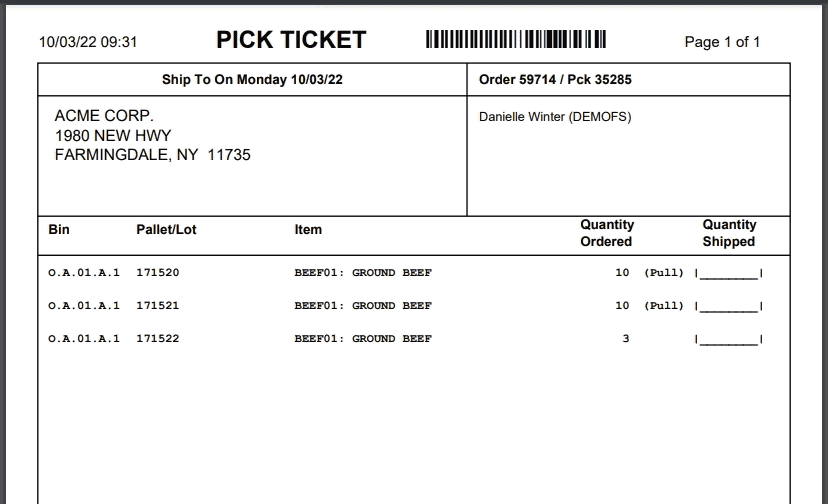
  • Pick Tickets
    Pick tickets can be generated once an order has been released and inventory has been allocated.  Contact I.T. to have pick tickets automatically printed upon release.  

    Note: Pick tickets will only contain those items on an order that have been released and allocated for picking.  Any unreleased items on an order will not be printed on pick tickets.   

    1. Click on the WMS Tickets Icon and either the View Pick Ticket Icon or Print Document  to view or print the pick ticket. 


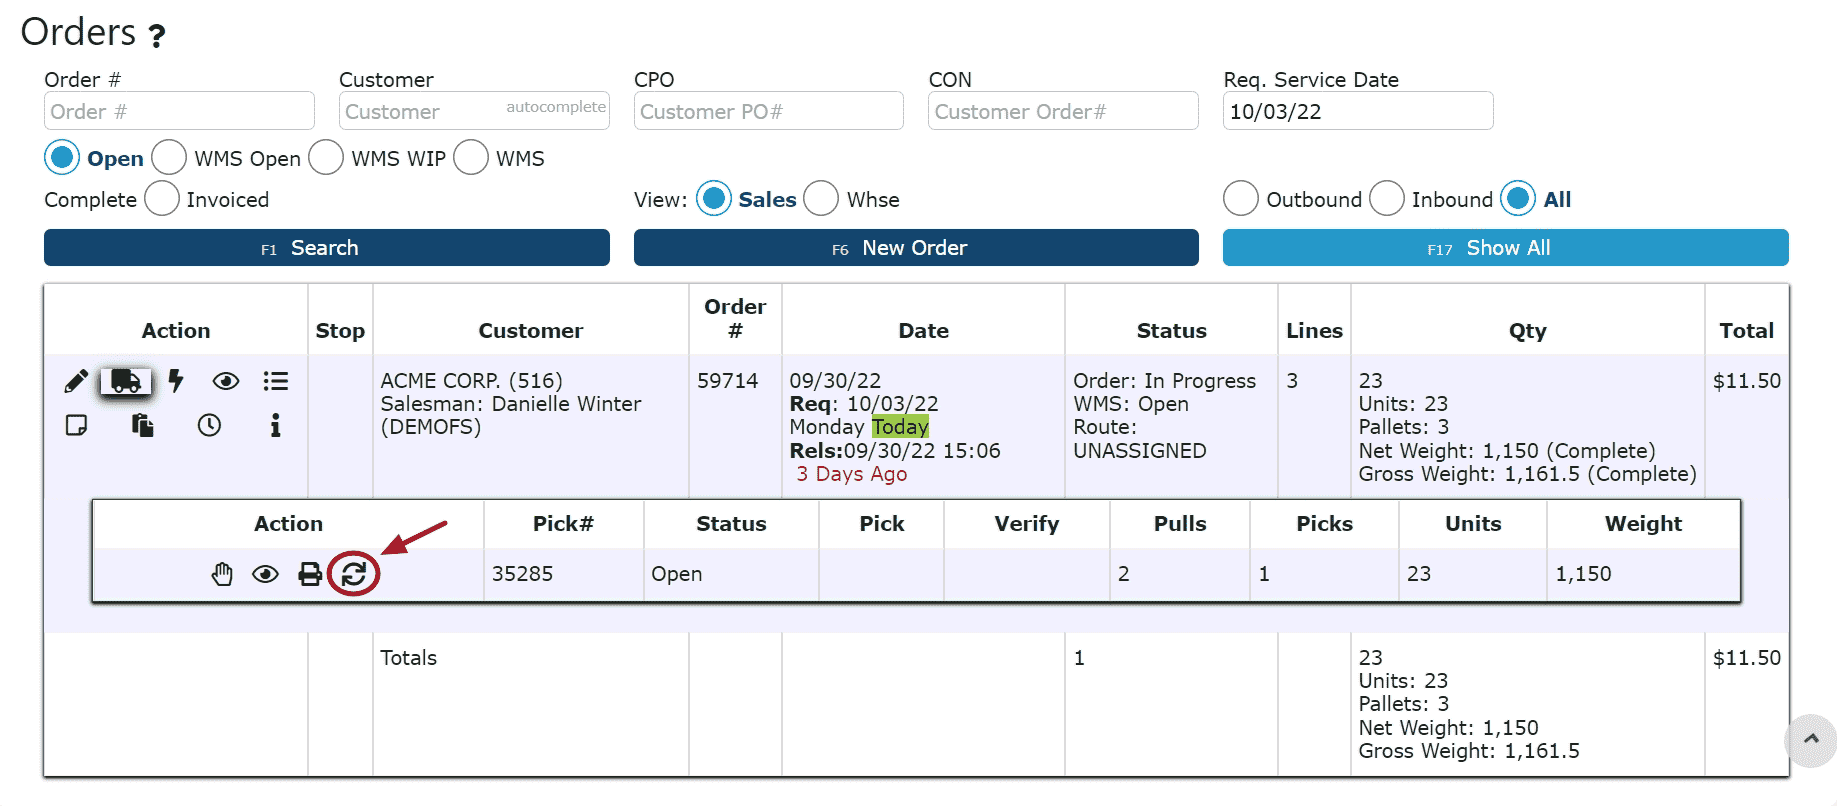
    Re-generating Pick Tickets

    As orders are changed, pick tickets can be re-generated to contain the most up to date information pertaining to the order.  

    1. Click on the Create New Pick Ticket PDF Icon to regenerate a fresh copy of a pick ticket 


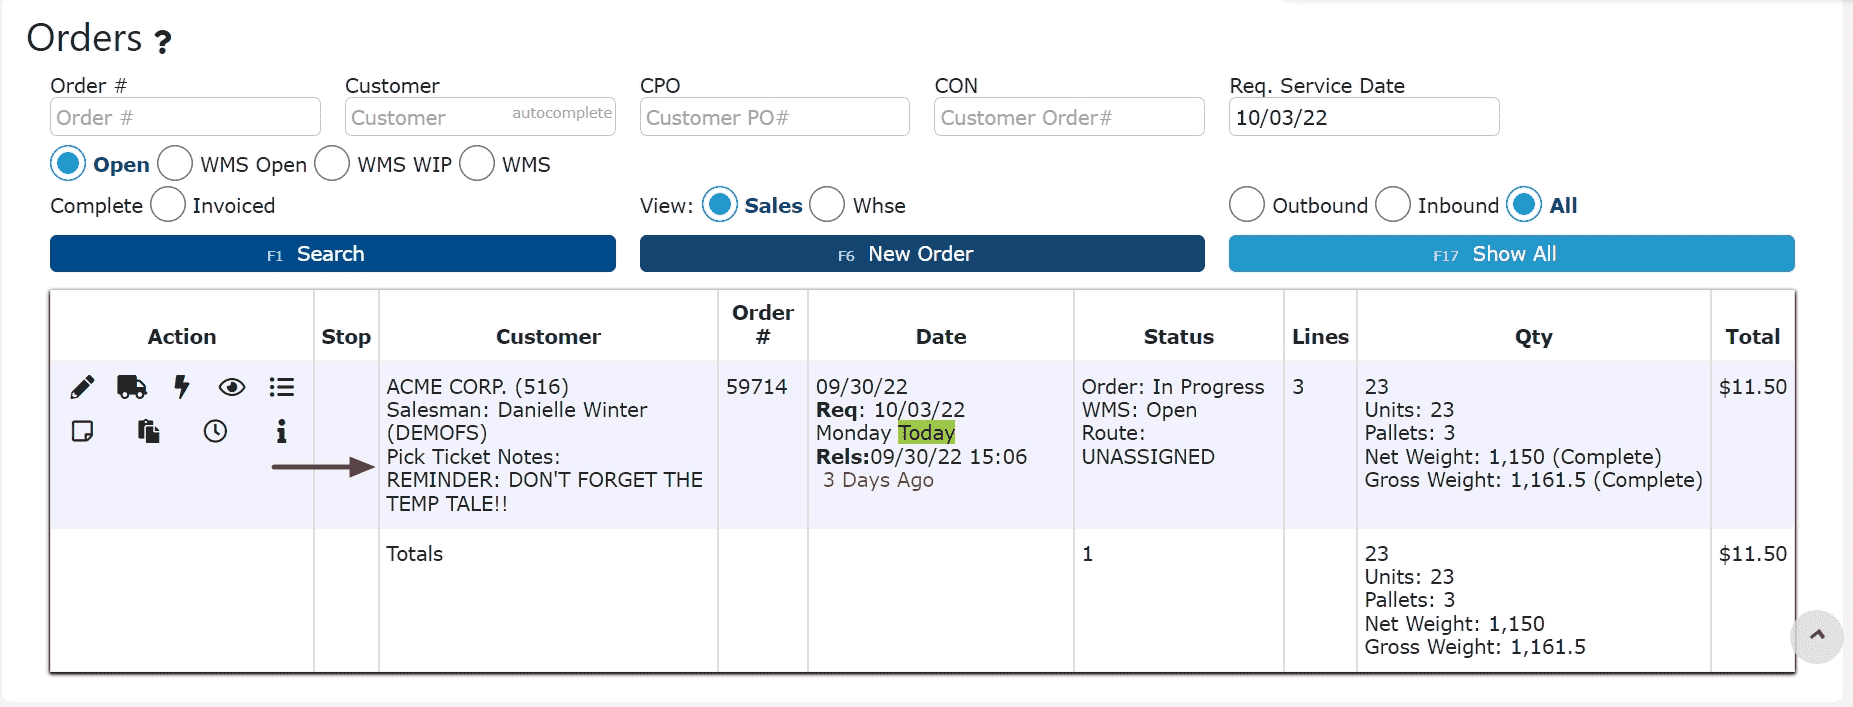
    Pick Ticket Notes

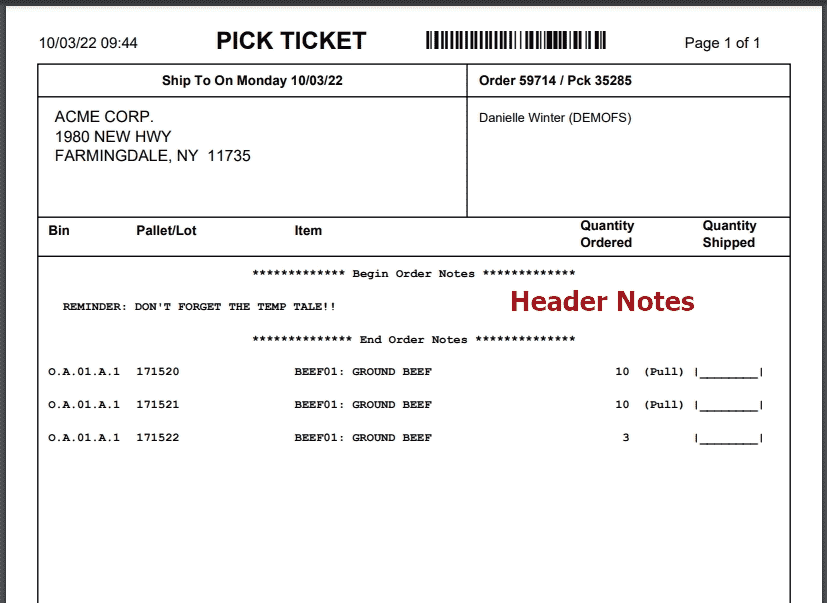
    Miscellaneous notes can be added to pick tickets to remind or warn pickers of special circumstances pertaining to certain products.  

    Header Pick Ticket Notes:
    1. Click on the Add Notes Icon 


    2. Enter a note and select to Print Notes On: Pick Ticket, then save your entry 


    Note: If notes are added after release, pick tickets must be re-generated to include those recently added notes.  


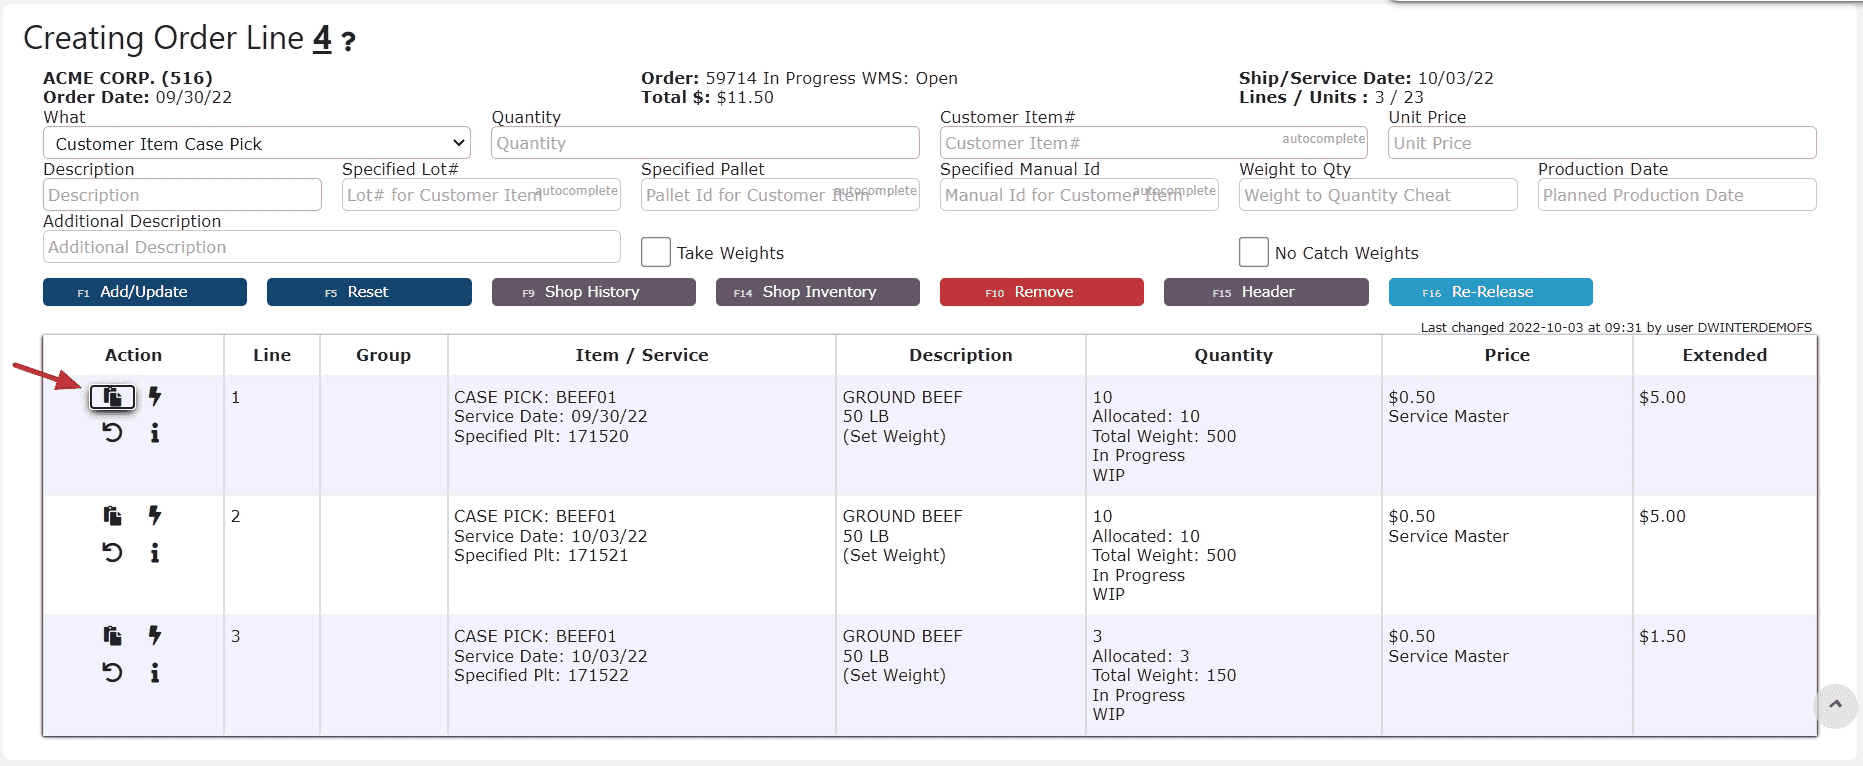
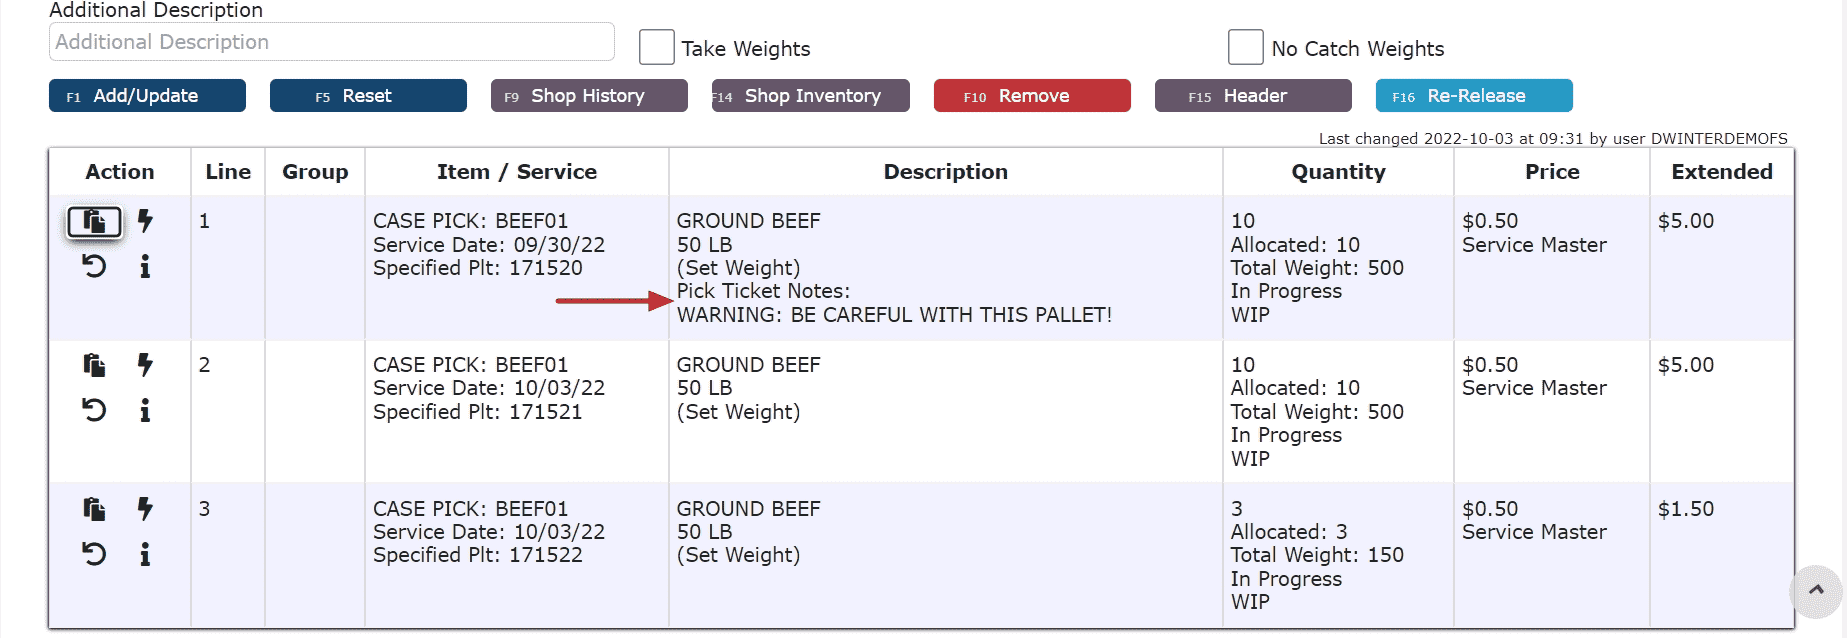
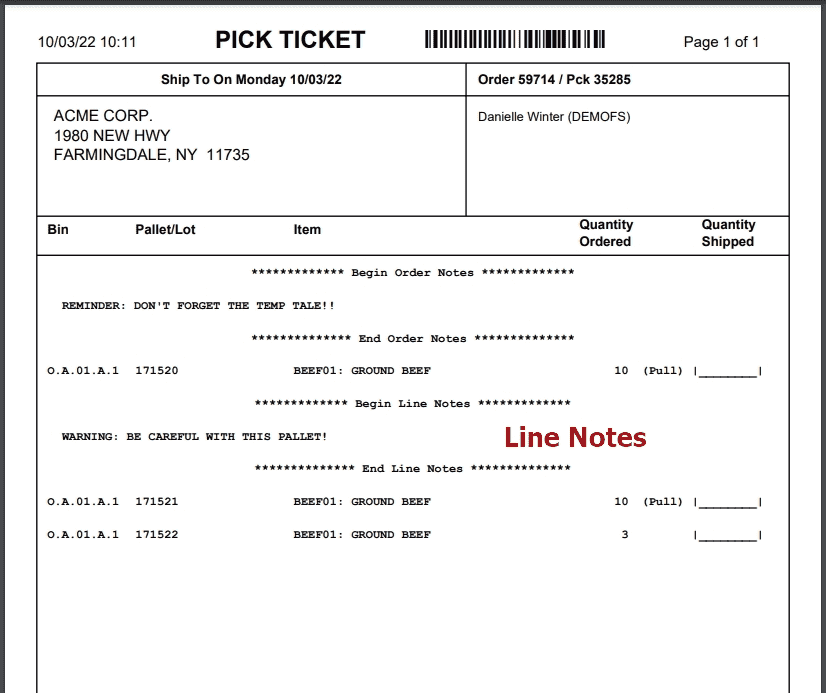
    Line-Level Pick Ticket Notes:

    1. Click on the Add Notes Icon next to a line item


    2. Enter a note and select to Print Notes On: Pick Ticket, then save your entry 


    Note: If notes are added after release, pick tickets must be re-generated to include those recently added notes.
  • BOLs
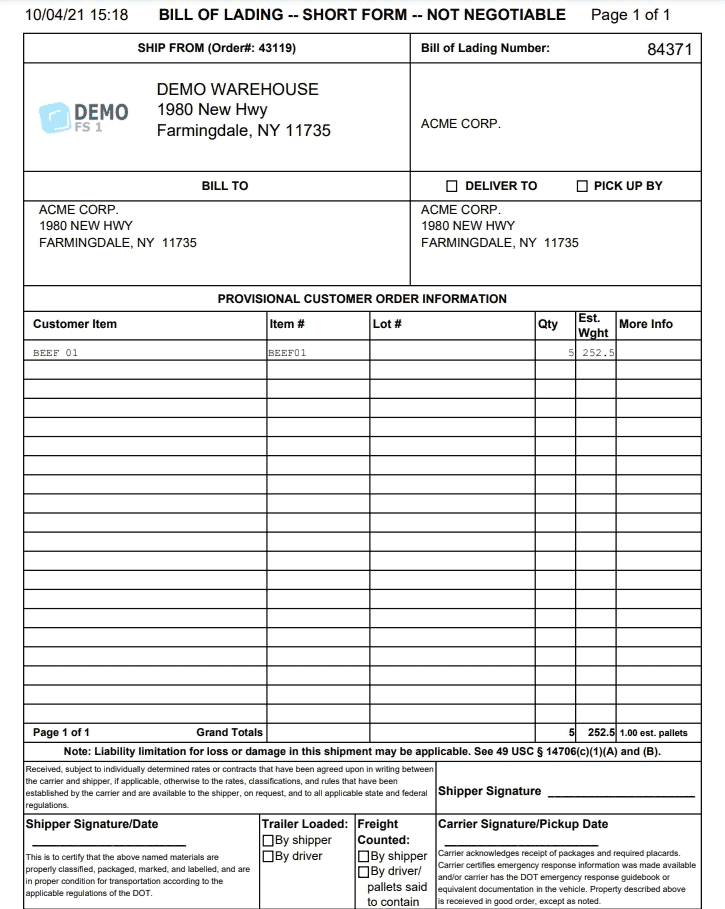
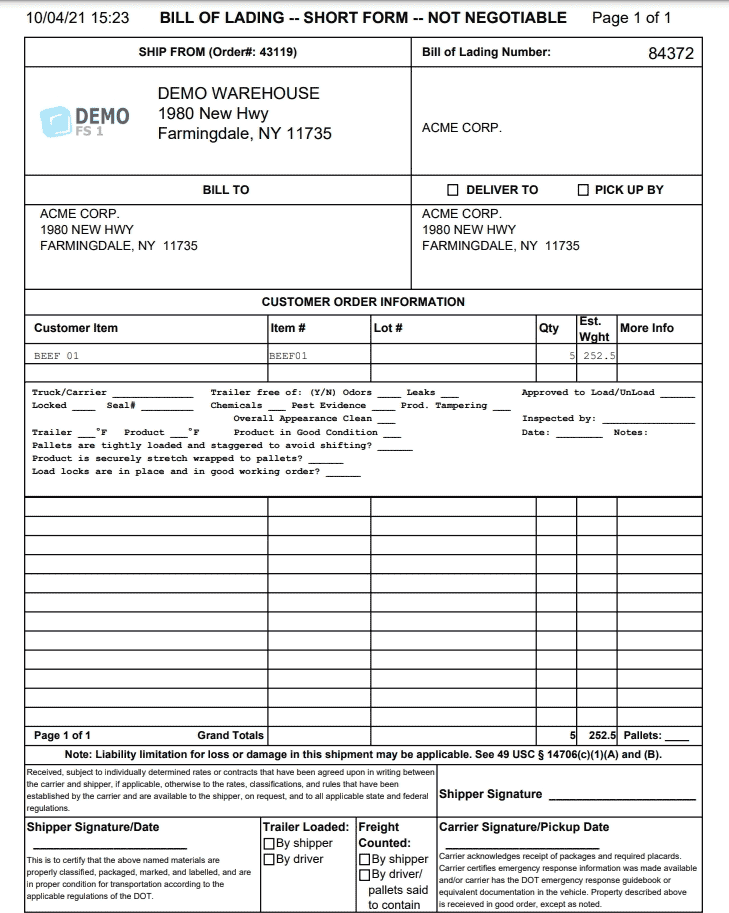
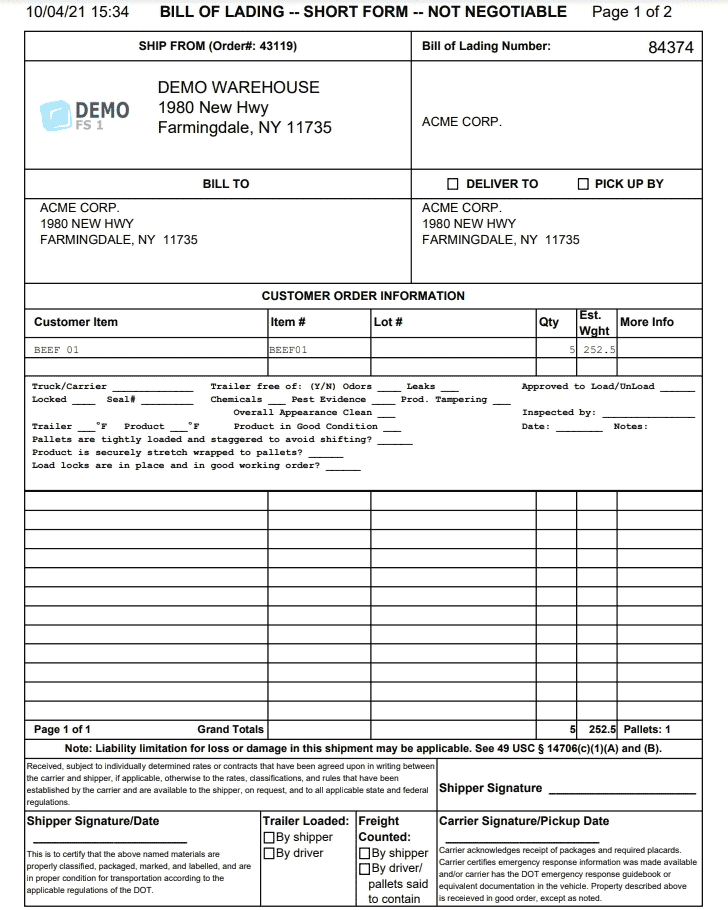
    BOLs can be generated at any point after an order has been created.  Weights displayed will be based on either the gross weight, or catch weight if individual weights have been taken.    

    Pre-Release: BOLs will indicate provisional customer order information including weight and total pallet estimates 


    Post-Release: BOLs will indicate estimated weight based on either the gross, or catch weight if individual weights have been taken.  Pallet count will remain blank until after verification.  


    Post Verification: BOLs will indicate estimated weight based on the gross or catch weight.  Official pallet count will now be indicated.  


    Fresh/Frozen Specifications: Fresh or Frozen if selected will be indicated on the BOL above the Shipper Signature.  System default rhetoric for each will print automatically unless custom rhetoric is requested. 
     
    Default Cooler Message: Air temperature set point 28deg. F providing an air temperature 28deg. F while in transit. 

    Default Frozen Message:
    Air temperature set point -10deg. F providing an air temperature range of -10deg. F to 31deg. F while in transit. 


    Generating BOLs: 

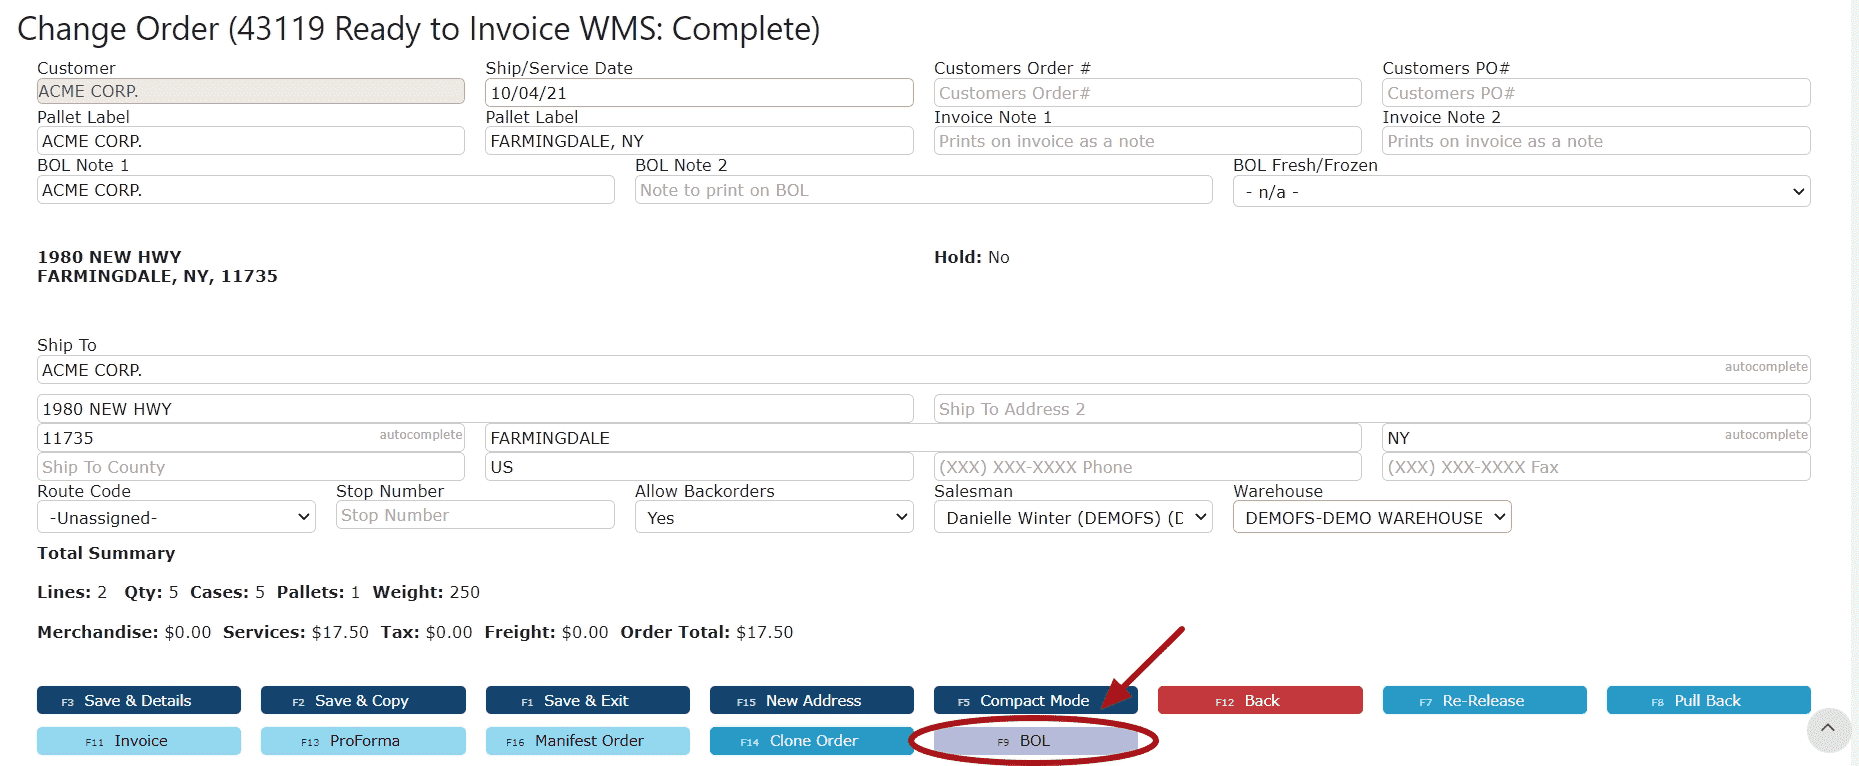
    1. Click on the BOL Button in the order header to generate a new BOL document 


    2. Click on the Order Documents Icon 


    3. Click on either the View Document Icon to view, or the Print Document Icon to print 


    Emailing BOLs: 


    1. Click on the Send Email Icon 
     
     
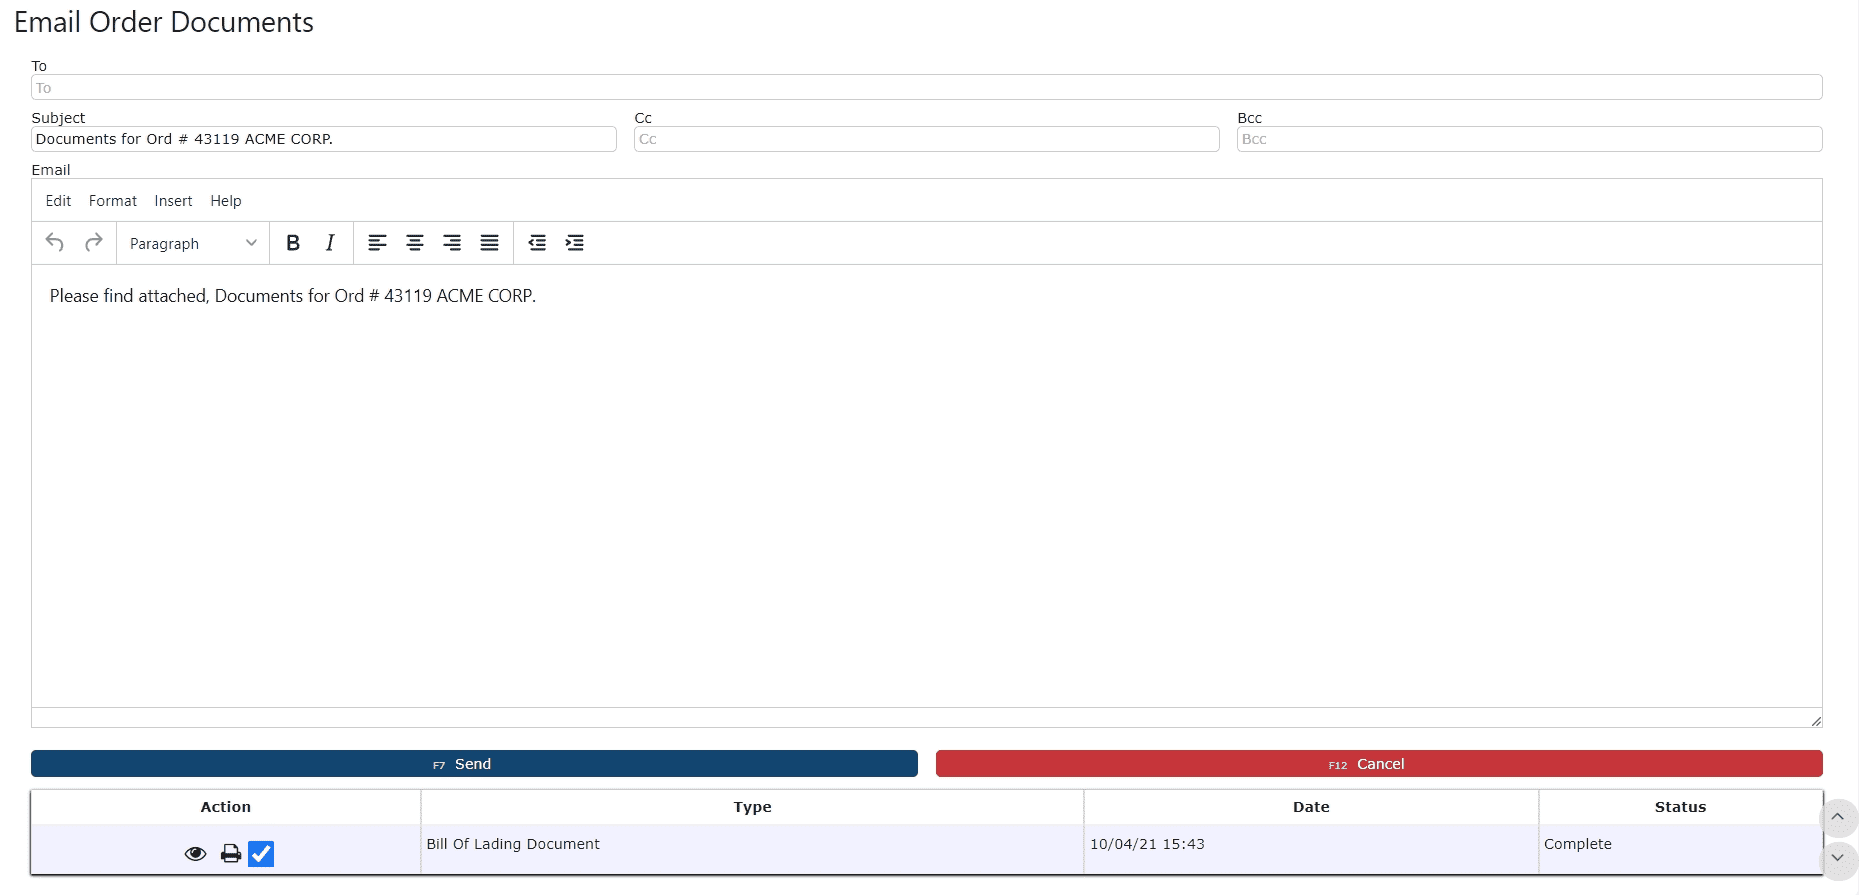
    2. Fill in the email's recipients, subject and body, then check the BOL Checkbox and send  

  • Order Confirmations
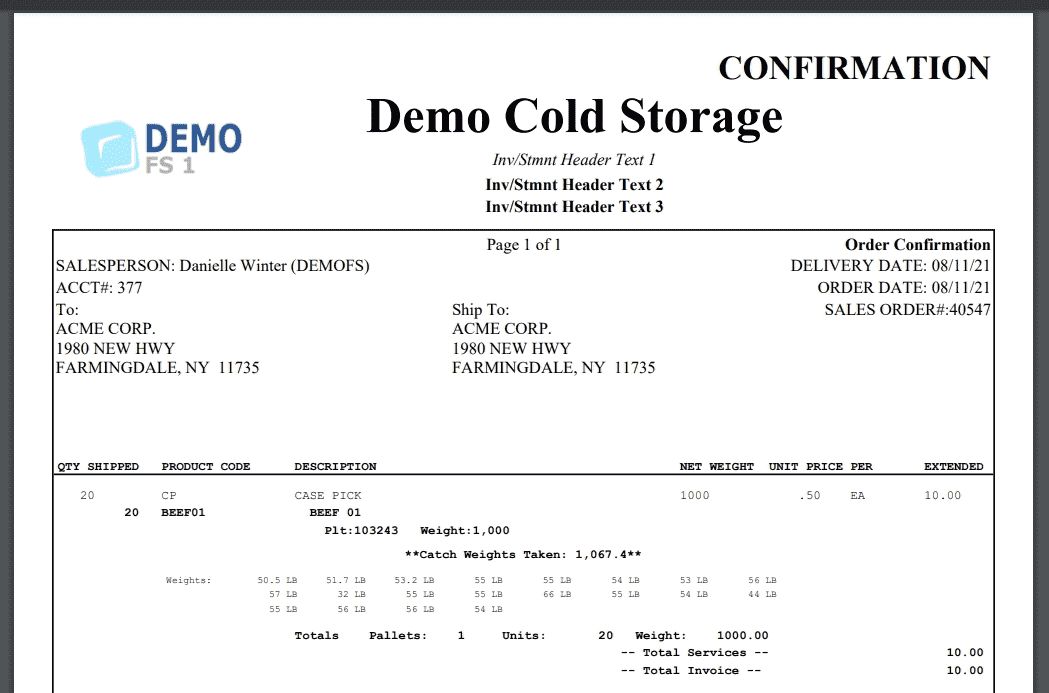
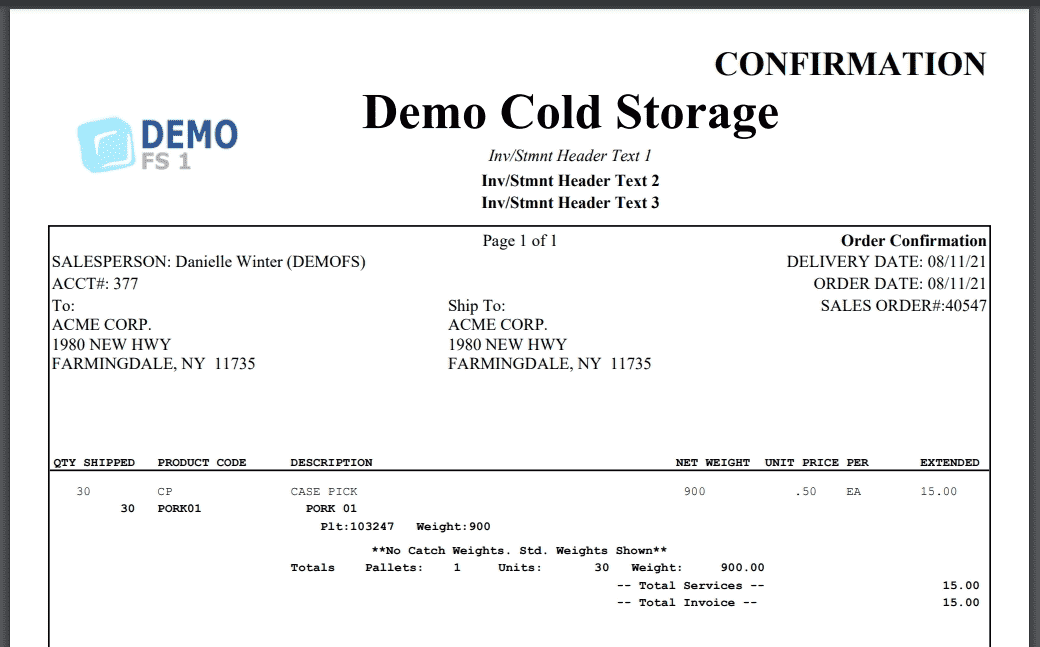
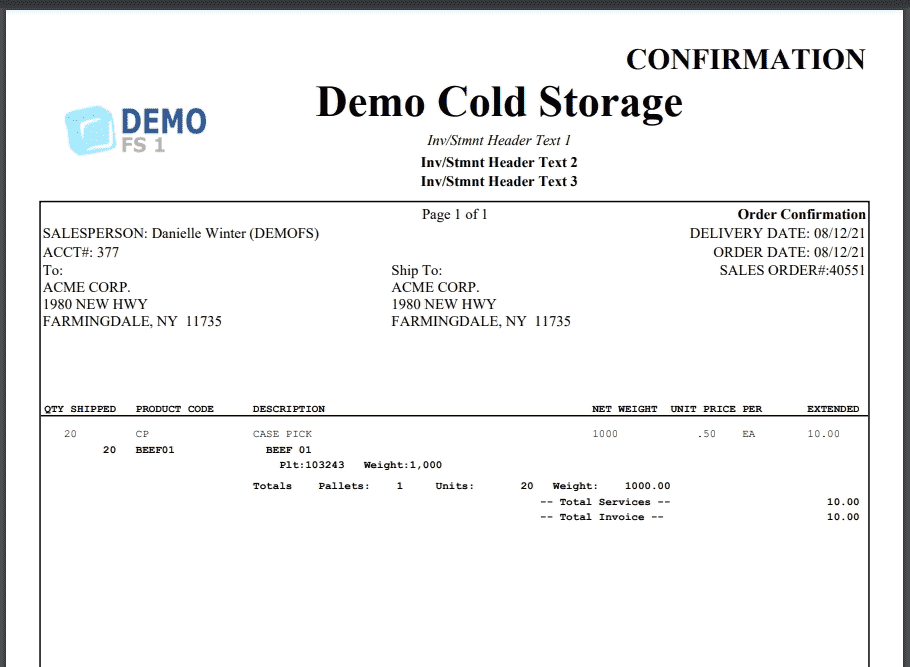
    Order confirmations can be generated at any point after the order has been created, up until verification has taken place.    


    Generating Order Confirmations: 

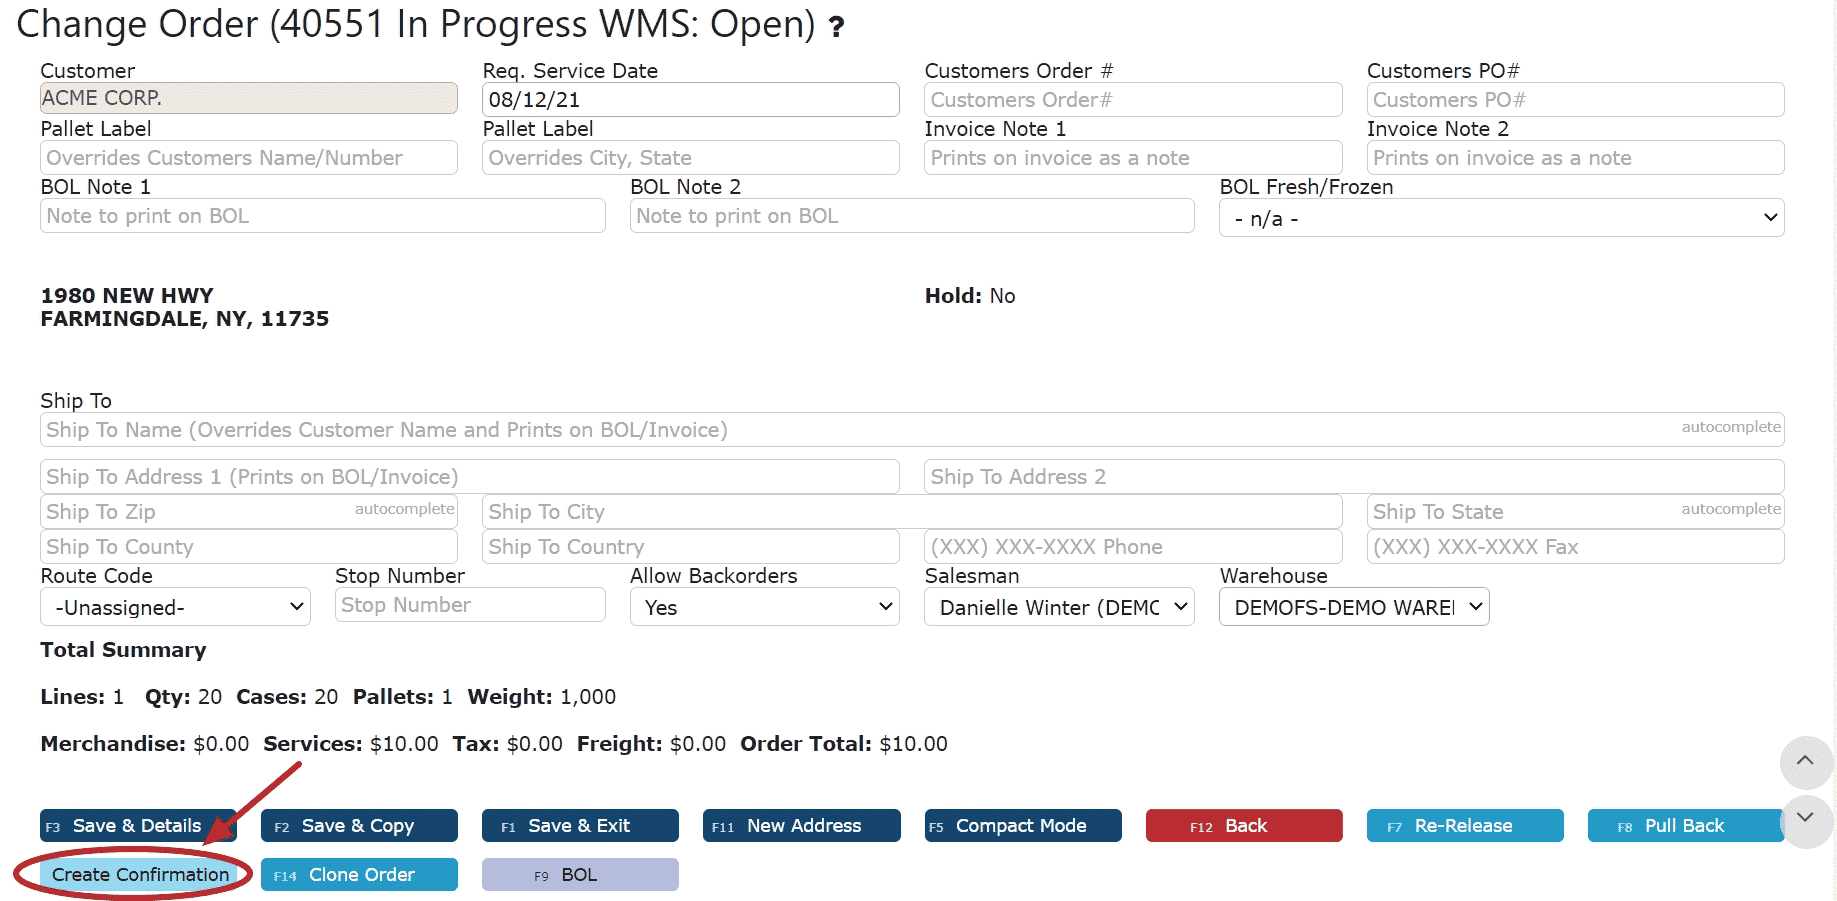
    1. Click on the Create Confirmation Button in the order header to generate a new confirmation document 


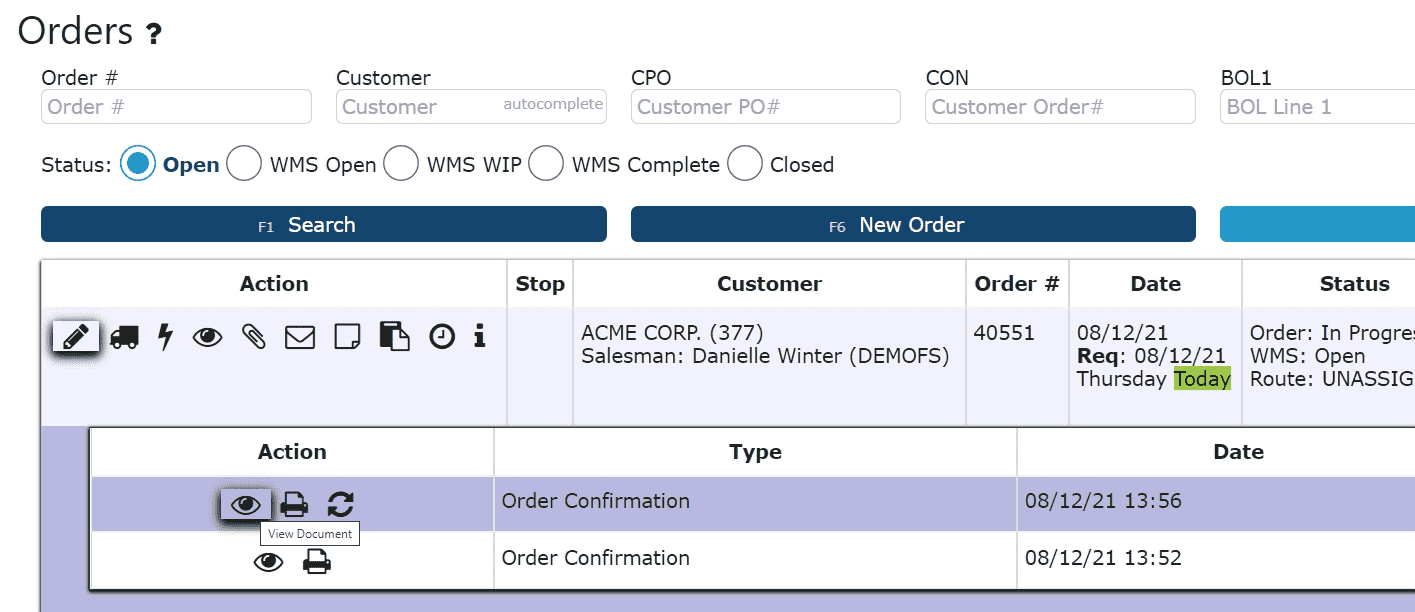
    2. Click on the Order Documents Icon 


    3. Click on either the View Document Icon to view, or the Print Document Icon to print 


    Emailing Order Confirmations: 

    1. Click on the Send Email Icon 


    2. Fill in the email's recipients, subject and body, then check the Order Confirmation Checkbox and send  

  • Proforma
    Proforma:
    Proforma invoices are preliminary billing documents that summarize goods or services before an official invoice is generated. In the Inspired ERP system, proformas serve as a useful tool for providing customers with a detailed preview of charges associated with a customer order before the order is finalized or invoiced.

    • Proformas do not affect accounting or inventory; they are strictly non-posting documents meant for customer review and internal approval purposes.
     
    • These documents can be generated from the Sales → Orders screen once an order has been created, picked, and verified.
     
    • Proformas display all line items, quantities, pricing, and totals, and are formatted similarly to final invoices—making them ideal for quote approvals or purchase confirmations.
     
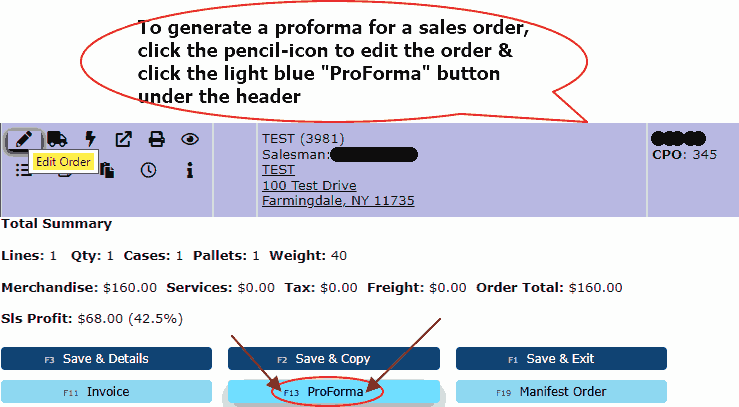
    • To print or email a proforma, simply open the order and click on the Proforma button located near the bottom of the order screen.
     
    • If any changes are made to the order, a new proforma should be generated to reflect the updated pricing or services.
     
    Using proformas within Inspired ensures transparency, avoids miscommunication with customers, and supports smoother order approvals—especially for service-only orders.
     
  • Invoices
    Invoices:
    Invoices are finalized billing documents generated within the Inspired ERP system to officially record revenue and initiate customer payment collection. They serve as permanent financial records—once an invoice is created, the sales order tied to it becomes locked and cannot be modified.


    • For service-only customer orders, invoices are created immediately after the order is released, since no physical goods are being shipped or manifested.
     
    • For orders containing inventory items, the order must first be manifested before it enters a Ready to Invoice status. Only then can an invoice be generated.
     
    • Invoices reflect a complete breakdown of services or items sold, including quantities, rates, and taxes.
     
    • Once an invoice is created, it is final and cannot be undone or changed in Inspired. It’s critical to confirm the sales order is correct before proceeding with invoicing.

    • If the customer is configured for automated invoicing emails, the system will send the invoice automatically upon creation.

    • Invoices can be emailed directly from the Order Entry screen by clicking the email icon under the Action column. This sends the invoice to the customer contacts associated with the order.
  • Statements
    Statements:
    Statements provide a clear snapshot of each customer’s account status, including all open invoices, credits, and outstanding balances. They are essential for managing accounts receivable, helping both internal teams and customers stay on top of unpaid invoices, due dates, and aging balances. Statements can be printed or emailed directly from the system and are a key tool used during collection efforts and monthly reconciliation processes.
     
    • Statements can be accessed from Accounting → Accounts Receivable → AR Statements.
     
    • Each line displays a summary of customer account activity, including Open Invoices, Open Credits, and totals broken down by aging buckets.
     
    • Expanding a row reveals individual invoice and credit memo details such as Type, Date, Due Date, Total, Paid, Status, and Days Past Due.
     
    • The Status column shows whether an invoice is open and may include warnings like "(1 Day)" or "(Due in 9 Days)" based on aging.
     
    • Credit memos are displayed with negative values and reduce the total balance due for the customer.
     
    • The Action column includes icons to view, print, or email a customer’s latest statement.
     
    • Statements allow your AR team to identify overdue payments, apply credits, and communicate effectively with customers about their outstanding balances.
     
    • You can generate formal PDF statements from this screen for emailing or printing purposes.
  • Attachments
    Attachments:
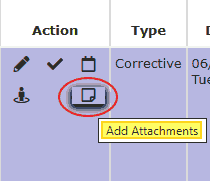
    Attachments are used throughout the Inspired system to store important supporting documents—such as contracts, scanned forms, invoices, photos, maintenance reports, or any relevant external files—within a specific record. This allows users to centralize key documentation for quick access, improved recordkeeping, and audit readiness. The folded-paper icon typically represents where you can upload or view attachments.


    Sales Module – Where Attachments Can Be Added:
    • Sales → Orders
    Attach documents to a sales order by clicking the folded paper icon under the Action column.

    Sales → Customers
    Use the arrow under the Action column, then click the Attachments icon to upload customer-specific files.

    Sales → Leads & Prospects
    Similar to customers, click the Action arrow and then the Attachments icon to store files related to potential clients.

    Warehouse Module – Where Attachments Can Be Added:
    Warehouse → Item Master
    Access the Attachments icon via the Action arrow to upload documents like spec sheets or vendor certifications for specific items.

    Assets Module – Where Attachments Can Be Added:
    Assets → Assets
    Attach files directly to assets such as manuals, warranty info, or repair documents using the folded paper icon.

    Assets → PM Schedules
    Click the Attachments icon to include documents related to preventive maintenance plans.

    Assets → Maintenance Events
    Upload service reports, technician notes, or other event-related files to a specific maintenance entry using the paper icon.

    Purchasing Module – Where Attachments Can Be Added:
    Purchasing → Vendors
    Open the Action dropdown, then click the Attachments icon to store vendor agreements or tax forms.

    Purchasing → Purchase Orders
    Use the paper icon under the Action column to add files such as supplier confirmations or packing lists to each PO.

    Accounting Module – Where Attachments Can Be Added:
    Accounting → Accounts Payable → AP Invoices
    Add supporting invoice documentation by clicking the Attachments icon under the Action column.

    Reports Module – Where Attachments Can Be Added:
    Reports → Accounts Receivable → AR Invoice Register
    Use the paper icon to attach backup documents to individual invoice records.

    Reports → Accounts Receivable → AR Credit Register
    Upload files supporting credit memos directly to the credit record.

    Reports → Accounts Receivable → AR Overpayment Register
    Store documentation related to overpayments by using the Attachments icon.

    Reports → Accounts Receivable → A/R Invoices/Credits/Over Payments
    Centralized access point to manage attachments across invoices, credits, and overpayment transactions.
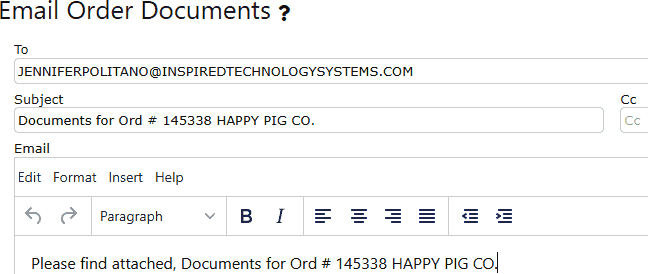
  • Emailing Order Documents
    Emailing Order Documents:
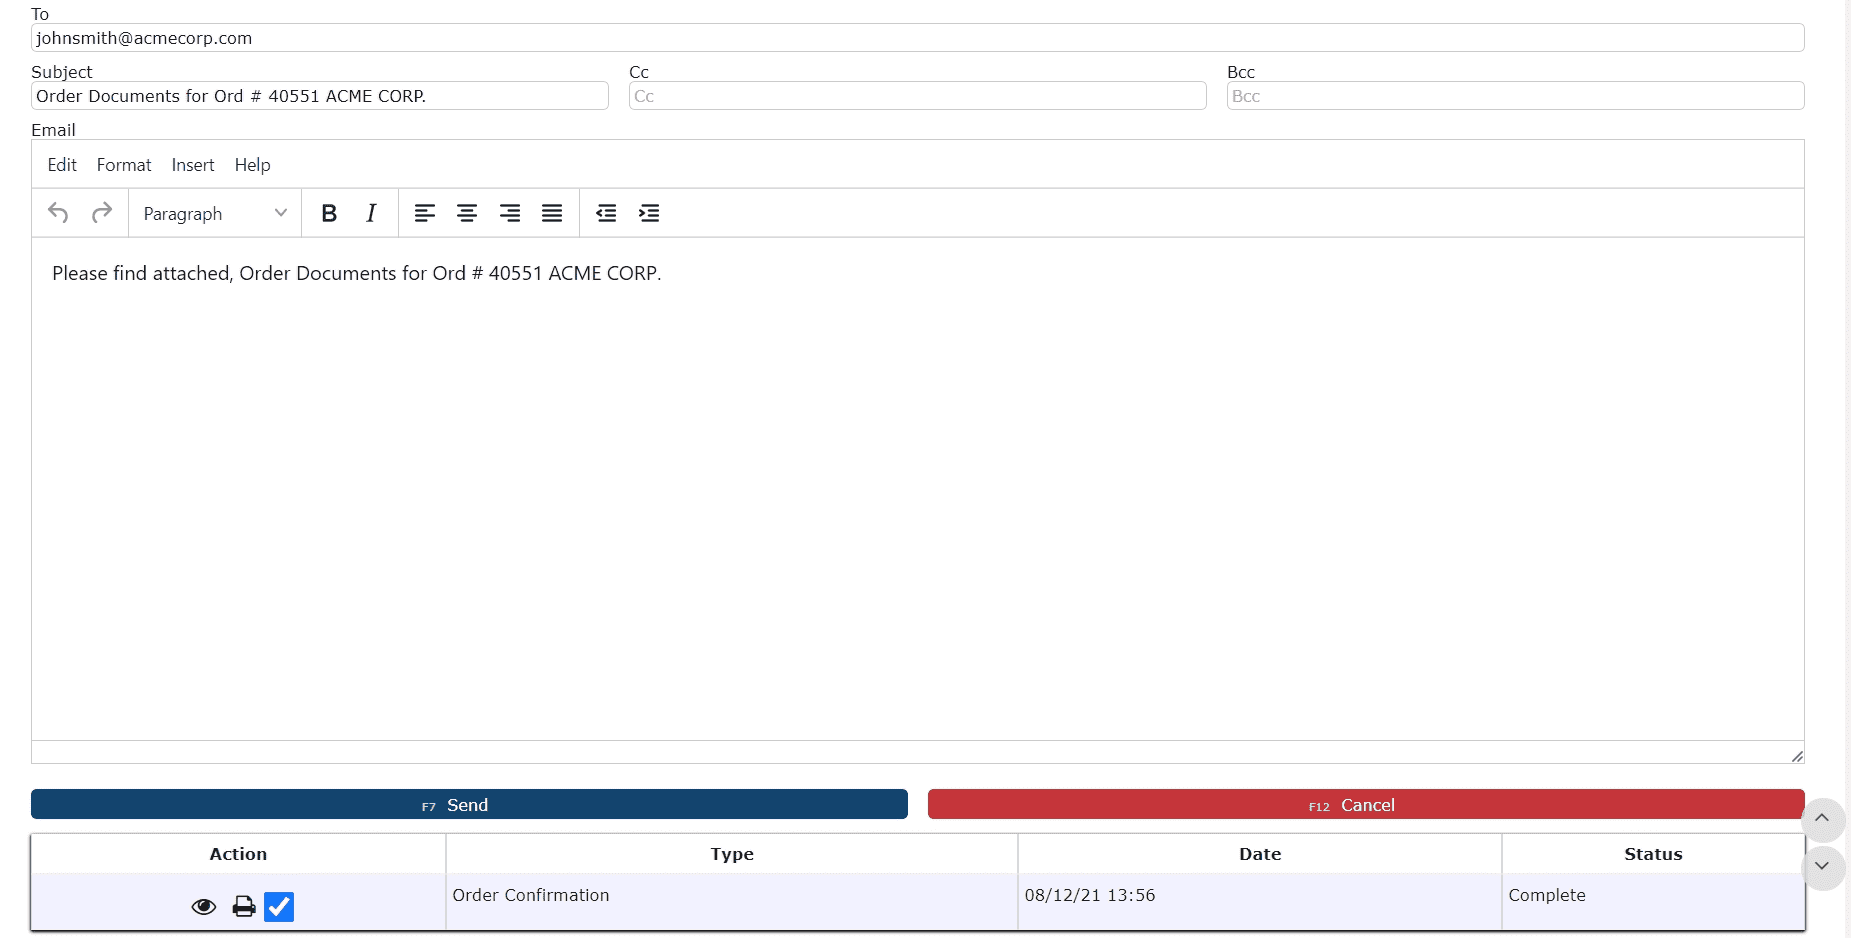
    This quick guide outlines how to email specific order documents directly to your customer.
     
    1. Locate the Email Option
    After a sales order is created, it will initially appear blank. As documents are generated—such as order confirmations or bills of lading—an email icon will appear in the Action column next to the customer.


    2. Access the Email Form
    Click the send email icon to open a new screen with an email template. Any customer contact emails saved in the Customer Master will automatically populate the To field. You may update the recipients or modify the message content as needed.


    3. Select Documents to Send
    Scroll to the bottom of the email screen to view the list of generated documents. Check the box next to each PDF you wish to attach and send to the customer.


    4. Send the Email
    Once your message is ready and the correct documents are selected, click the dark blue Send button to deliver the email.

Orders Out of Margin

  • Orders Outside of Gross Profit Margin
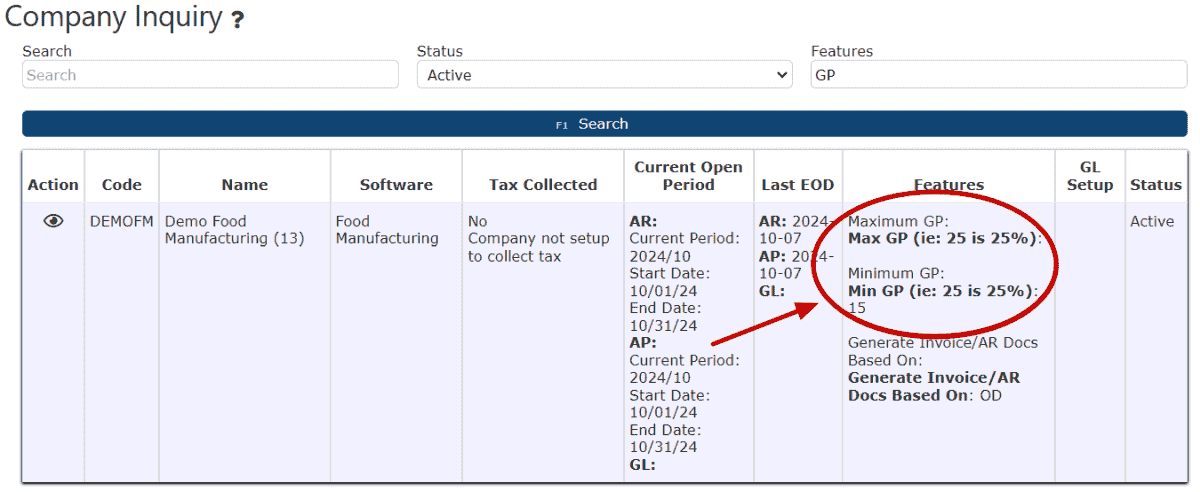
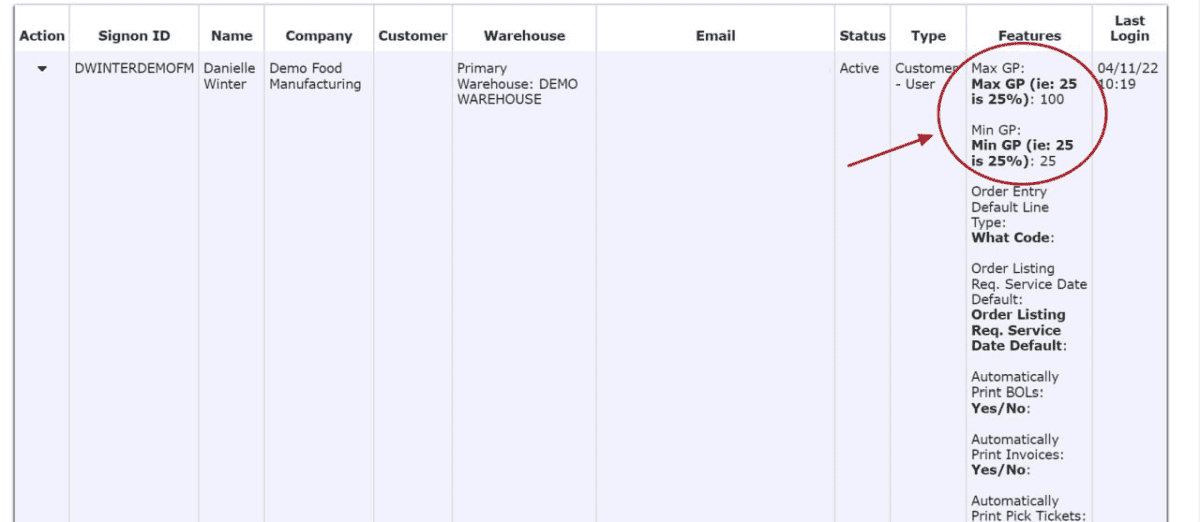
    Prevent workers from generating ProFormas and invoicing orders outside of the acceptable Gross Profit (GP) Margin range by setting up a Minimum and Maximum GP % Margin.

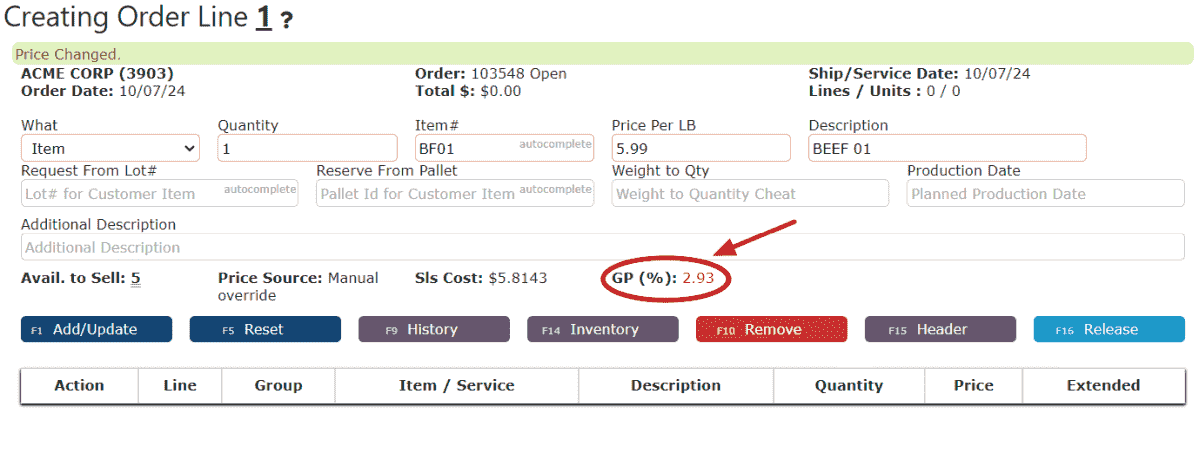
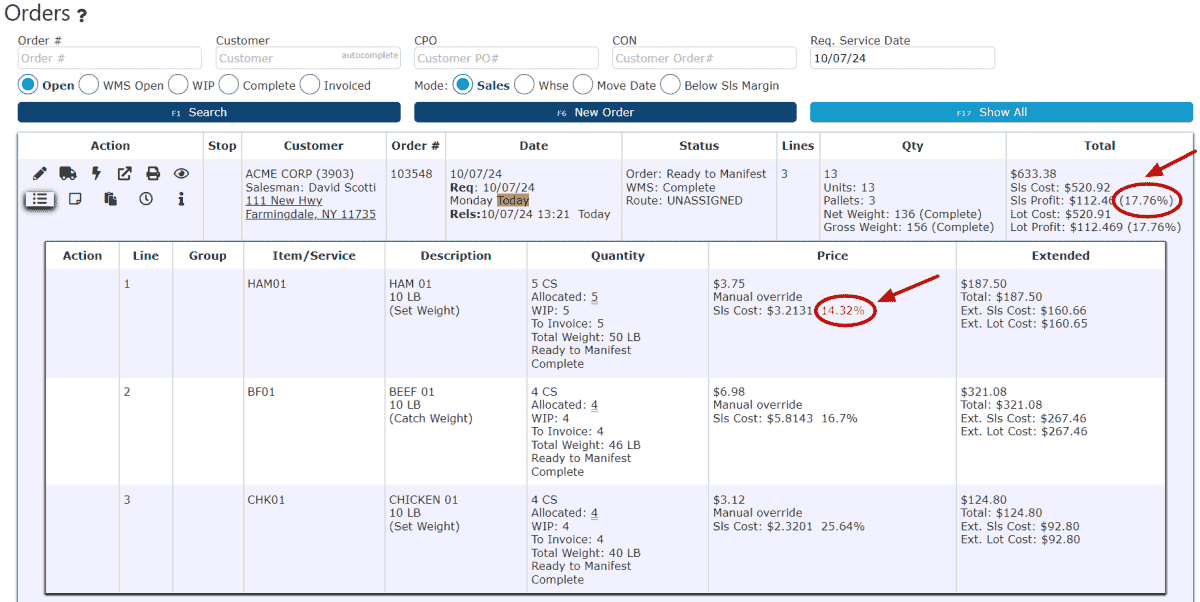
    Red text throughout the system warns users when GP is out of range:

    Creating Order Lines: When creating order lines, the user will be warned with red text for the GP % if the line they are adding results in profits below or above the company's accepted minimum/maximum Sls GP. 

    Example: Company set up with GP Margins based on Order Level Profits, with a minimum Sls Profit of 15%.

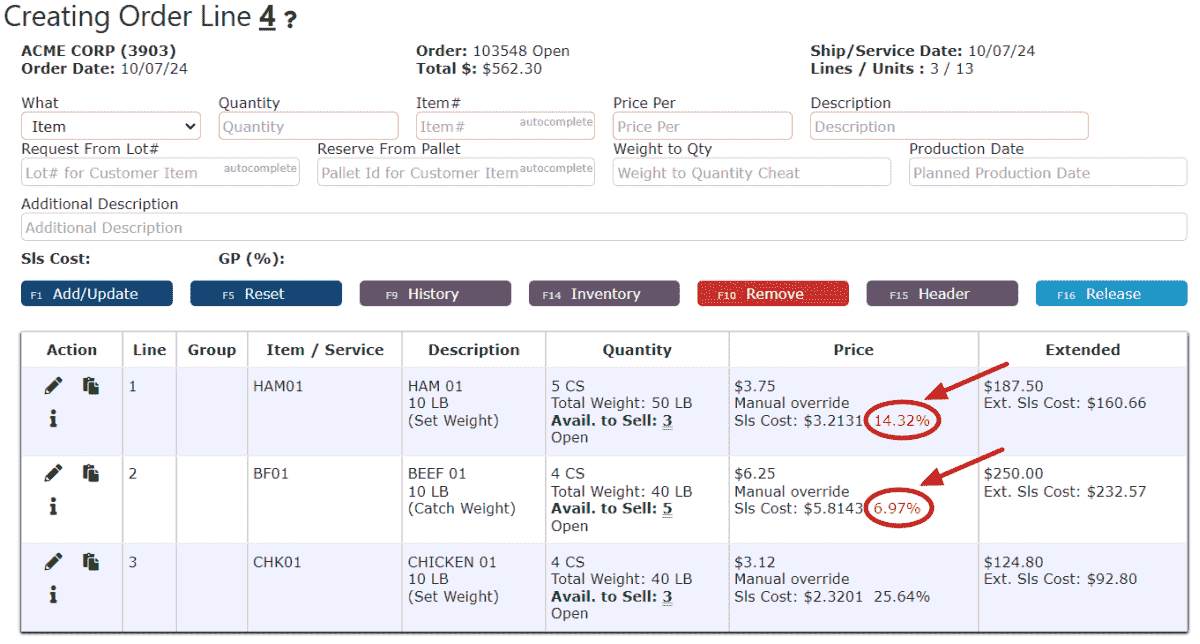
    Order Details: Order Detail lines resulting in a Sls GP % above or below the company's minimum/maximum percentage are identified with red text. 

    Example: Company set up with GP Margins based on Order Level Profits, with a minimum Sls Profit of 15%.


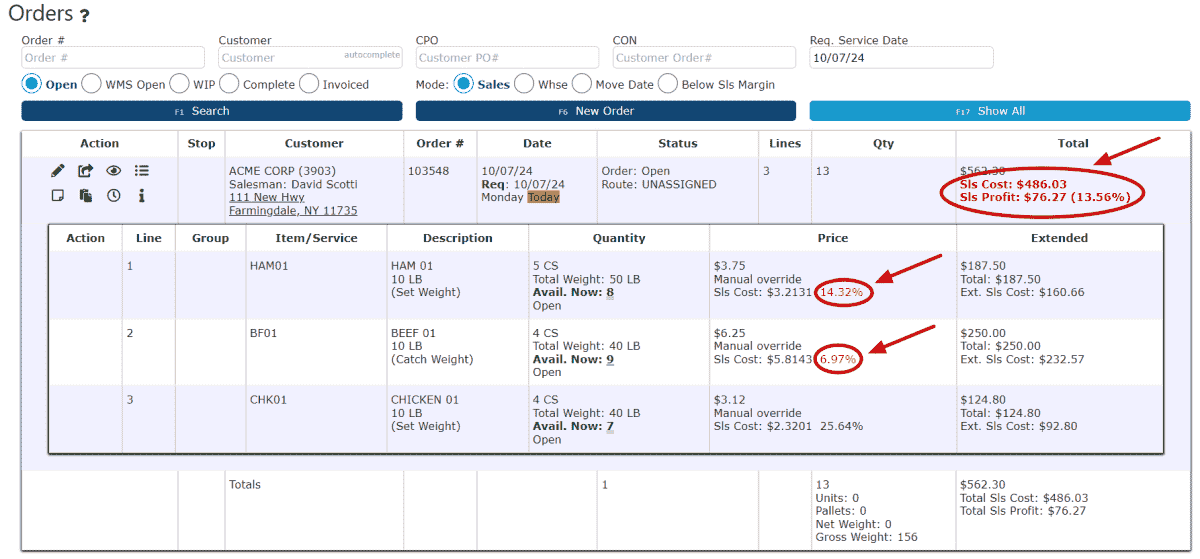
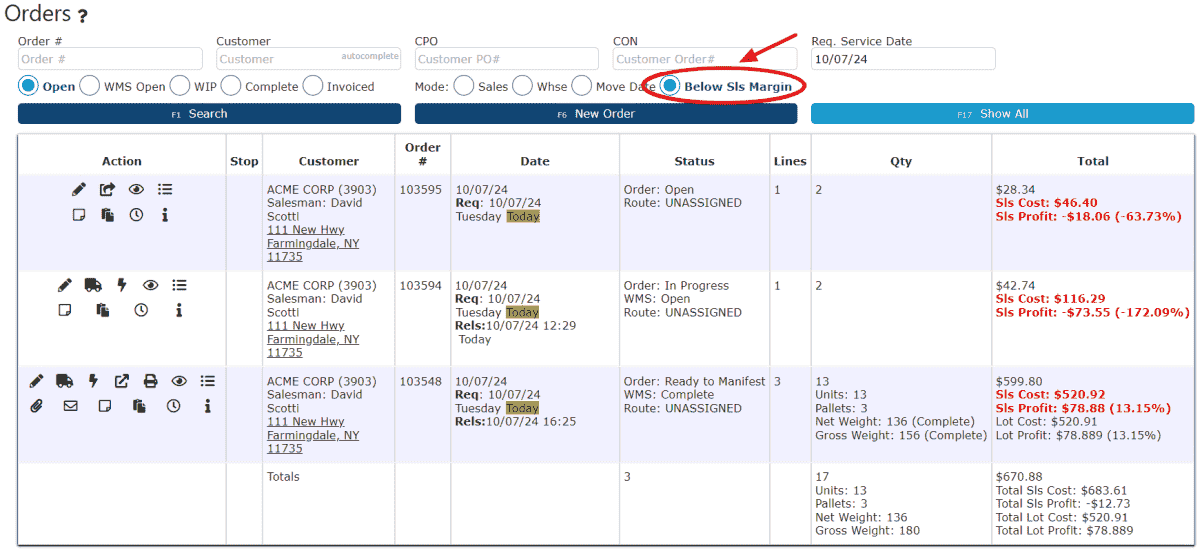
    Order Listing: Orders that fall outside of the acceptable GP margin range are identified with bold and red text for the order's Sales totals (Sls Cost, Sls Profit, and Sls Profit %).

    Example: Company set up with GP Margins based on Order Level Profits, with a minimum Sls Profit of 15%.


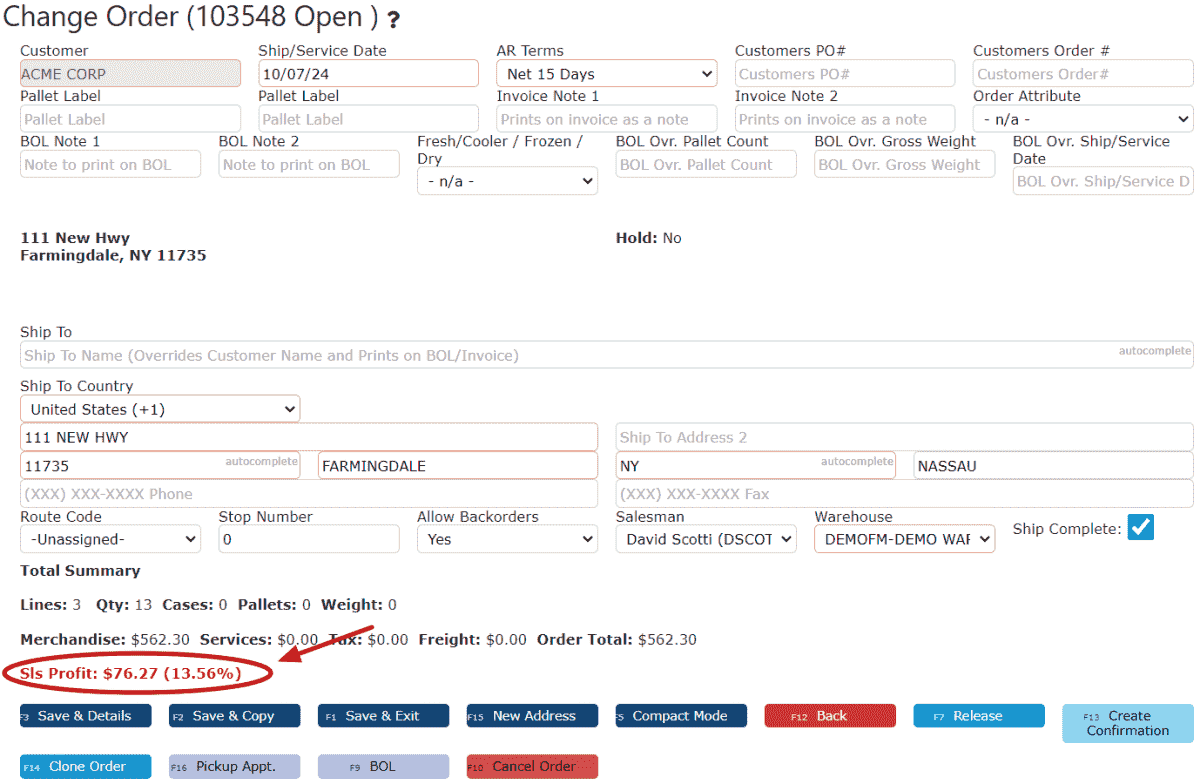
    Order Header: Warns the user with bold and red text signaling that the order falls outside of the company's accepted range.

    Example: Company set up with GP Margins based on Order Level Profits, with a minimum Sls Profit of 15%.


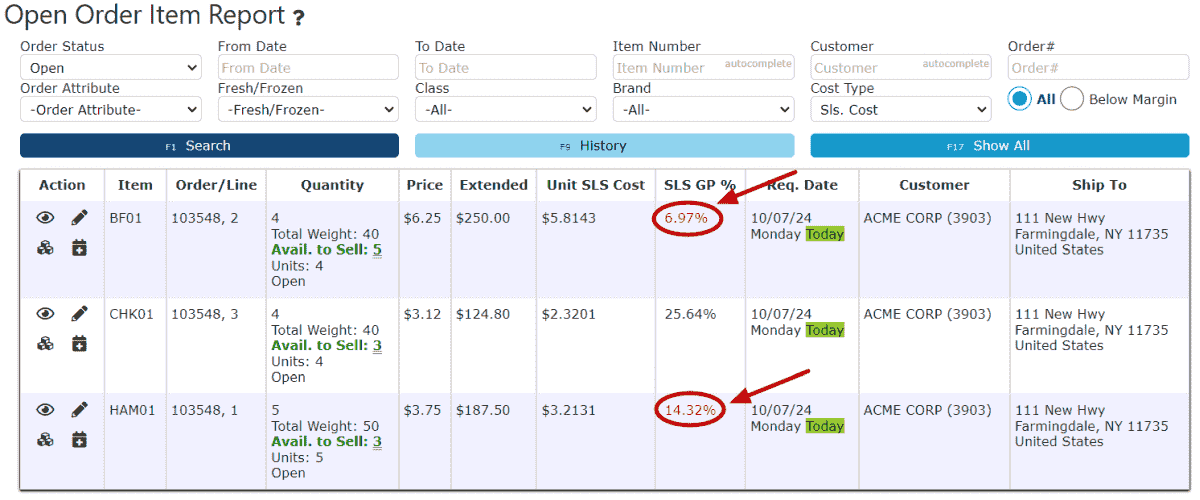
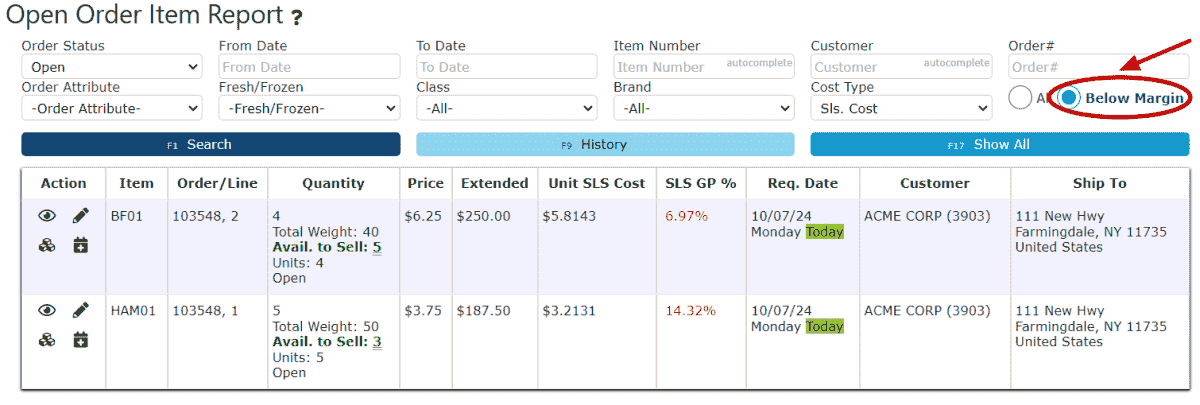
    Open Order Item Report:Identifies order lines with Sls GP % outside of the company's margins with red text.

    Example: Company set up with GP Margins based on Order Level Profits, with a minimum Sls Profit of 15%.


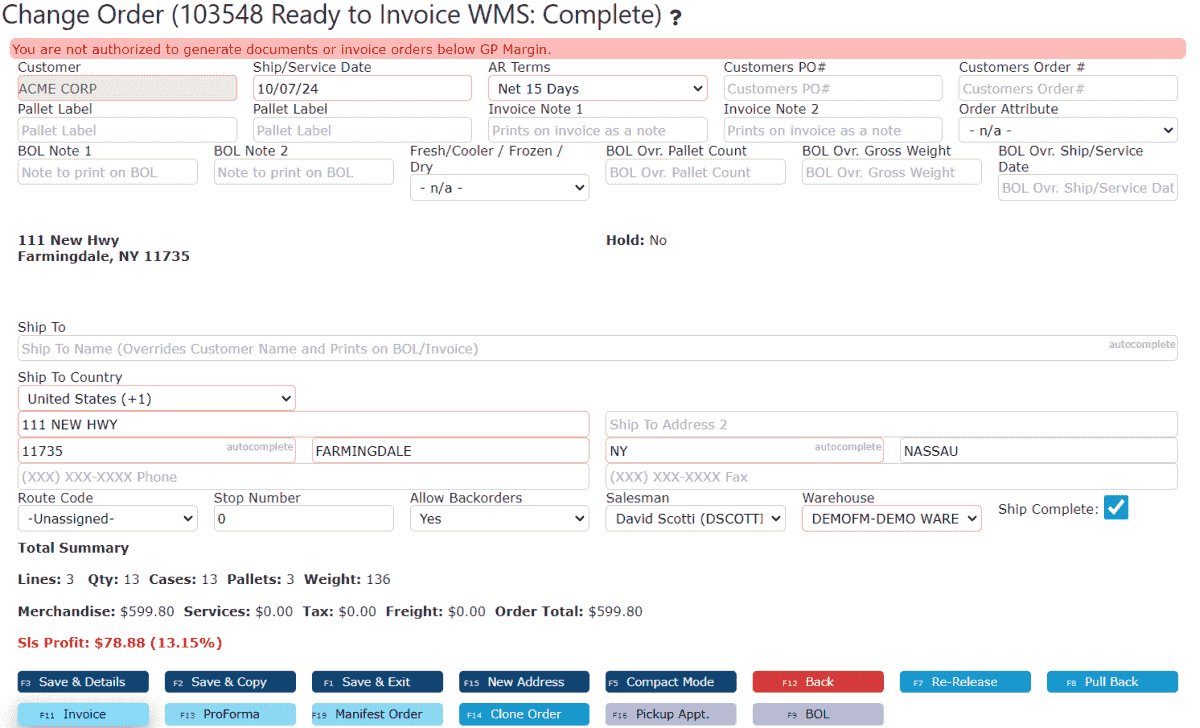
    Users WITHOUT authority to Invoice outside of GP % Margin will be prevented from generating ProFormas and invoicing orders:

    Error message unauthorized users see when attempting to invoice order outside of GP Margins:


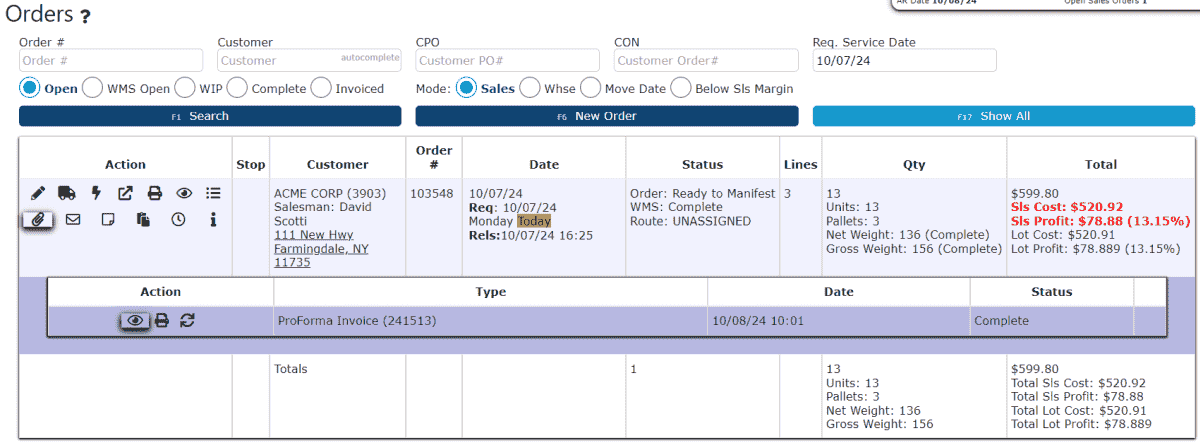
    Users WITH authority to Invoice outside of GP % Margin are allowed to proceed:

    Successfully generating a proforma for an order with totals outside of the company's GP Margins:


    Isolate Below Margin Orders on Various Reports:

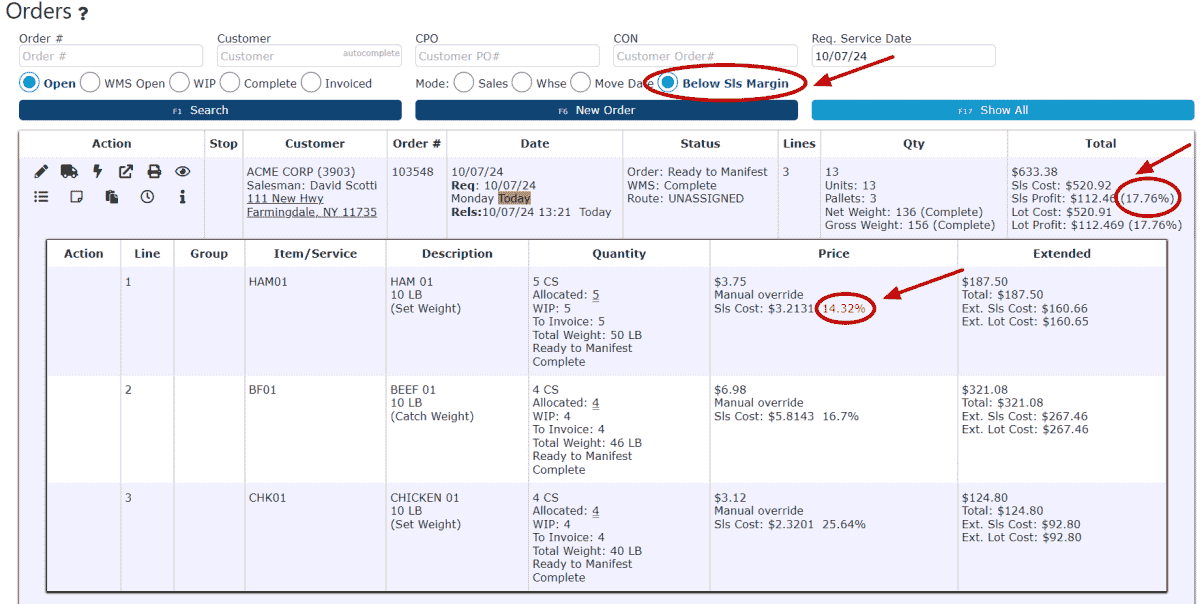
    Order Listing: Isolate any orders below the company's margins on the Order Listing by selecting the Below Sls Margin radio button.

    Example: A company with Margins set up by Order Level with a minimum Sls Profit of 15%, selecting the Below Sls Margin radio button on the Order Listing results in a list of the orders that fall below the company's Minimum GP. 


    Open Order/Item Report: Isolate any Order lines resulting in GP below the Company's Minimum GP, by selecting the Below Sls Margin radio button on the Open Order Item Report.

    Example: For a company with Margins set up by Order Level with a minimum Sls Profit of 15%, selecting the Below Sls Margin radio button on the Open Order Item Report results in a list of the order lines that fall below the company's Minimum GP.


    Set up Min/Max GP % for the Entire Company:


    Set up a Specific Min/Max GP % for Certain Users:


    Order Level vs. Order Detail Level:
    Companies that are set up with GP margins based on Order Level GP % can generate proformas and invoice orders that have Order Lines with Sls Profits below the company's minimum GP %, as long as the Order's total Sales Profit % falls within the company's margins.

    Whereas, companies set up with GP margins based on Order Detail Level GP % are prevented from generating proformas and invoicing orders when any of the Order Lines are below the company's minimum GP %, even if their total Sales Profit % falls within the company's margins.

    Below is an example of an order with an Order Level Sales Profit that is above the company minimum of 15% but contains Order Lines that are not above the company minimum on the Order Detail Level.


    The difference between a company set to determine which orders are below the minimum Sls Profit % by Order Level verses by Order Detail Level can be observed in the scenario below.

    This order has one (1) Order Detail lines whose individual Sls Profit % falls below the company minimum. The order would be considered Below Sls Margin for a company with GP Margins based on Order Detail Level Profits, despite the Order Level Sls Profit falling within the company's set range. Any attempt to generate proformas or invoice this order will be prevented with the expected error messages. 

    Example: An order under a company with GP Margins set by Order Detail Level where the Order Level GP is within the company's margins, but at least one (1) order line's Order Detail Level GP falls outside of the Company's Margins. 


    The example above would not appear Below Sls Margins for a company with GP margins set by Order Level. However, it would be listed as Below Sls Margin under a company with GP margin % set up to be by Order Detail Level.

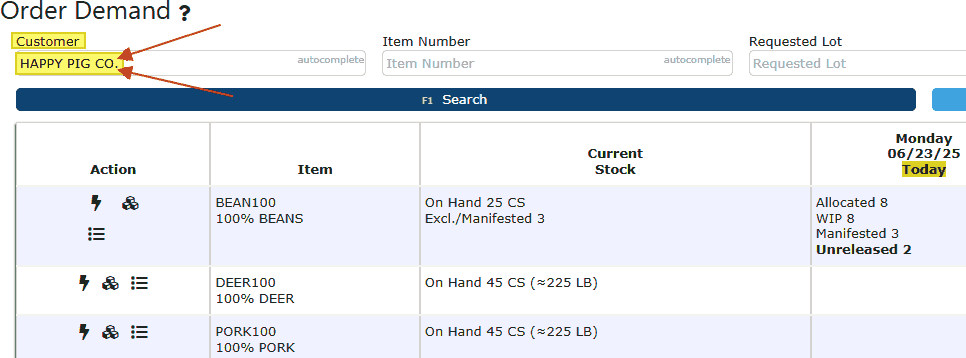
Order Demand

  • Key Information
    Order Demand Key Information:
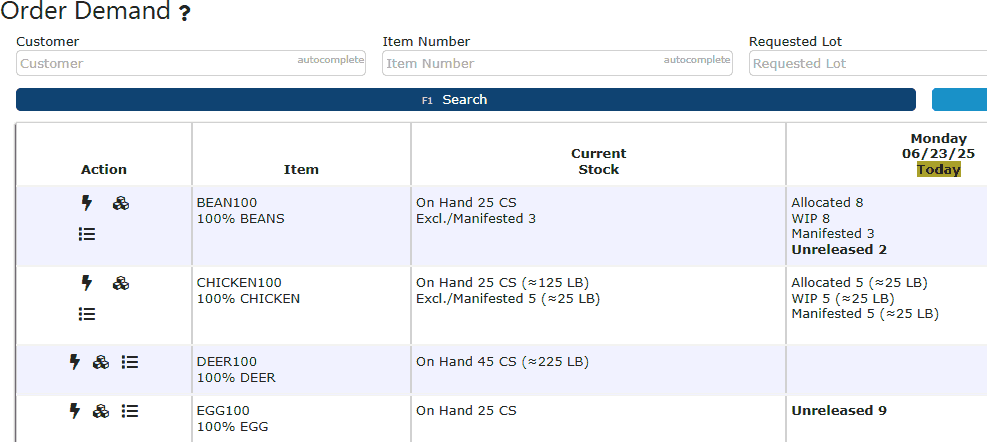
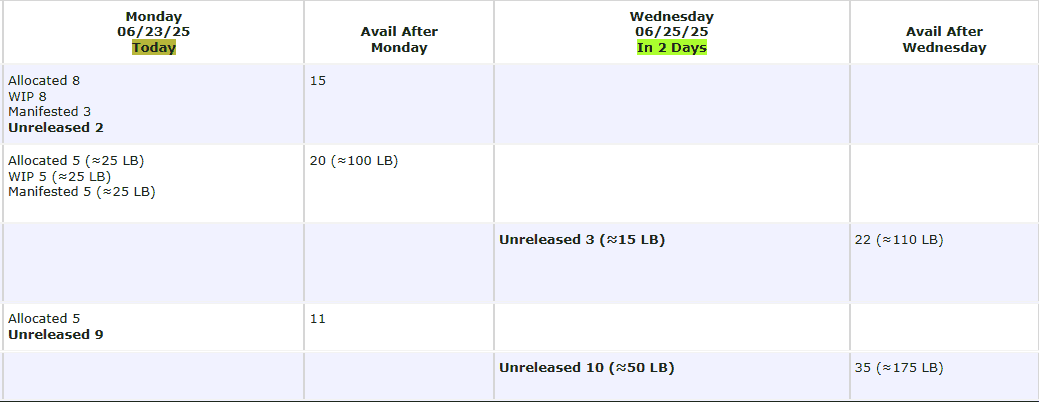
    The Order Demand screen in Inspired ERP provides a forward-looking, time-phased projection of inventory availability. It combines current on-hand quantities with scheduled outgoing shipments to show how stock levels will change over the coming days. Each row represents a single product (SKU), starting with its core details—item code, description, and current stock level—followed by a series of date-based columns labeled “Available after [Day]”.
    The Current Stock column reflects the quantity available now, and each subsequent “Available after” column shows the projected remaining stock after that day’s scheduled orders are fulfilled. This horizontal, day-by-day progression functions as a rolling calculation, making it easy to see exactly when stock will fall to critical levels. In ERP terms, this is similar to an Available-to-Promise (ATP) Schedule, Projected On-Hand Report, or Time-Phased Inventory Plan, which are essential tools in demand planning and MRP processes.

    Accessing Order Demand
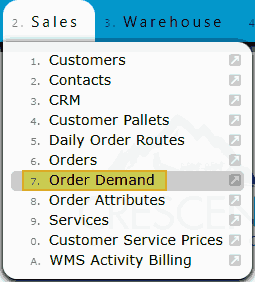
    • Navigate to Sales → Order Demand from the main menu to open the screen.

    • The page will display in a new view with filter options at the top for refining results.

    Filtering Options
    General View – Displays all current sales order demand across all customers and items.

    By Customer – Shows only orders tied to a specific customer.

    By Item – Displays demand for a single item code.

    By Customer & Item – Combines both filters to show demand for a specific product under a specific customer.

    By Item Number & Lot Number – Provides the most targeted view by specifying both an item and a requested lot number.

    Key Uses
    Demand Planning – Spot future dates when stock may be insufficient to meet demand.

    Production Scheduling – Align manufacturing runs with projected inventory needs.

    Purchasing – Initiate replenishment before stock dips below required levels.

    Customer Service – Confirm availability for upcoming customer orders.

    What-If Analysis – Evaluate how large or unexpected orders will affect future stock.

    How It Helps
    Rather than showing inventory as a static number, the Order Demand screen transforms it into a rolling projection. This allows planners and managers to anticipate shortages, balance supply with demand, and avoid last-minute issues when fulfilling customer orders.

  • Order Demand
    Order Demand:
    A quick & easy tutorial on how to use the Order Demand screen.

    1. Begin by hovering over the Sales menu at the top of the screen, then select Order Demand from the dropdown list.


    2. This will open the Order Demand screen in a new view. From here, you can explore sales order demand using multiple filtering options depending on your needs:

    • General View – Displays all current sales order demand across customers and items.


    • By Customer – Filter demand data to show only orders associated with a specific customer.


    • By Item – Narrow the results by selecting a particular item code to view demand for that item only.


    • By Customer & Item – Combine filters to display demand for a specific item under a specific customer.


    • By Item Number & Lot Number – Drill down further by specifying both the item and associated requested lot number to view targeted demand.


    3. The Order Demand screen also provides forward-looking availability, allowing you to see when an item is expected to become available after a selected date.

Order Imaging

  • Key Information
    Key Information:
    Order Imaging allows users to capture and store outbound shipment photos directly within Inspired ERP. This feature helps document pallet condition, product integrity, and truck status at the point of shipping—providing visual proof that can reduce chargebacks and disputes. Images are linked directly to each customer order and can be uploaded using a computer.

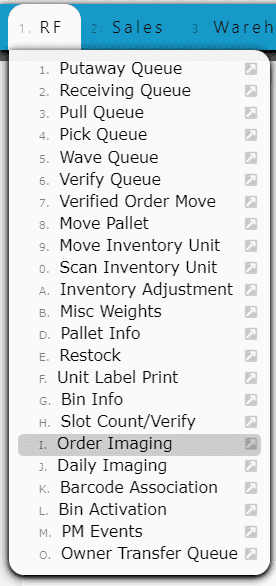
    • Navigate to RF → Order Imaging to begin the upload process.
     
    • You must scan or type in a valid Order # to associate your photos with the correct customer order.
     
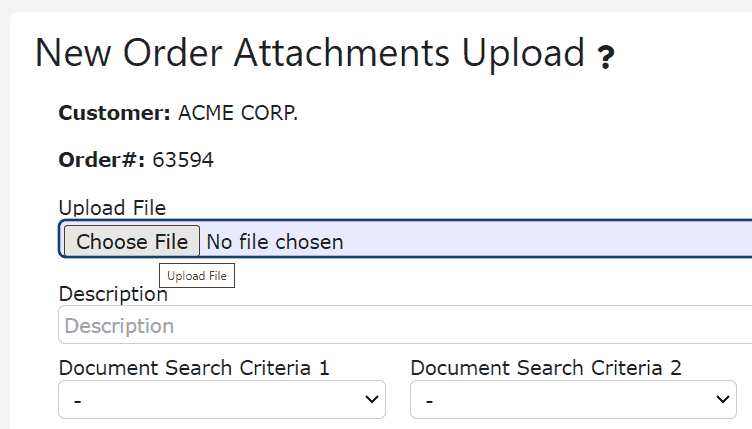
    • Use the New Image button to add each photo, then click Choose File to upload from your local device.
     
    • Uploaded images are permanently tied to the sales order and can be viewed at any time from within the system.
     
    • This process is typically performed at staging or shipping once outbound pallet loading is complete.
  • Attaching Images to Orders
    Documenting outbound shipments in Inspired ERP ensures a clear record of pallet condition, product integrity, and truck status before departure. Photos provide visual proof for reducing disputes, preventing chargebacks, and supporting claims resolution. You can capture images on a mobile, handheld RF device, or computer and attach them directly to the relevant sales order.

    1. Access the Order Imaging Menu
    From the RF Menu, select the Order Imaging option. This will open the interface for attaching images to sales orders.


    2. Identify the Order
    Use your RF scanner or manually enter the Order # in the provided field. This ensures all uploaded images are linked to the correct shipment record.


    3. Initiate a New Image Entry
    Select the New Image button to begin adding photos to the order.


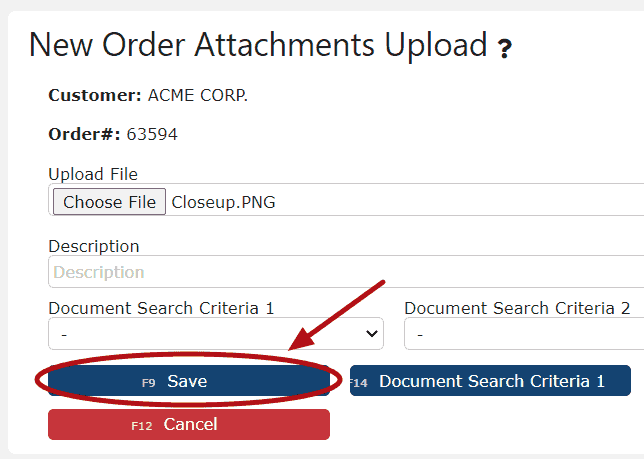
    4. Upload the Image File
    Click the Choose File button, browse to the location of your saved photo, and select it. Once the file is chosen, click Save to complete the upload process.


    5. Repeat as Needed
    Continue adding images until all relevant shipment angles and conditions have been documented.

    Tip: It’s best practice to capture multiple perspectives—including close-ups of pallet labels, overall pallet condition, and the interior of the truck—to create a complete visual record.

Recurring Orders

  • Key Information
    Key Information:
    Recurring orders allow you to automate the creation of repeat customer pick orders based on a fixed schedule. This functionality reduces manual work, supports consistent planning, and ensures that frequent customer orders are never missed. Orders can be scheduled to recur based on specific weekdays, days of the month, or even yearly patterns, with optional auto-release for invoicing.
     
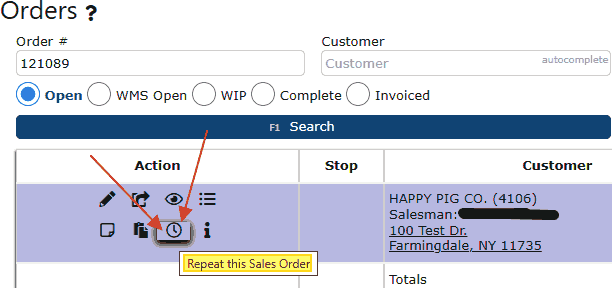
    • Recurring orders are created by clicking the clock icon under the Action column in the Sales → Orders screen.
     
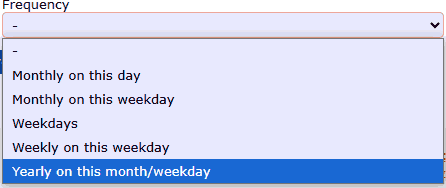
    • Available frequency options include:


    • Users can also set the start date, end date, and indicate whether the recurring order should be automatically released upon generation.
     
    • Once saved, new orders will be created automatically according to the selected frequency, reducing the need for manual entry.
     
    • Recurring schedules can be reviewed, updated, or canceled at any time by accessing the original setup.
  • Recurring Orders
    Recurring Pick Orders:
    A simple yet easy tutorial on how to have a specific sales order recur on certain weekdays, every month, etc.

    1. Navigate to Sales → Orders from the top menu.

    2. On the Orders page, enter the desired Order # into the search field at the top to locate the order you wish to make recurring.


    3. Once the order appears, look under the Action column for the clock icon. Hovering over it will display the tooltip “Repeat this Sales Order.” Click this icon to begin setting up the recurring schedule.


    4. You’ll be redirected to the New Recurring Order screen. From here, choose:
     
    • The start date for the recurring schedule
     
    • The frequency (daily, weekly, monthly, etc.)
     
    • The end date (or leave blank for no end)
     
    • Whether the invoice should be automatically released to the customer
     
    Once all selections are made, click the dark blue Save button to finalize the recurring setup.

Quick Order

  • Key Information
    Key Information:
    Quick Order (also known as Compact Mode) in Inspired ERP is designed for fast, streamlined entry of product sales, ideal for on-the-spot or walk-in transactions. It condenses the order creation process into a simplified, minimal layout—removing nonessential fields—so users can quickly enter customer information, select products, and complete the order. Unlike standard order entry, Quick Order is intended exclusively for either item sales or services.

    To access Quick Order, begin from the New Order screen (Order Header view) and click the Compact Mode button at the bottom of the screen. This will open the simplified Quick Order interface.

    • In the Quick Order header, only essential fields—Customer and Ship/Service Date—are displayed, reducing data entry time.

    • Once the required fields are entered, click Save to proceed to the Quick Order item entry screen.

    • The item entry screen is a clean, focused layout where you enter QuantityItem #, and Price Per.

    • Prices are automatically pulled from the Item Master or Customer Price settings, ensuring correct pricing without manual lookup.

    • Click Add/Update after each item to save it to the order. Repeat this process for all products being sold.

    • Quick Order is not designed for shipping in the traditional sense—it’s most effective for immediate, counter-style or retail-like transactions where product leaves the warehouse at the point of sale.
  • Quick Order Creation
    Quick Order Creation:
    A quick & simple guide on how to create a quick order.

    1. Access the Orders Menu
    From the main menu, navigate to Sales → Orders.


    2. Start a New Order
    Click the dark blue New Order button located near the top of the screen to begin creating a new Quick Order.


    3. Enable Compact Mode
    • You will first land on the New Order Header screen.
    • To switch to a simplified layout, scroll to the bottom and click the dark blue Compact Mode button.
    • The header will refresh, displaying only two fields: Customer and Ship Service Date.
    • Complete both fields, then click Save to move to the Order Lines page.


    4. Enter Order Lines
    • On the Order Lines page, you’ll see the compact version of the sales order entry screen.
    • Enter the Quantity and Item Code for each product. Adjust the Price if needed.
    • Click Add/Update to add the line to your order. Repeat for each additional item.

    Note: In Quick Order mode, only physical items can be added—services are not supported.


    5. Finalize the Order
    Once all lines are entered, release the order and continue with the standard fulfillment process.