Service Customer Orders

Overview

Order Creation and Release

  • Releasing a Service Only Customer Order
    Releasing a Service Only Customer Order:

    A quick and helpful guide showing how to release a service only customer order.

    1. Once your service-only customer order is fully created and ready for release, simply proceed with the process by clicking on the light blue Release button. Doing so will update the order status to Ready to Invoice, indicating it is prepared for billing.


    2. Be sure to confirm the release by clicking “OK” on the popup prompt that asks if you’re certain about releasing the entire sales order. This finalizes the release process.

Invoicing

  • Emailing Invoices to Contacts
    Emailing Invoices to Contacts:

    A streamlined guide for sending previously generated invoices to additional contacts associated with a sales order.

    1. Begin by hovering over the Sales menu and selecting the Orders option from the dropdown.


    2. Once you're on the Orders screen, you will see order status options under the Order # textbox at the top left of your screen. Clicked on the Invoiced option to view all recently invoiced orders.


    3. Once you're on this screen, further specify by typing in the order # in the order # textbox field & press Search.


    4. Once your invoiced sales order appears, locate the Action column and click on the email icon to begin the process of sending the invoice via email.


    5. This will open a new screen displaying the email composition layout. All associated contacts for the customer will automatically populate in the To field, separated by commas. You may add additional recipients in the CC field if needed. Scroll down slightly to confirm the invoice is attached at the bottom. Add any relevant message content to the email body, and when ready, click the dark blue Send button to deliver the email along with the invoice attachment.


Applying Payment

  • Key Information
    Key Information:
    Effectively managing AR cash receipts is a critical part of the receivables workflow in Inspired ERP. The AR Cash Receipts module provides users with a centralized view of incoming customer payments—whether applied via check, credit, ACH transfer, or other methods. This screen helps streamline cash application processes, offering detailed insights into payment status, amounts deposited, reference details, and user actions.

    Search & Filter Options: Easily locate cash receipt entries by Customer, Check #, Date Range, Reference #, Payment Type, or Bank. Use sorting and subtotals to view results by date, customer, or payment method.
     
    Receipt Types: The system tracks various receipt types including:
     
    Check – Manually received check payments.
     
    Apply Credit – Application of existing credit balances.
     
    Externally Processed ACH/Transfer/Wire – Electronic payment methods handled outside the system.
     
    Action Icons: Use the icons under the “Action” column to view detailed receipt information, reverse a transaction if needed (based on permissions), or analyze the distribution of payment to invoices.
     
    Receipt Status: Keep track of whether a receipt is “Posted” and successfully distributed, with full visibility into the associated AR period and total distributed amount.
     
    Audit Trail: Every entry shows the user responsible for processing the payment, providing accountability and transparency.
  • Applying a Cash Receipt
    Applying a Cash Receipt:
    A simple, step-by-step guide to applying a cash receipt to a sales order.

    1. Start by navigating to the Accounting menu. From there, go to Accounts Receivable, and select AR Cash Receipts.


    2. You’ll be taken to the AR Cash Receipts screen. To initiate a new cash receipt entry, click the Add New button located at the top of the page.


    3. This will take you to the New Cash Receipt screen. Enter the total payment amount, payment date, payment method, and the customer associated with the receipt. Once all required fields are completed, click the dark blue "Distribute $" button to proceed.


    4. You will now be directed to the Distribution of Payment screen. If a customer was entered earlier, a list of that customer's outstanding invoices will be displayed. On the left-hand side, under the Action column, you’ll notice two icons next to each unpaid invoice.

    • Clicking the money sign icon will automatically allocate the full payment amount to the selected invoice.


    • Clicking the plus icon allows you to manually enter a specific payment amount, enabling partial payments or distribution of funds across multiple invoices.

    5. Once you’ve finished allocating the payment—whether to a single invoice or across multiple customers—click the dark purple "Back to Header" button located at the top of the screen to return to the main receipt summary.


    6. You’ll now be returned to the main New Cash Receipt screen. With the payment distribution completed, click the light blue "Close Payment" button near the top of the page to finalize the receipt.


    7. You’ll be redirected back to the AR Cash Receipts screen, where you’ll see the status updated to Ready to Post. To complete the process, click the orange "Post" button located at the top right. A confirmation prompt will appear—select OK to officially post the cash receipt.


    8. Once posted, a confirmation message will appear at the top of the screen indicating that the batch has been successfully submitted. To verify the posting, navigate to the Show dropdown menu on the right side of the screen, select Posted, and locate the most recent entry. Your newly posted cash receipt should appear at the top of the list, displaying the associated amount and customer details.

Customer Order Documents

  • Proforma
    Proforma:
    Proforma invoices are preliminary billing documents that summarize goods or services before an official invoice is generated. In the Inspired ERP system, proformas serve as a useful tool for providing customers with a detailed preview of charges associated with a customer order before the order is finalized or invoiced.

    • Proformas do not affect accounting or inventory; they are strictly non-posting documents meant for customer review and internal approval purposes.
     
    • These documents can be generated from the Sales → Orders screen once an order has been created, picked, and verified.
     
    • Proformas display all line items, quantities, pricing, and totals, and are formatted similarly to final invoices—making them ideal for quote approvals or purchase confirmations.
     
    • To print or email a proforma, simply open the order and click on the Proforma button located near the bottom of the order screen.
     
    • If any changes are made to the order, a new proforma should be generated to reflect the updated pricing or services.
     
    Using proformas within Inspired ensures transparency, avoids miscommunication with customers, and supports smoother order approvals—especially for service-only orders.
     
  • Invoices
    Invoices:
    Invoices are finalized billing documents generated within the Inspired ERP system to officially record revenue and initiate customer payment collection. They serve as permanent financial records—once an invoice is created, the sales order tied to it becomes locked and cannot be modified.


    • For service-only customer orders, invoices are created immediately after the order is released, since no physical goods are being shipped or manifested.
     
    • For orders containing inventory items, the order must first be manifested before it enters a Ready to Invoice status. Only then can an invoice be generated.
     
    • Invoices reflect a complete breakdown of services or items sold, including quantities, rates, and taxes.
     
    • Once an invoice is created, it is final and cannot be undone or changed in Inspired. It’s critical to confirm the sales order is correct before proceeding with invoicing.

    • If the customer is configured for automated invoicing emails, the system will send the invoice automatically upon creation.

    • Invoices can be emailed directly from the Order Entry screen by clicking the email icon under the Action column. This sends the invoice to the customer contacts associated with the order.
  • Statements
    Statements:
    Statements provide a clear snapshot of each customer’s account status, including all open invoices, credits, and outstanding balances. They are essential for managing accounts receivable, helping both internal teams and customers stay on top of unpaid invoices, due dates, and aging balances. Statements can be printed or emailed directly from the system and are a key tool used during collection efforts and monthly reconciliation processes.
     
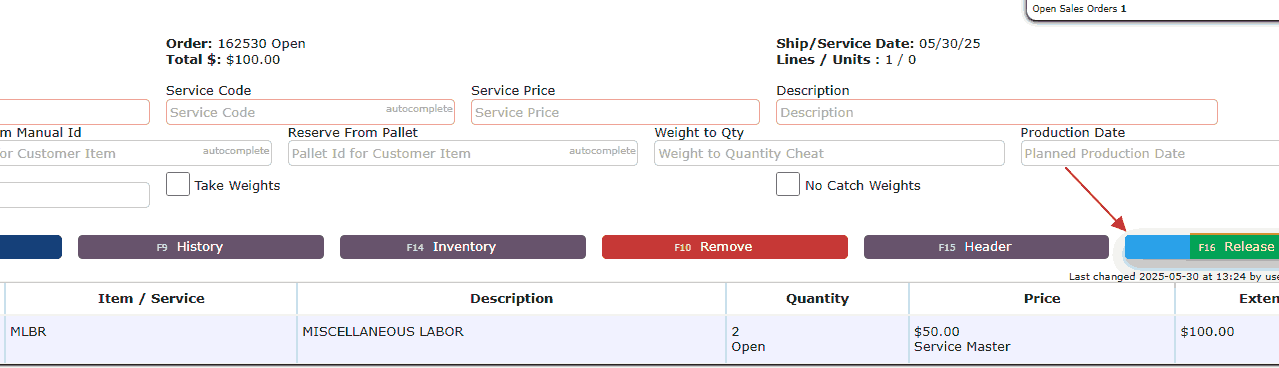
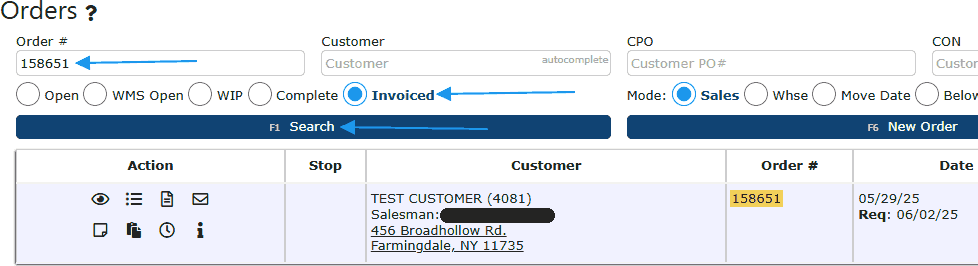
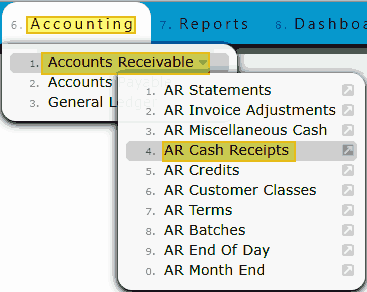
    • Statements can be accessed from Accounting → Accounts Receivable → AR Statements.
     
    • Each line displays a summary of customer account activity, including Open Invoices, Open Credits, and totals broken down by aging buckets.
     
    • Expanding a row reveals individual invoice and credit memo details such as Type, Date, Due Date, Total, Paid, Status, and Days Past Due.
     
    • The Status column shows whether an invoice is open and may include warnings like "(1 Day)" or "(Due in 9 Days)" based on aging.
     
    • Credit memos are displayed with negative values and reduce the total balance due for the customer.
     
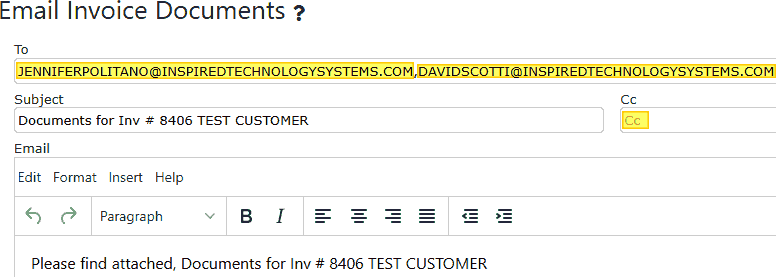
    • The Action column includes icons to view, print, or email a customer’s latest statement.
     
    • Statements allow your AR team to identify overdue payments, apply credits, and communicate effectively with customers about their outstanding balances.
     
    • You can generate formal PDF statements from this screen for emailing or printing purposes.
  • Attachments
    Attachments:
    Attachments are used throughout the Inspired system to store important supporting documents—such as contracts, scanned forms, invoices, photos, maintenance reports, or any relevant external files—within a specific record. This allows users to centralize key documentation for quick access, improved recordkeeping, and audit readiness. The folded-paper icon typically represents where you can upload or view attachments.


    Sales Module – Where Attachments Can Be Added:
    • Sales → Orders
    Attach documents to a sales order by clicking the folded paper icon under the Action column.

    Sales → Customers
    Use the arrow under the Action column, then click the Attachments icon to upload customer-specific files.

    Sales → Leads & Prospects
    Similar to customers, click the Action arrow and then the Attachments icon to store files related to potential clients.

    Warehouse Module – Where Attachments Can Be Added:
    Warehouse → Item Master
    Access the Attachments icon via the Action arrow to upload documents like spec sheets or vendor certifications for specific items.

    Assets Module – Where Attachments Can Be Added:
    Assets → Assets
    Attach files directly to assets such as manuals, warranty info, or repair documents using the folded paper icon.

    Assets → PM Schedules
    Click the Attachments icon to include documents related to preventive maintenance plans.

    Assets → Maintenance Events
    Upload service reports, technician notes, or other event-related files to a specific maintenance entry using the paper icon.

    Purchasing Module – Where Attachments Can Be Added:
    Purchasing → Vendors
    Open the Action dropdown, then click the Attachments icon to store vendor agreements or tax forms.

    Purchasing → Purchase Orders
    Use the paper icon under the Action column to add files such as supplier confirmations or packing lists to each PO.

    Accounting Module – Where Attachments Can Be Added:
    Accounting → Accounts Payable → AP Invoices
    Add supporting invoice documentation by clicking the Attachments icon under the Action column.

    Reports Module – Where Attachments Can Be Added:
    Reports → Accounts Receivable → AR Invoice Register
    Use the paper icon to attach backup documents to individual invoice records.

    Reports → Accounts Receivable → AR Credit Register
    Upload files supporting credit memos directly to the credit record.

    Reports → Accounts Receivable → AR Overpayment Register
    Store documentation related to overpayments by using the Attachments icon.

    Reports → Accounts Receivable → A/R Invoices/Credits/Over Payments
    Centralized access point to manage attachments across invoices, credits, and overpayment transactions.