Customers

Overview

  • Customers, Contacts and CRM
    The Customer, Contacts & CRM allows you to create, maintain, and track customer, lead, and prospect information across the system. This ensures that your business has a centralized view of all customer activity, supporting better account management, order control, and compliance tracking.

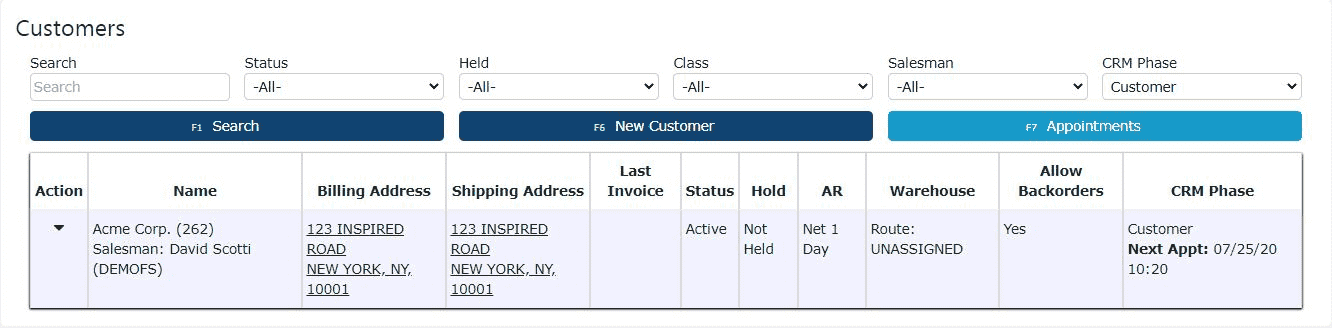
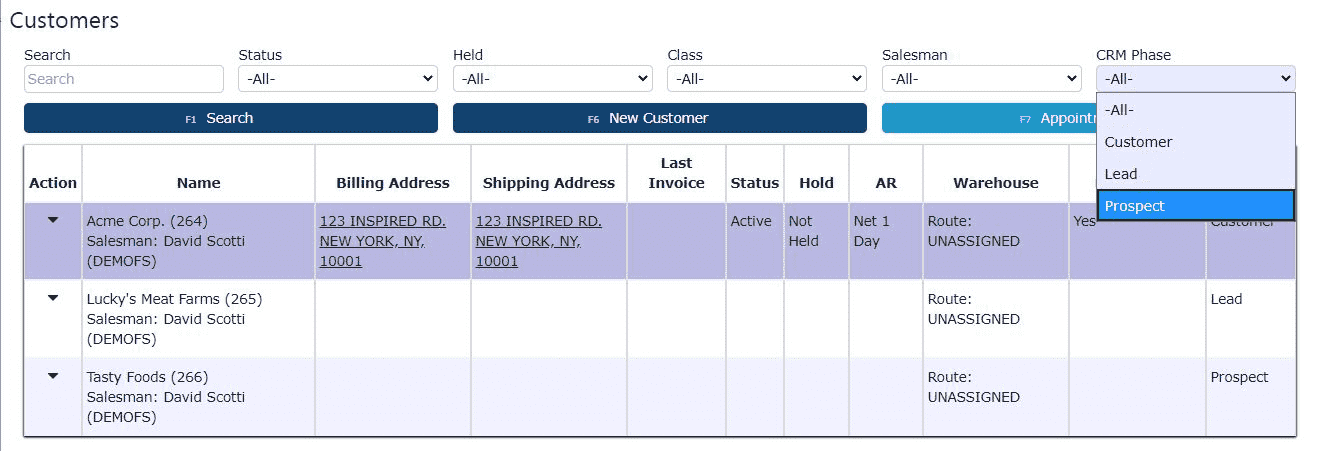
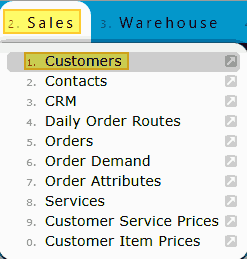
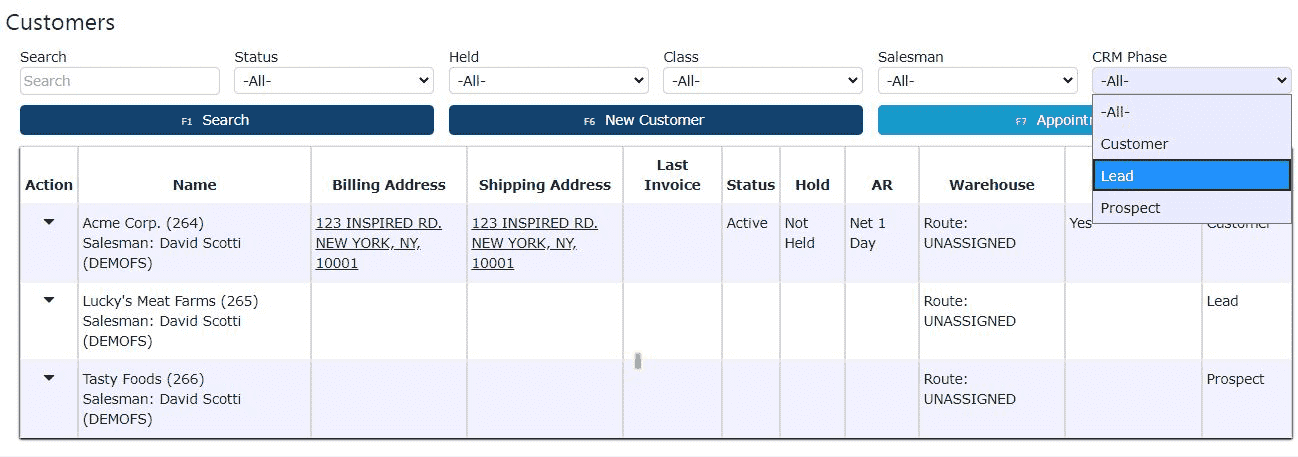
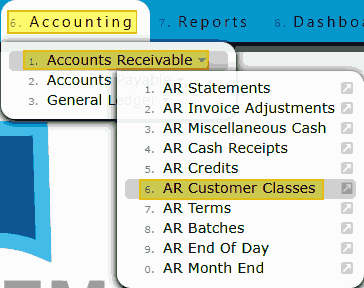
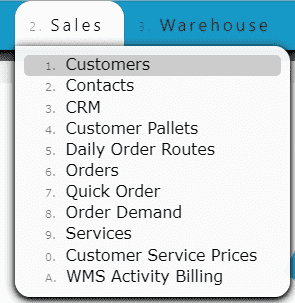
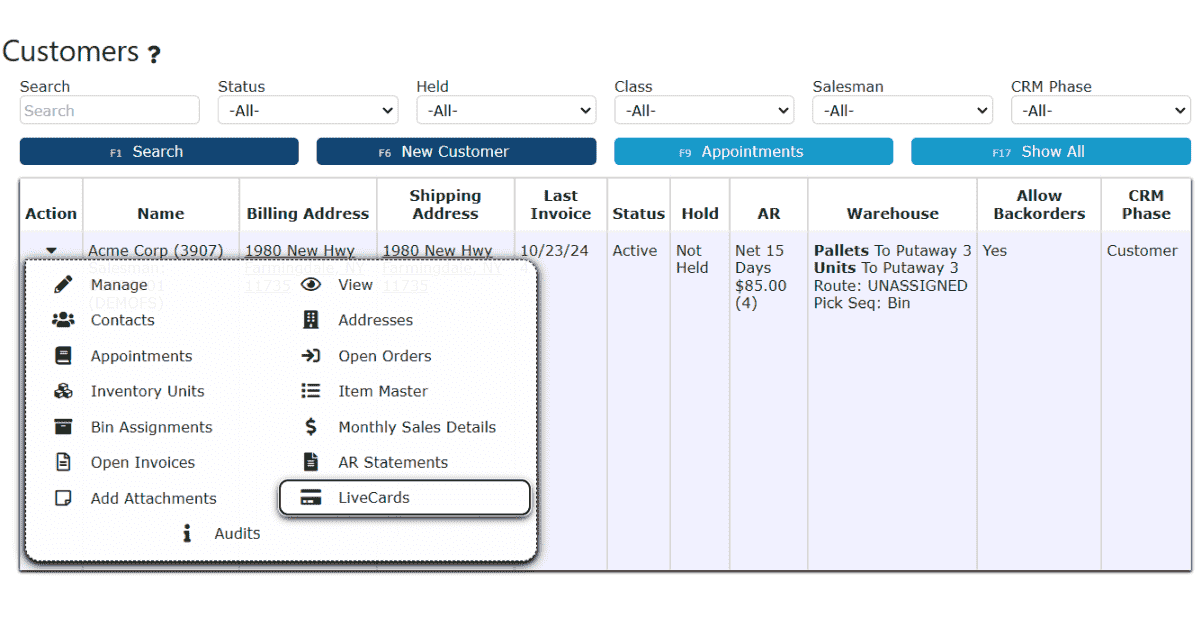
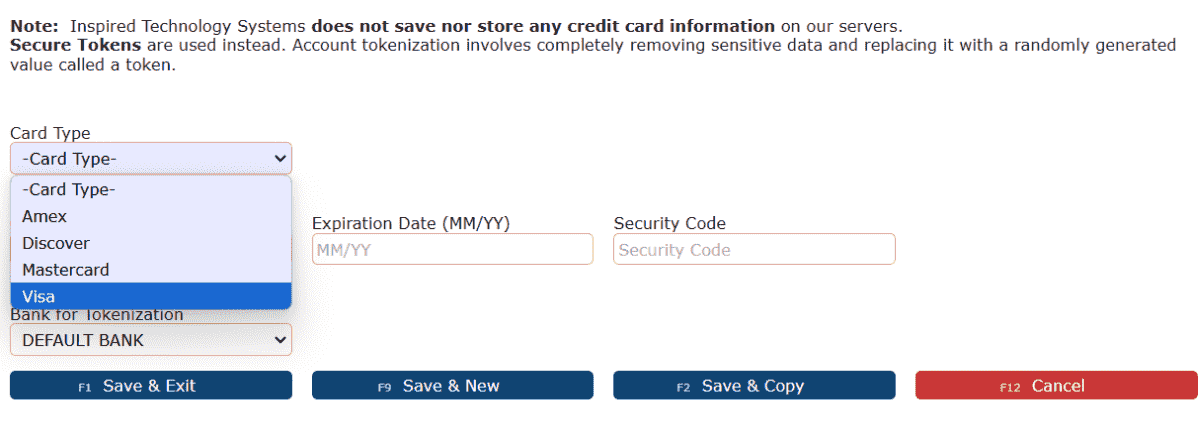
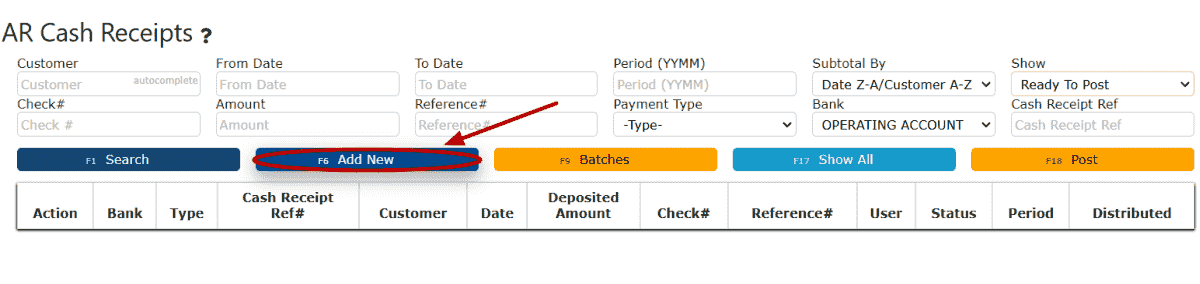
    Customer Information
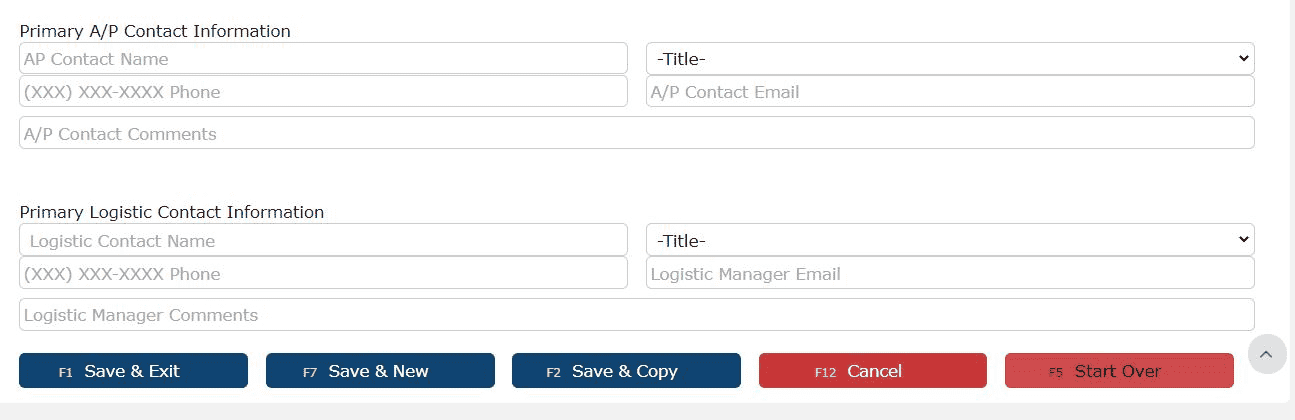
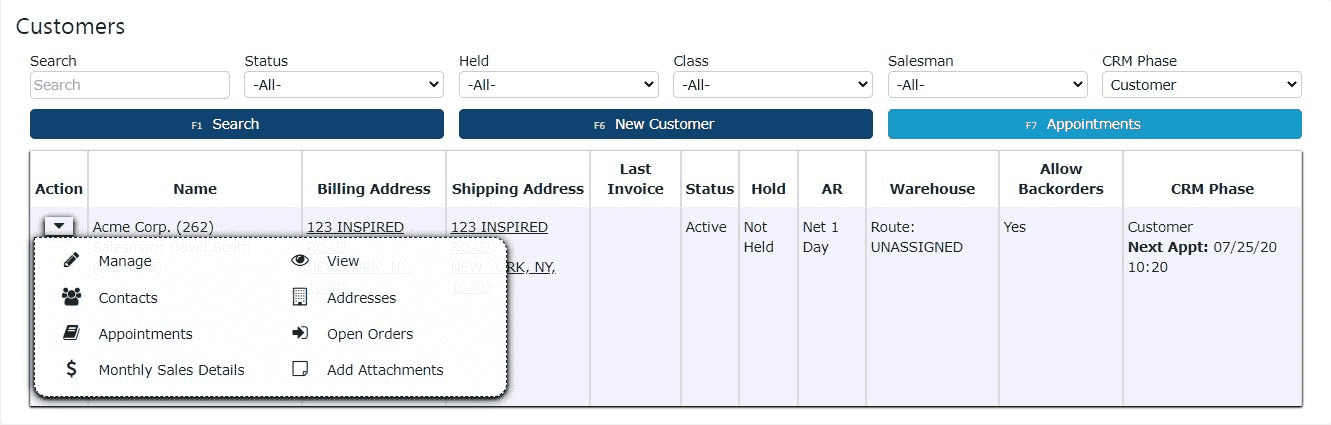
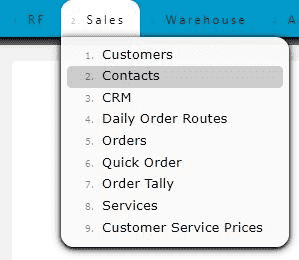
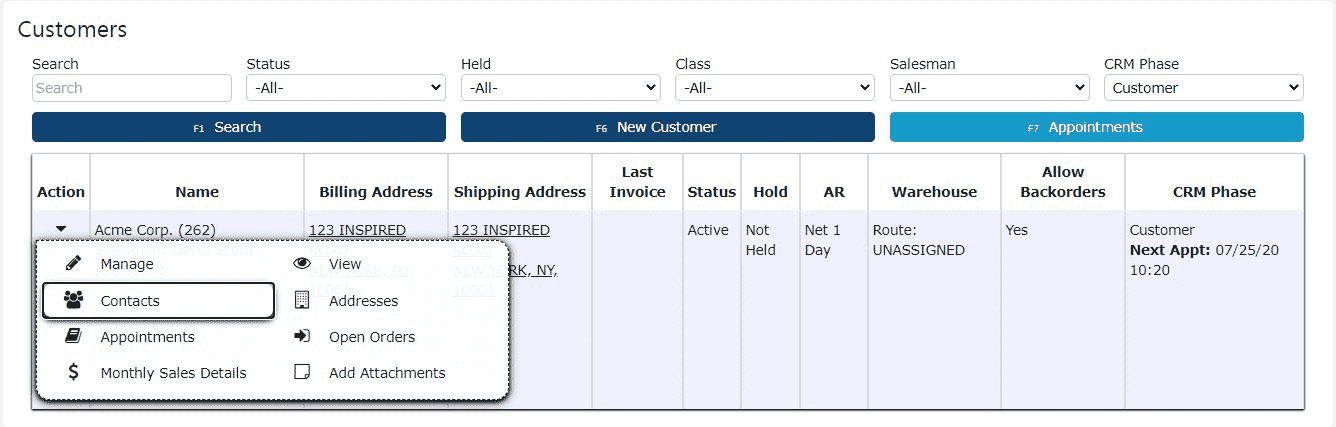
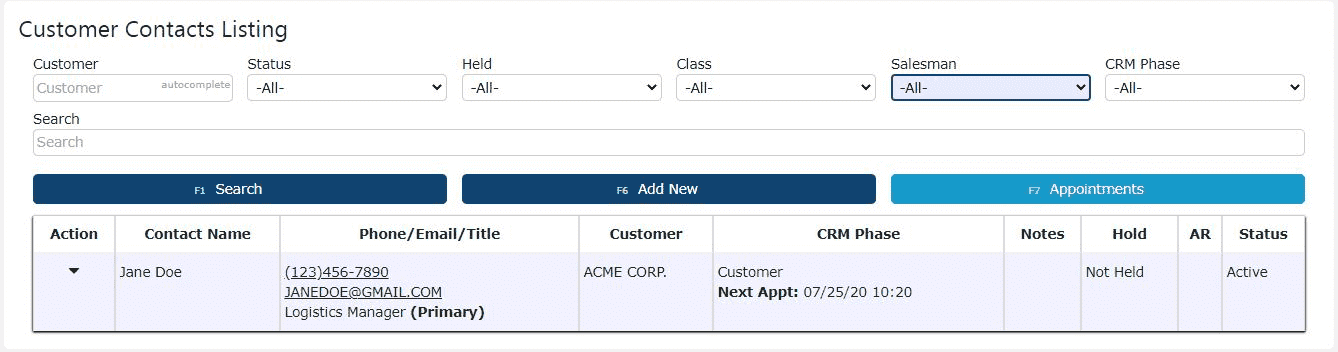
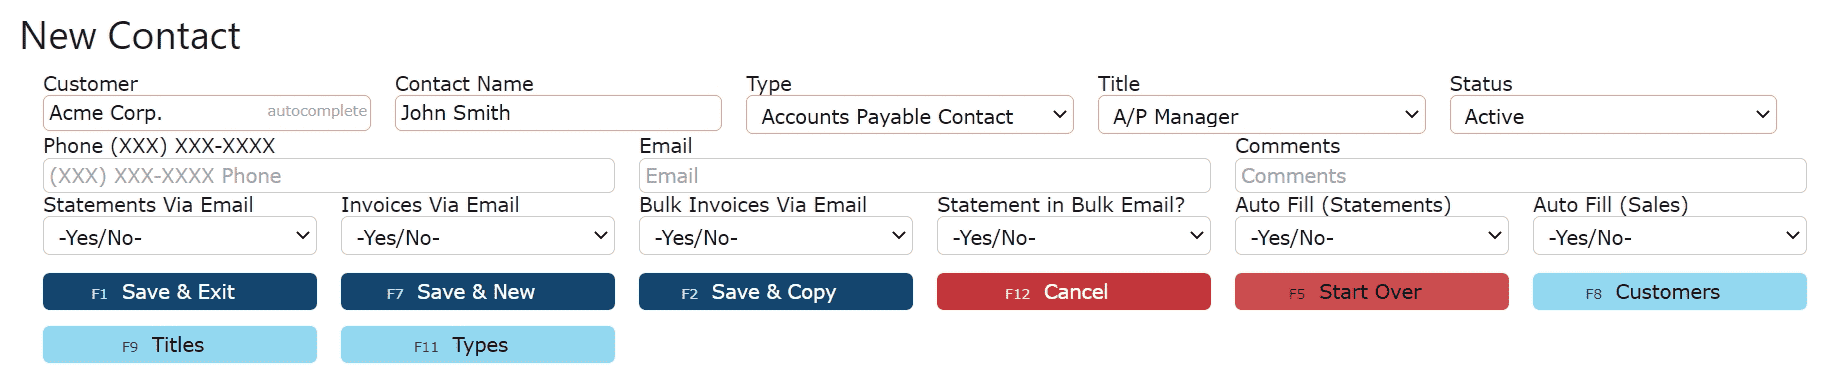
    Contacts – Maintain contact records of any type, including standard AP and Logistics contacts.
     
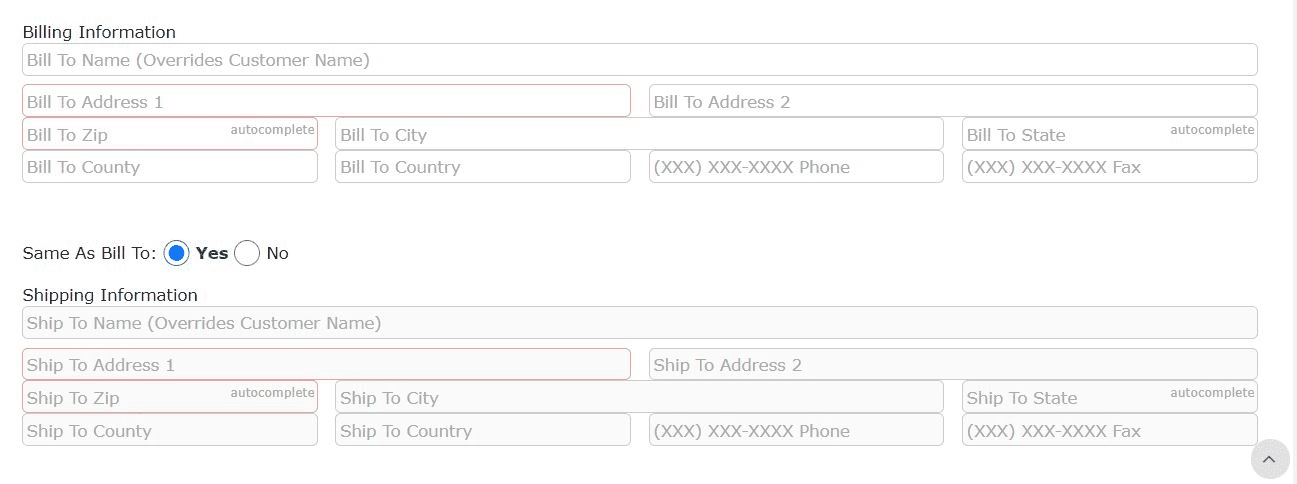
    Addresses – Support for billing and shipping addresses, including support from other countries such as France, Australia, Canada, Netherlands, and New Zealand. If requested, I.T. will add in more countries.
     
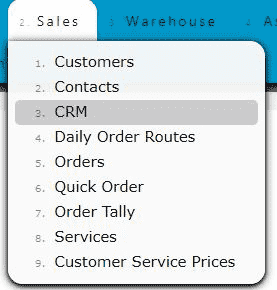
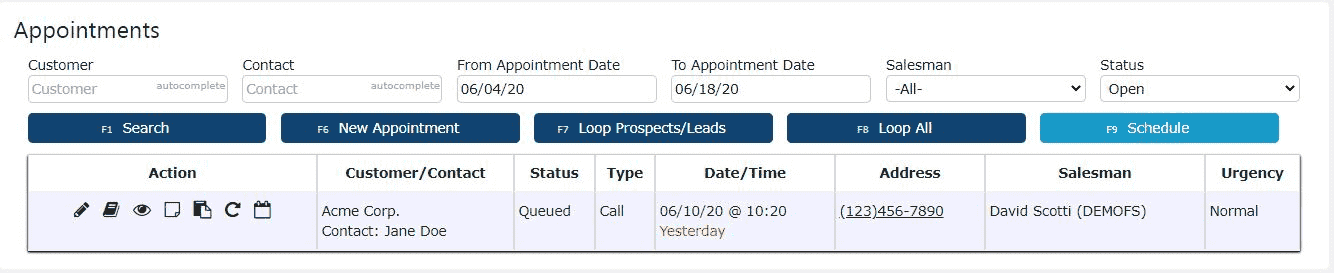
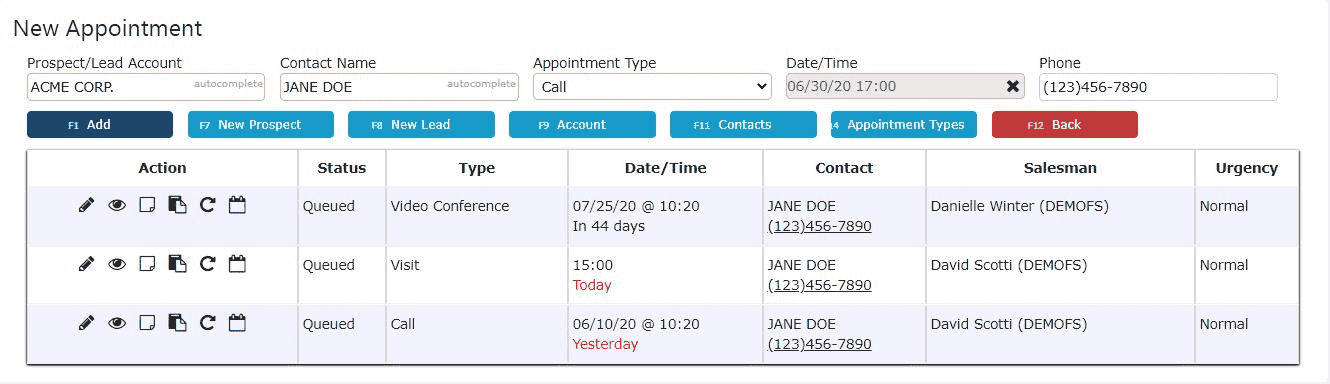
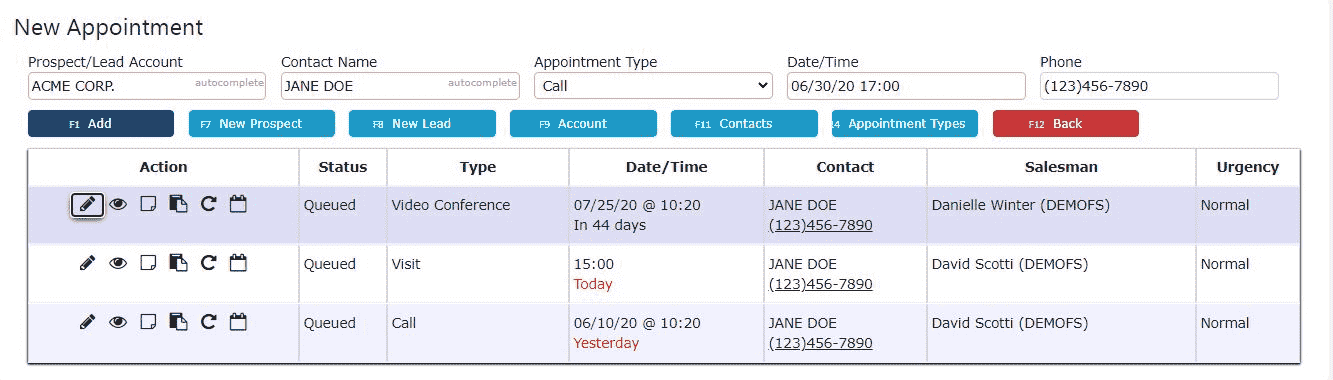
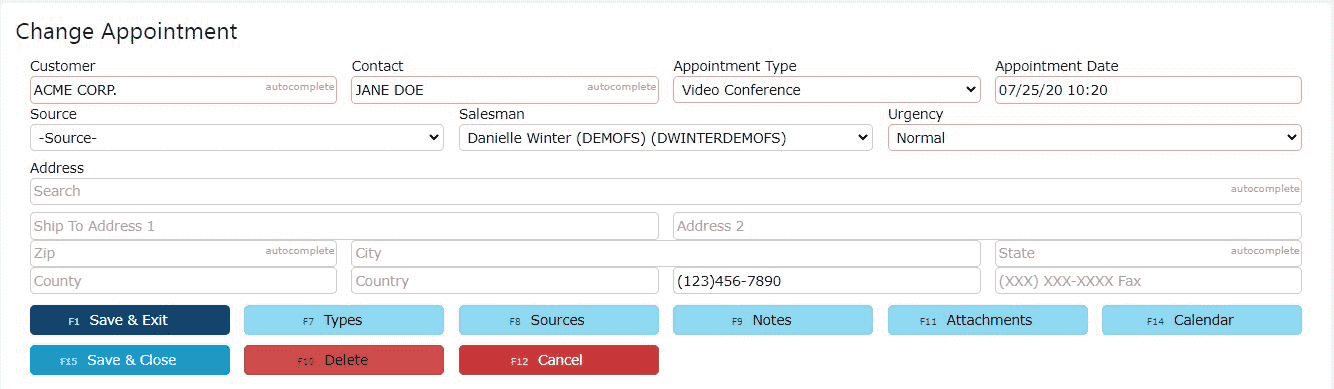
    Appointments (CRM) – Schedule and track customer meetings and activities directly within the CRM.
     
    Attachments – Store customer-specific attachments with inline image previews via thumbnail display.
     
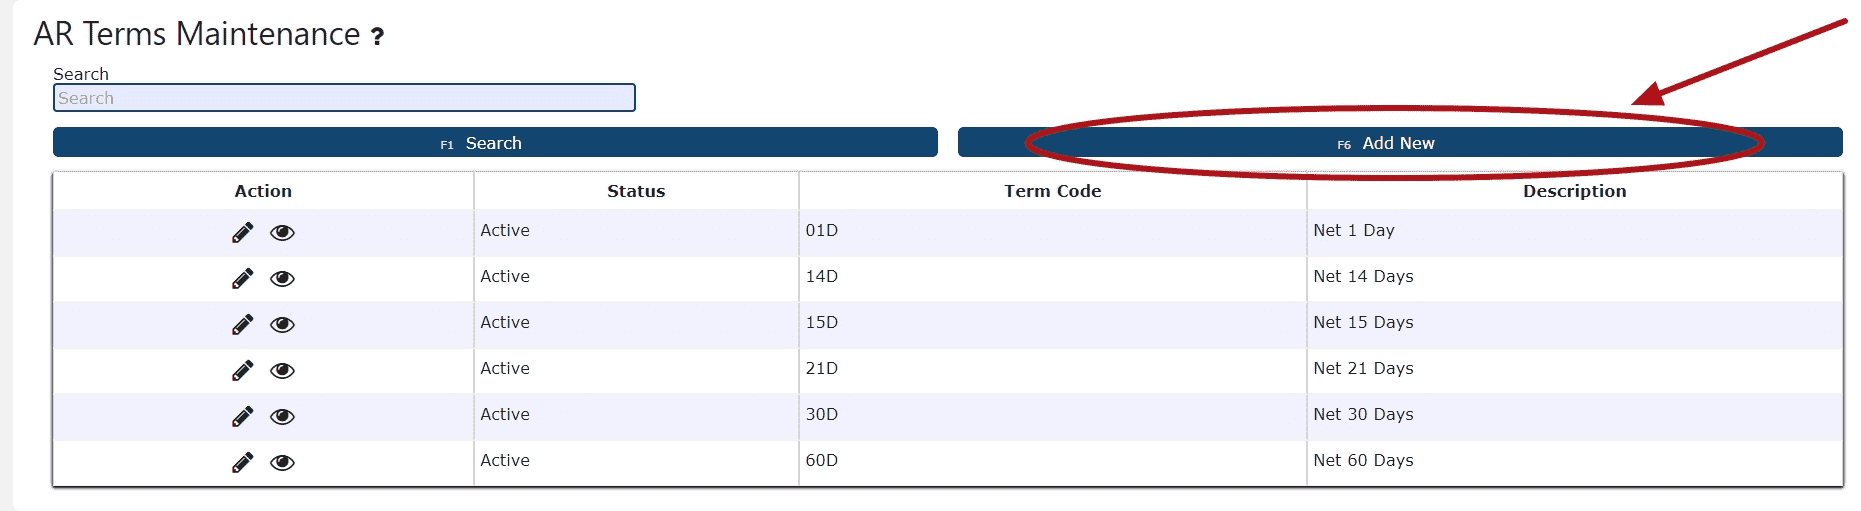
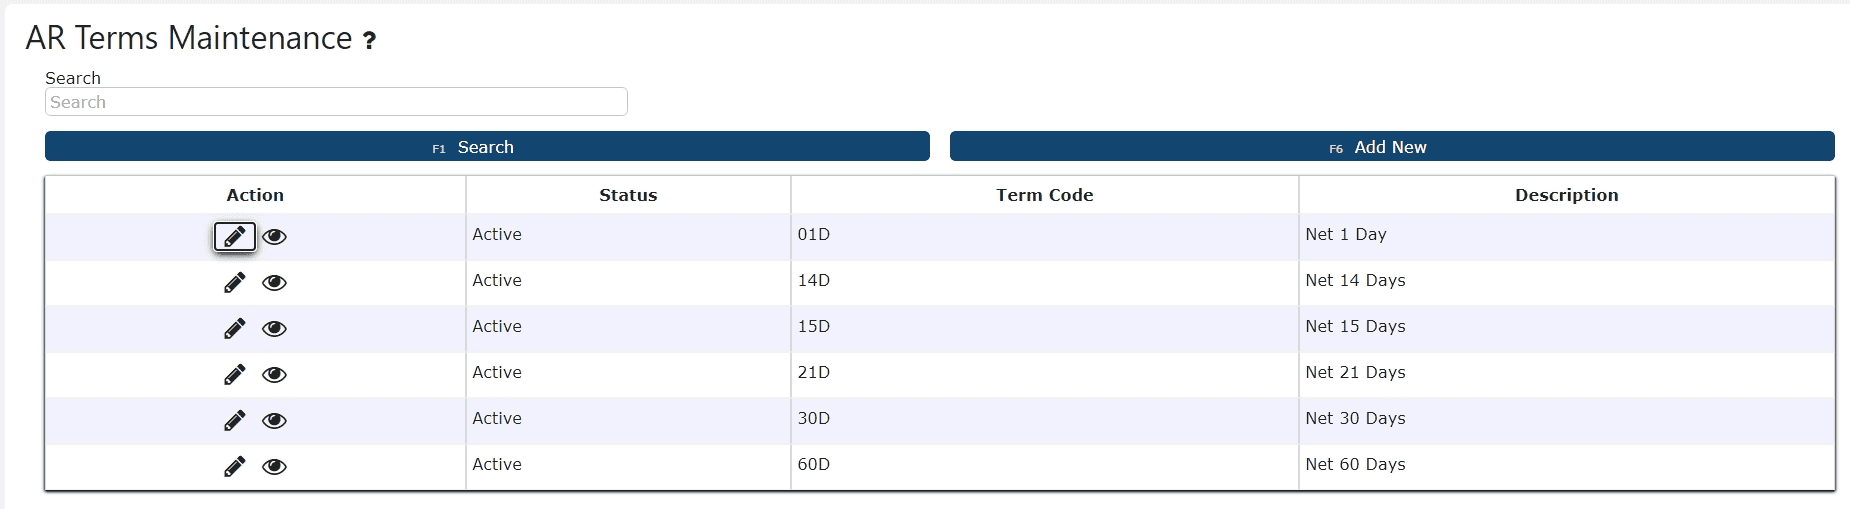
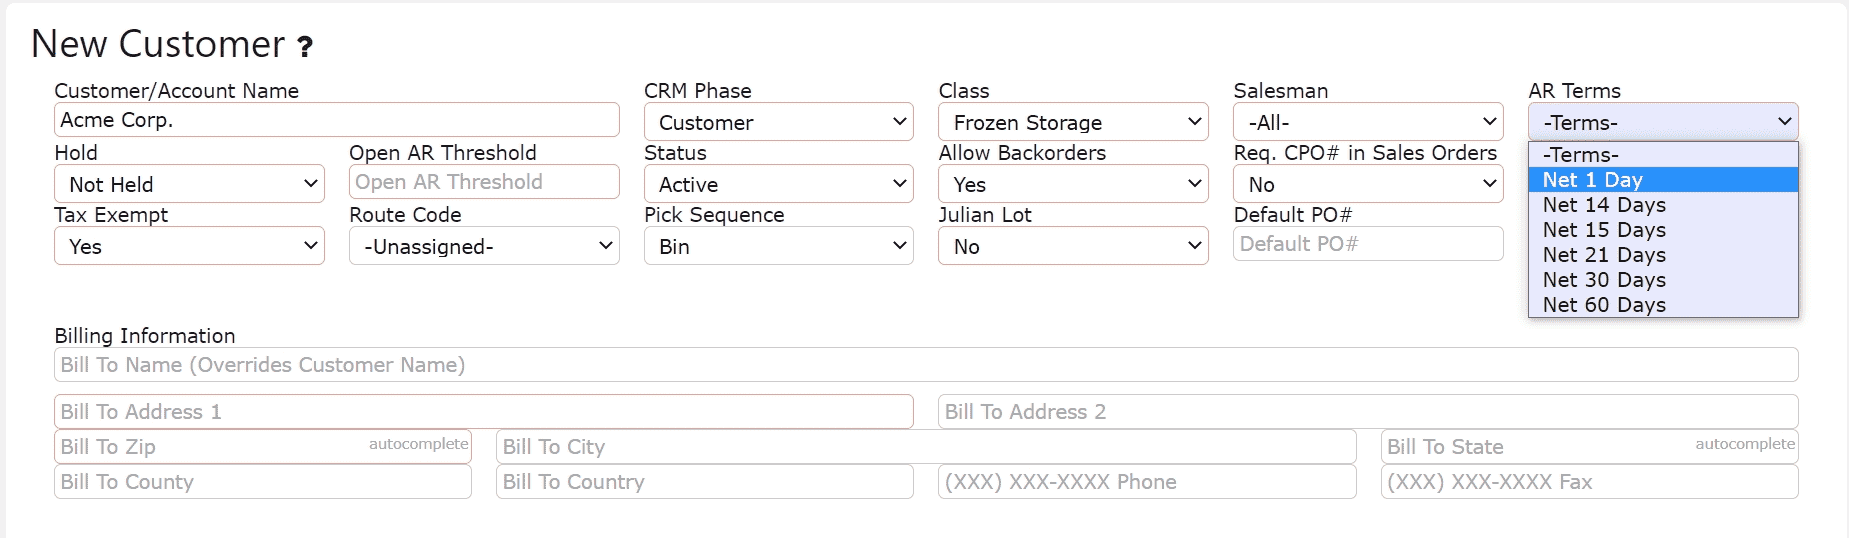
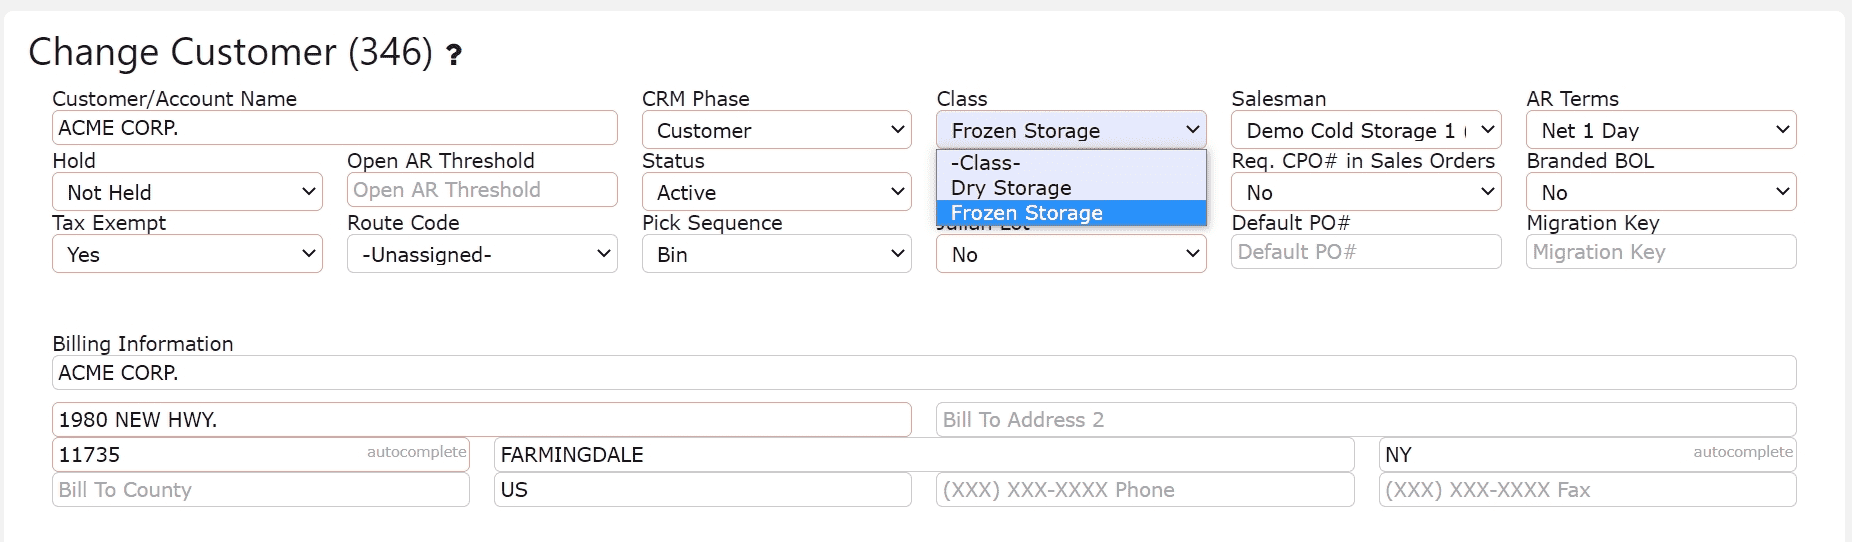
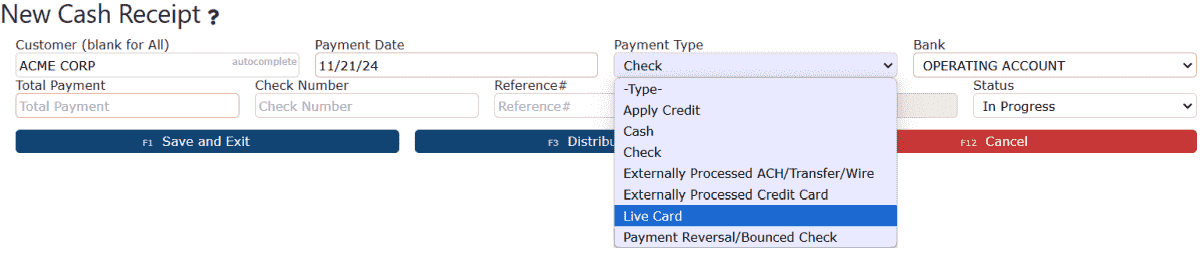
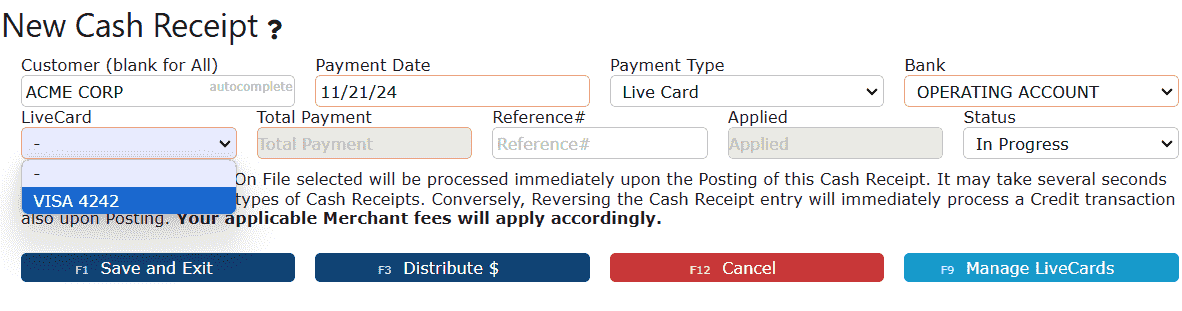
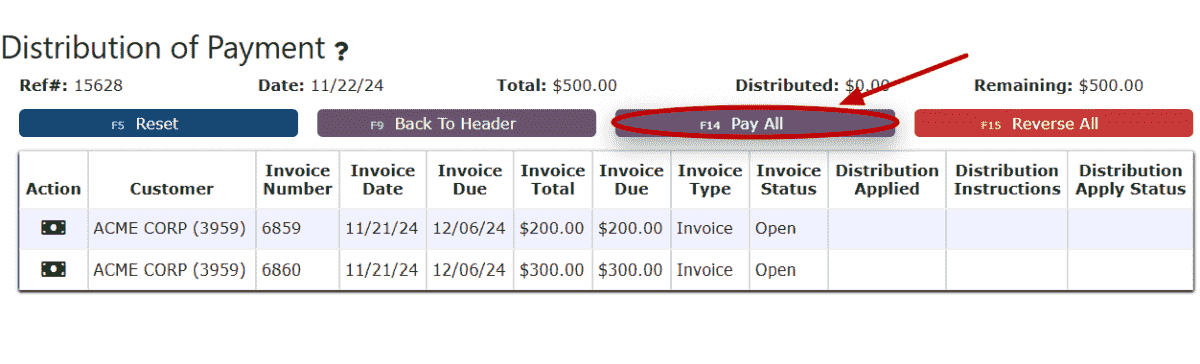
    Preferences – Assign key attributes such as customer class, assigned salesman, AR terms, hold status, and route codes.
     
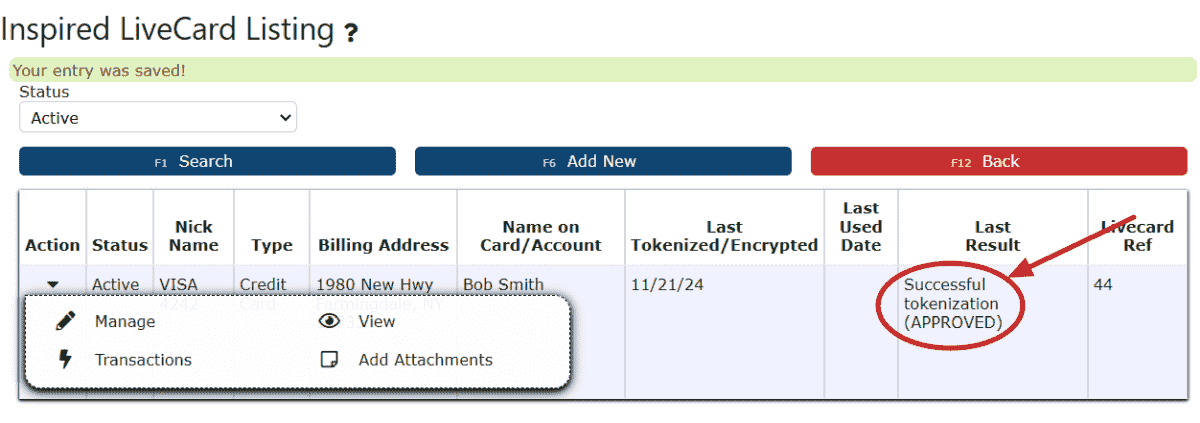
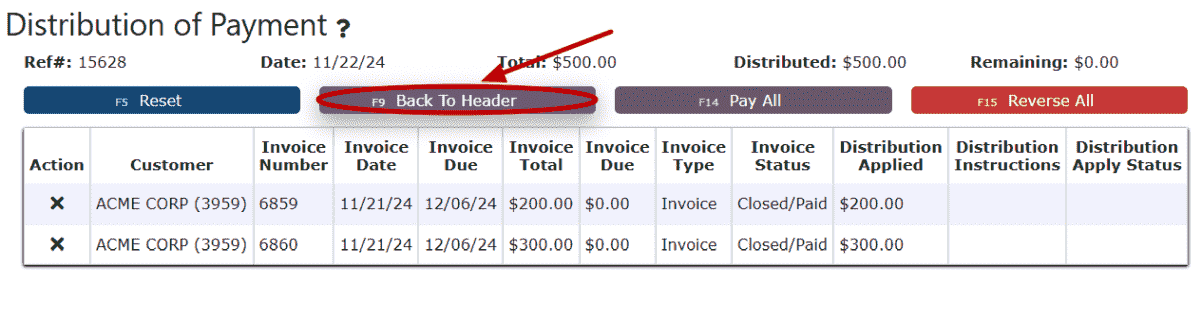
    Held Customers – Prevent all order entry activity if a customer is on hold, with enforcement extended to picking, verification, manifesting, and document creation (e.g., proformas). The same rules apply if the customer record is disabled. The only action a held customer can perform is creating a sales order.
     
    AR Threshold – This is automatically turned on by the system if the customer goes over their set AR threshold.
     
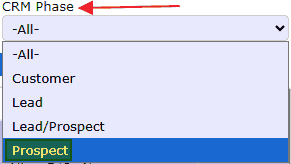
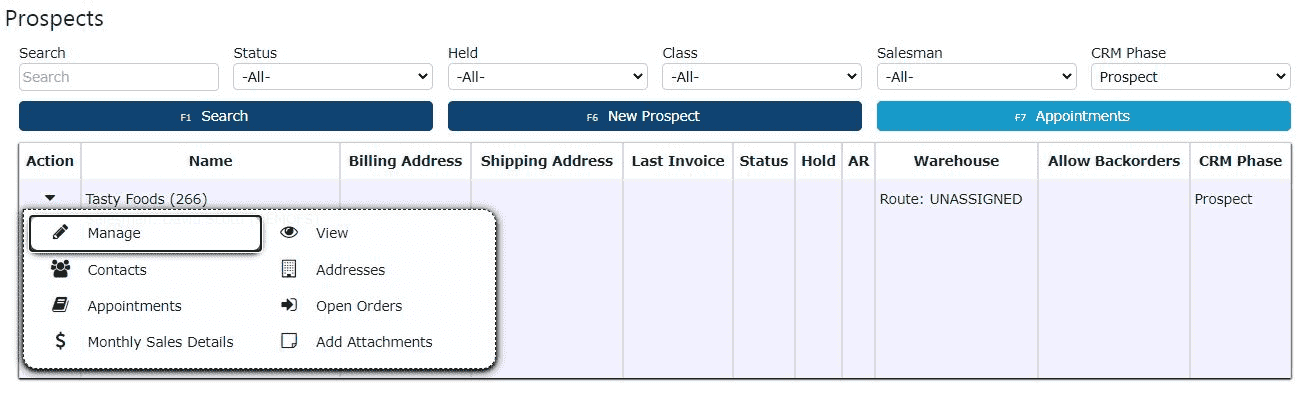
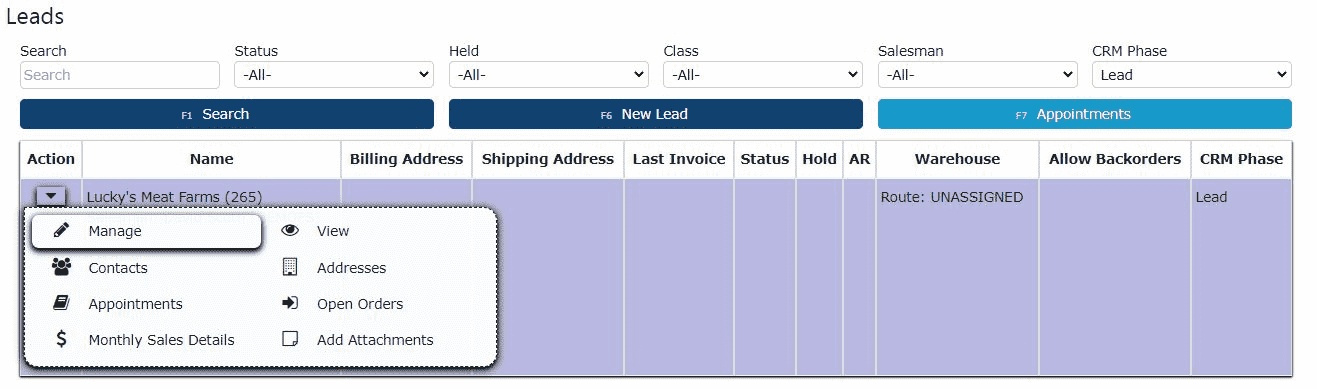
    Lead & Prospect Information
    Contacts – Capture prospect and lead contact information, including AP and Logistics contacts as standard.
     
    Addresses – Maintain billing and shipping addresses, including support from other countries such as France, Australia, Canada, Netherlands, and New Zealand. If requested, I.T. will add in more countries.
     
    Appointments (CRM) – Track prospect and lead appointments in the CRM for visibility across the sales cycle.
     
    Attachments – Upload and manage attachments specific to prospects and leads, now with thumbnail previews.
     
    Preferences – Assign prospect/lead class and salesman information for improved tracking and reporting.

Customers

  • Key Information
    Inventory Preferences:

    Pick Sequence:Choose between Bin or Item to dictate how the system will organize the order of things to be picked.  Choosing bin will guide the picker to pick by bin proximity as to optimize the speed in which picks are completed.  By Item guides the picker to pick one sku to completion before the next sku on the same order is picked.  

    Julian Lot: This “Lot” number represents a date of expiration for inventory.  The expiration is automatically set to be one year after the date from the lot number and is assigned to the Customer Lot number when creating a putaway.  Customers setup to utilize Julian Lots will have their inventory automatically indicate Julian Lot date's as their sell by dates.  
     
    Format: (YYDDD)   
     
    Example:
    Customer Lot Number/Julian Lot #: 21364
    21: Year 2021
    364: Day of the year(12/30)
     
    Therefore, the Sell by date for that inventory will be 12/30/21
     
    **Expiration Date only computed if Julian Date = Yes
     
    Document Preferences:
     
    Brand BOL:If set to yes, this customer will see their own logo on BOLs generated for them.  (Contact I.T. to enable this feature)  
     
    AR:
     
    Open AR Threshold:
    • The Open AR Threshold allows you to set a dollar limit on the amount of outstanding Accounts Receivable (AR) a customer can carry before being automatically placed on Open AR Hold.

    • When a value is entered in the Open AR Threshold field under Customer Maintenance, the system continuously compares that threshold against the customer’s actual outstanding AR balance.

    • If the balance exceeds the threshold, the system will automatically change the customer’s status to Open AR Hold, preventing further order processing until the balance is reduced to below the threshold.

    • Once the customer’s AR balance falls back below the threshold, the system will automatically release them from hold and return their status to Not Held.

    • This feature ensures credit risk is managed consistently without requiring manual monitoring or intervention.

    Held Customers:
    • Customers placed on Hold are restricted from all order entry activity. This restriction is enforced across picking, verification, manifesting, and the creation of documents such as proformas.

    • If a customer is fully disabled, the restrictions are stricter: no orders can be created or processed, including sales orders.

    • Rules for saving the AR Threshold value in Customer Maintenance are enforced to ensure accurate and consistent credit control settings.

    AR Statements:
    • AR Statements provide customers with a summary of their outstanding invoices and overall account activity for a specific period.

    • Statements can include open invoices, payments received, credits applied, and past due amounts, giving customers a clear snapshot of what they owe.

    • In Inspired ERP, AR Statements are typically generated on a scheduled basis (e.g., monthly) and can be sent directly to customers to help streamline collections and improve payment visibility.

    • By using AR Statements, companies reinforce communication with customers and encourage timely payments.

    AR Aging:
    • AR Aging reports break down outstanding customer invoices by how long they have been unpaid, typically segmented into time buckets such as current, 1-7 days, 8-14 days, 15-30 days, 31-60 days, & 61+ days.

    • This tool helps companies quickly identify overdue balances and prioritize collection efforts.

    • In Inspired ERP, AR Aging can be viewed by customer or across all customers, providing insight into potential credit risks and helping guide collection strategies.

    • The Aging report also works hand-in-hand with Open AR Thresholds, since it highlights accounts trending toward delinquency that may soon trigger an automatic AR Hold.

    Sales:

    Require CPO# in Sales Order:Mandate whether or not your customer's purchase order # maintained in their system should be displayed on your customer order 
     
    Go-Live/Migrations:
     
    Migration Key:To be populated with any relevant key information from a migrated source.  This information is only relevant/required for pre-existing customers migrated into the software and is not required for future customers. 
  • Creating a Customer
    1. Go to the Sales Menu and click on the Customers Sub-Menu. 


    2. Click on the New Customer button to add a customer


    3. Fill in the customer's basic information and preferences (Customer must be chosen for CRM Phase) 


    4. Fill in the customer's billing and shipping information    
     

    5. Fill in the customer's primary contact information for their AP department and Logistics department 


    6. Save the customer by clicking on one of the Save buttons

     
  • Editing a Customer
    1. Click on the Carrot icon next to an account to view all management options 


    2. Click on the Manage icon (Pencil) to edit an existing account


    3. Click on one of the Save buttons to save the changes 

Prospects

  • Key Information
    Key Information:

    • Created by selecting the “Prospect” phase within the customer entry screen.

    • Required fields include customer/account name, class (e.g., wholesaler), and assigned salesman.

    • Each prospect can have associated contact records, including titles, email preferences, and communication types.

    • Users can log appointments and upload documents directly into the profile.

    • Prospects remain in the system until they are converted to a “Customer” by updating the CRM Phase, preserving all historical data for continuity.

    What is a Prospect?

    A prospect is a potential customer who has moved beyond the lead stage by meeting initial qualification criteria and demonstrating genuine interest in your products or services. While not yet converted into an active customer, a prospect is considered a realistic business opportunity and is actively engaged by the sales or marketing team.

    Key Characteristics of a Prospect:

    • Has been entered into the system and assigned the “Prospect” CRM Phase.
     
    • Represents a qualified lead that meets internal targeting criteria such as budget, company size, or location.
     
    • Has shown intent to purchase or learn more through inquiries, meetings, or responses to outreach.
     
    • May be involved in early sales funnel stages like product demos, discovery calls, or proposal evaluations.

    • Maintains contact history, documents, and appointment logs within the system to support a smooth transition to customer status.
     
    • Can be converted to a full customer profile once the relationship advances, with all data and activity preserved.
  • Creating a Prospect
    A quick & extremely simple tutorial showing how to create a prospect.

    1. Go to the Sales Menu and click on the Customers Sub-Menu
    From the main left-hand navigation panel, select the Sales menu. Then click into the Customers sub-menu. This will take you to the full customer management screen, where you can view and manage all Leads, Prospects, and Active Customers.


    2. Select Prospect from the CRM Phase dropdown
    Once on the Customers screen, locate the CRM Phase dropdown menu near the top of the page. Use this dropdown to filter your view by selecting Prospect. This ensures you're in the correct phase before creating the new record.
        

    3. Click on the New Prospect button
    After filtering for Prospects, click on the New Prospect button near the upper part of the screen. This opens the New Prospect form, specifically for entering Prospect details.
      

    4. Fill in the Prospect's name, choose a class and a salesman (required)
    On the New Prospect screen, fill in all required fields. Enter the Prospect's name in the customer name field, then choose a valid Class and assign a Salesman from the dropdowns provided. These three fields are mandatory in order to proceed.
      
    5. Click on one of the Save buttons to save
    Once all necessary information is filled in, you can choose from two options to save the record:
    • Click Save & Exit to save the Prospect and return to the main Customers screen.
    • Or, click Save & New to save the current Prospect and automatically begin entering another Prospect on a fresh blank form.
  • Editing a Prospect

    How to Edit a Prospect

    1. Begin by navigating to the Sales → Customers menu at the top of the screen.


    2. You’ll now be on the Customer Listing page. Before proceeding, locate the CRM Phase dropdown menu in the upper-right corner of the screen. Use this menu to filter your view — select Prospect to display only potential customers instead of all customer records.


    3. The list will now show only your active prospects. Use the search field to locate the specific prospect you wish to update. Once found, click the carrot icon next to their name to expand the management options, then select the Manage (pencil) icon to open the record for editing.
      

    4. You’ll be directed to the Change Customer screen for that prospect. Make the necessary updates to the record, and when finished, click one of the dark blue Save buttons at the bottom of the page to apply your changes.

Leads

  • Key Information
    Key Information:

    • Leads are accessed from the Customer List where the CRM Phase is marked as Lead.
     
    • Full access to management tools is available, including contacts, appointments, sales details, AR statements, open orders, and invoice tracking.
     
    • Leads support document uploads, CRM note tracking, and audit history visibility for better collaboration across departments.
     
    • Lead records remain in an "Active" status until the CRM Phase is manually updated to "Customer," signaling successful conversion.
     
    • Settings such as route assignments, pick sequences, and backorder rules can be configured even during the Lead stage, helping to prepare accounts before full onboarding.

    What is a Lead?

    A lead is an individual or organization that has shown initial interest in your business but has not yet been evaluated or qualified as a viable sales opportunity. Leads represent the earliest stage in the customer lifecycle and are typically the entry point into the CRM. They are gathered through various marketing efforts, such as website forms, newsletter signups, trade shows, referrals, or purchased databases.

    Key Characteristics of a Lead:

    • Captured through inbound or outbound marketing efforts (e.g., content downloads, contact forms, list imports).
     
    • May have expressed passive or active interest, but has not yet been qualified by the sales or marketing team.
     
    • Not yet evaluated for fit, intent, or readiness to buy.
     
    • Can include basic contact details, company info, and source data (e.g., how they were acquired).
     
    • Typically reviewed and nurtured through email campaigns or outreach to determine potential value.
     
    • Serves as the starting point in the CRM pipeline: Lead → Prospect → Customer.
  • Creating a Lead
    1. Navigate to the Customer Management Area
    Begin by going to the Sales module located in the main menu. From there, click on the Customers sub-menu option to open the full customer listing screen.

     
    2. Filter for Leads Using CRM Phase
    Once on the Customers screen, locate the CRM Phase dropdown menu near the top of the page. Select Lead from this dropdown to ensure you're working within the correct CRM category for prospective customers.
      

    3. Click the “New Lead” Button
    With the Lead phase selected, click the dark blue New Lead button at the top of the screen. This will bring up the data entry form where you can input information for the new lead.
     

    4. Enter Required Lead Details
    On the New Lead form, begin filling out the necessary fields. Enter the lead’s company name in the customer textbox. Then, choose the appropriate customer class from the class dropdown—this helps categorize the type of customer for reporting and tracking purposes. You’ll also need to assign a salesman using the dropdown menu, as this field is required to proceed. Additional optional fields, such as phone number, email, or notes, can also be entered here to give your sales team more context when managing the lead.
     

    5. Save the Lead Record
    Once all required fields have been entered, click one of the available Save buttons to create the new lead. You can use the standard Save & Exit button to return to the lead list or use Save & Copy if you'd like to immediately add another lead customer.
  • Editing a Lead
    1. Open Management Options for the Desired Lead
    Start by navigating to the Sales → Customers screen and ensuring the CRM Phase filter is set to Lead. Locate the lead you wish to edit from the list. On the far left-hand side of the lead's row, click the carrot (â–¼) icon to expand the available management options for that record. Then, click the Manage (pencil) icon to open the lead in edit mode.
     

    2. Update Lead Information as Needed
    You will now be on the Edit Lead screen. From here, you can modify any of the lead’s existing details—such as the name, customer class, assigned salesperson, or any additional contact info. Make sure all required fields remain properly filled out.


    3. Save Your Changes
    Once you've finished making updates, click one of the available Save buttons. Use Save & Exit to return to the customer list, or Save & New if you’d like to save this lead's changes & create a new lead.

AR Terms

  • AR Terms

    AR Terms Maintenance - Overview

    The AR Terms Maintenance page allows your organization to configure and manage the payment terms used throughout Accounts Receivable. These terms define when customer payments are due, how due dates are calculated, and how they are applied to sales orders, invoices, and collections activities.

    In food manufacturing and temperature-controlled warehousing environments, where cash flow and product turnover are tightly linked, accurate AR terms are essential for maintaining consistent billing practices and supporting reliable financial reporting.

    Key Information
    • Define the timeframe customers have to remit payment.

    • Standardize due-date calculations across Sales, Accounting, and Customer Service.

    • Ensure consistent billing and reduce discrepancies during AR reconciliation.

    • Support contract-specific payment requirements often found in food, produce, and perishable goods industries.

    Where AR Terms Are Used
    Customer Account Maintenance – Assign payment terms at the customer level; these terms automatically carry into new orders.

    Sales Orders – Payment terms appear in the order header and flow into AR documentation.

    AR Invoicing – Determines invoice due dates and how invoices appear aging reports.

    Collections & Reporting – Ensures accurate aging buckets for credit management and follow-up.

    Configurable Term Types
    AR terms can vary by company and can include, but are not limited to:

    • Net X Days (payment due X days after invoice date)

    • Receipt-Based Terms (payment window begins upon the customer receiving goods)

    • Immediate or Same-Day Terms

    • Custom contract-specific payment structures 

    • Industry-specific terms used in produce, cold storage, or manufacturing

    Because each organization can define its own structure, the list of available terms in the system will differ based on your company’s accounting policies.

    Actions Available in AR Terms Maintenance
    Add New: Create a new AR term code, name, and description.

    Edit: Modify existing terms or update terminology as business requirements change.

    View: Review term details without making changes.

    Active/Disable: Disable terms no longer in use while preserving historical data.

    Best Practices
    • Align terms with customer contracts, vendor agreements, and industry compliance requirements.

    • Use receipt-based terms when customers require temperature checks or signed delivery confirmations.

    • Maintain consistent naming conventions for clear audit trails.

    • Review AR terms periodically to ensure they still support billing accuracy and cash-flow goals.

  • Creating an AR Term

    Creating an AR Term In FM

    1. Navigate to the Accounting main menu and select the AR Terms sub-menu under Accounts Receivable to view the existing payment definitions.


    2. On the maintenance screen, click the Add New button. This action prepares the system for defining a fresh set of payment conditions.


    3. Input a unique Term Code (must be a numeric value followed by the letter 'D') and a concise Description (e.g., Net 30 Days). Click one of the available Save buttons to finalize and deploy the new payment term.

    Examples: Net 15 Days -> 15D 
    Net 20 Days -> 20D 

  • Editing an AR Term

    How to Edit an AR Term in FM

    1. First, navigate to the Accounting → Accounts Receivable → AR Terms menu.


    2. Click the Manage Table (pencil) icon next to the AR Term you need to update. This opens the term’s detail screen, where you can review and adjust payment timelines used for food manufacturing customer billing.


    3. Modify the necessary fields, such as term descriptions or due-date intervals, then choose any of the available Save buttons to confirm and apply the updated AR Term settings across your Food Manufacturing AR processes.

  • Deleting an AR Term

    How to Delete an AR Term in FM

    1. First, navigate to the Accounting → Accounts Receivable → AR Terms menu.


    2. On the AR Terms Maintenance screen, you’ll see all terms currently configured in the system. To initiate deletion, click the pencil icon under the Action column for the term you want to review.


    3. This opens the Edit AR Terms page. Go to the bottom of the screen and locate the red Delete button. Select it to proceed. A confirmation prompt will appear advising that this action is permanent—click OK to confirm.


    Important System Behavior
    If an AR Term is currently in use anywhere within the Food Manufacturing module—such as on customer accounts, active or historical sales orders, or posted invoices—the system will prevent deletion and display an error message indicating that the record cannot be removed. Here is what that error message looks like:


    This safeguard ensures financial accuracy and prevents the deletion of AR Terms that are already tied to customer, order, or billing history.

    Recommended Action: Disable the AR Term
    If the AR Term can no longer be used for new transactions but must remain for historical reference, the recommended approach is to disable it rather than delete it.

    1. Navigate to Accounting → Accounts Receivable → AR Terms.

    2. Click the Manage Table (pencil) icon next to the AR Term you want to update.

    3. Find the Status dropdown.

    4. Change the status from Active to Disabled.

    5. Click Save to apply the change.

    Disabling the AR Term removes it from future selection in the Food Manufacturing workflow while keeping all historical records intact and compliant.
  • Assigning an AR Term

    How to Assign an AR Term to a Customer

    1. Begin by navigating to Sales → Customers.


    2. You will be brought to the Customer Maintenance list. Use the search field to locate the customer you need to update. Once they appear in the results, click the carrot (down-arrow) icon to expand the action menu, then select the Manage (pencil) icon to open their account.


    3. You will now be on the Change Customer screen for the selected customer. Locate the AR Terms dropdown near the top of the page. Open the dropdown and choose the appropriate AR Term based on the customer’s payment requirements. After selecting the correct term, scroll to the bottom of the screen and finalize your changes by clicking any of the Save buttons.

Customer Classes

  • Customer Classes

    Customer Classes Key Information

    AR Customer Classes allow you to categorize customers based on their relationship to your production workflows, distribution processes, and billing structure. These classifications ensure accurate financial handling, consistent reporting, and precise operational behavior throughout the system. Customer Classes are especially important when your customer base includes wholesalers, distributors, retail chains, co-pack clients, and specialty accounts with unique billing or production requirements.

    Common Use Classes
    Retail / Chain Accounts: Retail partners may require shorter lead times, specific packaging, or compliance rules—customer classes help group and analyze this segment effectively.

    Distributors: Useful for customers who redistribute product to smaller retail locations or service regions.

    Foodservice Customers: Helpful for restaurants, institutions, or regional buyers who place recurring mid-volume orders.

    • Wholesale Customers: Wholesalers typically purchase high volumes of finished goods for redistribution, making them a key segment within the Food Manufacturing workflow. Assigning a dedicated Customer Class for wholesale accounts helps streamline financial settings, production forecasting, and reporting.

    Best Practices
    • Keep Class Codes short but meaningful for quick identification.

    • Use clear, descriptive names so all teams—Sales, Accounting, Production—apply them consistently.

    • Review classes periodically to ensure they match your current product lines and customer base.

    • Avoid over-categorization; create a new class only when it affects pricing, production, or reporting.

  • Creating a Customer Class

    How to Create an AR Customer Class

    1. Start by navigating to the Accounting menu, hovering to Accounts Receivable, and selecting AR Customer Classes to access your facility’s full list of customer classifications.


    2. The maintenance screen displays every customer class already configured. To add a new one, select the Add New button at the top of the page.


    3. In the setup window, enter a Class Code and Description that clearly identifies the customer segment your facility needs to track. When finished, choose any of the Save options to store the new class.

  • Editing a Customer Class

    How to Edit a Customer Class

    1. To begin, select Accounting → Accounts Receivable → AR Customer Classes.


    2. Find the AR Customer Classes maintenance list and update the appropriate class. To access the class configuration screen, click the pencil icon next to the corresponding row.


    3. Make any required adjustments to the Class Code, Description, or other relevant fields on the Edit Customer Class screen in order to keep the classification accurate and up to date. Select one of the Save buttons to implement and commit your modifications to the system.

  • Deleting a Customer Class

    How to Delete a Customer Class

    1. Start by going to Accounting → Accounts Receivable → AR Customer Classes. This brings you to the Customer Class Maintenance page, where all existing customer class codes configured for the Food Manufacturing module are listed.


    2. Find the customer class you want to remove. Click the Manage Table (pencil) icon next to the entry to open its details. This gives you the opportunity to review the configuration before proceeding with deletion.
     
     
    3. Within the Customer Class detail screen, select the Delete button to remove the class. A confirmation prompt will appear, reminding you that the deletion is irreversible. Confirm the action to complete the removal.


    Important System Behavior
    The system will not allow you to delete a customer class that is currently in use. If the class is assigned to any active or historical FM customer accounts, the system will automatically prevent deletion and display an error message indicating that the class is tied to existing records. This safeguard ensures that historical customer classifications remain intact for reporting, billing, and audit compliance.


    Recommended Action: Disable the Customer Class
    If a customer class should no longer be applied to new FM customers—but must remain visible for historical reporting, revenue tracking, or audit needs—the best practice is to disable the class rather than delete it.

    1. Go to Accounting → Accounts Receivable → AR Customer Classes.

    2. Click the Manage Table (pencil) icon next to the customer class you want to update.

    3. Locate the Status dropdown in the record.

    4. Change the status from Active to Disabled.

    5. Click Save to finalize the update.

    Disabling a Customer Class removes it from selection on new FM customer setups while ensuring that all existing customer assignments, transaction history, and reporting classifications remain fully accurate and accessible.
  • Assigning a Customer Class

    How to Assign a Customer Class to a Customer Account

    1. Go to Sales → Customers to open the Customer Master list. This page displays all customer accounts configured in the module and serves as the central point for managing account-level settings.
     

    2. Locate the customer account you want to update. Click the Manage icon (pencil) to access the full customer profile. This will open the account maintenance screen, where you can review and modify customer-specific details.


    3. Within the customer profile, find the Class dropdown menu. Choose the appropriate class that best categorizes the customer—such as Frozen Storage, Dry Storage, Wholesaler, or another class defined by your organization. After making the selection, click any of the available Save buttons to apply the update and ensure the correct classification is tied to future billing, reporting, and operational workflows.

Contacts

  • Key Information
    Primary Contacts: Designate one contact as the main point of communication for an account. This ensures all essential updates, billing information, and service-related messages are directed to the appropriate individual. Primary contacts can be managed directly through the Account Maintenance screen and are critical for maintaining consistent customer communication.

    To Assign Primary Contact: Click on the Make Primary Button and the selected contact will automatically become the primary contact for the associated account. 

    Titles: Titles represent the job position or role of a contact within the customer’s organization. Maintaining accurate titles helps internal teams identify who to reach out to for specific functions like logistics, finance, or procurement. This section links to the Titles Maintenance page, where users can create and update job titles as needed.

    Examples:
    Logistics Manager – Oversees shipping, warehousing, and distribution operations.
    Logistics Clerk – Handles daily logistics tasks such as inventory checks or shipment tracking.

    Types: Contact types define the purpose or area of responsibility the contact holds in relation to your organization. Assigning contact types allows teams to quickly filter, sort, and communicate with the right individuals depending on the business need. Users can manage these through the Types Maintenance page.

    Examples:
    Accounts Payable Contact – Manages invoice payments, billing questions, and account reconciliations.
    Logistics Contact – Coordinates order shipments, delivery schedules, and freight issues.

    Maintaining accurate primary contacts, titles, and contact types ensures streamlined communication, proper routing of critical information, and improved customer relationship management. By clearly defining roles—such as Accounts Payable Contact or Logistics Manager—your business can enhance operational efficiency, reduce response time, and ensure that every interaction reaches the right individual. Regularly reviewing and updating these fields helps maintain data accuracy and supports seamless collaboration across departments.
  • Creating a Contact
    1. Go to the Sales Menu and Click on the Contacts Sub-Menu or click on the Contacts icon next to a particular customer, prospect or lead


    2. Click on the Add New button to add a new contact for a particular customer 


    3. Enter the customer/account name, contact name, type, title and status 


    4. Add a phone number, email address and select some email options

    Note: If statements or invoices are to be sent via email, an email address is required.


    Statements Via Email: If set to "Yes", a statement document will be emailed automatically during the End of Day process on a chosen day.  Contact I.T to enable. 
    Invoices Via Email: If set to "Yes", an invoice document and a BOL(if applicable) will automatically be emailed as soon as an order is invoiced.  
    Bulk Invoices Via Email: If set to "Yes", one email will be sent out weekly containing all of the current open invoices.  Contact I.T to enable. 
    Statement in Bulk Email?: If set to "Yes" and Bulk Invoices Via Email set to "Yes", a statement will be included in the weekly bulk email along with the open invoices. 

    Auto Fill (Statements): Contact email addresses set to "Yes" will be autofilled in each subsequent email with the option to send AR Statements. 
    Auto Fill (Sales): Contact email addresses set to "Yes" will be autofilled in each subsequent order email with the option to send BOLs and/or Invoices.  

    *Any autofill option that has yes selected will not automaticaly email the corresponding documents, but rather autofill each contact email address for future manual emailings.
  • Editing a Contact
    1. Click on the Manage icon (Pencil) next to the contact record to edit 


    2. Make any necessary changes to the contact's information 


    3. Click on the of the Save buttons to save the changes
  • Sending Emails to a Contact
    A detailed explanation showing how to send emails to a contact in the Inspired system.

    1. Go to the Sales menu & click on the Contacts option.

    2. This will navigate you to the Customer Contacts Listing page. To locate a specific contact, enter the customer name under the Customer field & click the Search button, or use the search textbox to look up the contact by name directly.


    3. Once you've found the contact you wish to send an email to, click on the upside down triangle button under the Action tab. This will open up a plethora of options to choose from.


    4. Click on the Send Email button to begin the process of sending an email to your contact.


    5. This will direct you to the Email Contact screen, where the contact's email address will automatically appear in the To field. Enter a subject line, add any necessary recipients in the CC field, and compose your message in the email body.


    6. When you're ready to send, click the dark blue Send button at the bottom of the screen.

CRM

  • Key Information
    Attachments: 

    Account/appointment related documents can be attached to each appointment  

    Calendar: 

    Appointment entries are automatically added to the Calendar/Schedule 
    Email and Notification alerts can be assigned to appointment schedule entries 

    Recurring Appointments: 

    Repeat appointments on a weekly, monthly or yearly basis 

    Notes: 

    Queued: Notes added prior the the appointment 
    Complete: Notes added after the appointment 

    Urgency:
     

    Rates importance level of the appointment 

    Appointment Types: 
    Examples: Phone Call 
    Introduction 
    Meeting 
     
    Sources: Categorizes origin of the appointment 
    Examples: Referral 
    Advertising
    Website 
    Organic Lead 

    Closed Appointments: 

    Appointments must be manually closed to indicate completion.  Once closed, any notes added will be labeled complete as opposed to queued.  

  • Creating an Appointment
    1. Go to the Sales Menu and click on the CRM Sub-Menu or click on the Appointments icon next to a particular customer, prospect or lead 


    2. Click on the New Appointment button 


    3. Enter a customer, prospect or lead, a contact name, an appointment type, and the date and time for the appointment (required) 


    4. Fill in a phone number (optional) 

    5. Click on the Add button to save the appointment 
  • Editing an Appointment
    1. Click on the Edit icon (Pencil) for the newly added appointment 


    2. Fill in any other additional information for the appointment (optional) 


Customer Preferences

  • Customer Preferences
    Choose the BOL format that works best for each of your customers.  

    BOL Summary Format: Displays 1 line per item/lot 


    BOL Detail Format: Displays 1 line per pallet, item, lot

LiveCards

  • Livecards
    LiveCards allow users to use credit cards to pay off invoices directly from the system.  

    Note:Inspired Technology Systems does not save nor store any credit card information on our servers.
    Secure Tokens are used instead. Account tokenization involves completely removing sensitive data and replacing it with a randomly generated value called a token.

    LiveCard Setup:

    1. Go to the Sales Menu and select the Customers Sub-Menu.


    2. Click on the Carrot icon next to the customer, then click on the LiveCards icon.


    3. Click on the Add New button.


    4. Click on the LiveCard Type dropdown and select the Credit Card option.


    5. Enter the Nick Name, Name on Card, and Billing Address for the card.


    6. Select a Card Type from the Card Type dropdown.


    7. Fill in the remaining LiveCard fields.


    8. Click on any of the Save buttons.


    9. This LiveCard is now ready to use for applying payments towards this customer's invoices.


    Using LiveCards to Apply Payments:

    1. Go to the Accounting Menu, hover over the Accounts Receivable Sub-Menu, and select the AR Cash Receipts Sub-Menu.


    2. Click on the Add New button.


    3. Enter the customer name and select the Live Card option from the Payment Type dropdown.


    4. Click on the LiveCard dropdown and select a LiveCard to use in this payment.


    5. Click on the Distribute $ button.


    6. Distribute the desired payment amount.

    a. Click on the Auto-Pay Remaining Balance icon to pay for a single invoice


    b. Click on the Pay All button to pay for All Open Invoices for this customer.


    7. Click on the Back to Header button.


    8. Click on the Close Payment button.


    9. Review the Cash Receipt that is Ready to Post.


    10. Click on the Post button.


    11. View the posted Cash Receipt by clicking on the Posted option under the Show dropdown