Customer Orders Overall

Order Attributes

  • Disabling an Order Attribute

    Disabling an Order Attribute

    Disabling an Order Attribute removes it from the list of selectable attributes on new and edited orders while preserving all historical records where the attribute was previously used. This ensures that your organization does not inadvertently apply outdated or irrelevant attributes to future transactions while maintaining accurate reporting, audit trails, and data integrity. Disabling is the recommended approach when an Order Attribute is no longer relevant or needed for current workflows.

    Disabling an Order Attribute
    You should consider disabling an Order Attribute when:

    • It is no longer used in current order workflows.

    • The attribute has been replaced by a new or updated value.

    • It was created for testing, seasonal use, or a limited purpose.

    • You want to prevent users from selecting the attribute on new or updated orders.

    Because Order Attributes can appear on historical orders, disabled attributes remain visible in reporting and order history, preserving accuracy.

    Steps to Disabling an Order Attribute
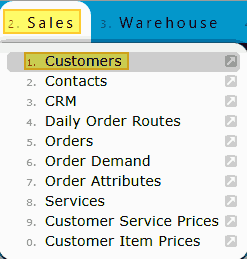
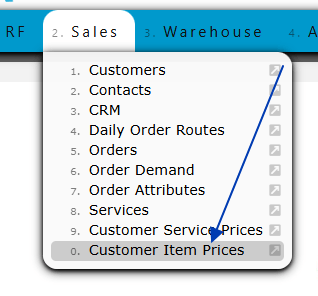
    1. Navigate to Sales → Order Attributes.


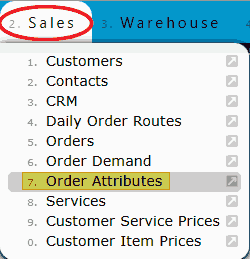
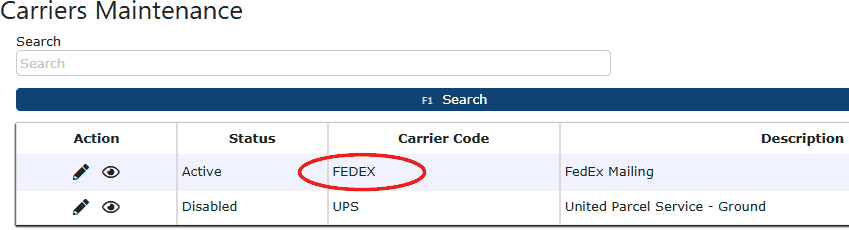
    2. The Order Attributes Maintenance screen displays all existing attributes.

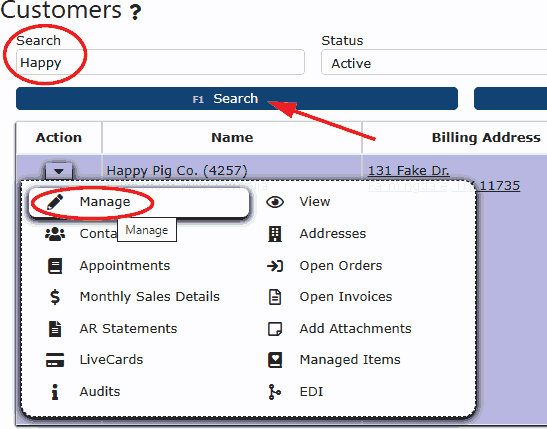
    3. Locate the Order Attribute you want to disable in the list. Use the Search field to quickly find the attribute by name or description if needed.


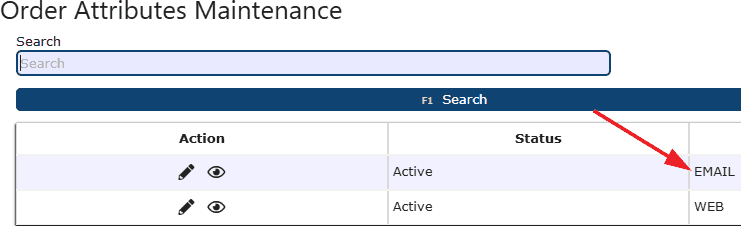
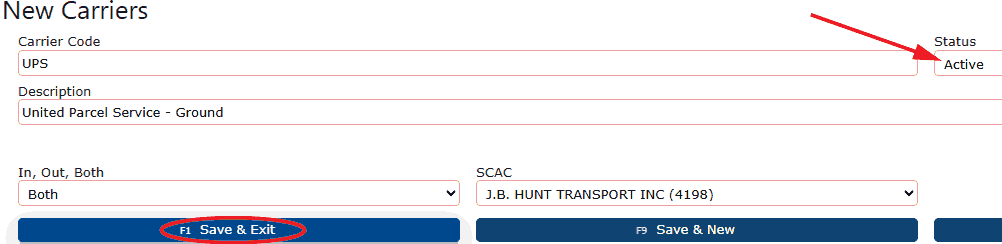
    4. Click the Manage (Pencil) icon in the Action column next to the desired Order Attribute.


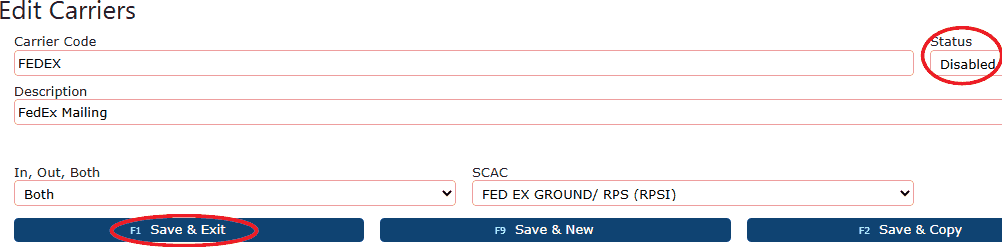
    5. In the Edit Order Attribute screen, find the Status dropdown.


    6. Change Status from Active to Disabled.


    7. Click Save & Exit to apply the change. Once disabled, the attribute will no longer appear as a selectable option when creating or editing orders.

    Behavior After Disabling
    After an order attribute has been disabled:

    • It is removed from all drop-down lists when selecting an attribute on new orders.

    • Users cannot apply the disabled attribute to any new or edited orders.

    • The attribute remains on historical records where it was previously used and continues to appear in reports and filters related to past order activity.

    • Disabled attributes will not interfere with order processing or reporting, but they will not be available for new transactions.

    Why Disabling is Better Than Deleting
    Order Attributes that have been used on customer orders cannot be deleted, regardless of whether the associated sales orders are still open, closed, or already invoiced. If you attempt to delete an Order Attribute that is tied to existing order records, the system will display a red hard-stop error message: "This record cannot be deleted. Order record(s) exist."

    This safeguard prevents the removal of attributes that are already linked to transactional data and ensures the integrity of historical and financial records. For this reason, disabling an Order Attribute is the correct and recommended approach when an attribute is no longer needed. Disabling allows you to:

    • Prevent the attribute from being selected on new or edited orders

    • Maintain accurate historical order, invoice, and reporting data

    • Avoid system errors caused by attempting to delete an attribute in use

    • Keep your active Order Attribute list clean and relevant without impacting past transactions

    Disabling ensures operational consistency while preserving all existing order history tied to the attribute.

  • Creating an Order Attribute

    Creating and Managing Order Attributes

    Order Attributes allow users to categorize, label, and filter orders throughout the system. They are commonly used to identify special handling requirements, customer-specific workflows, reporting needs, or internal classifications that apply to sales orders, purchase orders, or other transactional records. Once created, Order Attributes can be selected on orders and used as searchable and reportable fields across the system. Order Attributes are maintained in a centralized list, ensuring consistency and accuracy when applied to transactions.

    Creating a New Order Attribute

    1. Click Add New on the Order Attributes maintenance page.


    2. The New Order Attributes screen opens.

    Complete the following fields:

    • Order Attribute - Enter a short, clear identifier for the attribute. This is the value users will select when applying the attribute to an order.

    • Description - Enter a brief description explaining what the Order Attribute represents or when it should be used.

    • Status - By default, the status is set to Active, allowing the attribute to be immediately available for selection on orders.


    3. Click Save & Exit, Save & New, or Save & Copy, depending on your workflow. Once saved, the Order Attribute becomes available throughout the system wherever Order Attributes are supported.

    Editing an Existing Order Attribute

    To edit an existing order attribute:

    1. Locate the Order Attribute in the list using the Search field if needed.


    2. Click the Edit (pencil) icon under the Action column.


    3. Update the Order Attribute name, description, or status as required.


    4. Save your changes using any of the save buttons.

    Using Order Attributes in the System

    Once created, Order Attributes can be:

    • Selected directly on orders

    • Used as filters in order lists and reports

    • Applied consistently across departments for operational clarity

    • Leveraged for internal tracking, customer requirements, or workflow identification

    Since Order Attributes are centrally managed, they help standardiza how orders are classified and reviewed across the system.

Carriers

  • Creating & Managing a Carrier List

    Creating & Managing a Carrier List

    The Carrier List allows your company to define and control which carriers can be selected during inbound and outbound warehouse transactions. Carriers are used throughout the system during sales order manifesting, purchase order receiving, and putaway audits (Cold Storage only). Maintaining an accurate carrier master list helps ensure clean data entry, consistent reporting, and fewer errors during warehouse operations.

    Accessing the Carriers List
    1. Navigate to the Warehouse → Carriers menu.


    2. The Carriers Maintenance page opens, displaying all existing carriers (if applicable) for the company.


    Important:
    For a new company, this will initially be left blank.

    Behavior When the Carrier List is Blank

    When no carriers exist in the system:

    • Users may manually type any carrier name during:

    - Sales Order manifesting (Outbound)

    - Purchase Order receiving (Inbound – FM only)

    - Putaway audits (Inbound – Cold Storage only)

    • The system does not enforce carrier validation.

    This allows flexibility during early setup but provides no data control.

    Why Create a Carrier List
    Once at least one carrier exists in the Carrier List:

    • Users must select a carrier from the predefined list

    • Manual carrier entry is no longer allowed

    • Entering an unlisted carrier will display the message: “Carrier X is not in your master (In/Out)bound Carrier list.

    This ensures standardized carrier usage across all warehouse and accounting workflows.

    Adding a New Carrier

    1. From the Carriers Maintenance page, click Add New.


    2. Enter a Carrier Code in the textbox. This is a short, unique identifier that is used throughout the system. Examples are UPS, FEDEX, ABF.


    3. Enter a full or recognizable carrier description. An example is United Parcel Service - Ground.


    4. Select In / Out / Both for the carrier.

    • In is used for purchase orders (FM only)

    • In is used for putaways (cold storage only)

    • Out is used for sales orders & outbound manifesting

    • Both can be used for inbound and outbound transactions.


    5. Enter the SCAC (Standard Carrier Alpha Code)

    • This identifies the trucking company transporting the goods.

    • This is commonly required for freight and EDI processes.


    6. Verify the status of the carrier; it should be active. When you are done, click save to add the carrier to the master list.

    Managing Existing Carriers

    From the action column on the left:

    • Pencil icon (manage) - Edit carrier details such as description, In/Out usage, SCAC, or status.


    • Eye icon (view) - View carrier details in read-only mode.


    Best Practices for Carrier Maintenance
    • Create carriers before going live with shipping or receiving

    • Use consistent naming conventions for Carrier Codes

    • Assign correct In / Out usage to prevent selection errors

    • Use SCAC values whenever available for accurate freight tracking

  • Disabling a Carrier

    Disabling a Carrier

    Disabling a carrier allows your company to prevent a carrier from being selected in new warehouse transactions while preserving all historical data tied to that carrier. This is commonly used when a carrier is no longer active, no longer contracted, or temporarily unavailable, but still needs to remain in the system for reporting, audit trails, and transaction history. Disabling a carrier is a great practice, as it maintains data integrity across sales orders, purchase orders, and warehouse operations.

    When to Disable a Carrier
    You may want to disable a carrier if:

    • The carrier is no longer used for inbound or outbound shipments

    • A trucking company is no longer under contract

    • The carrier was created for testing or temporary use

    • The carrier should not appear as a selectable option during manifesting or receiving

    • You want to prevent data entry errors while keeping historical records intact

    Accessing the Carrier Maintenace Page

    1. Navigate to Warehouse → Carriers.


    2. The Carriers Maintenance page opens, displaying all existing carriers and their current status.


    Active carriers are available for selection during warehouse transactions, while disabled carriers are not.

    Steps to Disable a Carrier

    1. Locate the carrier you want to disable in the list.


    2. Click the Manage (Pencil) icon in the Action column.


    3. This opens the Edit Carrier screen. Find the Active dropdown list, then Change the Status field from Active to Disabled.


    4. Click any of the Save buttons to apply the change.


    Once saved, the carrier is immediately removed from selection lists throughout the system.

    System Validation Behavior

    If at least one carrier exists in the Carrier List and a user attempts to manually enter a carrier name that is not active, the system will display the following message:

    "Carrier X is not in your master (In/Out)bound Carrier list." This ensures that only active, approved carriers can be used going forward.

    Best Practices for Disabling Carriers

    • Confirm the carrier is no longer needed for upcoming shipments before disabling

    • Use clear descriptions to distinguish similar carriers

    • Periodically review disabled carriers to keep the list clean and relevant

    • Coordinate changes with warehouse and accounting teams to avoid confusion

    Important: Carrier Deletion Restrictions
    If a carrier has been used on inbound or outbound transactions—including sales orders, purchase orders, or putaways—and those transactions have already been completed and invoiced, the system will not allow the carrier to be deleted. When attempting to delete such a carrier, the system displays the following hard-stop message:

    This record cannot be deleted. Pallet record(s) exist. Unit record(s) exist.

    This restriction is enforced to protect data integrity and preserve accurate historical, warehouse, and financial records.

Minimum Shelf Life

  • Setting a Minimum Shelf Life For a Customer

    Minimum Shelf Life Overview

    The Minimum Shelf Life feature allows you to enforce customer-specific freshness requirements by ensuring that all inventory picked for a customer meets a required number of days before its Expiration / Use By date. This setting is configured at the Customer Master level and is enforced during warehouse picking. Minimum Shelf Life is commonly used by food, beverage, pharmaceutical, and regulated industries where customers require products to meet strict freshness or compliance standards at the time of shipment.

    When enabled, the system prevents non-compliant inventory from being picked, helping reduce chargebacks, spoilage, and customer disputes.

    What is Minimum Shelf Life?
    Minimum Shelf Life is a customer-level control that requires all picked inventory for that customer to have an Expires (Use By) date that meets or exceeds the minimum number of days configured. The logic is enforced during picking, not order entry, ensuring that:

    • Inventory without an expiration date cannot be picked
    • Inventory with an expiration date that does not meet the minimum requirement is blocked
    • Only compliant inventory is shipped to the customer

    Configuring Minimum Shelf Life
    Minimum Shelf Life is configured directly under the Customer Master.

    1. Navigate to the Sales → Customers menu.


    2. Locate the customer to be managed, and click on the triangle icon to expand the options menu. From here, select the Pencil (Manage) icon.


    3. Locate the Min. Days (Expires) optional dropdown field near the top of the page. Note that by default, this field is set to -None-.


    4. Select a value between 1 and 250 days, then save the customer record.


    Once this is saved, the Minimum Shelf Life requirement is immediately active for all future picks for that customer. The Minimum Shelf Life is calculated from the ship date of the order, not the order date or allocation date. The system evaluates whether the inventory’s Expires / Use By date meets the required number of days from the ship date before allowing the pick.

    What Happens During Picking

    When a customer has Minimum Shelf Life enabled, the system enforces compliance during picking across all picking methods, including RF scanning. When a minimum shelf life is set at the customer level:

    • A “Minimum Date” message is printed on the physical Pick Ticket
    • The same Minimum Date message appears on the Scan Gun (RF Picking screen)
    • Warehouse users are clearly informed of the requirement before attempting to pick inventory


    Hard Stop Scenarios
    Minimum Shelf Life introduces hard stop validation during picking to prevent non-compliant shipments.

    Scenario 1: Inventory Missing an Expires Date
    If inventory does not have an Expires / Use By date and the customer requires Minimum Shelf Life, picking is blocked. This ensures that inventory without proper date tracking cannot be shipped to customers who require shelf life validation.


    Scenario 2: Inventory Does Not Meet Minimum Shelf Life
    If the inventory has an Expires date, but that date does not meet the customer's minimum requirement, the pick is prevented.


    The actual dates displayed will reflect the inventory’s Expires date and the customer’s calculated minimum date. This guarantees that customers only receive inventory that satisfies their freshness or compliance standards.

    Why Minimum Shelf Life is Important
    Minimum Shelf Life does not prevent:
    • Order creation
    • Order release
    • Order waving

    Validation occurs only at picking, ensuring operational flexibility while still enforcing compliance at the critical fulfillment step.

    Minimum Shelf Life helps organizations:
    • Prevent shipping expired or near-expired inventory
    • Meet customer contractual requirements
    • Reduce customer complaints and returns
    • Maintain compliance with food safety and regulatory standards
    • Improve warehouse accuracy and accountability

    By enforcing shelf life requirements at the point of pick, Inspired ERP ensures that only compliant, sellable inventory reaches the customer.

    Key Takeaways
    • Minimum Shelf Life is configured at the Customer Master level
    • Valid values range from 1–250 days
    • The system evaluates the Expires / Use By date only
    • Inventory without an Expires date cannot be picked
    • Non-compliant inventory triggers a hard stop
    • Messages are shown on both Pick Tickets and RF Scan Guns
    • This feature ensures product quality, compliance, and customer satisfaction

Pallet Summary Sheet

  • Customer Pallet Summary Sheet

    Pallet Summary Sheet Overview

    The Customer Pallet Summary Sheet is an optional order-level document designed to provide a clear, pallet-by-pallet summary of a customer’s shipment. This summary prints automatically during order verification and is intended to be included alongside pallet labels. The feature enhances shipping accuracy, warehouse visibility, and customer documentation—especially for customers that require detailed pallet breakdowns.

    The Pallet Summary Sheet is printed in 8.5 x 11 format and is always sent to a document printer. This ensures readability and consistency when included with shipping paperwork.

    What is the Pallet Summary Sheet?
    The Pallet Summary Sheet is an order summary printout that consolidates pallet-level information into a clean, easy-to-read document. It is similar in structure to pallet summaries previously generated for specific customers but has been expanded as a configurable, system-wide feature.

    Each Pallet Summary Sheet includes key order information such as:

    • Customer name
    • Sales Order number
    • Delivery date
    • Total units and line count
    • Pallet sequencing (for multi-page summaries)
    • Pallet-level breakdown of the order

    When multiple pallets exist, the summary will automatically generate multiple pages (for example, “1 of 2”, “2 of 2”), ensuring all pallets are clearly documented.


    Above is an example of what a pallet summary sheet looks like.

    Enabling the Pallet Summary Sheet for a Customer

    The Pallet Summary Sheet is controlled at the Customer Master level. To enable the pallet summary sheet:

    1. Navigate to the Sales → Customers menu.


    2. Locate & edit the desired customer.


    3. Locate the Pallet Summary Sheet option.


    4. Set the dropdown value to Yes.


    5. Save the customer record.

    Available Settings:
    • No - The Pallet Summary Sheet will not print.
    • Yes - The Pallet Summary Sheet will automatically generate and print upon finishing item verification with the "Order Labels" checkbox selected.

    Once set to Yes, the Pallet Summary Sheet becomes part of the customer’s standard outbound documentation.

    Operational Benefits

    Using Customer Pallet Summary Sheets provides several key advantages:

    • Improves pallet-level visibility during shipping and verification
    • Reduces errors by clearly outlining pallet contents
    • Provides customers with professional, easy-to-read shipment documentation
    • Supports customers that require detailed pallet summaries for compliance or internal tracking
    • Automatically integrates into existing label and verification workflows

  • Order Pallet Label Format

    Order Pallet Label Formats Overview

    Order pallet label formats allow Inspired ERP to generate customer-specific pallet labels that meet unique EDI, retail, and receiving requirements. Some customers require pallet labels to follow a strict layout and include specific data elements, such as GTINs, pack sizes, weights, and pallet-level totals.

    To support this, Inspired provides a customer-level setting called Order Pallet Label Format, which determines how pallet labels are generated and printed once an order is verified. This article explains how order pallet label formats work, where they are configured, how labels are printed, and what validations must pass for labels to successfully generate.

    What is an Order Pallet Label Format?
    An Order Pallet Label Format controls the layout and data requirements of pallet labels printed for a customer. These labels:

    • Are generated at the order level
    • Apply only after an order has been fully verified
    • May follow a custom format required by the customer

    Currently, Inspired supports special pallet label formats for various different companies. Additional formats can be created and added as dropdown options as needed for other customers.

    Customer-Level Configuration
    The Order Pallet Label Format setting is maintained in the Customer Master and applies to all orders for that customer.

    1. Navigate to the Sales → Customers menu.


    2. Search for the customer, then under the Action tab on the left, click the upside-down triangle icon to expand options.


    3. Click the Manage / Edit (pencil icon) button.

    4. Locate the Order Pallet Label Format dropdown.


    Note: Order Pallet Label Formats control how pallet labels are printed and do not affect pallet-building rules, such as whether a customer allows multi-item pallets.

    When Order Pallet Labels Are Generated
    Order pallet labels are only available after an order has been fully verified. Because an order may contain multiple pick tickets, labels are not generated until:

    • All pick tickets are verified
    • The order reaches Ready to Manifest status

    This ensures pallet data is complete and accurate before labels are printed.

    How to Print Order Pallet Labels
    There are two ways to generate and print order pallet labels once the order is verified.

    Method 1: Print Order Labels from Order Entry
    • Navigate to Sales → Orders (order entry screen) & search for the order in question.


    • Click the Print Order Labels (printer icon)


    • The system generates pallet labels using the customer’s selected format.

    Method 2: Automatic Printing During Verification
    • During the final verification step, select the Order Labels checkbox (by default, this should already be checked).


    • Once verification is complete, the system automatically prints the order pallet labels.

    Both methods produce the same pallet labels and use the Order Pallet Label Format selected on the customer.

    Optional Item Setup
    Order pallet label formats do not inherently require item or system data. A customer may request a custom Order Pallet Label Format without requiring pack size, GTIN, gross weight, pallet weight, or any other item-level fields. Validations are enforced only when the specific pallet label format is designed to require certain data elements. If a label format does not depend on a given field, the system will not validate or block label printing based on that field. Depending entirely on how a customer’s pallet label format is built, the following data elements may be used, but are not mandatory:

    Pack & Size: When used, the first value represents units per case
    • Gross weight
    • GTIN number

    Important: Selecting an Order Pallet Label Format does not automatically require any of the above fields. These elements are validated only if the specific label format is configured to use them.

    Requesting a Custom Order Pallet Label Format

    Customers who require a unique pallet label layout can request a custom Order Pallet Label Format to be created by Inspired.

    • Contact Inspired Technology Systems and request a custom Order Pallet Label Format
    • 
    Provide a sample label, specification, or customer requirements if available
    • Indicate whether the format should include or enforce any item or system data

    When requesting a custom pallet label format, customers may optionally specify whether the label should use or validate any of the following:

    • Pack & size
    • Gross weight
    • GTIN number
    • Pallet weight
    • Any other item- or pallet-level data elements

    These restrictions are optional and only applied if explicitly requested and built into the label format.

    Once the Format is Created
    • The custom pallet label format will be added as a dropdown option under Order Pallet Label Format in the Customer Master
    • The format can then be selected for the appropriate customer
    • All order pallet labels for that customer will follow the new format once orders are verified

    This approach allows Inspired to support both simple and highly specialized pallet labeling requirements without impacting other customers or workflows.

    Key Takeaways
    • Order Pallet Label Formats are customer-specific and optional
    • Selecting a label format does not automatically impose item requirements
    • Any validations are driven solely by how the label format is designed
    • Custom pallet label formats can be requested directly from Inspired
    • Optional item and pallet restrictions can be included if required by the customer

Ship Multi Item

  • Shipping Multi Item Pallets

    Shipping Multi-Item Pallets

    Shipping multi-item pallets allows warehouse teams to place more than one SKU on a single pallet during the picking and shipping process. While the Inspired ERP system fully supports mixed-SKU pallets, many EDI customers require stricter pallet rules to meet their compliance, labeling, and receiving standards.

    To support these requirements, Inspired provides a customer-level control that determines whether multiple SKUs are allowed on the same pallet. This ensures orders are picked, verified, and shipped in compliance with customer-specific rules—without relying on manual checks or tribal knowledge. This article explains how the Ship Multi Item Plts customer setting works, how it impacts the picking process, and what warehouse users will see when mixed-SKU pallets are not allowed.

    What is a Multi-Item Pallet?
    A multi-item pallet (also referred to as a multi-SKU pallet) contains two or more different items stacked on the same pallet.

    Examples:
    • A pallet containing Item A and Item B
    • A pallet containing three different SKUs picked for the same order

    Some customers—especially EDI customers—do not allow this and require:

    • One SKU per pallet
    • Pallets to remain SKU-pure from picking through shipping

    Inspired ERP supports both workflows, controlled entirely at the customer level.

    Where to Configure This Setting
    The Ship Multi Item Plts? setting is maintained in the Customer Master.

    1. Go to Sales → Customers.


    2. Search for the customer using the search bar at the top of the screen.

    3. Under the Action tab on the left, click the upside-down triangle icon to expand customer options. Then click the Manage / Edit (pencil icon) button.


    4. Locate the Ship Multi Item Plts? dropdown near the top of the page.


    • This field is automatically set to Yes for all new customers
    • It may be changed to No when a customer requires SKU-pure pallets

    How This Affects the Picking Process

    When Ship Multi Item Plts? is set to No, the system actively enforces pallet rules during picking.

    System Enforcement
    • Warehouse users cannot stack a different SKU onto an existing pallet
    • The system validates pallet contents in real time
    • Users must either:
    - Pick to a new pallet, or
    - Pick to another pallet that already contains the same item

    Error Message Example
    When attempting to place a different item onto a mixed pallet, the system displays the following message:


    This prevents compliance issues before the order ever reaches shipping or labeling.

    Relationship to EDI and Customer Compliance
    This feature is commonly enabled for EDI customers, who often require:

    • Strict pallet composition rules
    • SKU-pure pallets for automated receiving
    • Customer-specific labeling formats

    By enforcing pallet rules at the picking stage, Inspired ERP ensures:

    • Fewer shipping errors
    • Cleaner EDI transactions
    • Reduced chargebacks and rejections

    Pallet Labels (Brief Overview)
    Some customers that restrict multi-item pallets also require custom pallet labels. Inspired ERP supports customer-specific pallet label formats through the Order Pallet Label Format setting. These labels:

    • Are generated at the order level
    • Are only available after all pick tickets are verified
    • Print when the order reaches Ready to Manifest status

    Note: Pallet label formats are configured independently from the Ship Multi Item Plts? flag. A customer may restrict mixed-SKU pallets without requiring a custom label format, and vice versa.

    Key Takeaways
    • Inspired ERP fully supports both single-SKU and multi-SKU pallet workflows
    • The Ship Multi Item Plts? flag controls pallet composition at the customer level
    • The system enforces pallet rules during picking—before shipping or labeling
    • This feature is critical for EDI compliance and customer-specific shipping requirements

    By configuring this setting correctly, warehouse teams can confidently ship compliant pallets without manual oversight.

Customer Item Prices

  • Disabling a Customer Item Price

    Disabling a Customer Item Price

    Customer Item Pricing allows Inspired ERP to apply customer-specific prices for individual items during order entry. Over time, these prices may need to be discontinued due to contract changes, discontinued items, or corrections. Rather than deleting historical pricing records, Inspired ERP allows users to disable a customer item price. Disabling a price prevents it from being used on future orders while preserving pricing history for reporting, auditing, and reference purposes. This article explains when and why customer item prices should be disabled, where the setting is maintained, and how disabling a price impacts order entry.

    A Customer Item Price is a price record tied to:
    • A specific customer
    • A specific item
    • Optional conditions such as units of measure or effective dates

    When active, this price automatically overrides standard pricing during Sales Order Entry for that customer and item combination.

    Why Disable a Customer Price?
    Disabling a customer item price is commonly used when:
    • A negotiated price is no longer valid
    • A contract or agreement has expired
    • An item is no longer sold to that specific customer for that price

    Disabling ensures the price is no longer applied going forward, without removing historical data tied to past orders.

    How to Disable a Customer Item Price
    Disabling a customer item price removes it from active pricing without deleting the record.

    1. Go to Sales → Customer Item Prices menu.


    2. Select the All Items radio button near the top of the screen.


    3. Enter the Customer and Item Number to narrow the results, then click on the Search button.


    4. Locate the priced item and click the Edit (pencil icon) under the Action column.


    5. You will now be on the Change Customer Item Price screen. On this screen, simply locate the Status dropdown & change the status from Active to Disabled.


    Once disabled, the customer-specific price will no longer be available during order entry. Simply follow the steps above to reactivate the price if desired, however be sure to select Disabled from the Price Status dropdown option first to locate the disabled item with a customer price.

    How Customer Item Prices Apply During Order Entry
    When entering a sales order for a customer that has a customer-specific item price, the system applies that price automatically.

    Order Entry Behavior:
    • After selecting the Item on the order line
    • Before clicking Add / Update
    • The Price field automatically populates with the customer-specific price
    • The Price Source field displays Customer Price


    Pricing Priority:
    • Customer Item Price always overrides the Item Master price when one is active
    • If no active customer item price exists, the system falls back to standard pricing logic

    This ensures negotiated or contract pricing is consistently applied during order entry.

    Key Takeaways
    • Customer item prices are managed from Sales → Customer Item Prices
    • Use All Items to locate both priced and unpriced items
    • Disabling a price removes it from active order entry without deleting history
    • Disabled prices can be viewed using the Price Status filter
    • Disabled prices appear in red and can be re-enabled at any time

  • Customer Item Prices

    Customer Item Prices Overview

    Customer Item Prices in Inspired ERP allow you to assign customer-specific pricing to individual items. When a customer-specific price exists, it automatically overrides the standard Item Master price during sales order entry, ensuring accurate billing and consistent application of negotiated or contract pricing. This feature is commonly used for customers with special pricing agreements, volume discounts, or long-term contracts that differ from standard pricing.

    Accessing Customer Price Options
    1. Navigate to Sales → Customer Item Prices.


    2. The Customer Item Price Listing page opens, displaying item pricing based on the selected filters.


    Default Page Behavior (No Prices Yet)
    When you first access Sales → Customer Item Prices, the system displays all items without any customer-specific pricing applied.

    • For items that do not yet have a customer item price, the Add New + icon appears in the Action column.

    • No other action icons (Edit, View, Audits) appear until a customer price has been created.

    • Once a customer item price exists, the full set of action icons becomes available for that item.

    This design makes it easy to quickly identify which items still require customer pricing.

    Requiring Customer Item Prices (Customer-Level Settings)
    Inspired ERP allows you to enforce customer-specific pricing at the Customer Master level.

    • Within the Customer Master, you can enable Require Customer Item Prices.

    • When set to Yes, this customer must have a valid customer item price for every item they order.

    This setting is commonly used for contract customers or customers with negotiated pricing structures.

    System Enforcement & Validation

    If a customer is set to Require Customer Item Prices and attempts to add an item to a sales order without an active customer item price, the system will stop the order from proceeding. This red hard-stop message will be received:


    This ensures pricing accuracy and prevents orders from being entered with unintended or incorrect pricing.

    Pricing Priority Logic
    • Customer Item Prices always take priority over Item Master pricing.

    • If Require Customer Item Prices = No, the system will fall back to Item Master pricing when no customer price exists.

    • If Require Customer Item Prices = Yes, the system will not allow fallback pricing.

  • How to set up a New Customer Item Price

    How to Set Up a New Customer Price

    Customer Item Prices allow businesses to define customer-specific pricing that overrides standard Item Master pricing during sales order entry. This feature ensures accurate billing for customers with negotiated rates, contracts, or special pricing agreements. Once a customer item price is created, it automatically takes priority when that customer adds the item to a sales order, helping prevent pricing errors and manual overrides.

    Accessing Customer Price Options
    1. Navigate to Sales → Customer Item Prices.


    2. The Customer Item Price Listing page opens with filtering options at the top. By default, the page displays items based on your selected filters, such as customer, item number, item class, brand, item status, and price status.


    Understanding the Customer Item Price Listing
    The listing page provides a clear view of all customer-specific pricing:

    • Pencil - Edits the existing customer price.

    • Eyeball - Views the customer price.

    • Plus - Add a new customer price with a future As Of date.

    Info - View audit history of pricing changes.

    This layout makes it easy to identify which items still require pricing setup.

    Adding a New Customer Item Price

    To create a customer-specific price for an item:

    1. Locate the item in the Customer Item Price Listing.

    • Use the Search field or filters if needed.

    • Switch from Priced Only to All Items if the item does not yet have a customer price.


    2. Click on the Add New (+) icon in the action column.


    Completing the New Customer Item Price Screen
    On the New Customer Item Price screen, enter the following details:

    • Customer
    - Select the customer the price applies to.
    - This ensures the price is only used for that specific customer.

    • Item Number
    - Displays the selected item.
    - This value is auto-filled and cannot be changed on this screen.

    • Price Type / Method
    - Choose how the customer price is calculated.
    - This may be a fixed dollar amount or a percentage-based method, depending on your pricing rules.

    Price Type Value
    - Enter the dollar amount or percentage associated with the selected pricing method.

    • As Of Date
    - Defines when the price becomes effective.
    - This allows future pricing changes without deleting existing prices.

    Status
    - Set to Active to make the price available for use.
    - Inactive prices will not apply during order entry.

    Using As Of Dates to Override Existing Prices
    If a customer already has a price for an item:

    • Click the Plus (+) icon again to add a new price.


    • Enter a new As Of Date to define when the updated price takes effect.

    • The system will automatically use the most current active price based on the order date.

    This allows historical pricing to remain intact while supporting future changes.

    Customers That Require Customer Item Prices

    Some customers may be configured to require customer item pricing:

    • This setting is enabled in the Customer Master by setting Require Customer Item Prices = Yes.

    • When enabled, the customer cannot add items to a sales order unless a valid customer item price exists.


    If a required price is missing, the system will display a red hard stop message:


    This ensures pricing compliance and prevents accidental order entry without approved pricing.

    Best Practices for Setting Up Customer Item Prices
    • Review Customer Item Prices immediately after enabling Require Customer Item Prices for a customer.

    • Use Show → All Items to identify items that still need pricing.

    • Use As Of dates instead of editing existing prices to preserve pricing history.

    • Review audit history regularly to track pricing changes.