Manufacture Process

Overview

  • Manufacturing
    Easily plan and execute your manufacturing using our stream-lined cloud Food Manufacturing ERP Software.  Keep track of exactly what went into each day's manufacturing runs across any number of recipes, and what ultimately was produced from each run.  Our ERP for food industry software also lets you effortlessly trace through your production runs for a given lot to keep food traceability fast and simple.

    Process Using Recipes:

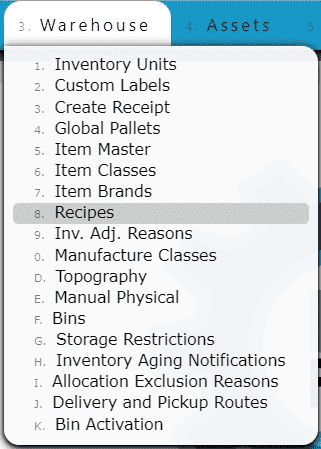
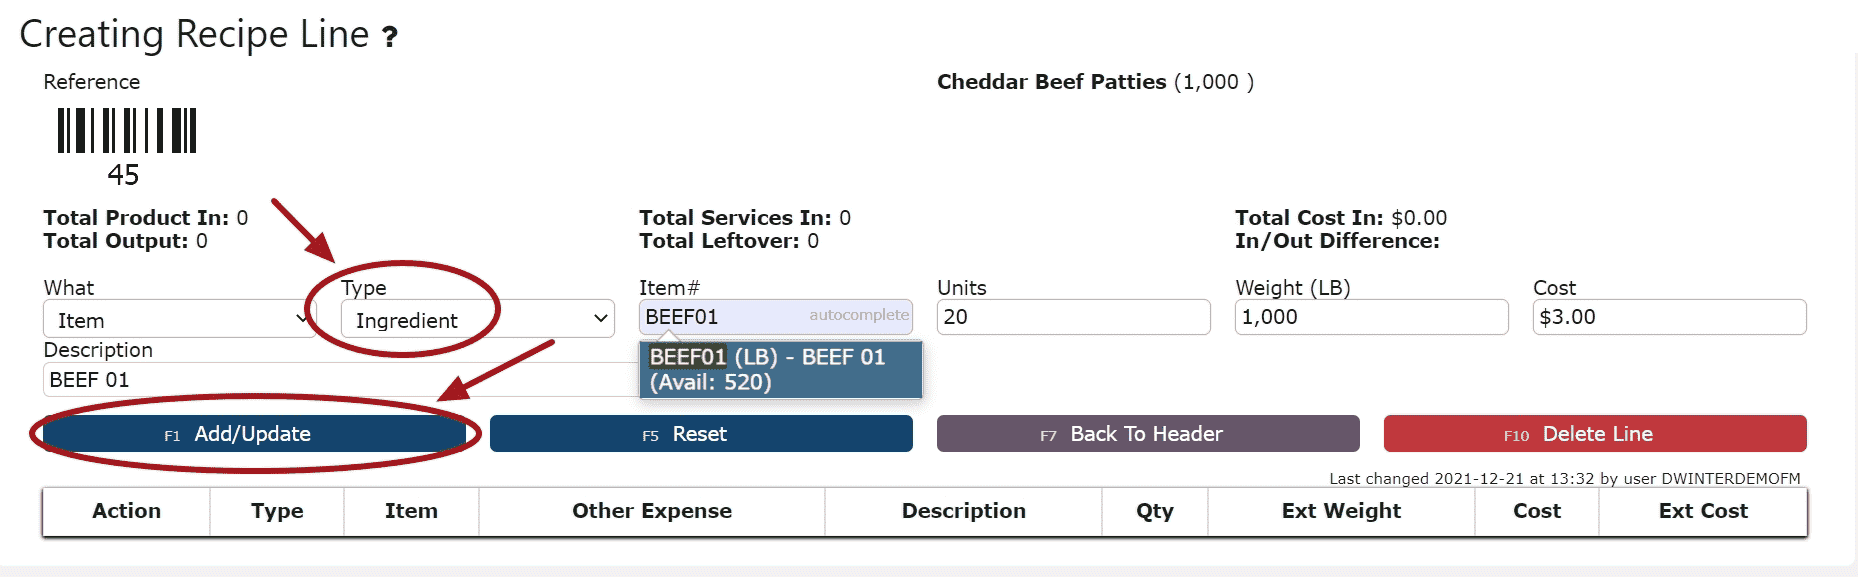
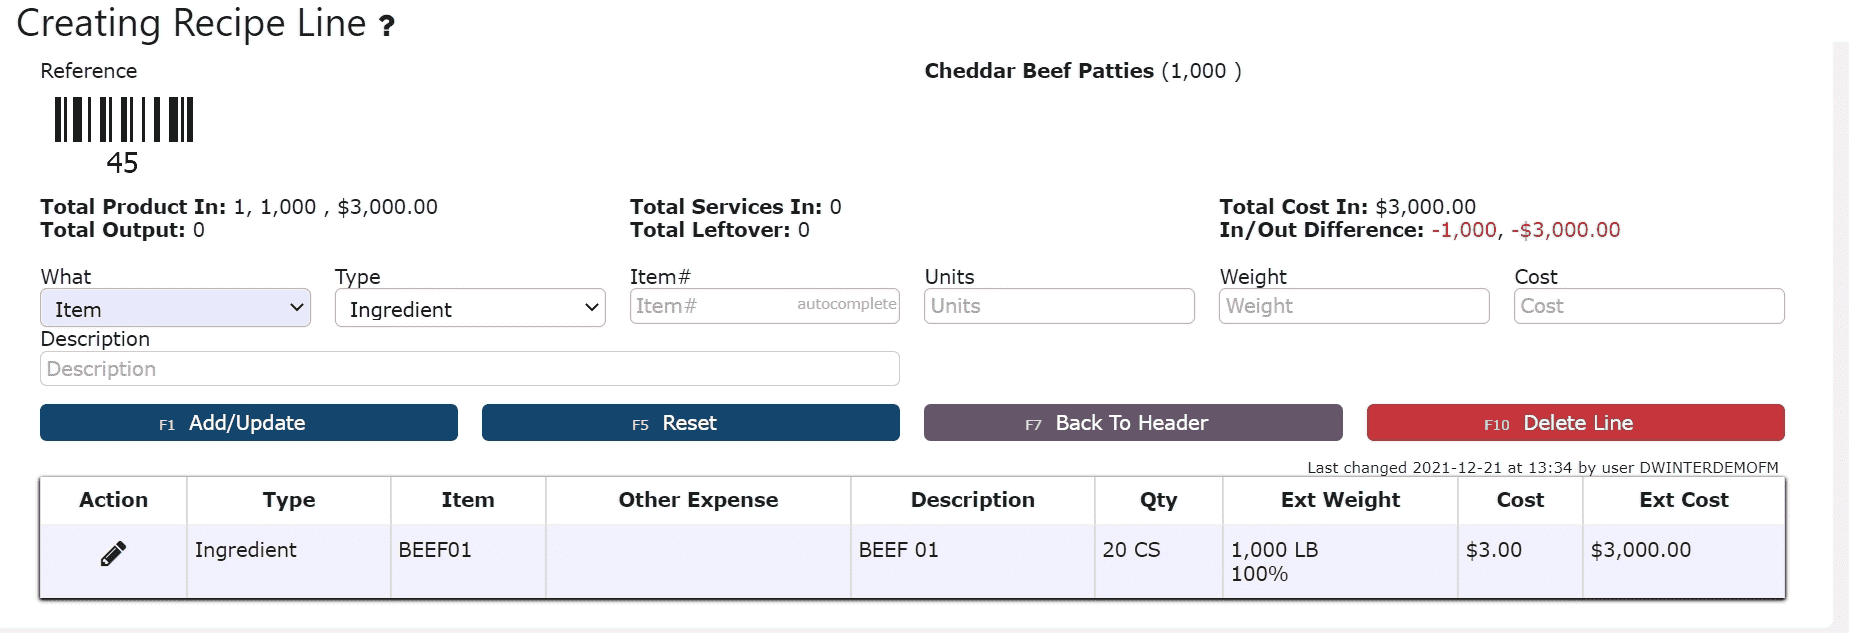
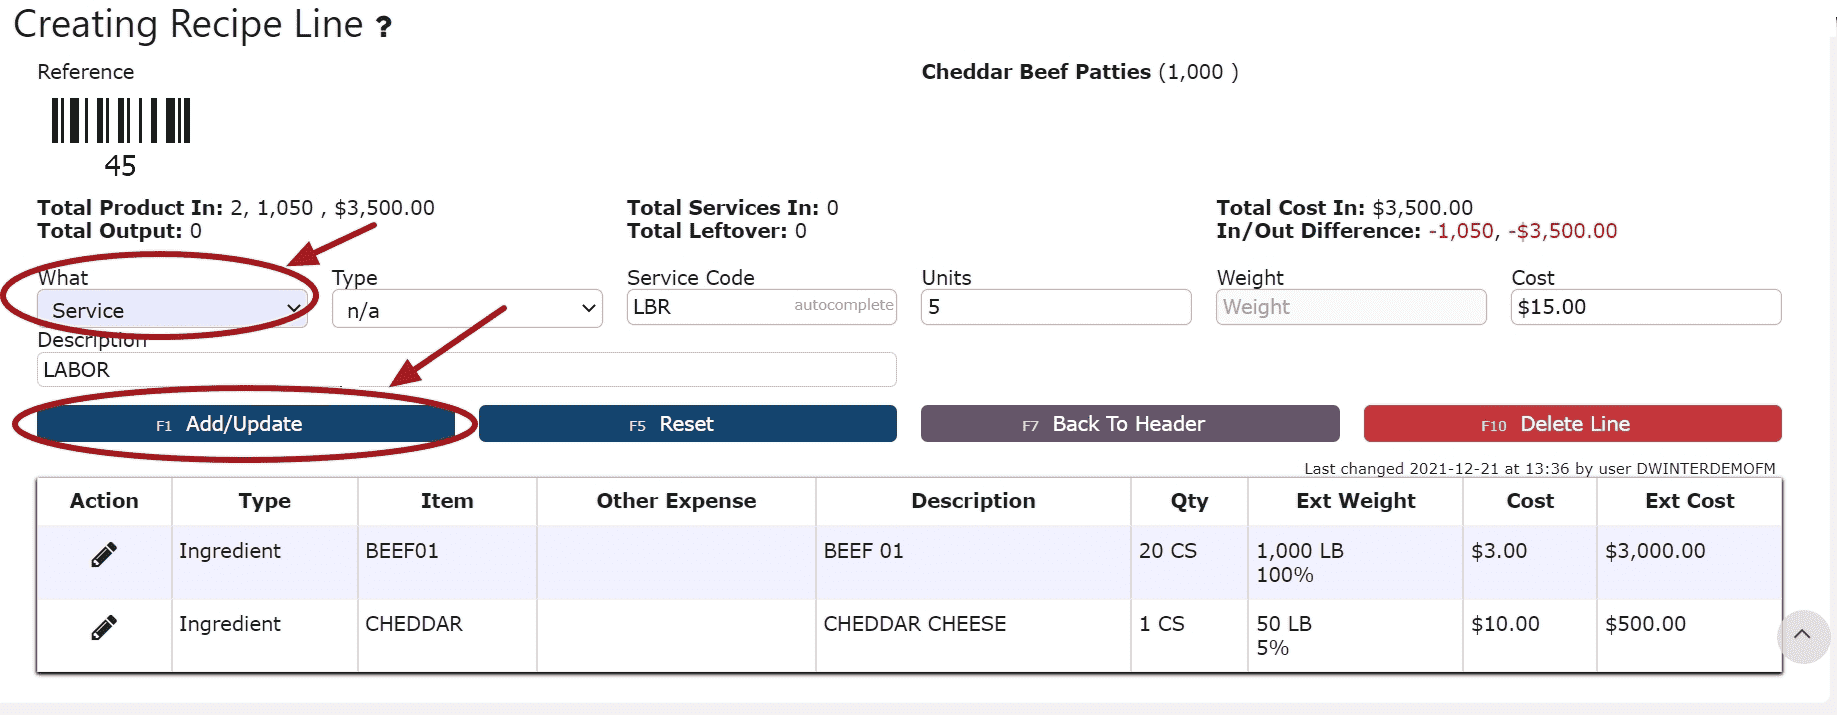
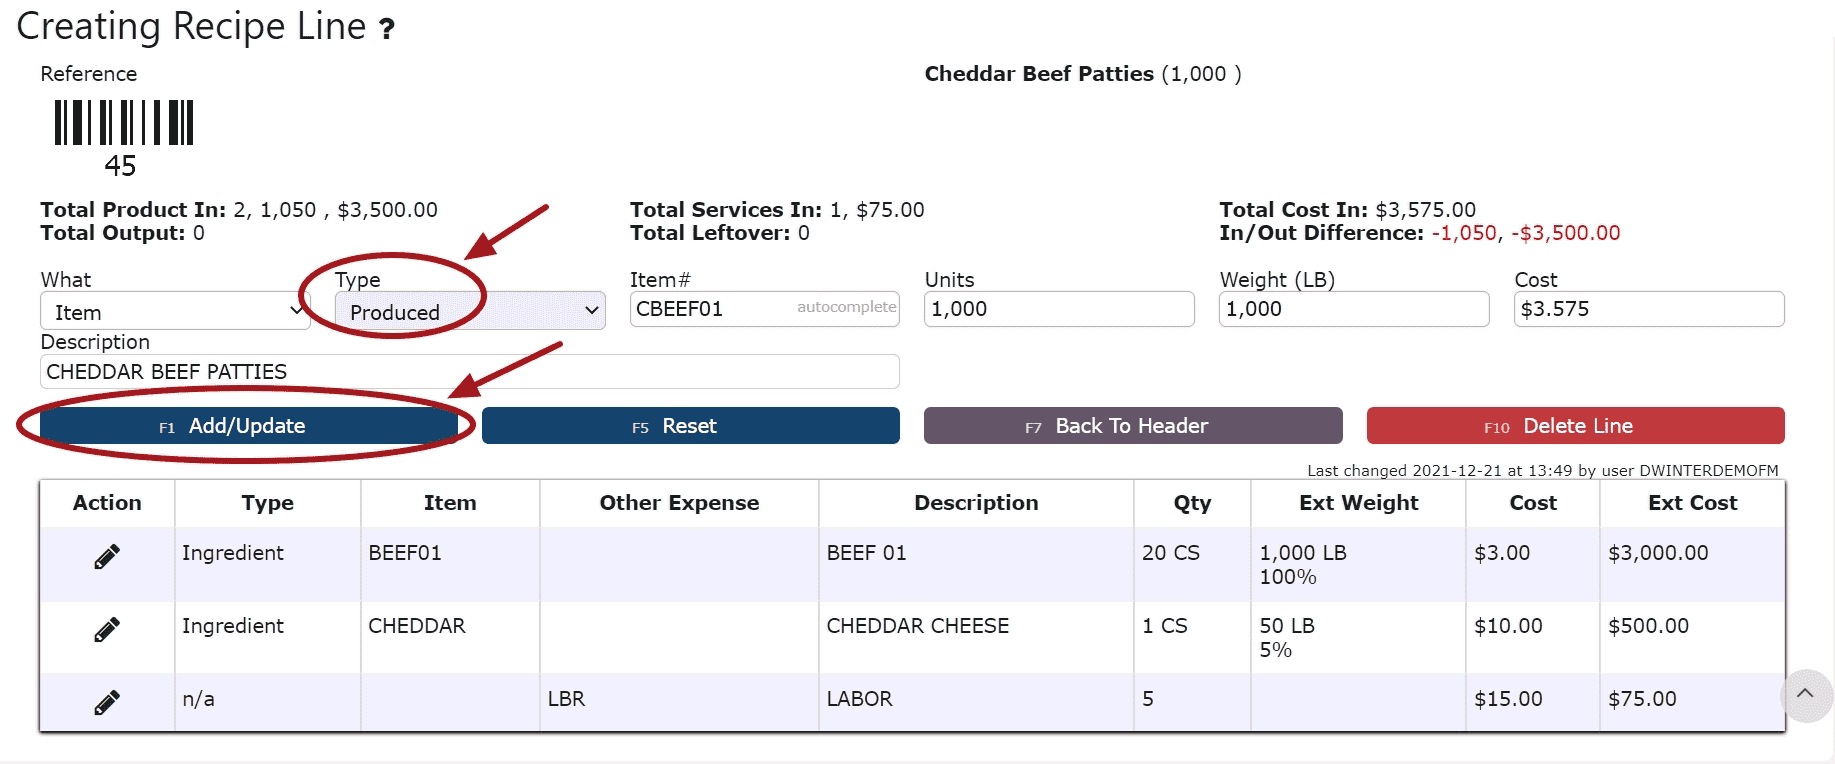
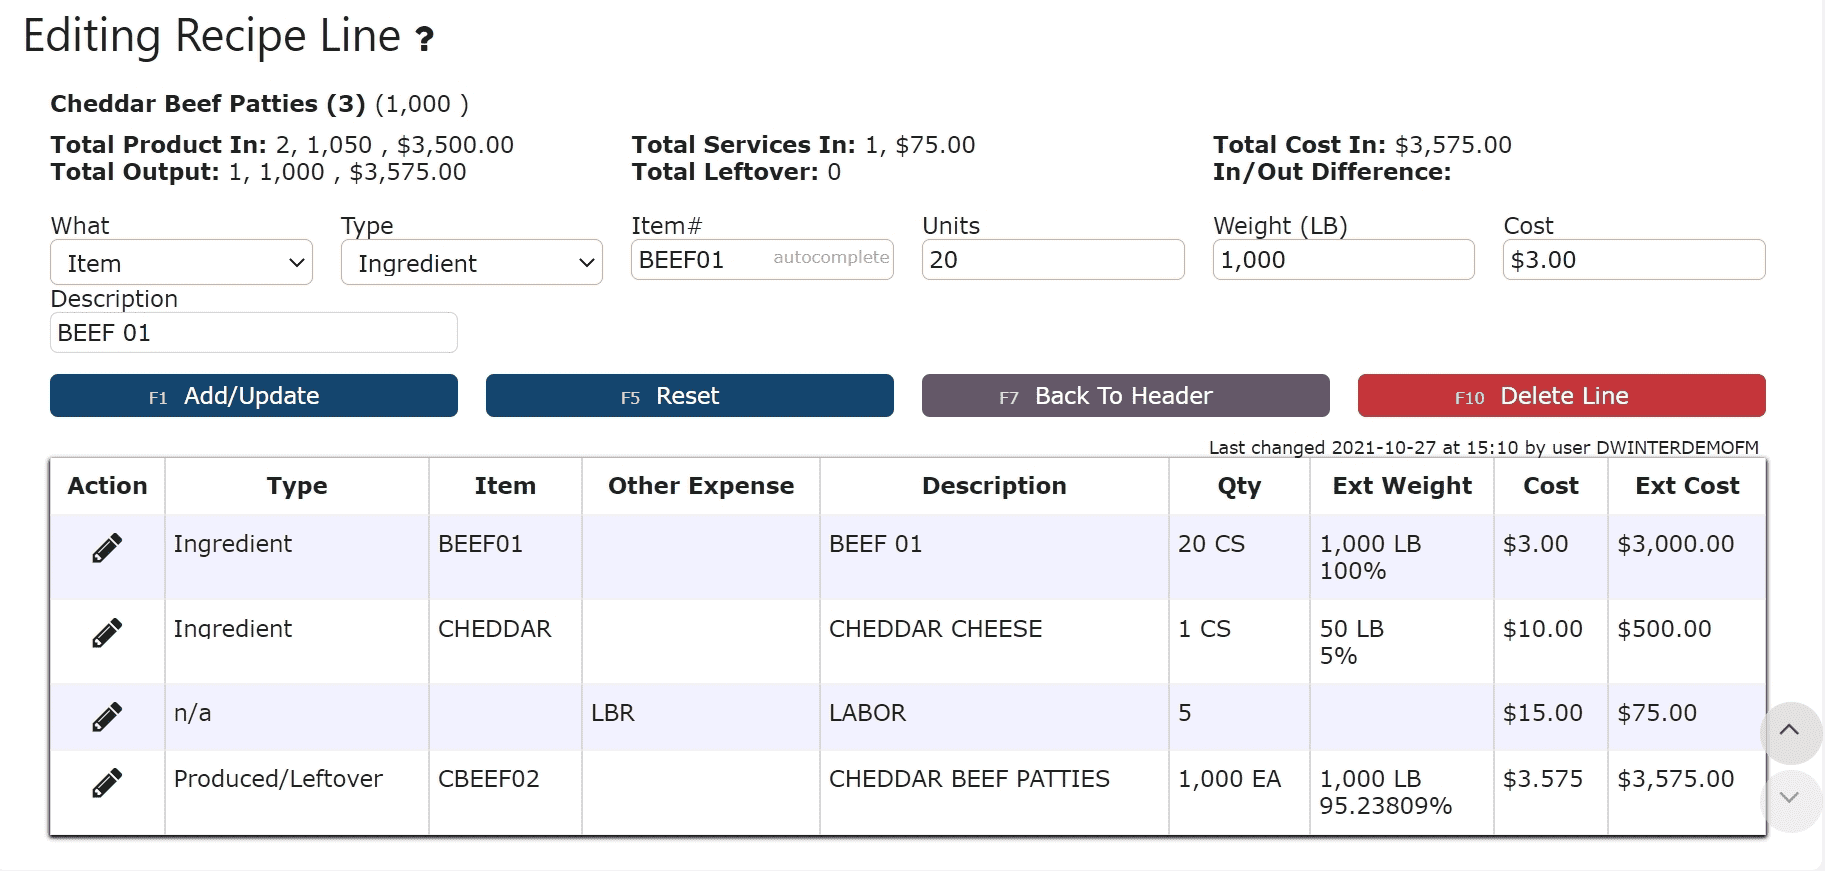
    *Contact I.T. to enable this feature. 

    1. Recipe: Create a recipe that contains the ingredients and the items to be produced. 

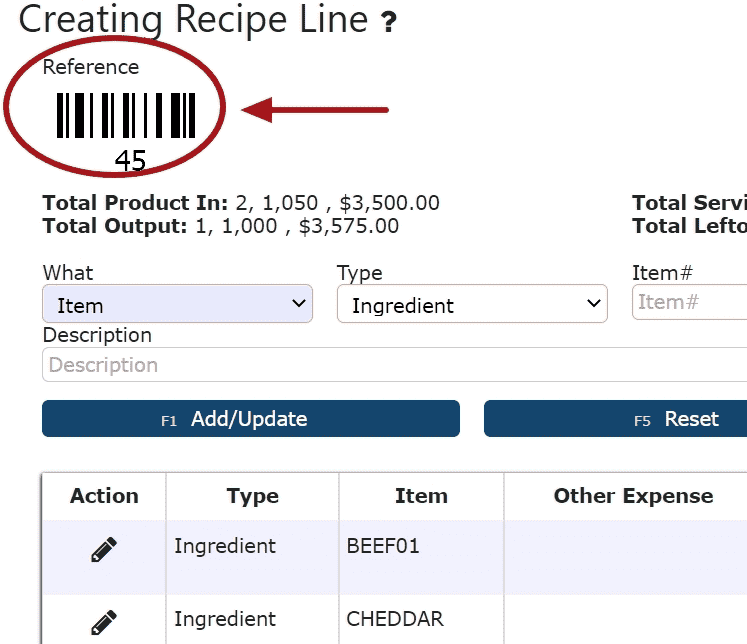
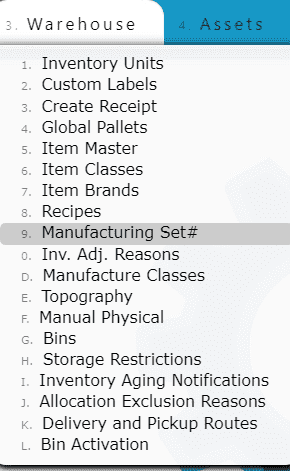
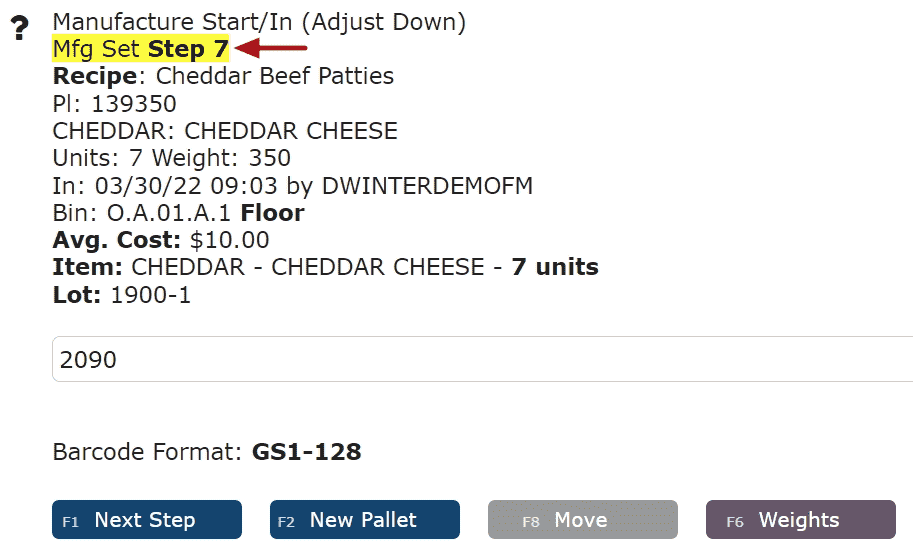
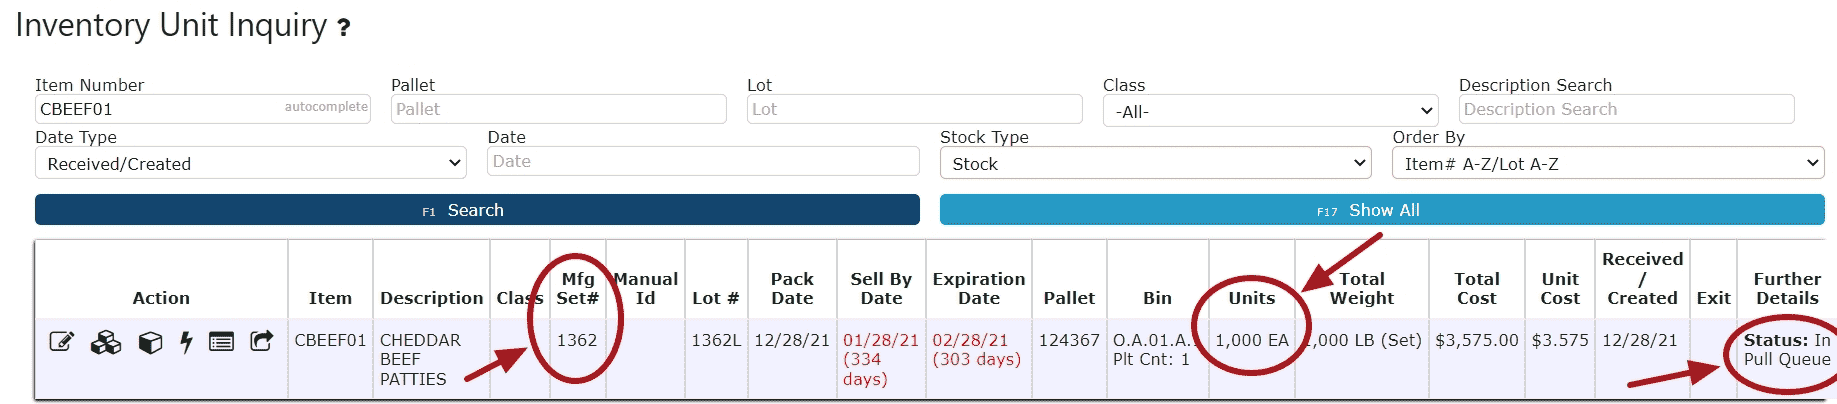
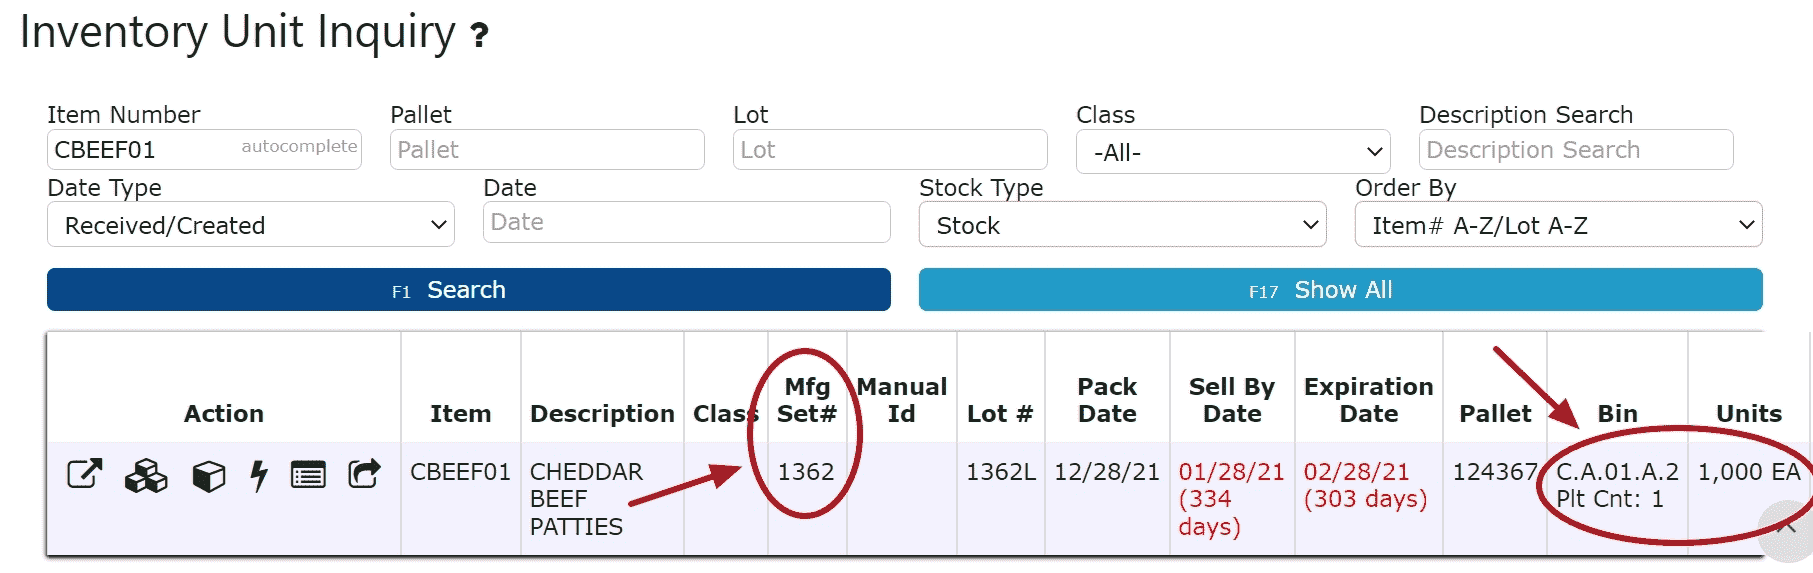
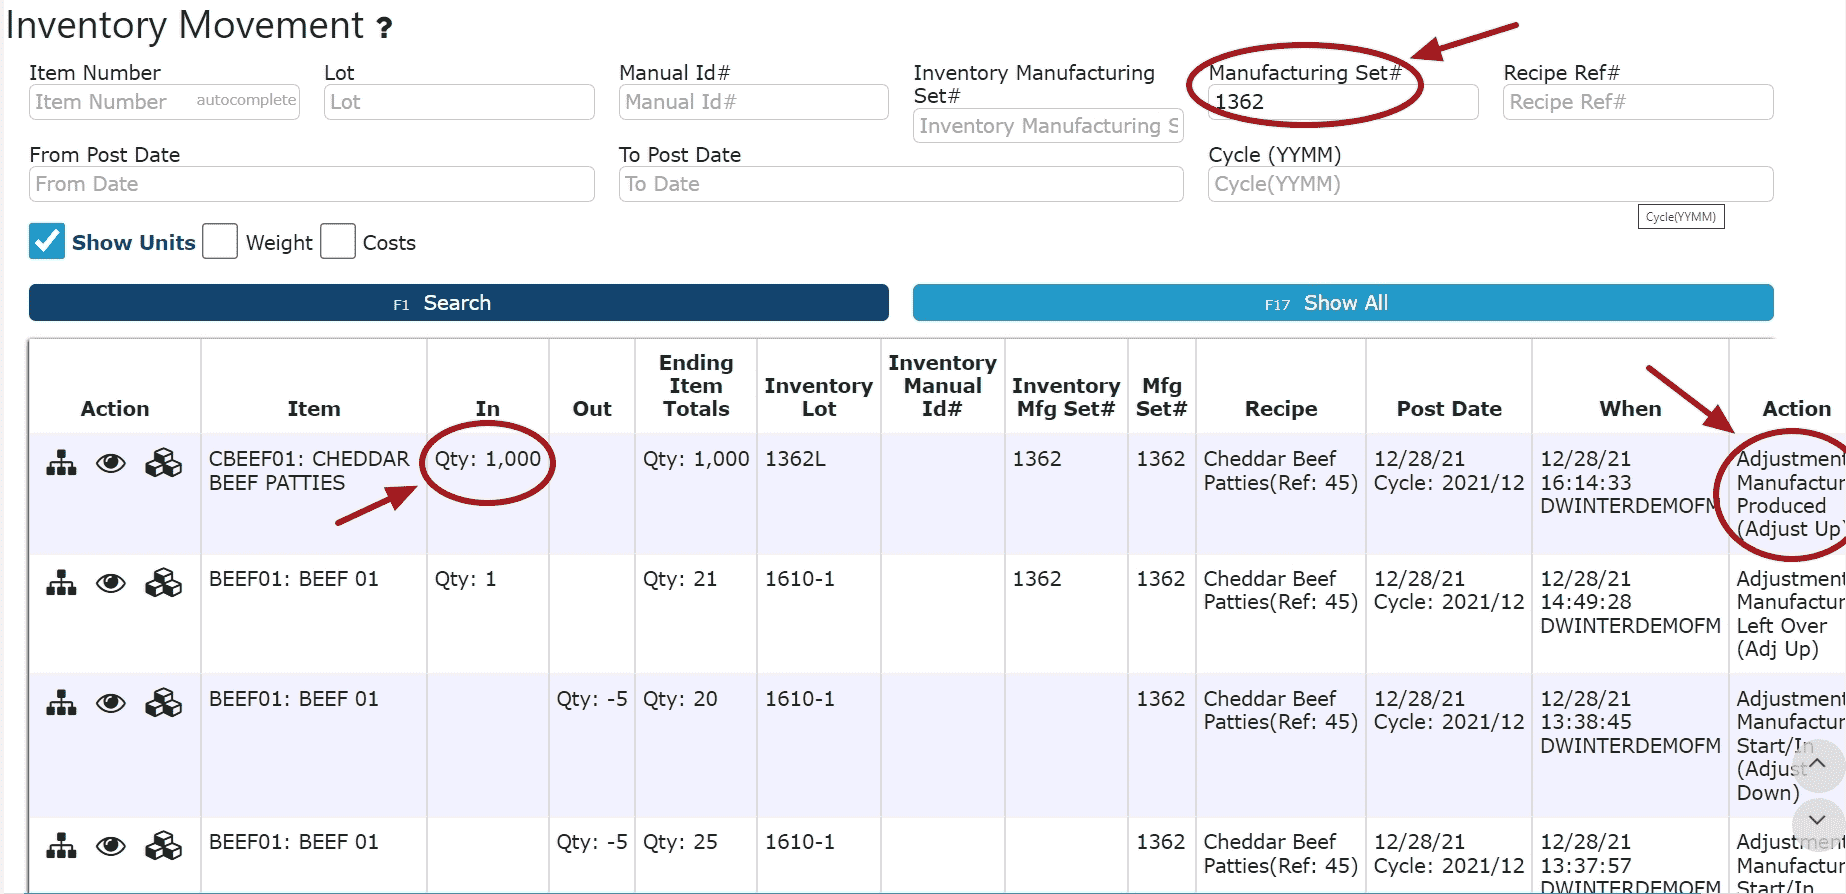
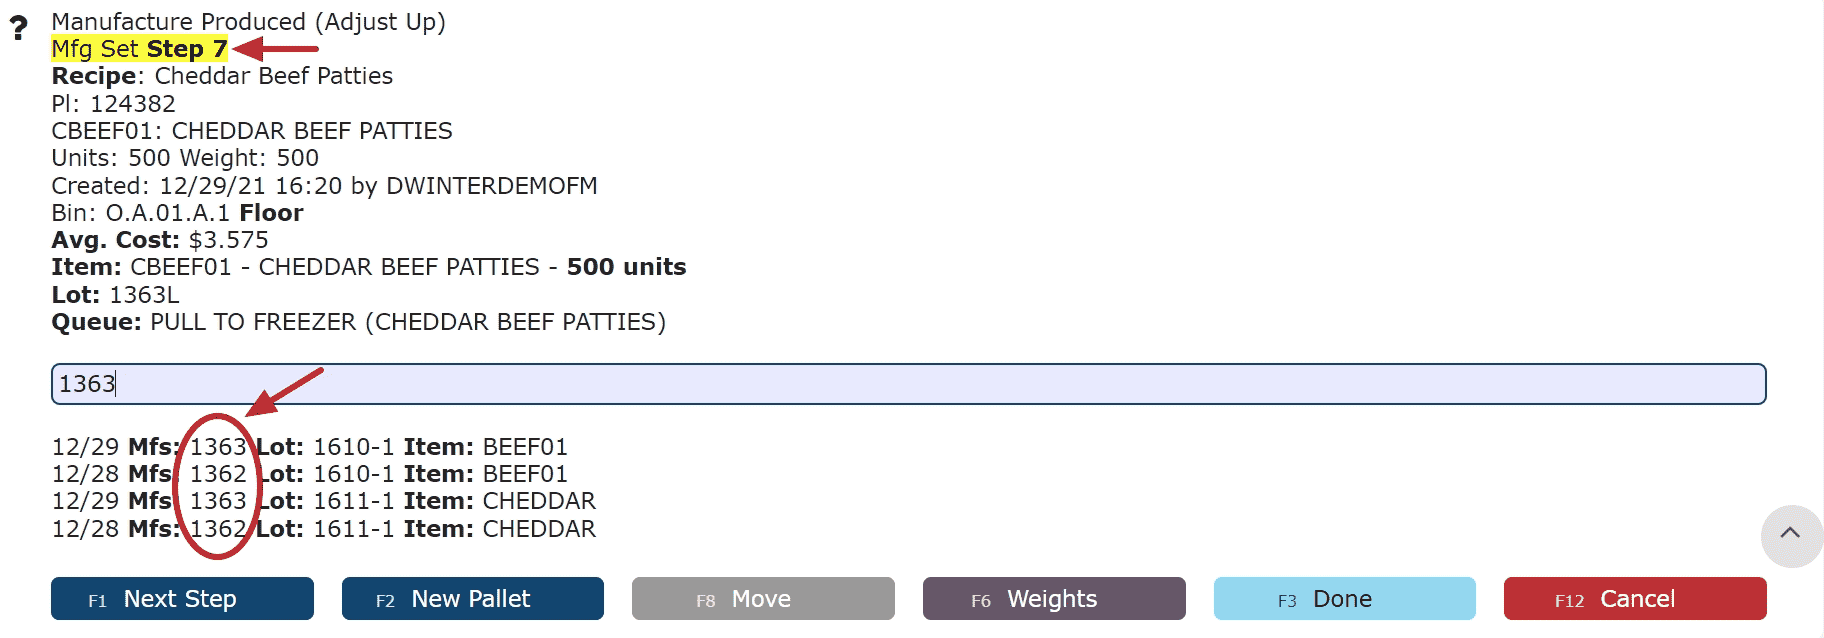
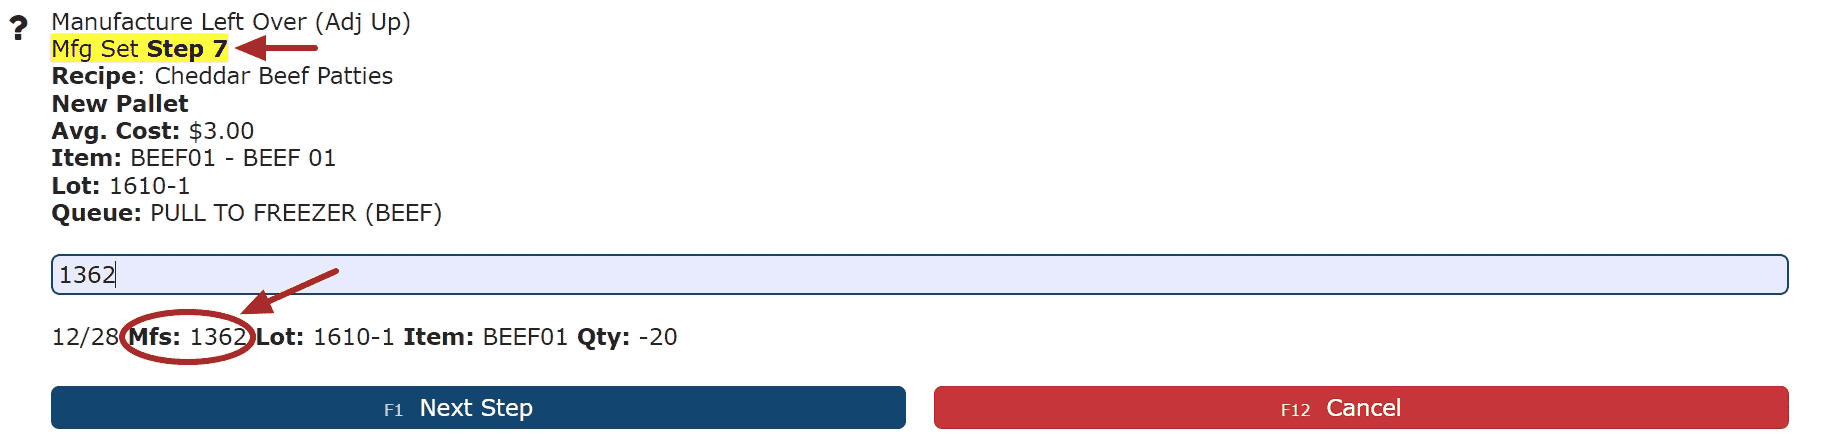
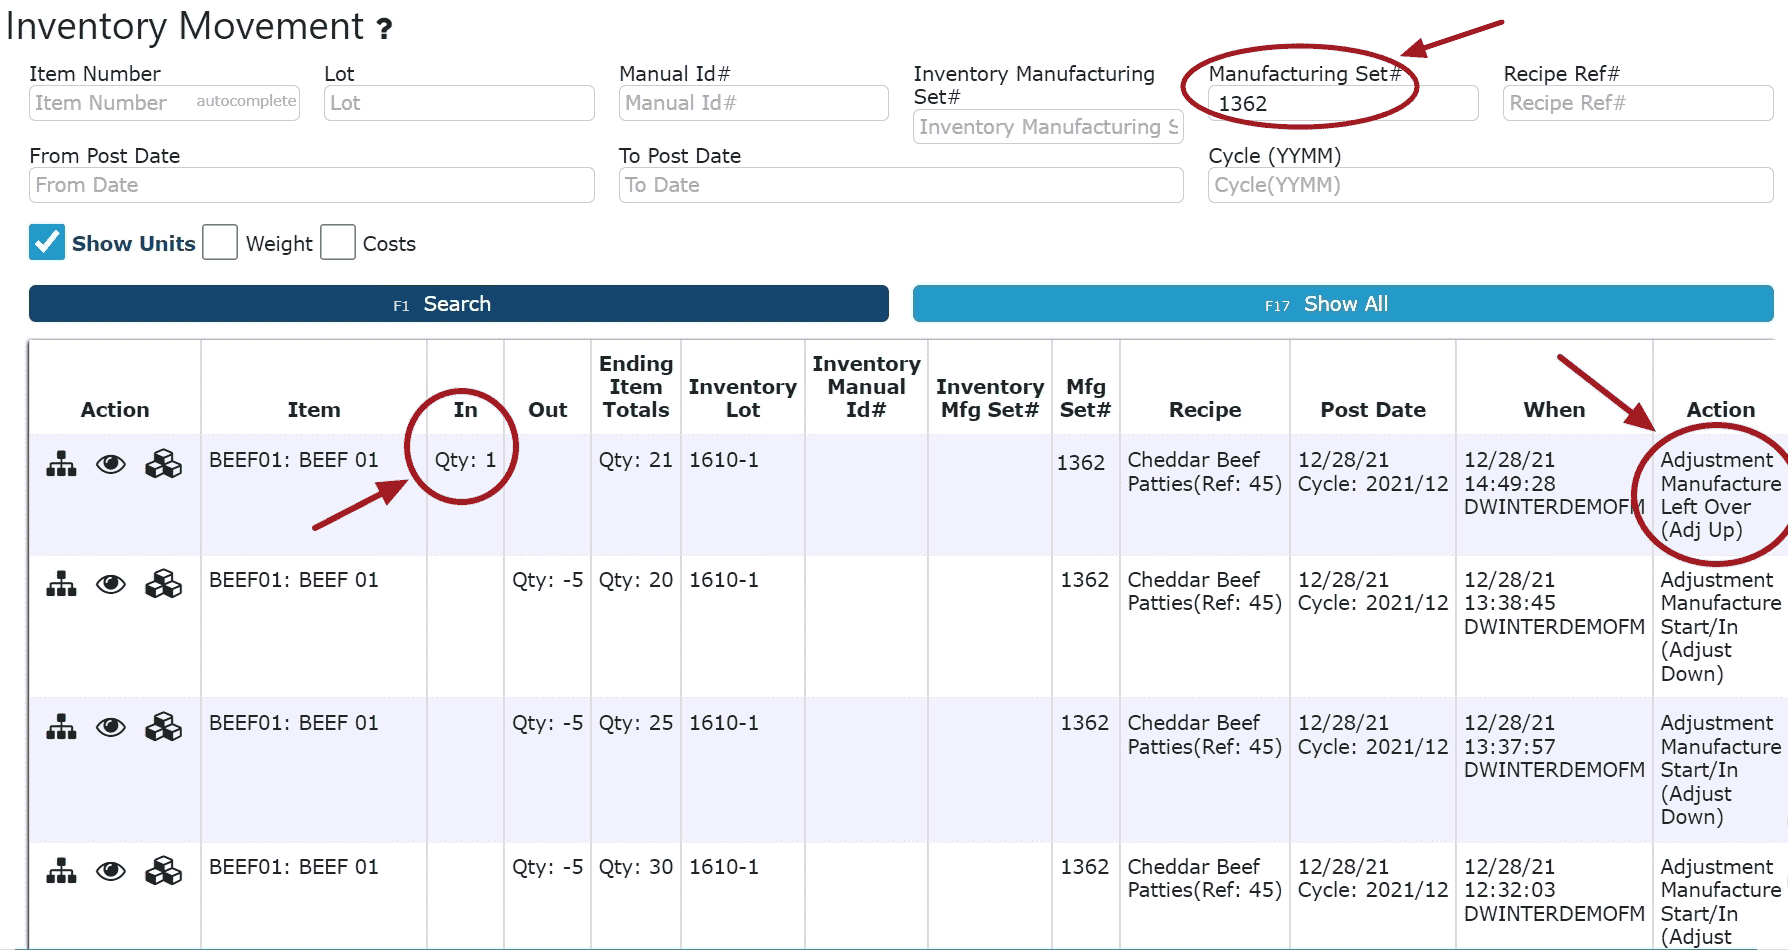
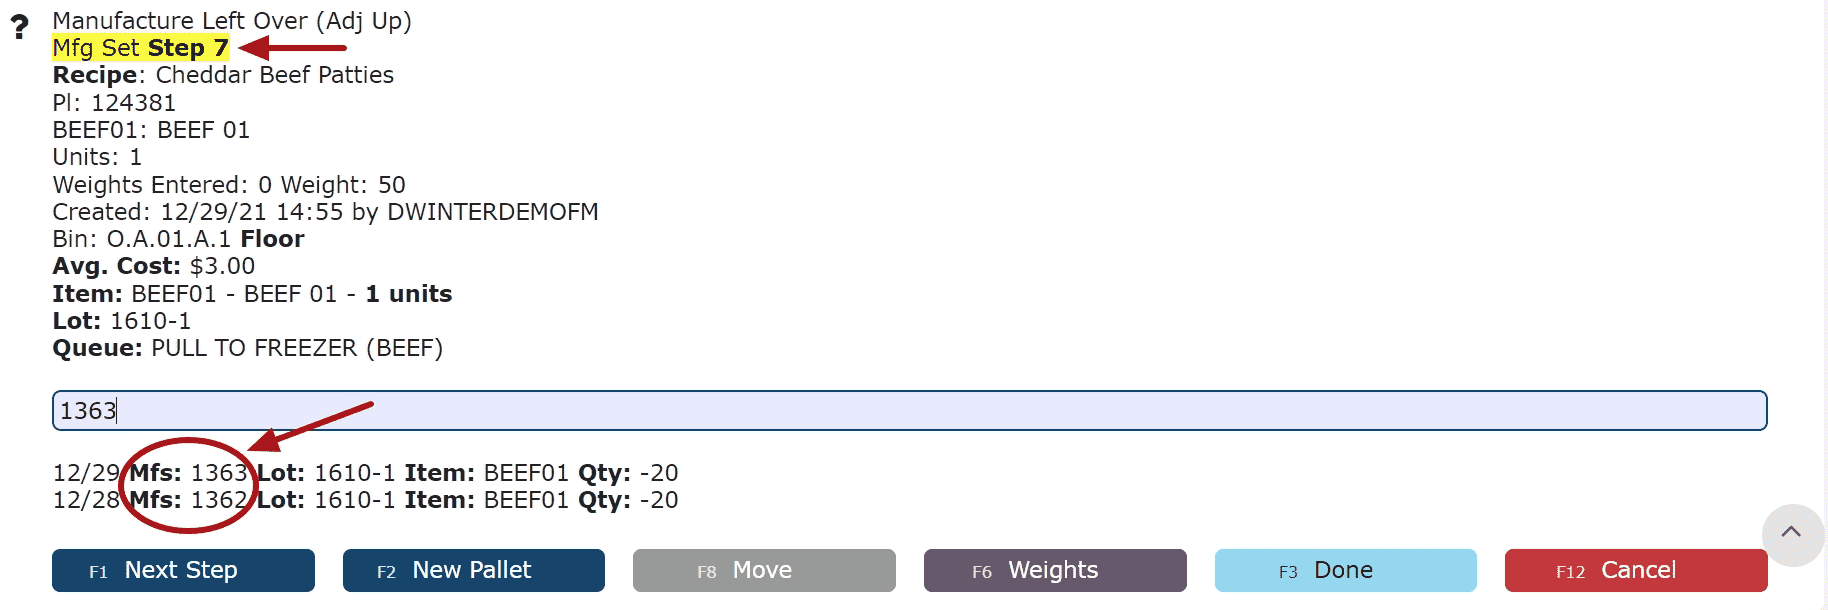
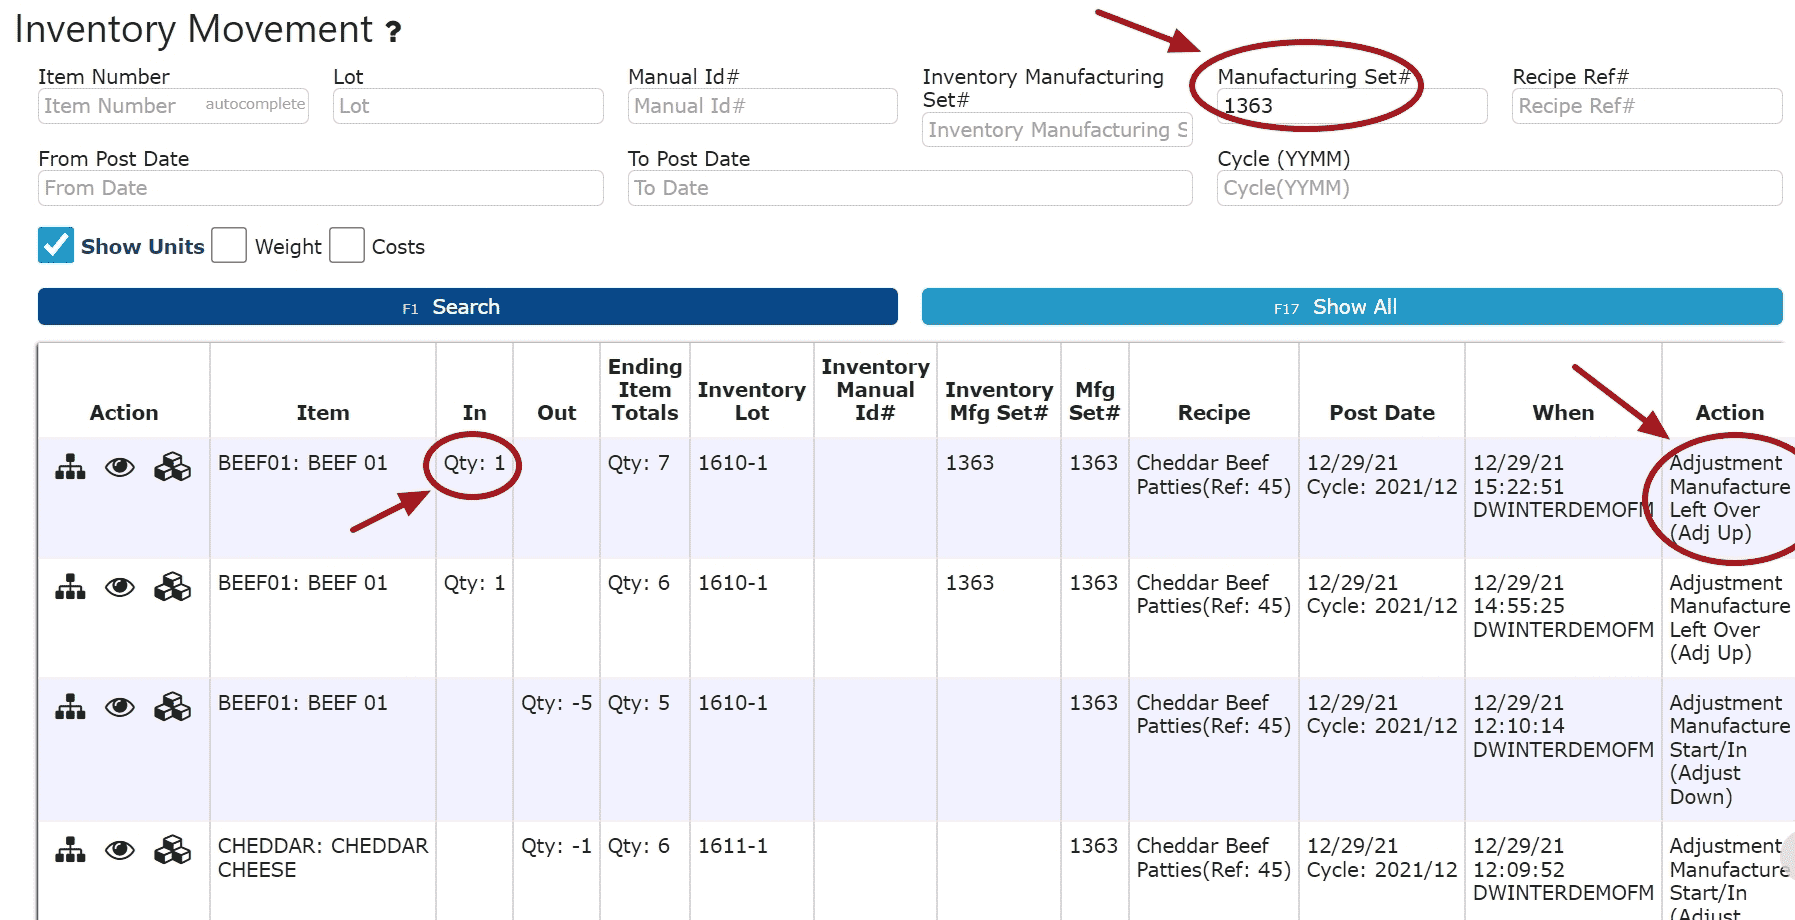
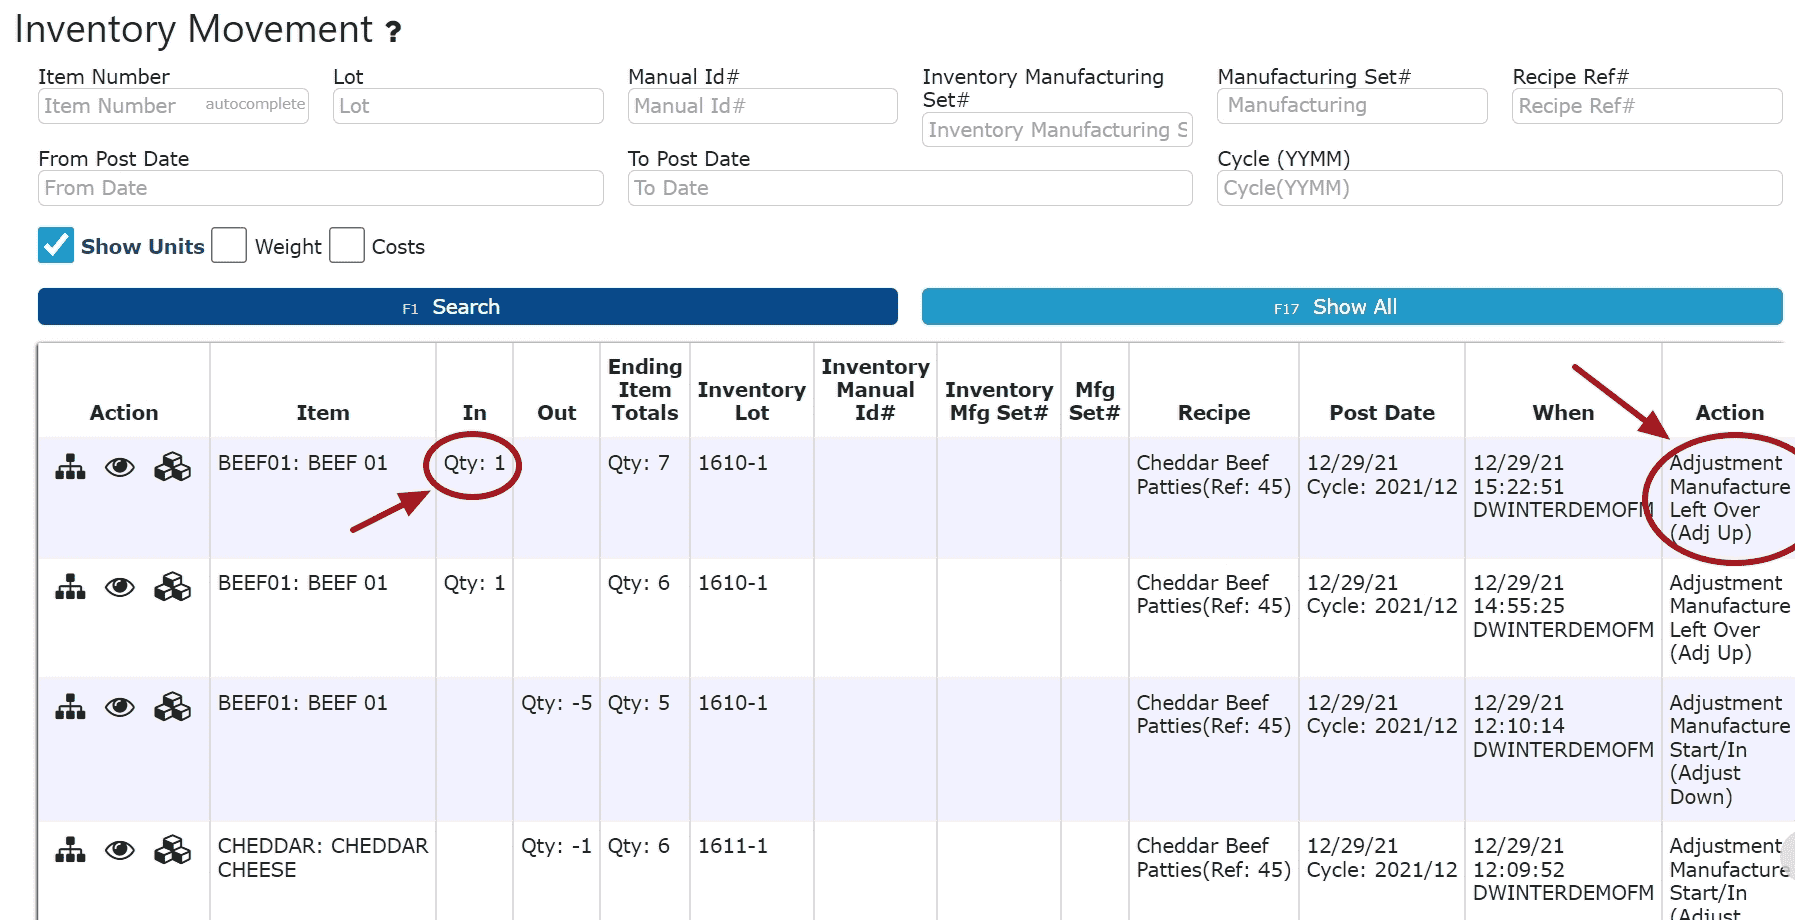
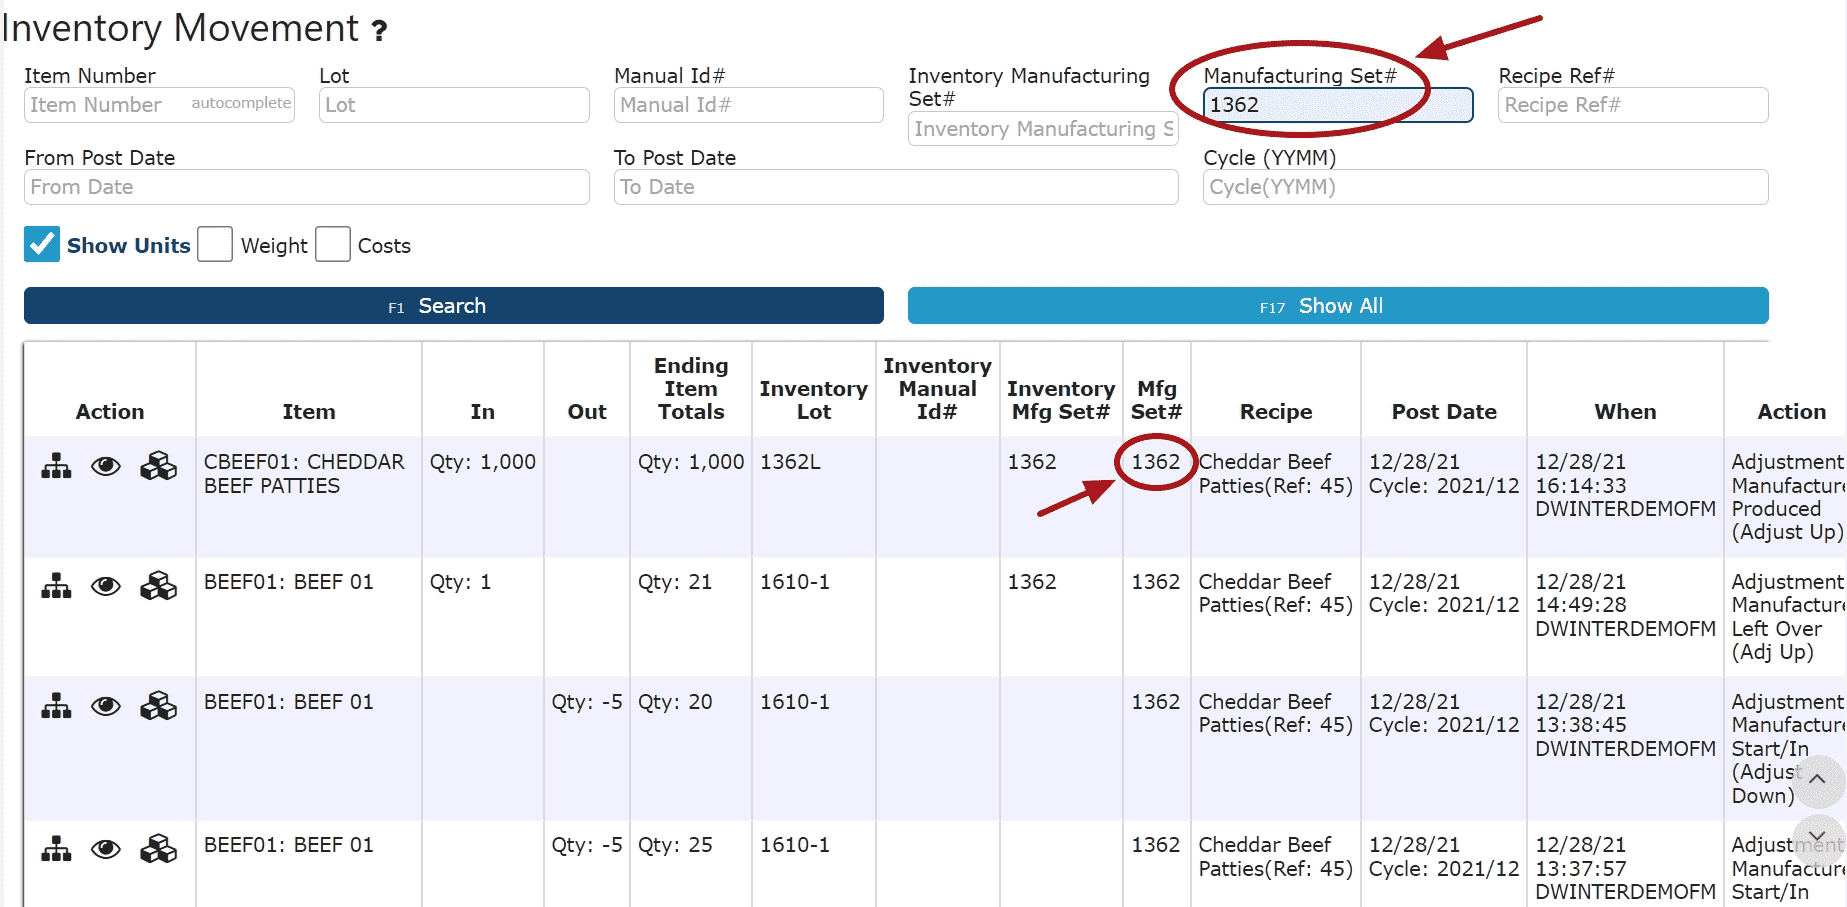
    2. Manufacturing Set#(MFS):  Represents a julian date that groups manufacturing runs for a particular day.  Choose to set the MFS# each day manually before starting the manufacturing process, or have the system automatically roll it forward at a specified time each day.  
     
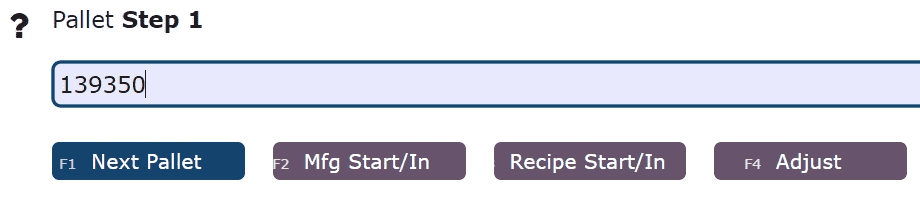
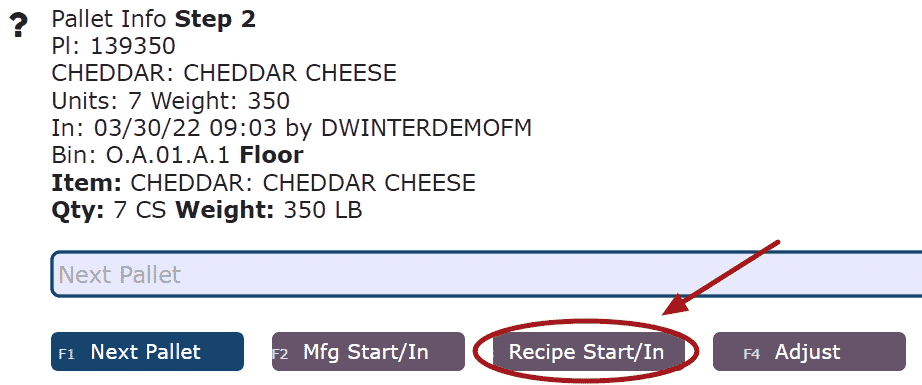
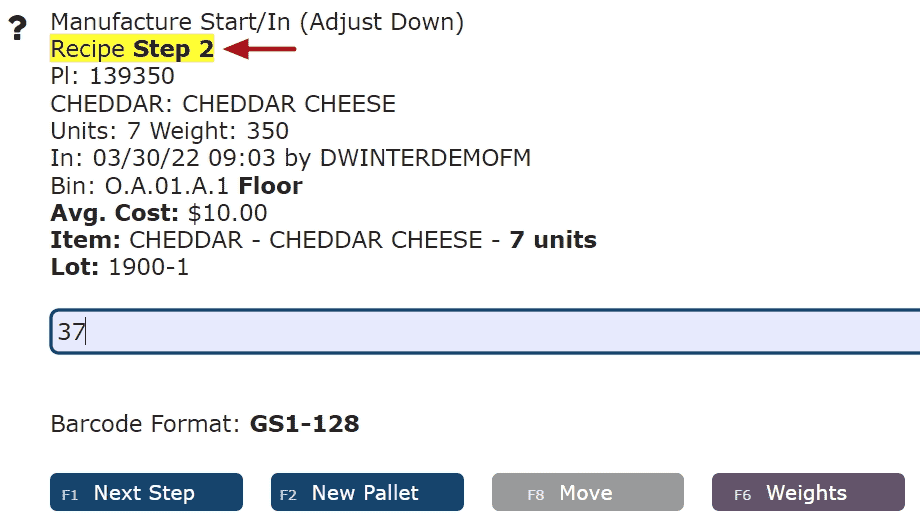
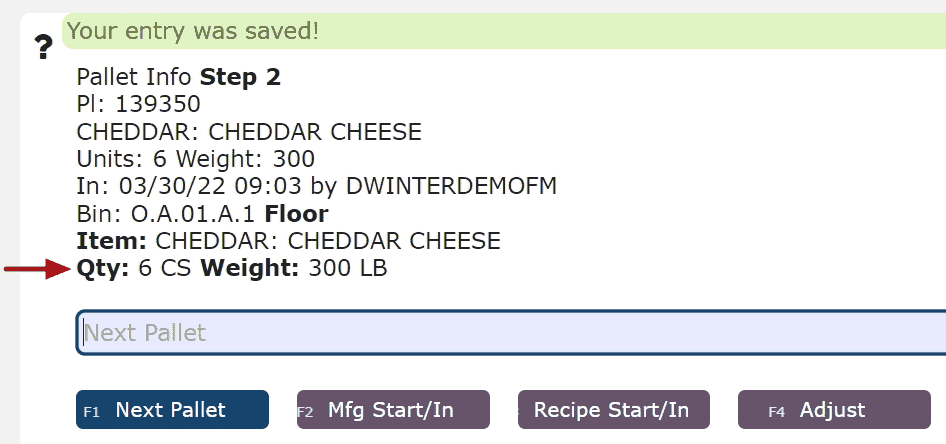
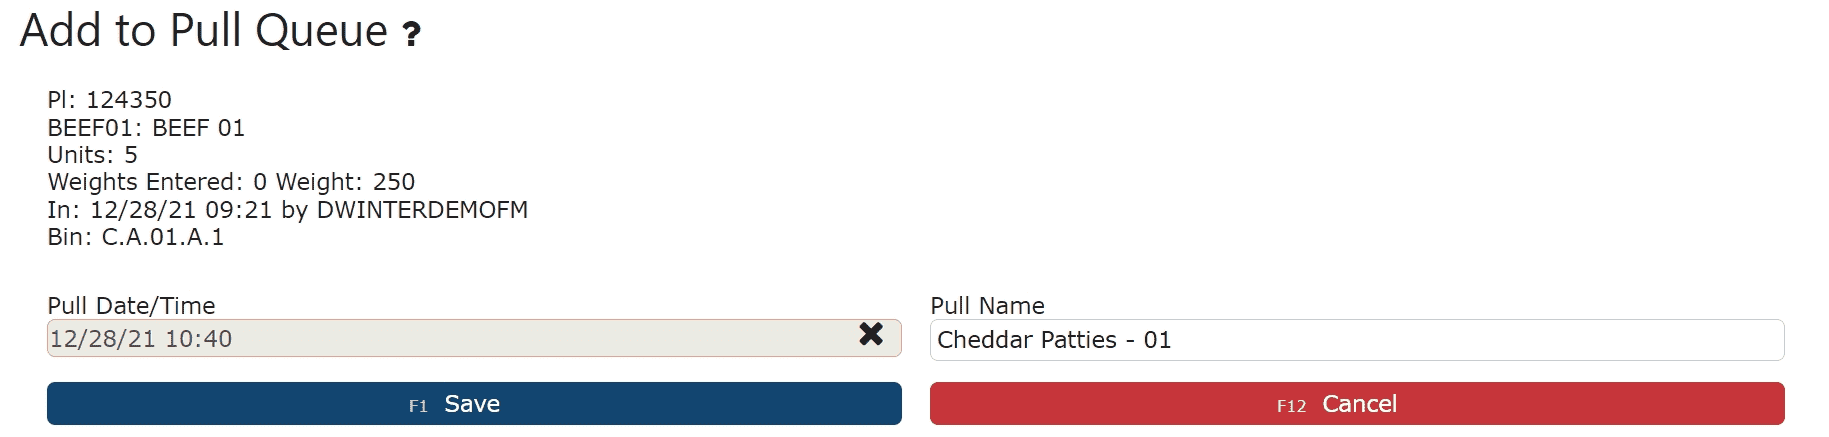
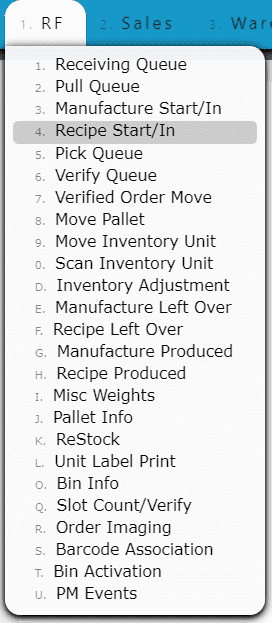
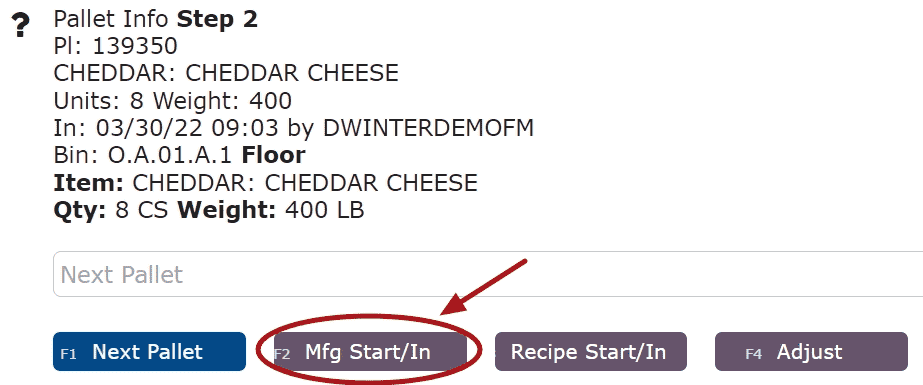
    3. Recipe Start/In: Take the items/ingredients out of inventory and have them placed into a manufacturing set.

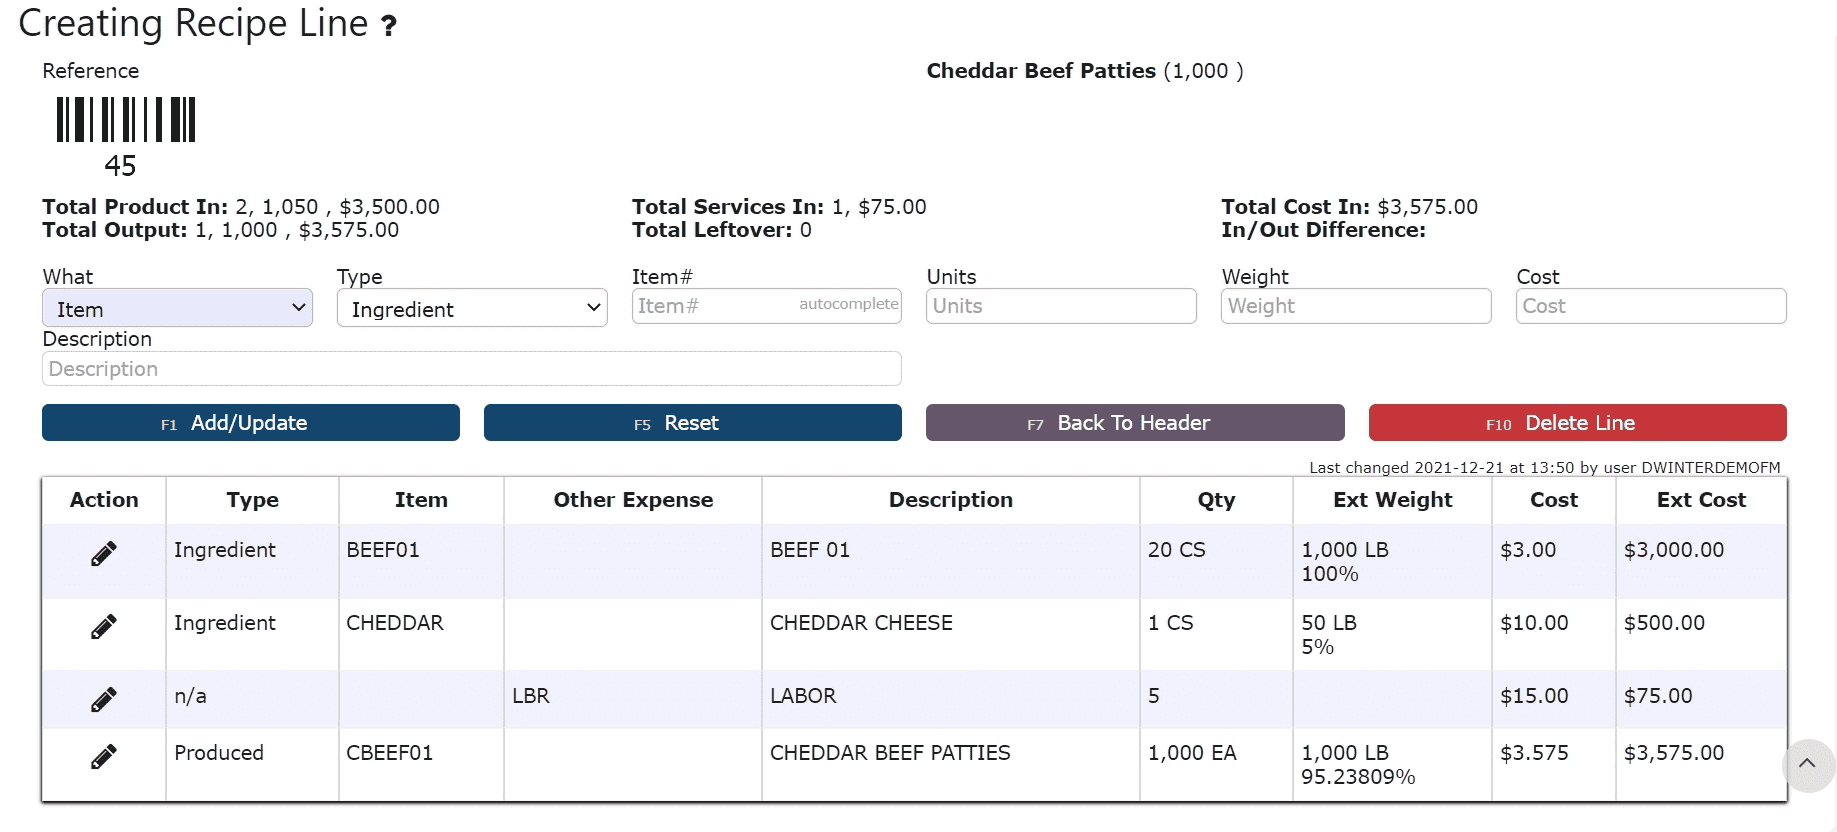
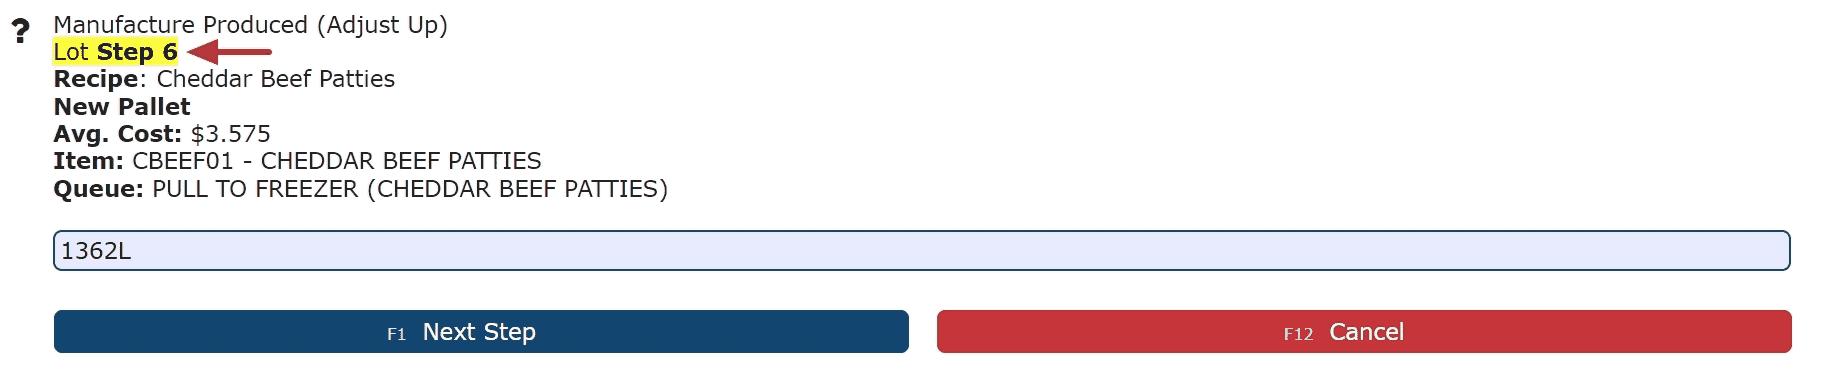
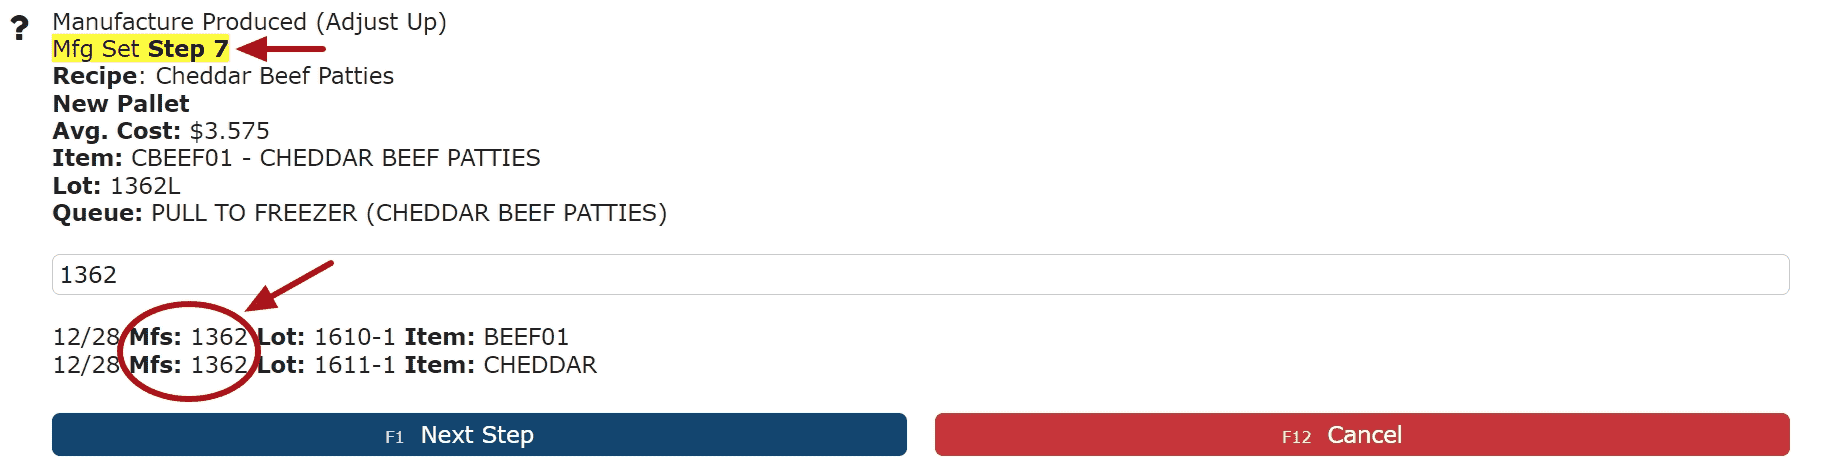
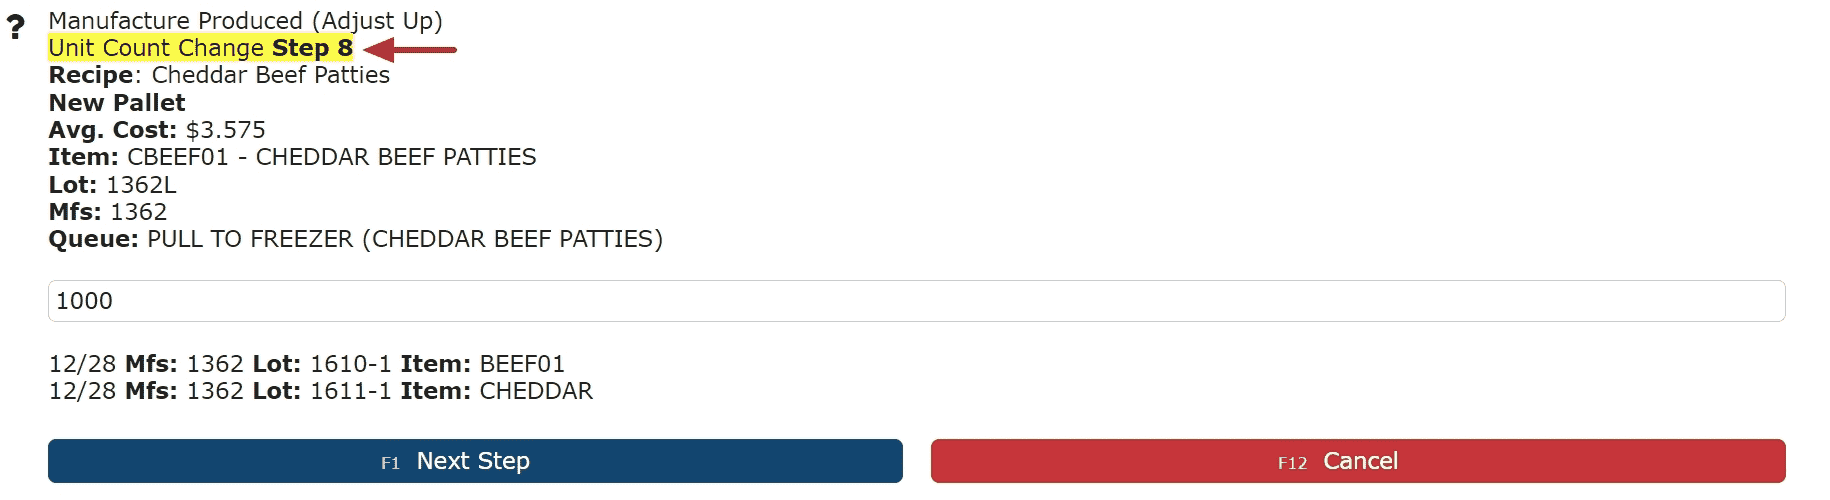
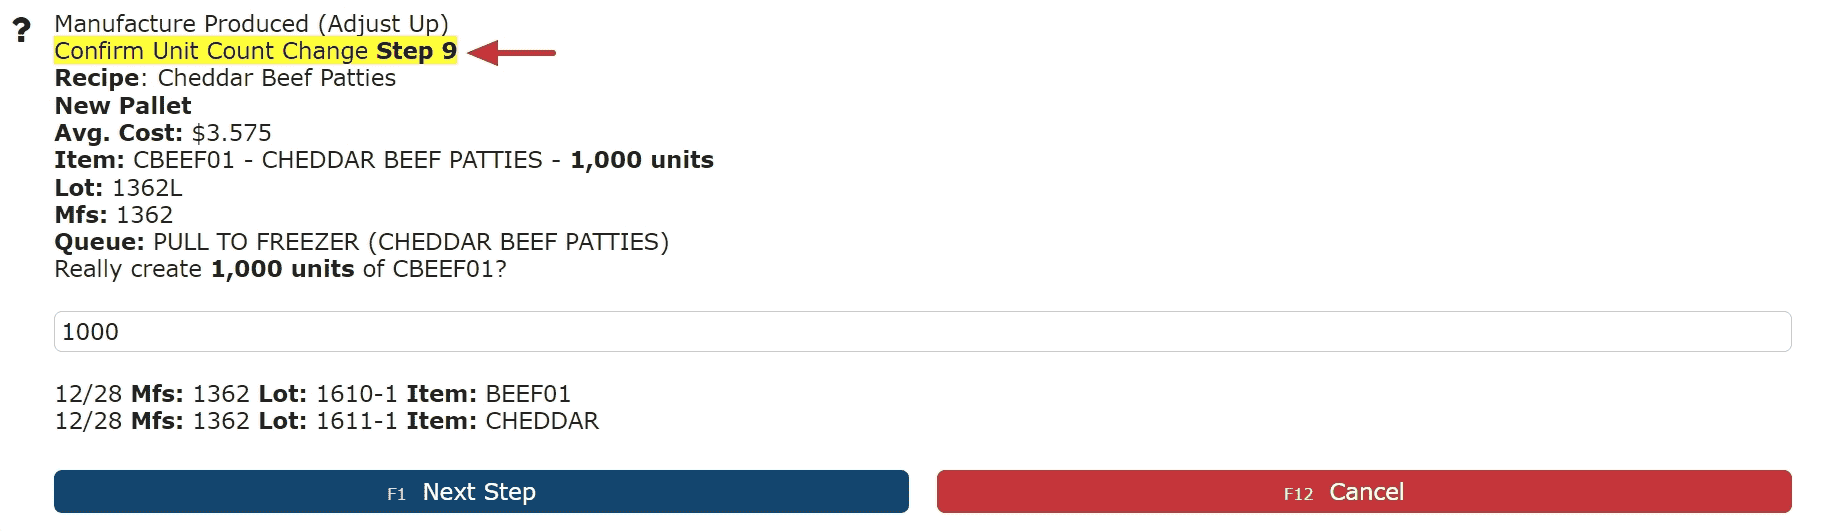
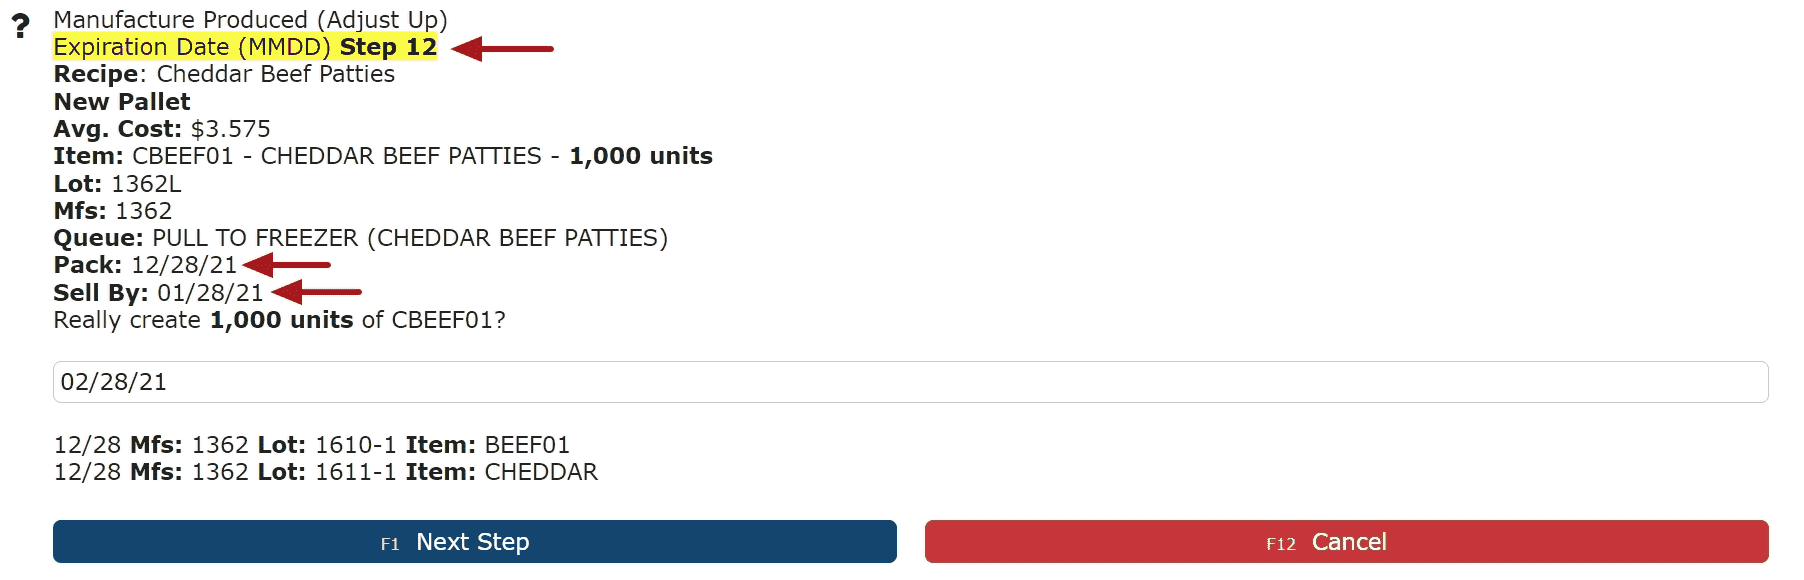
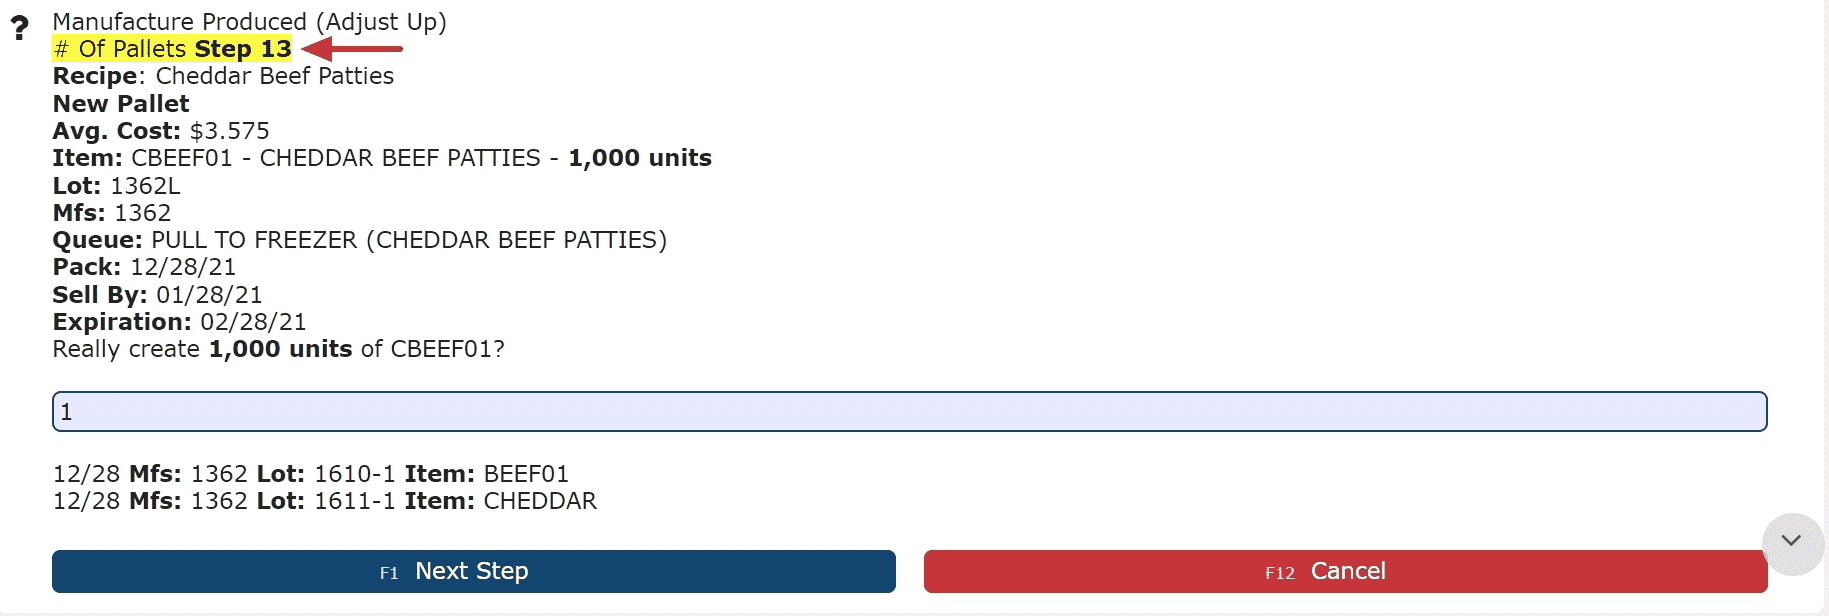
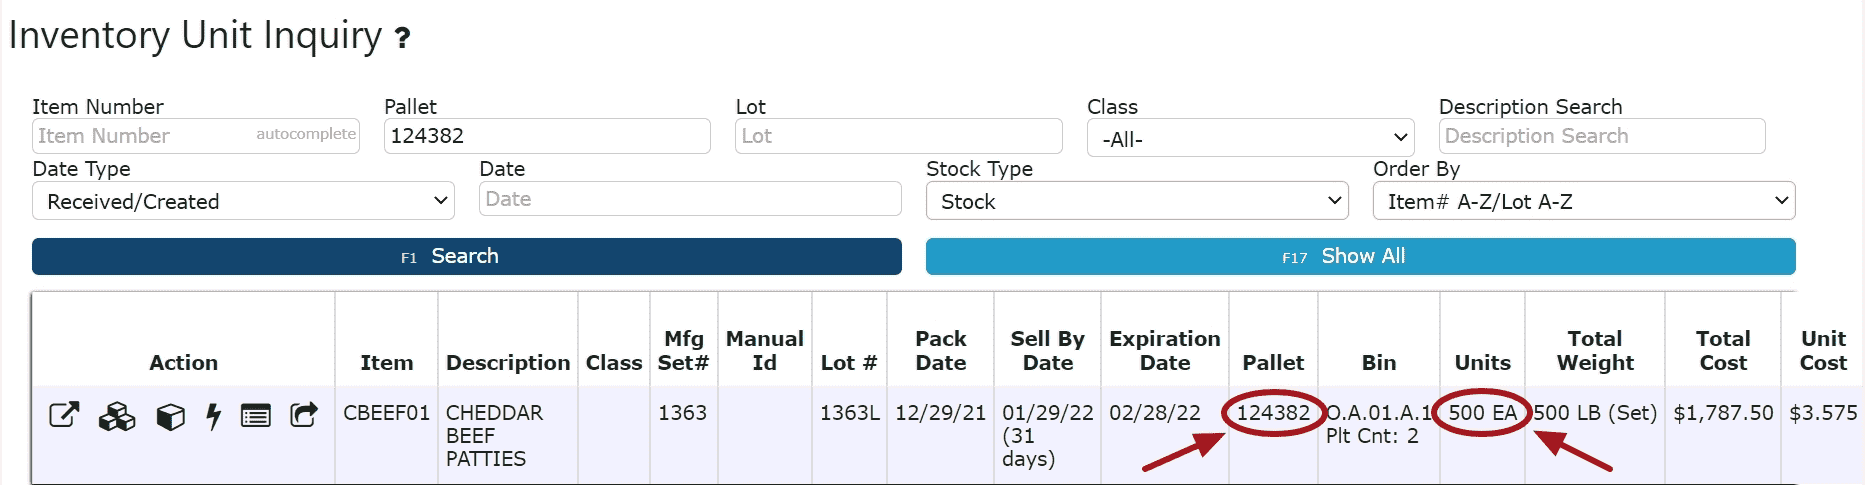
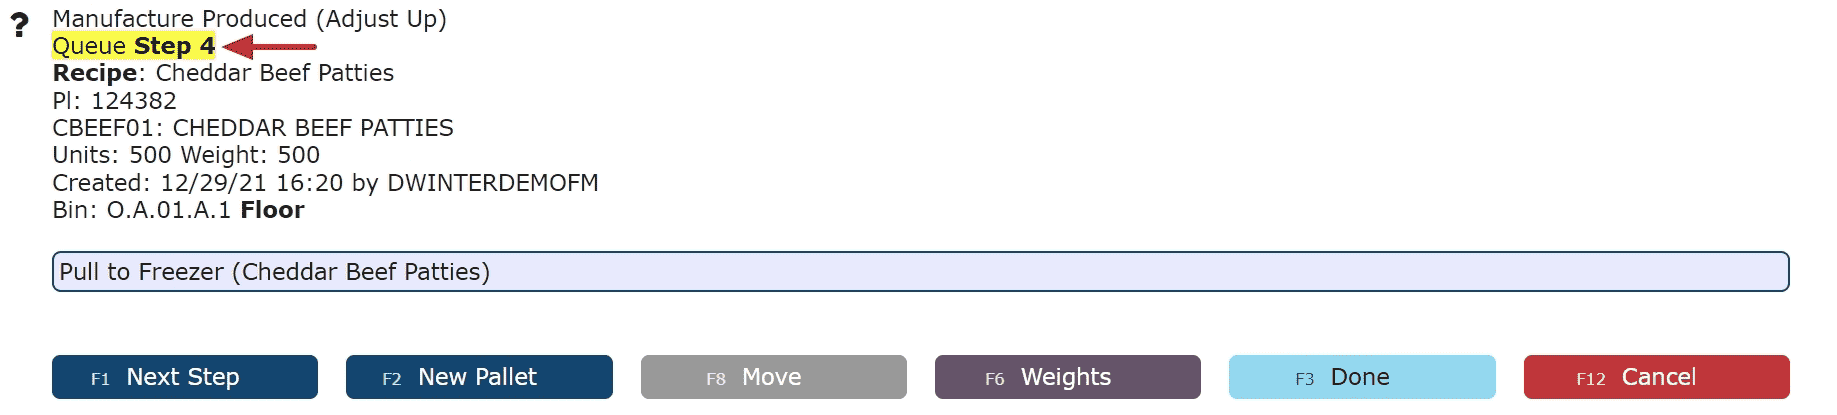
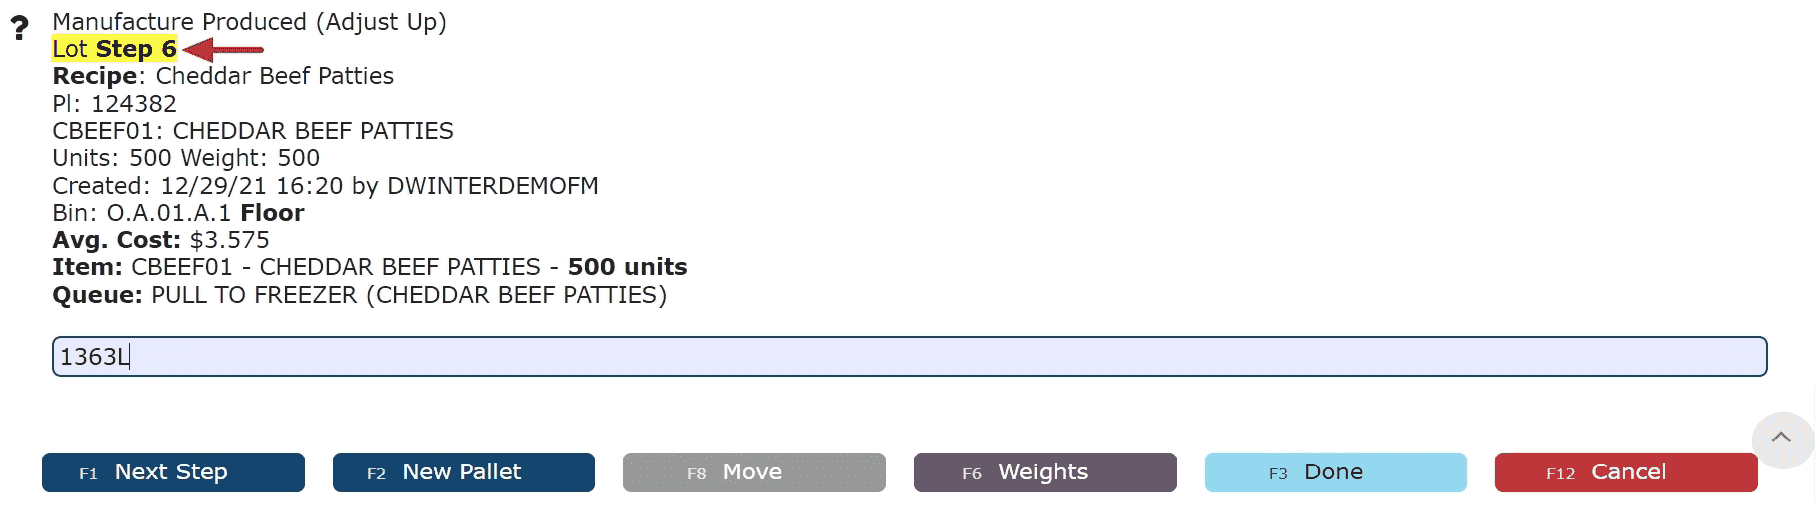
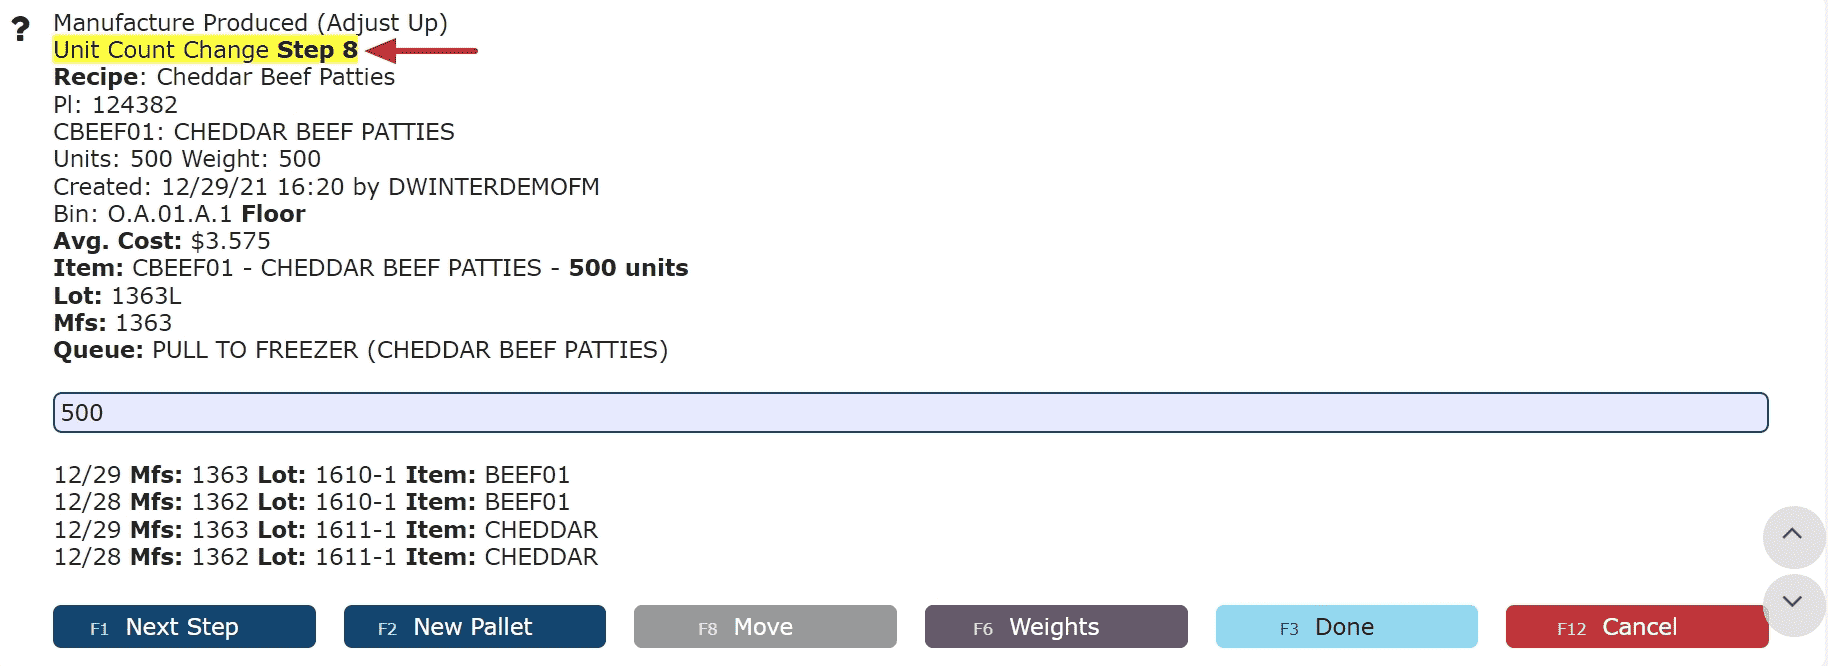
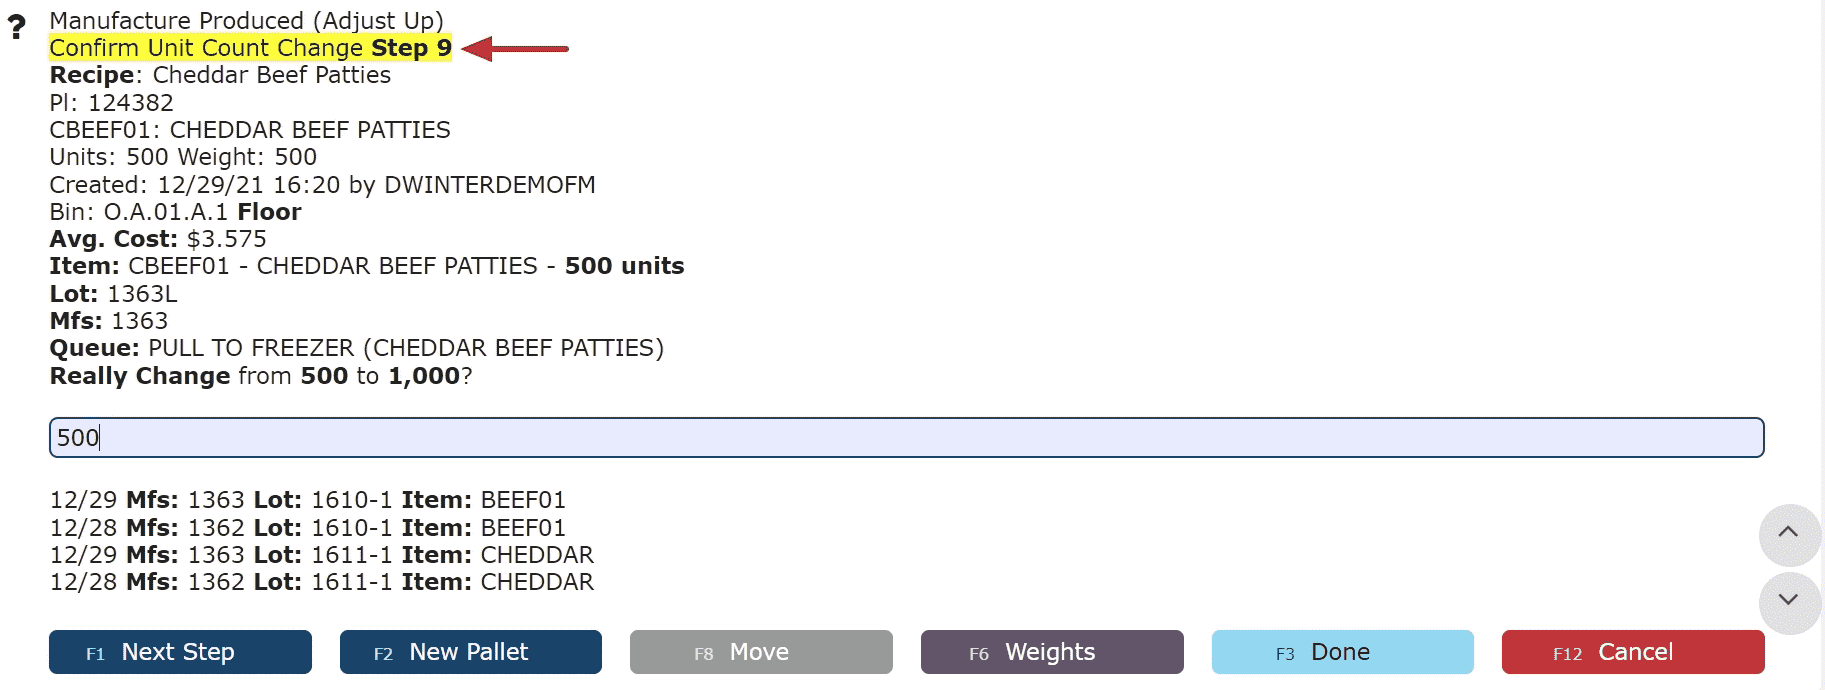
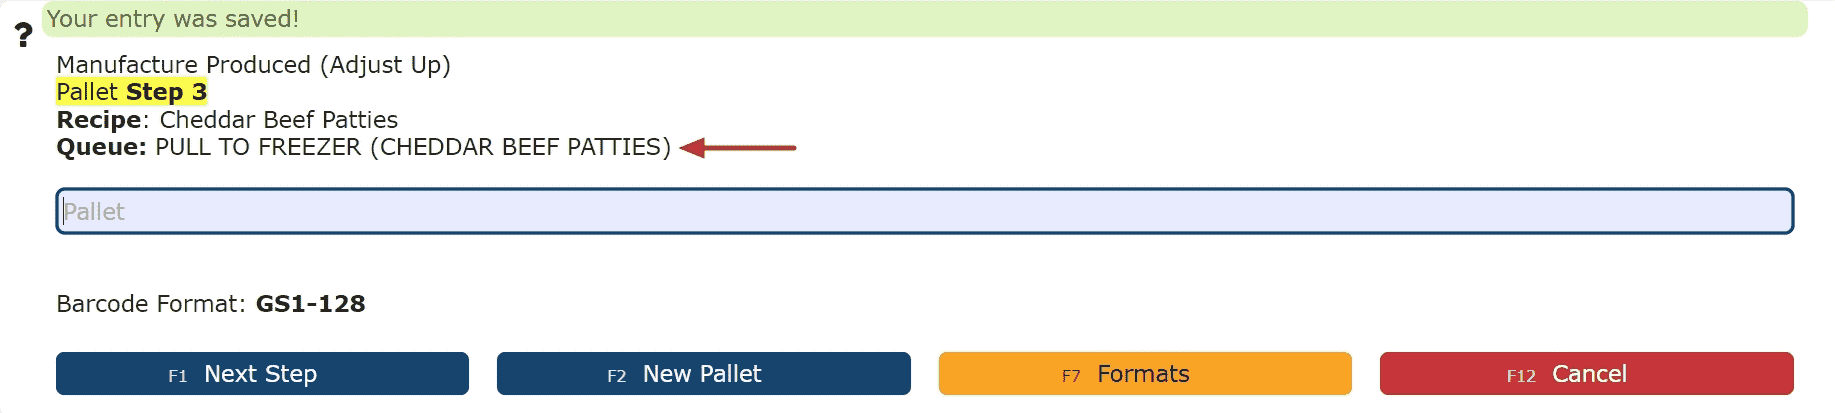
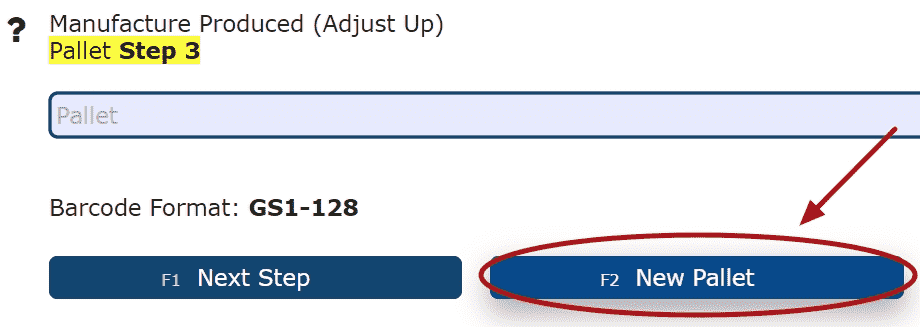
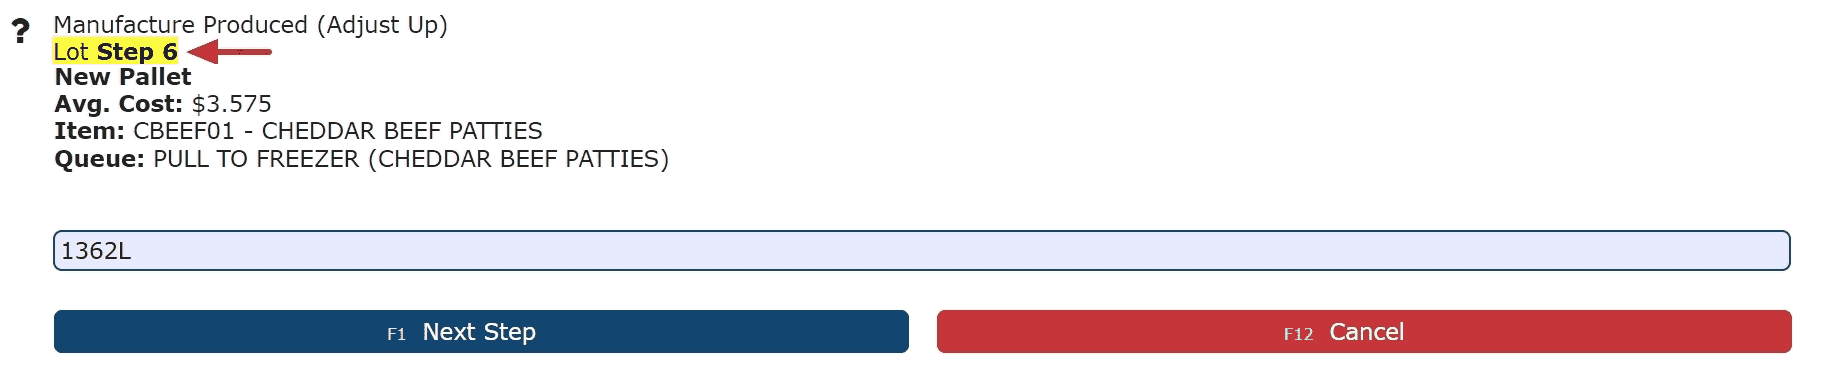
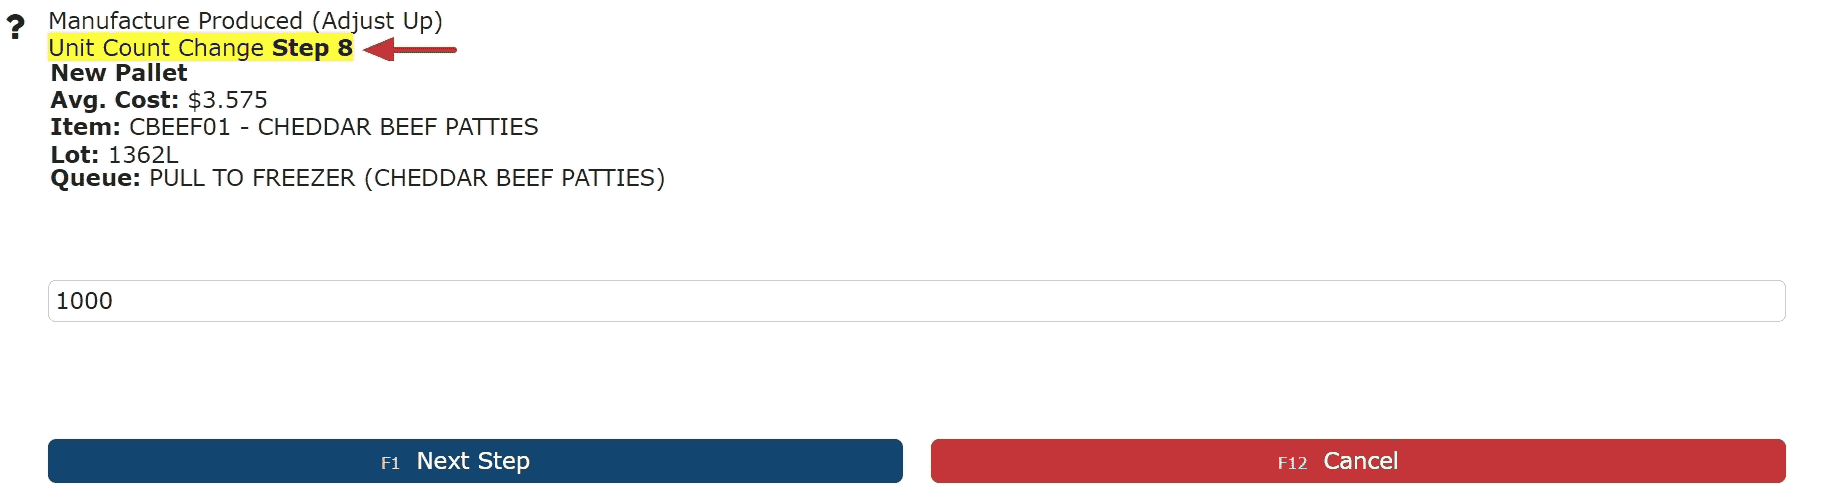
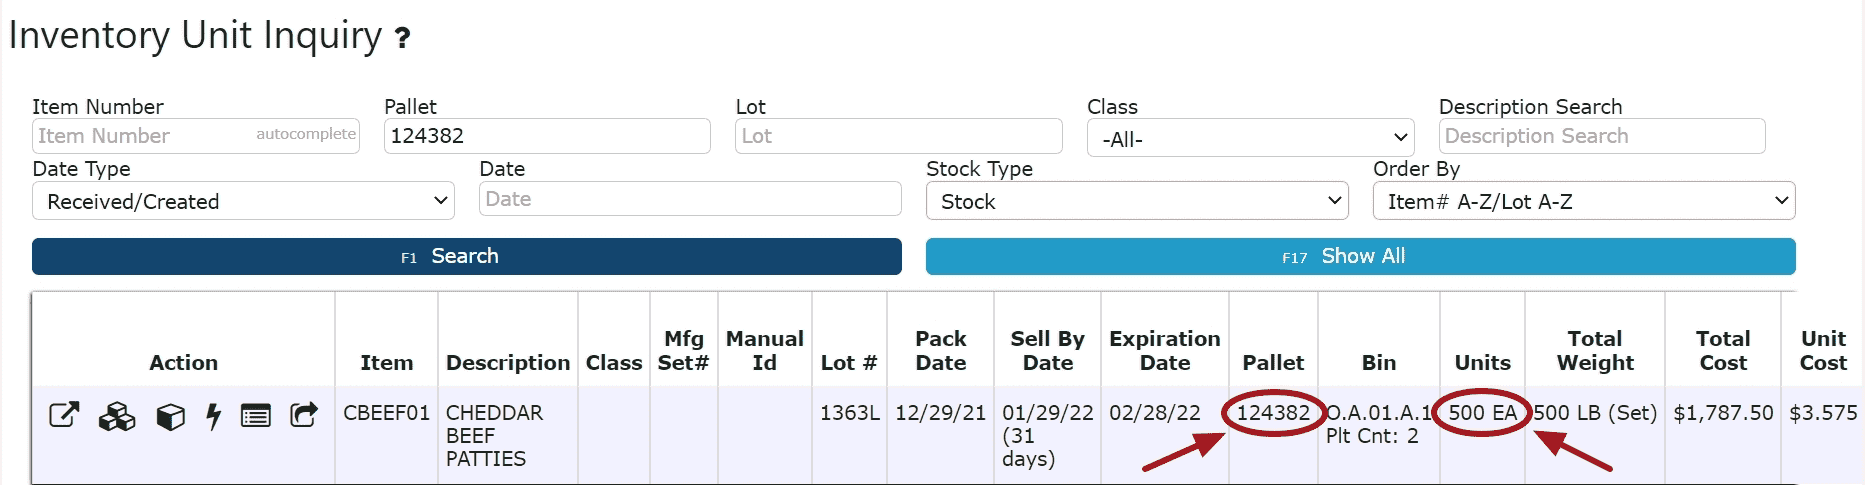
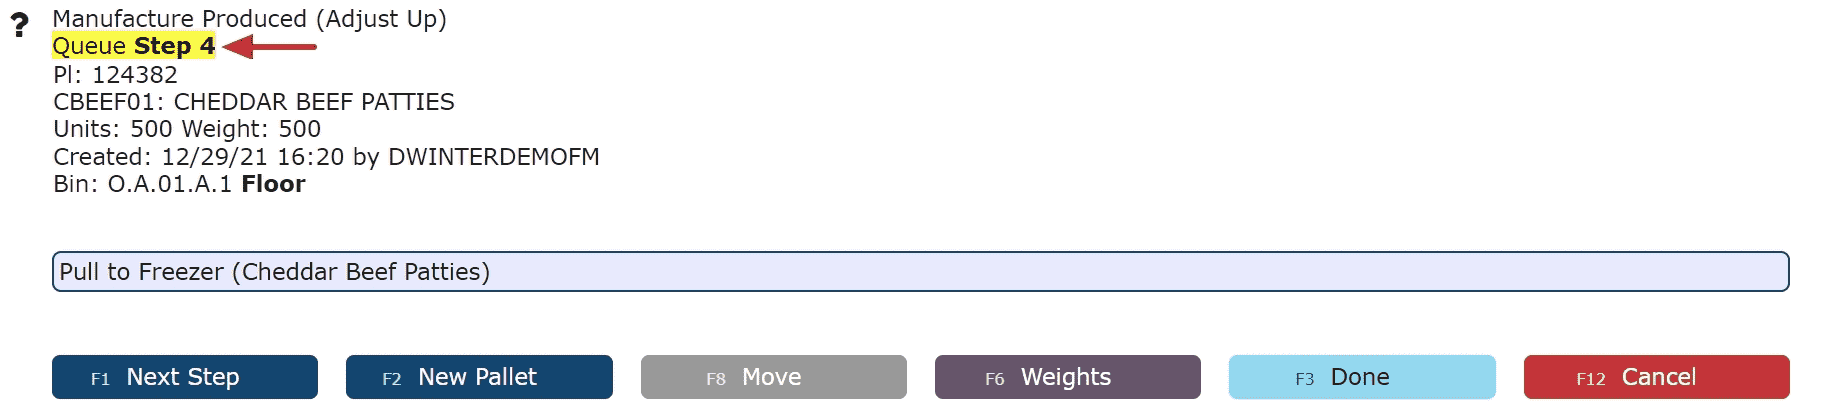
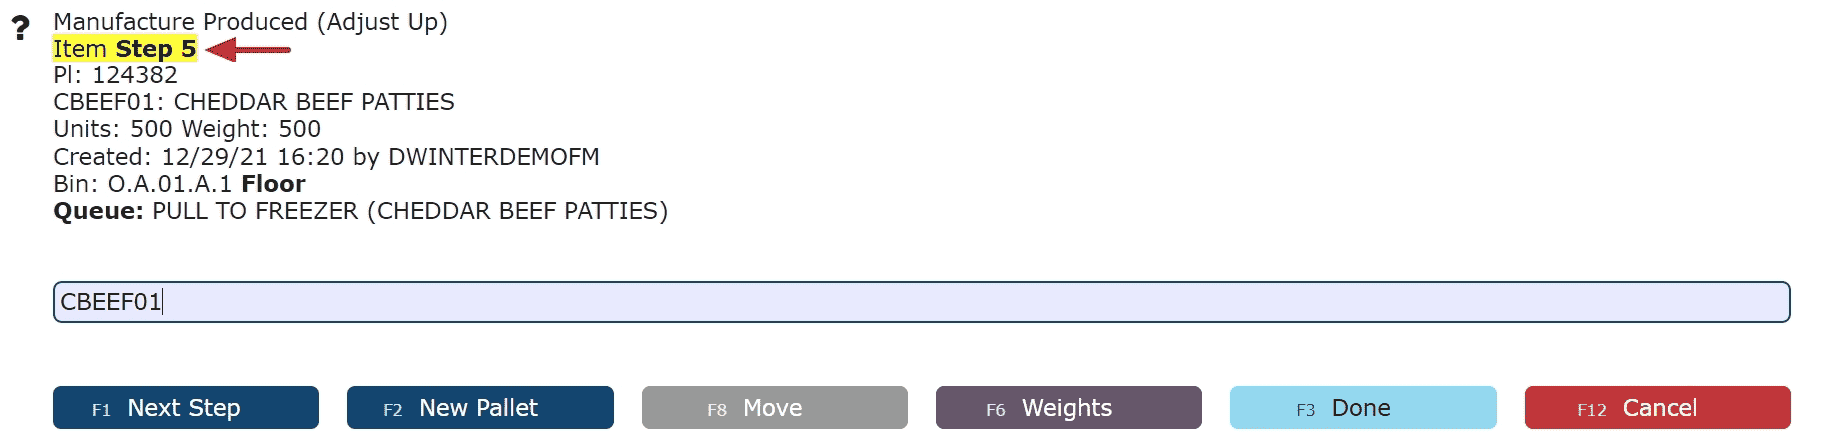
    4. RecipeProduced: Place the items produced into inventory, associated with the corresponding Start/In manufacturing set.

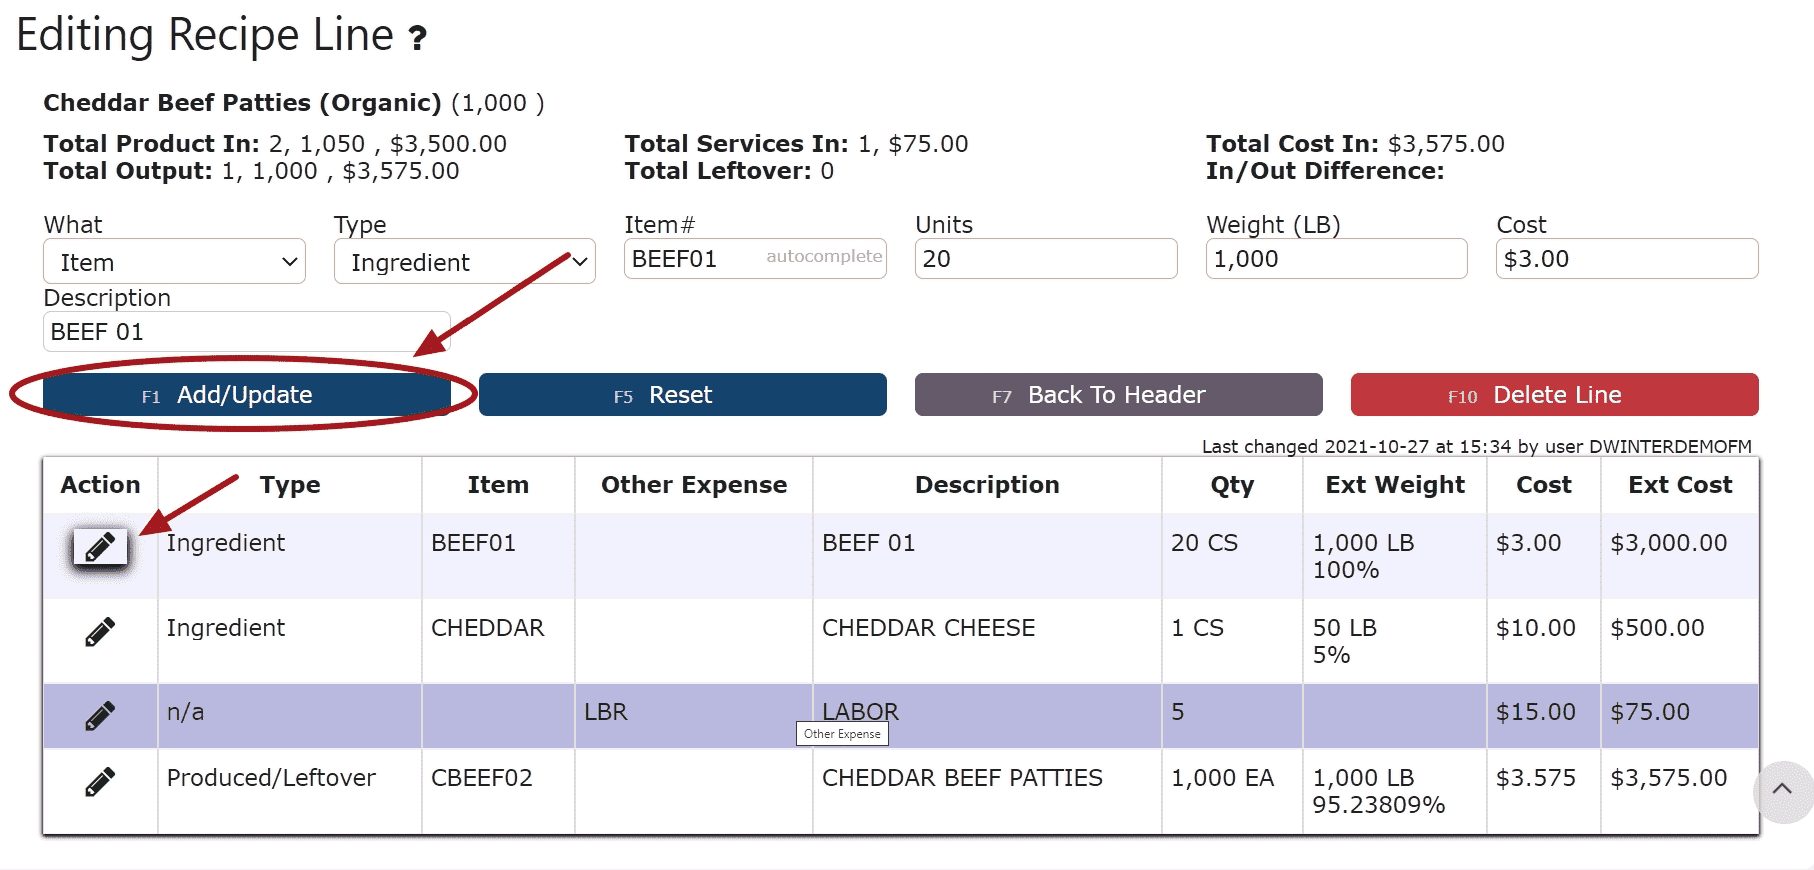
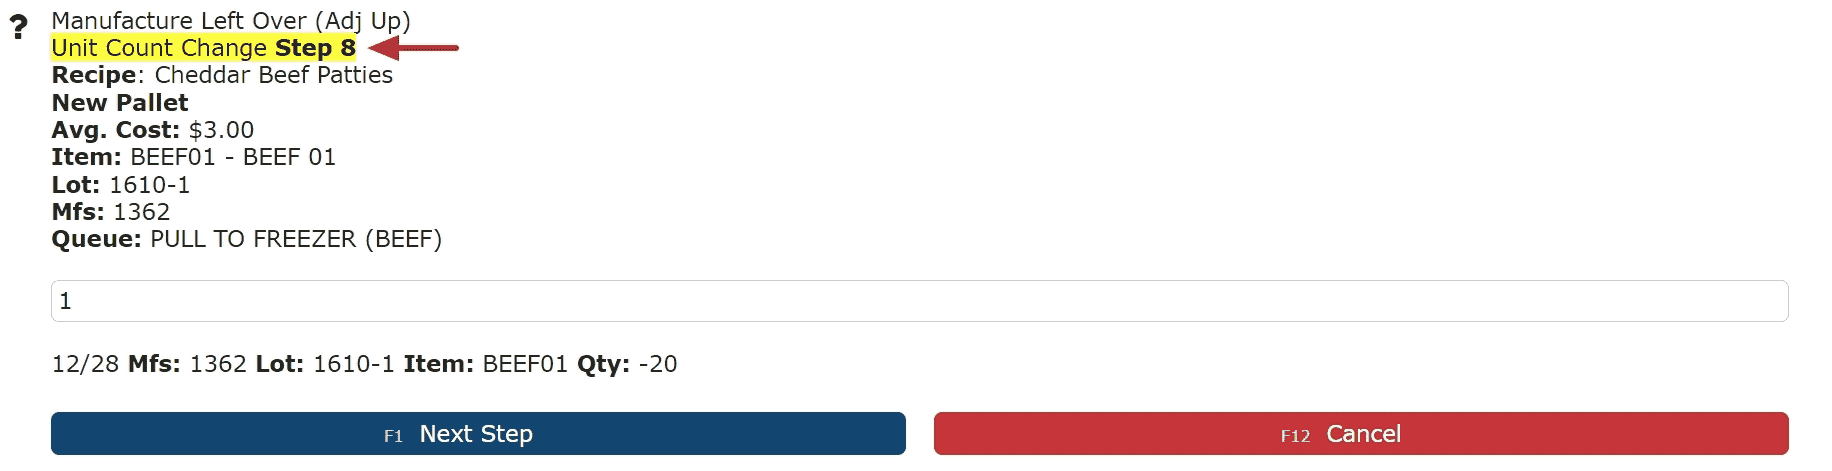
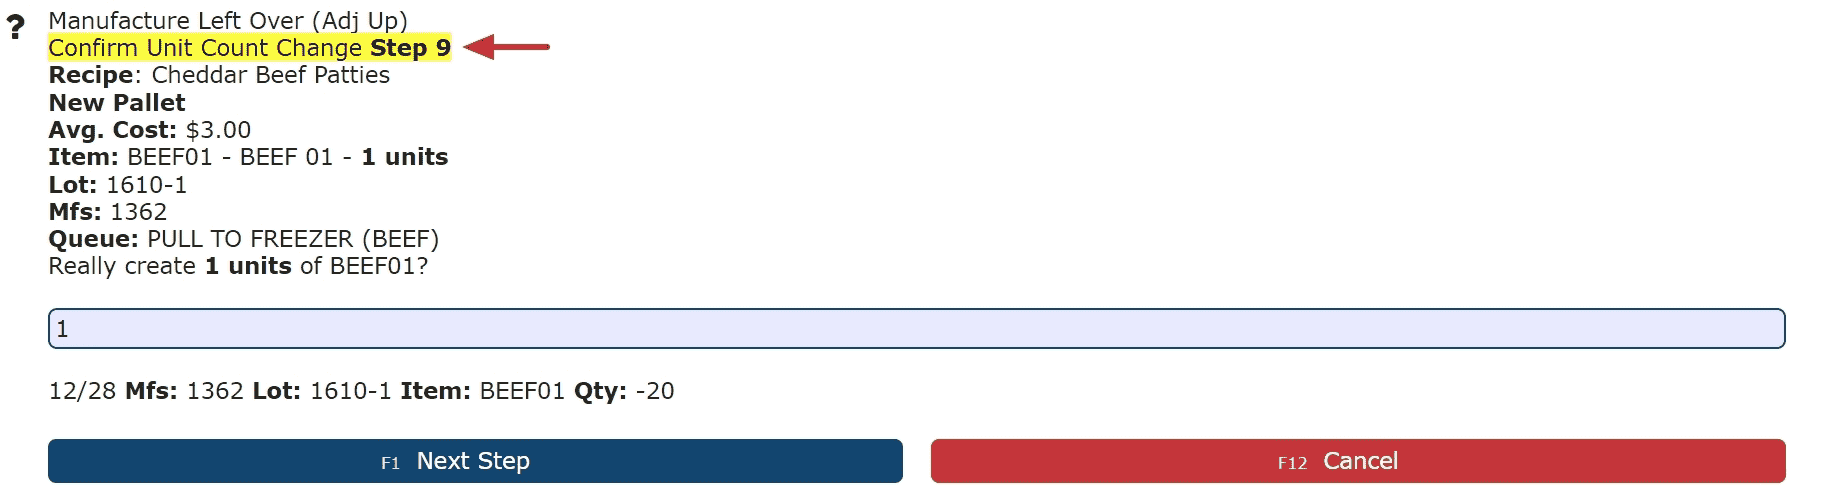
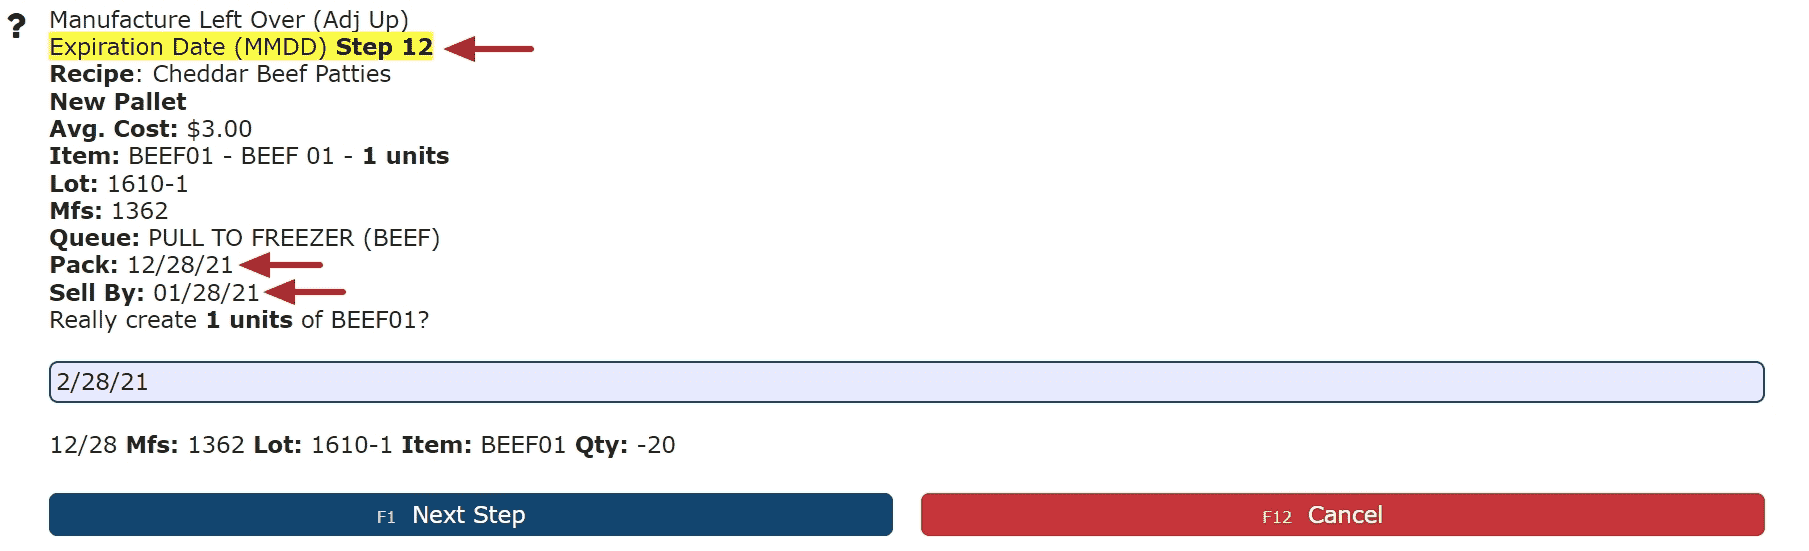
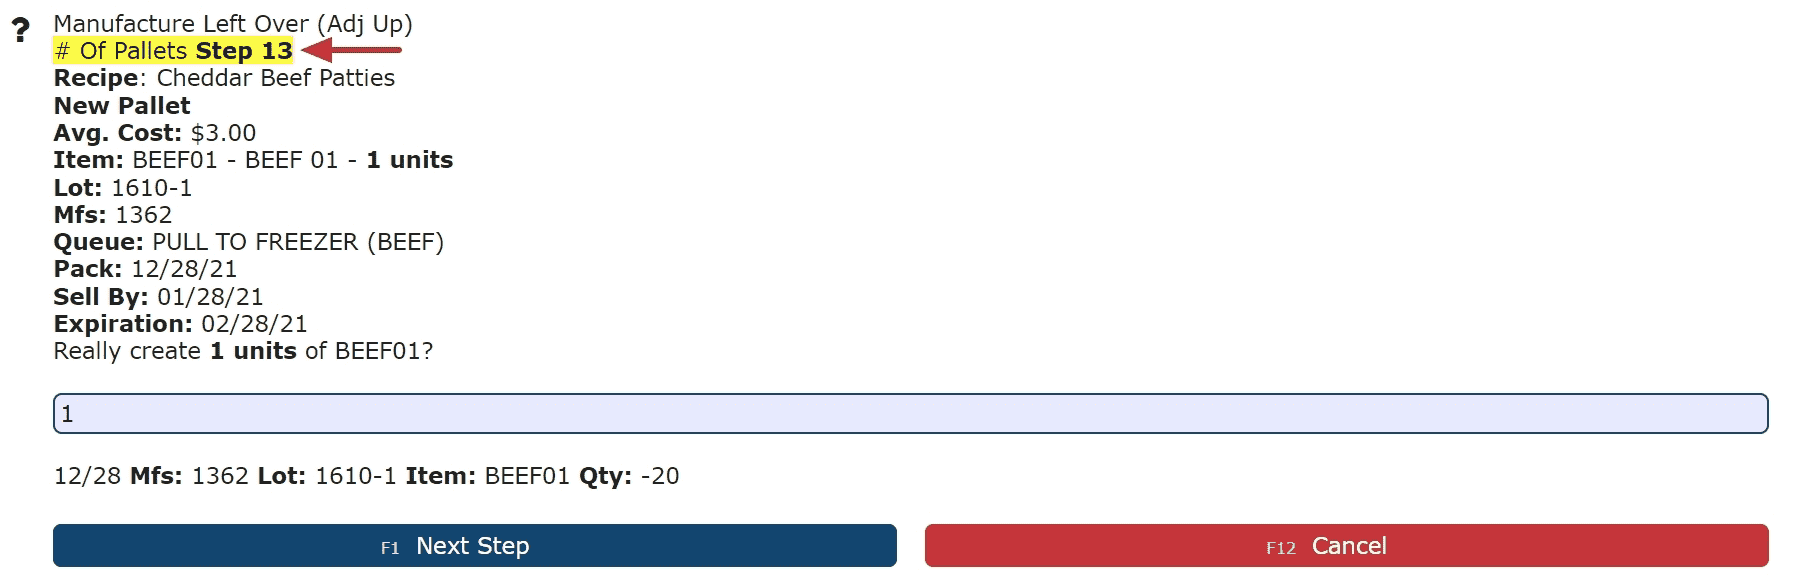
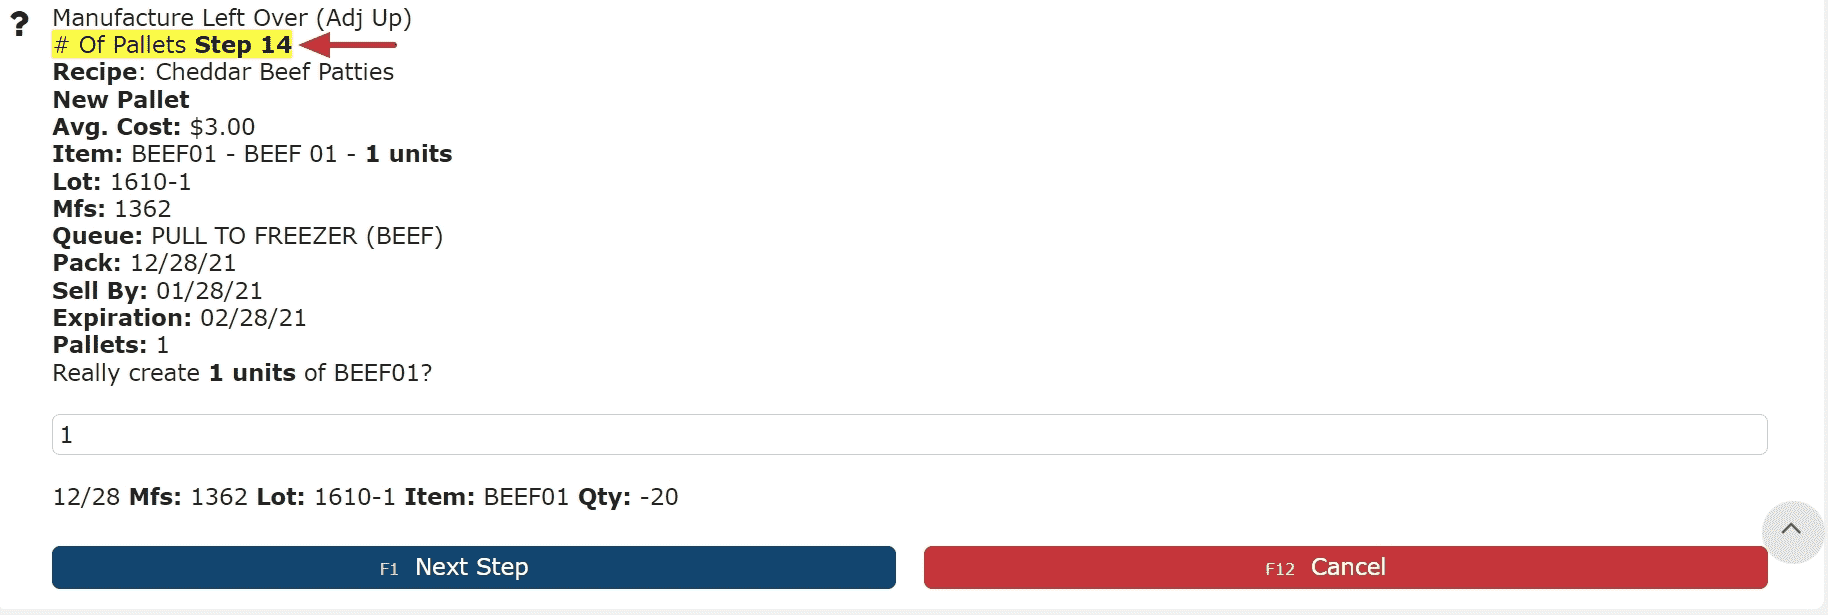
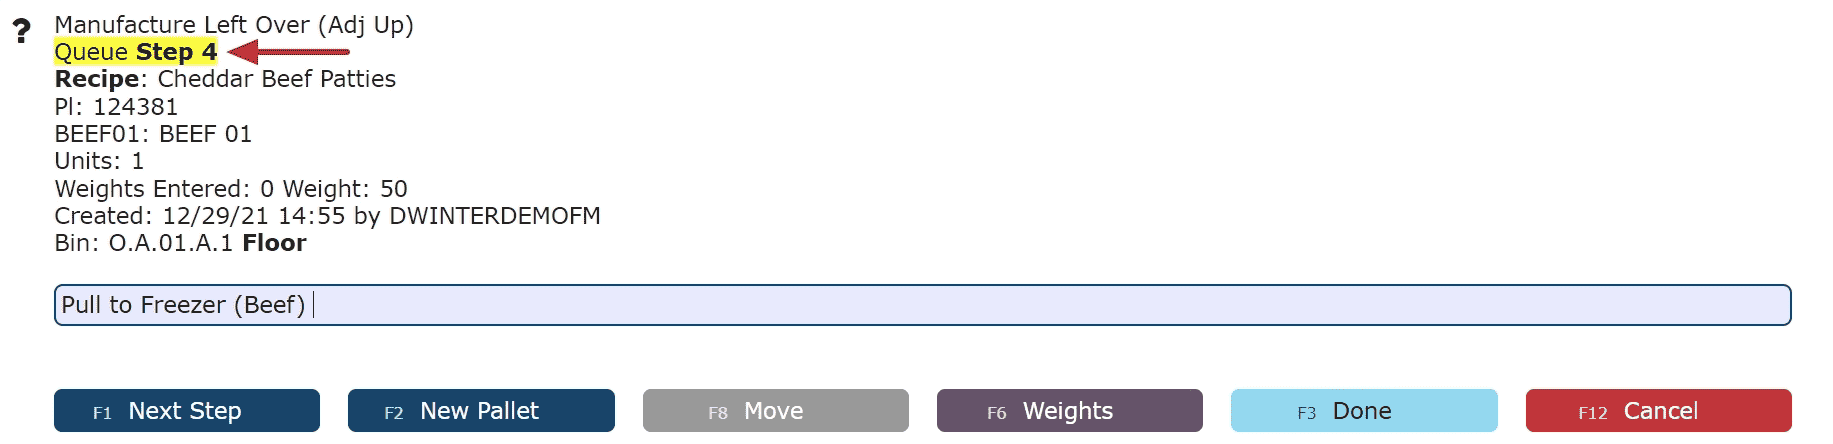
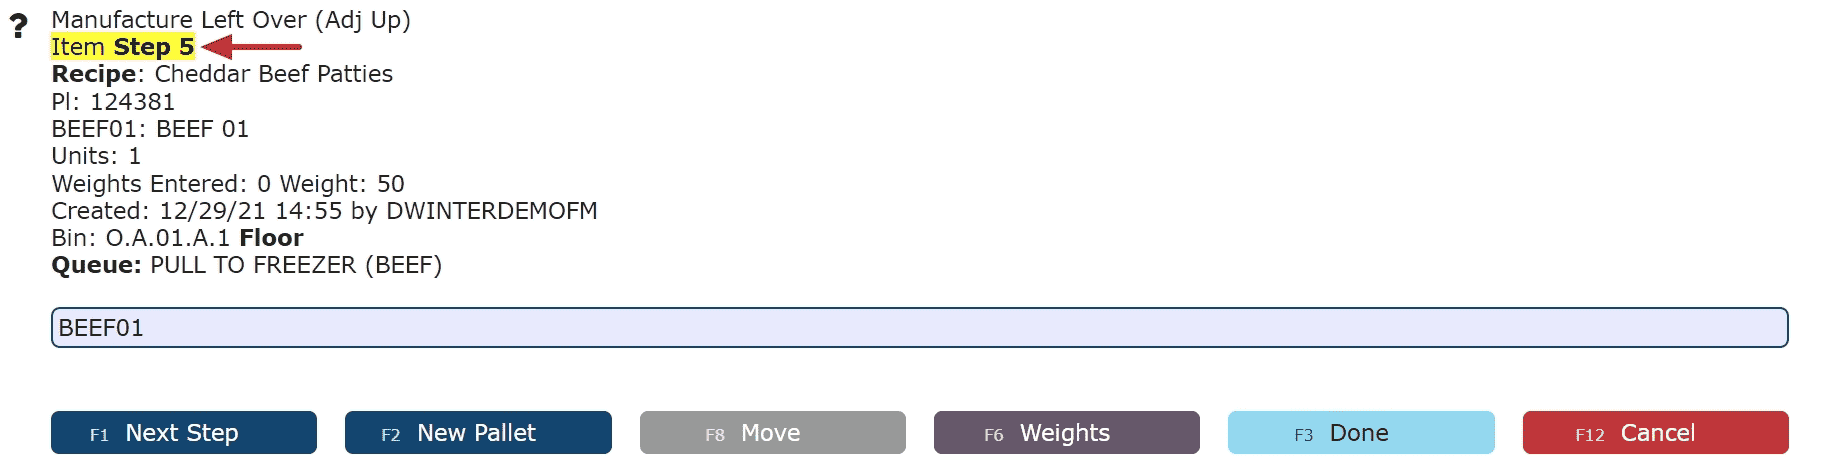
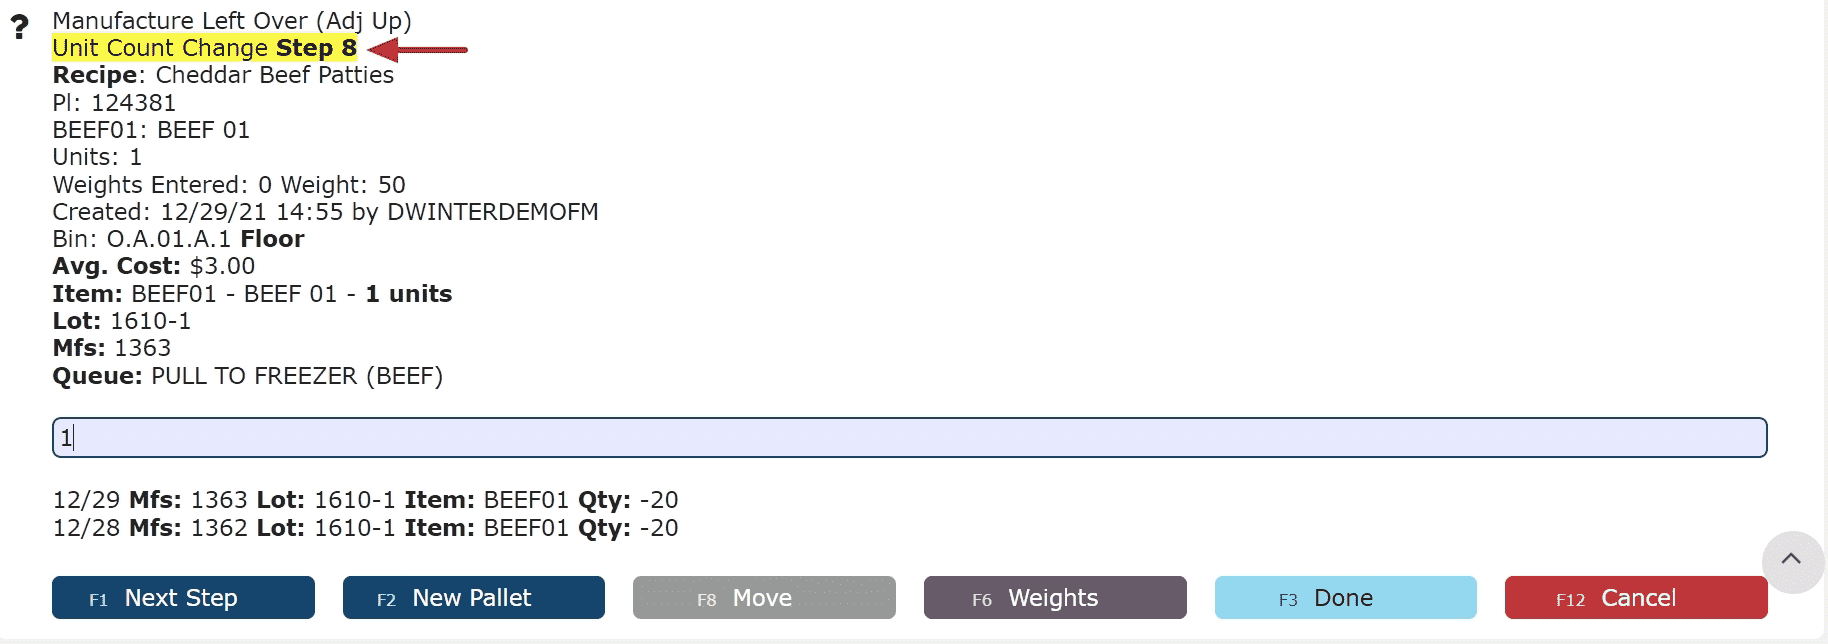
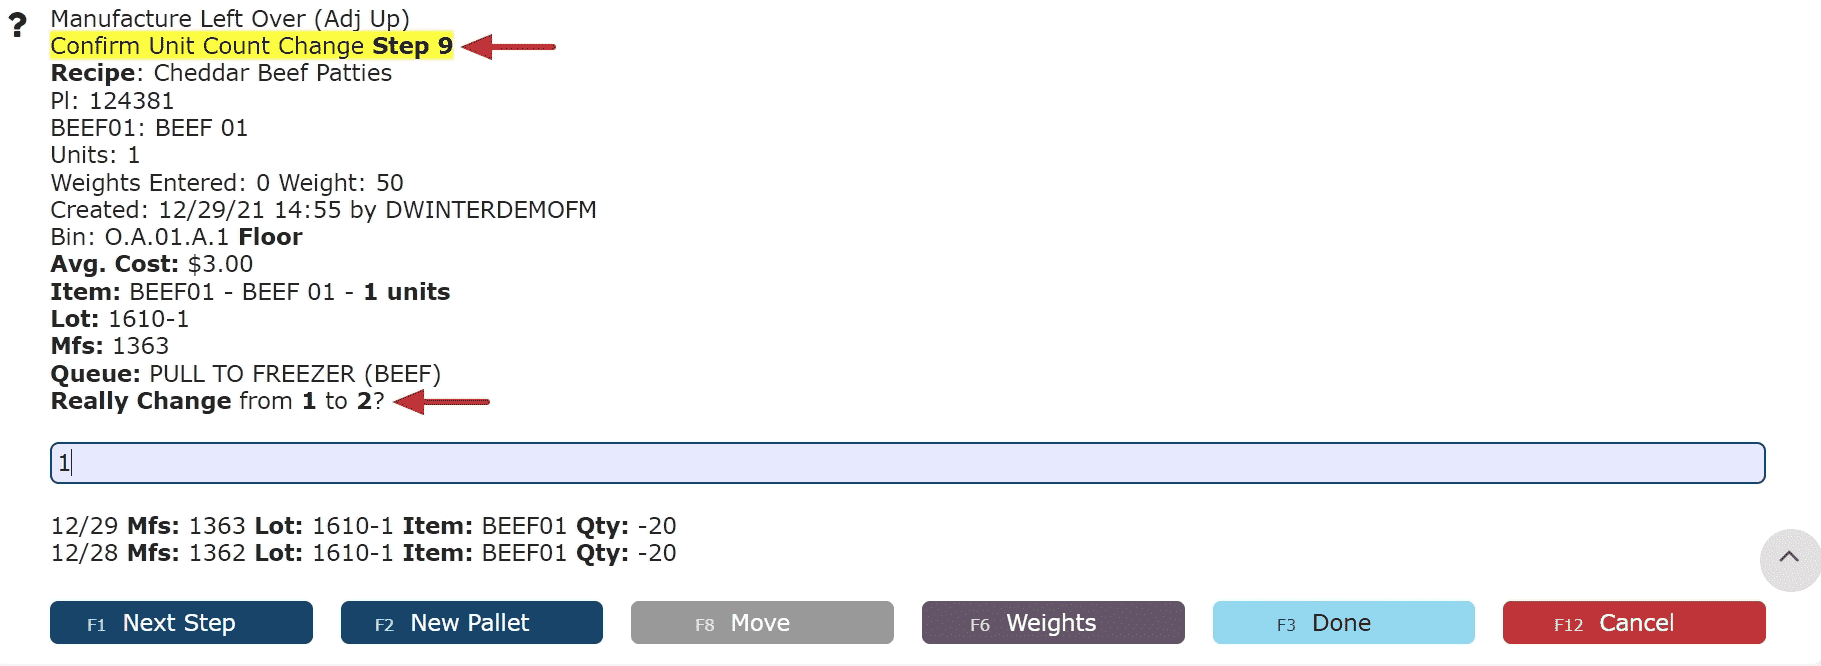
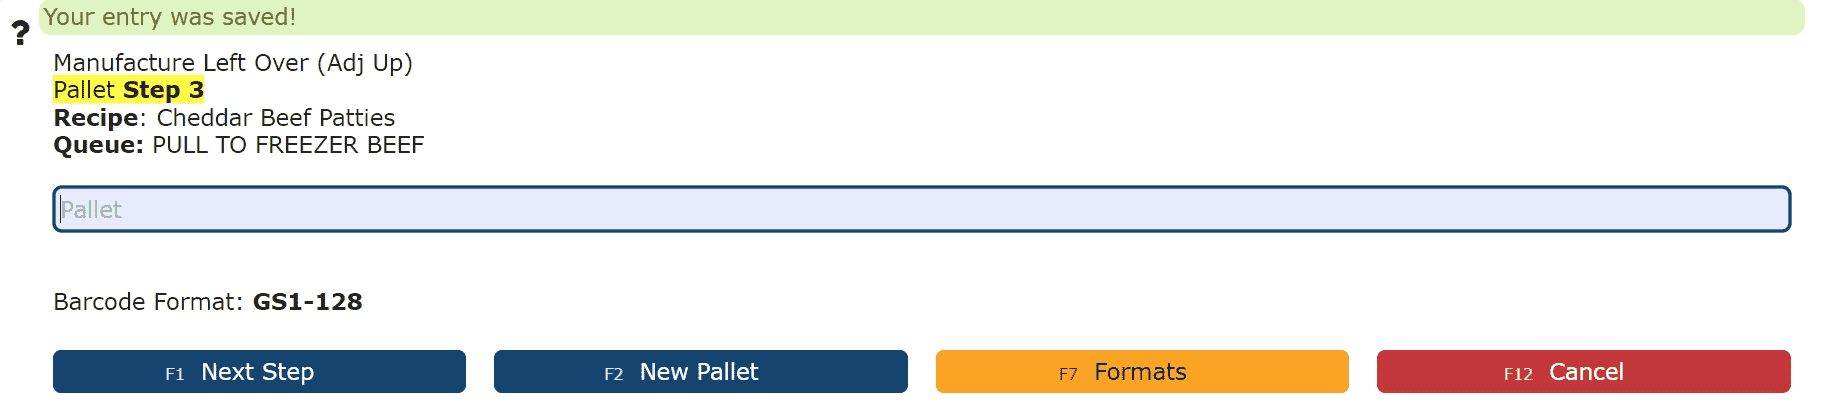
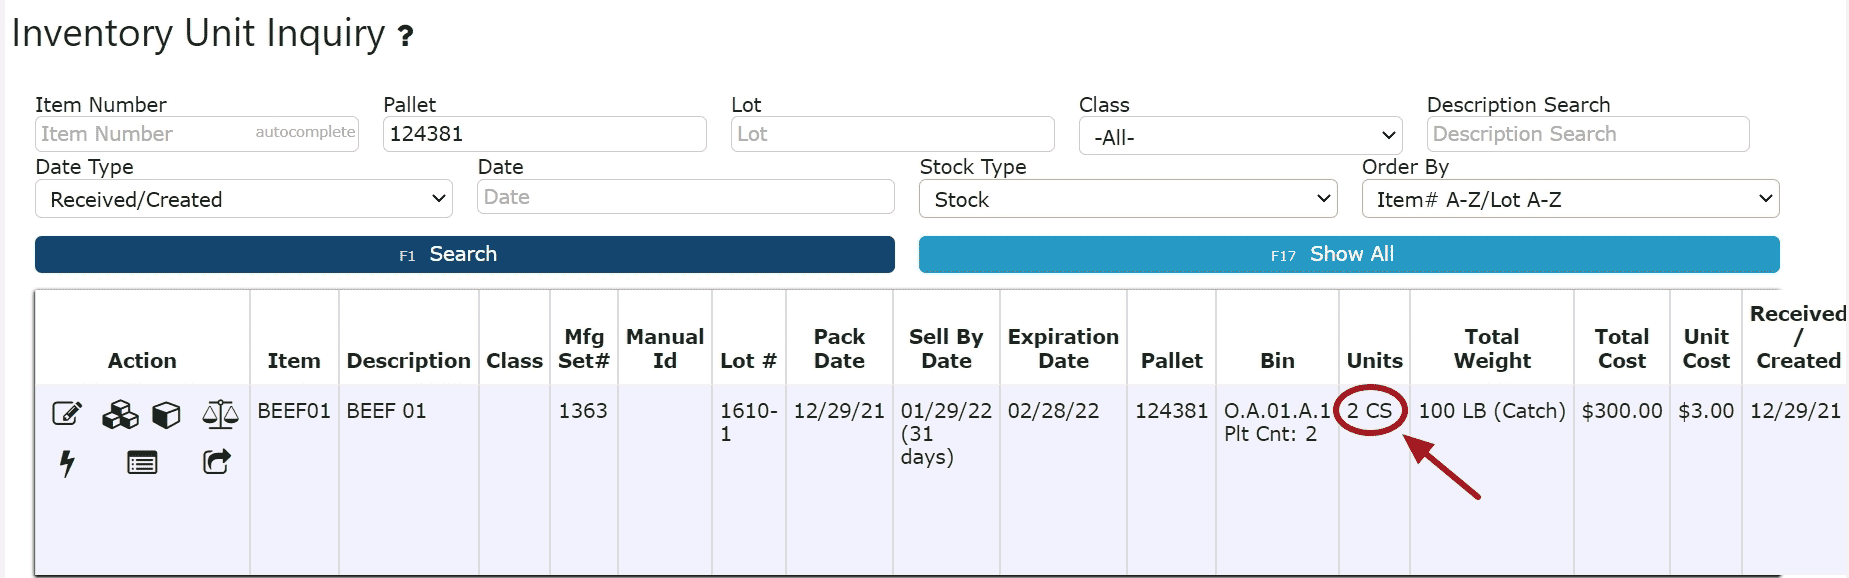
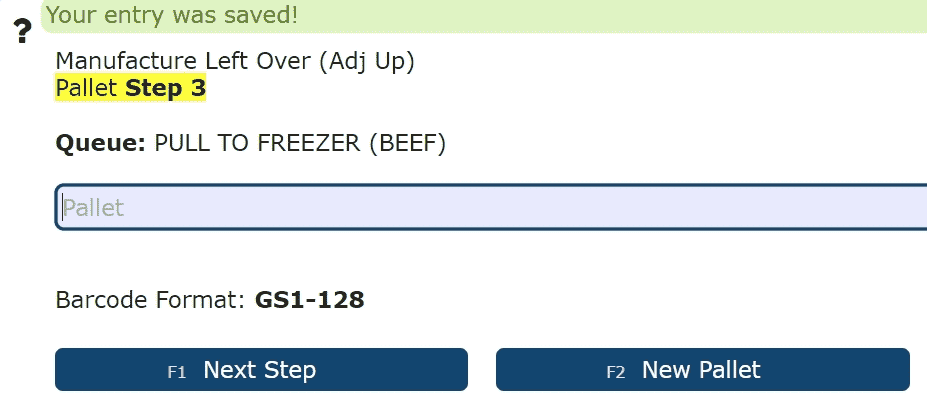
    5. Recipe Leftover: Place any unused items/ingredients back into inventory.  If MFS# is enabled, any leftover items will automatically take on the MFS# they entered the manufacturing process with.

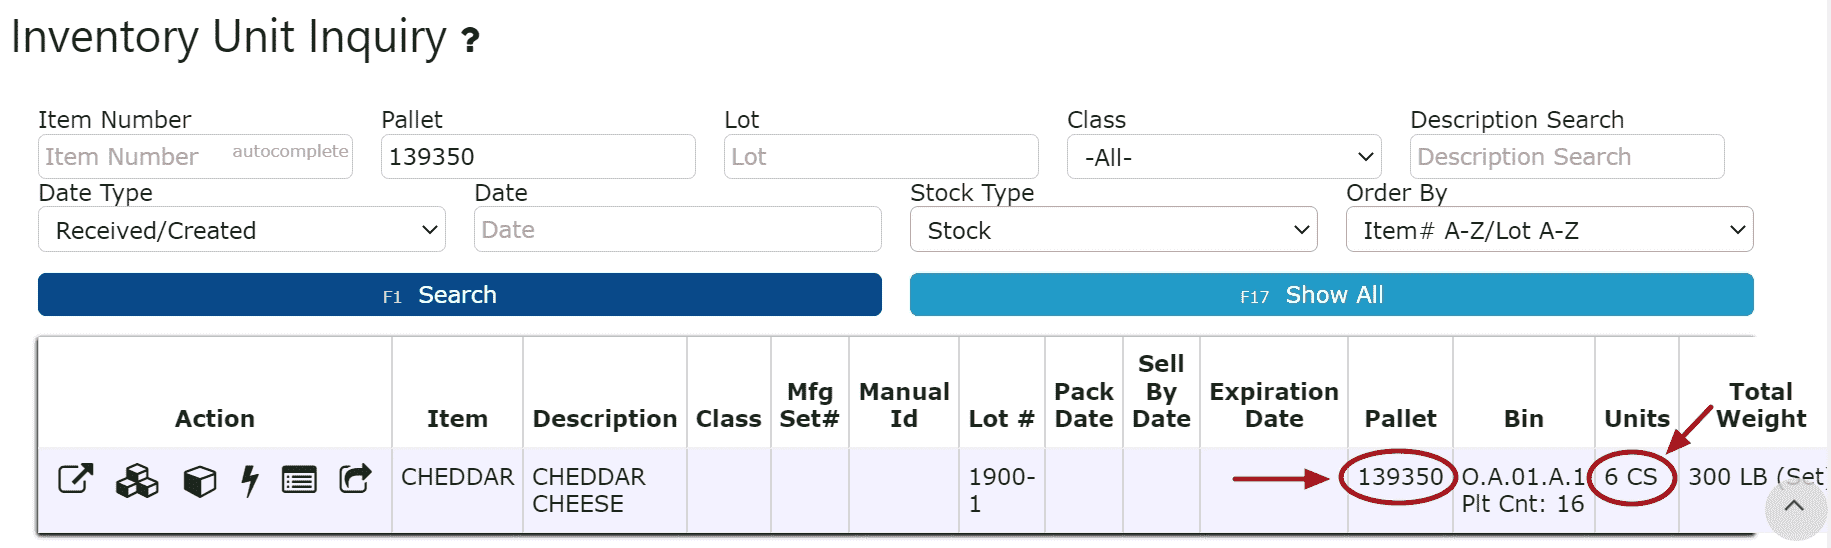
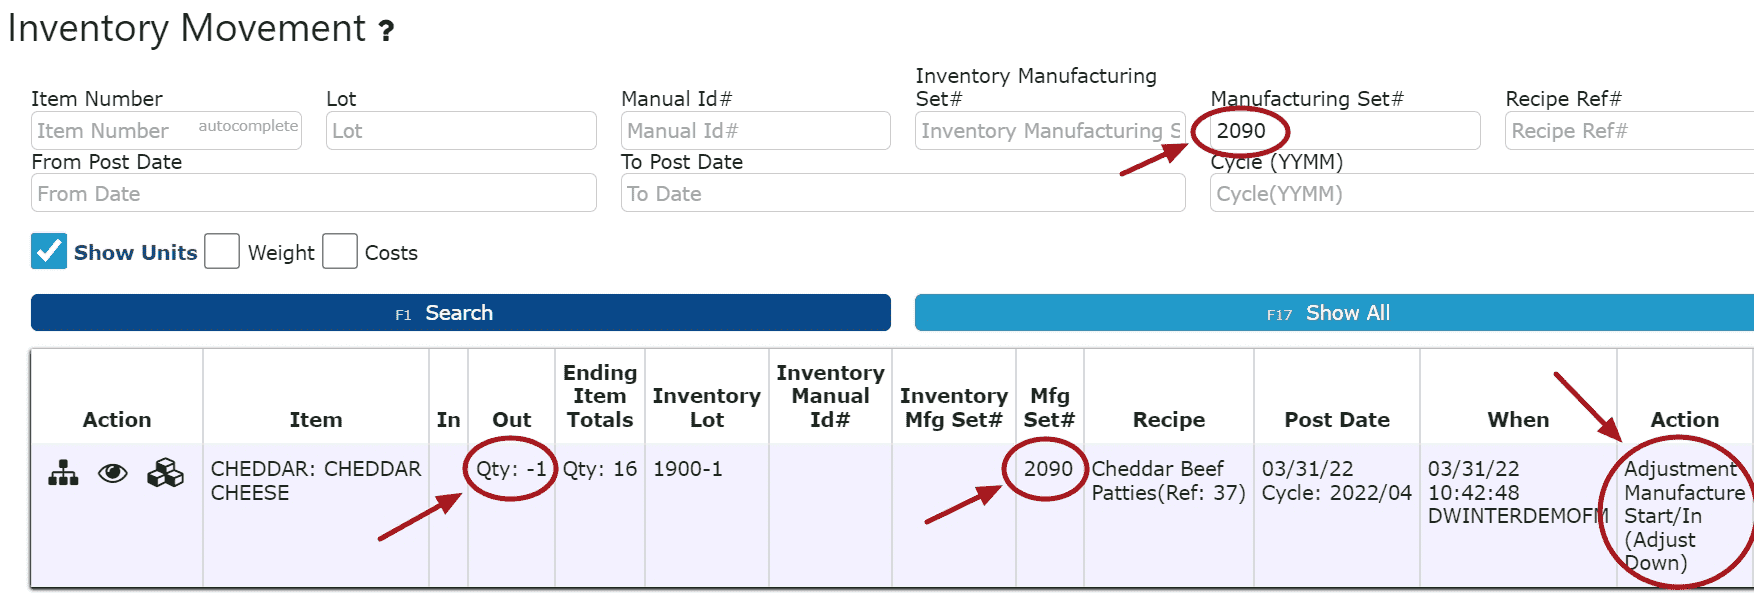
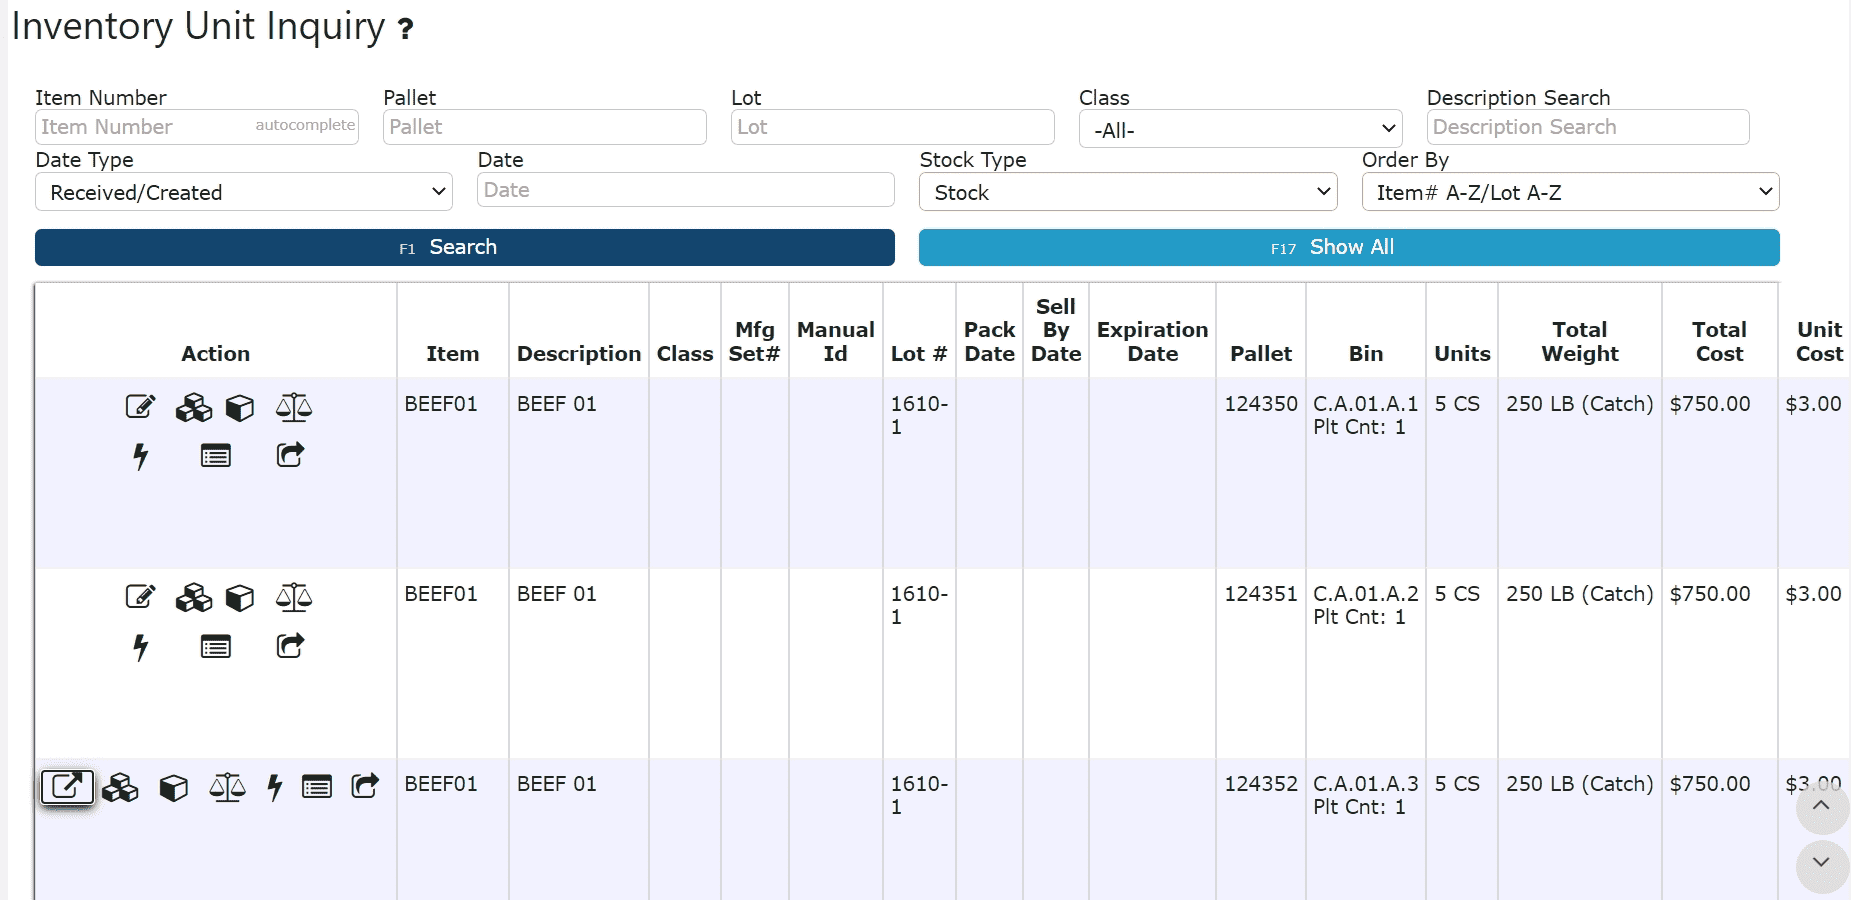
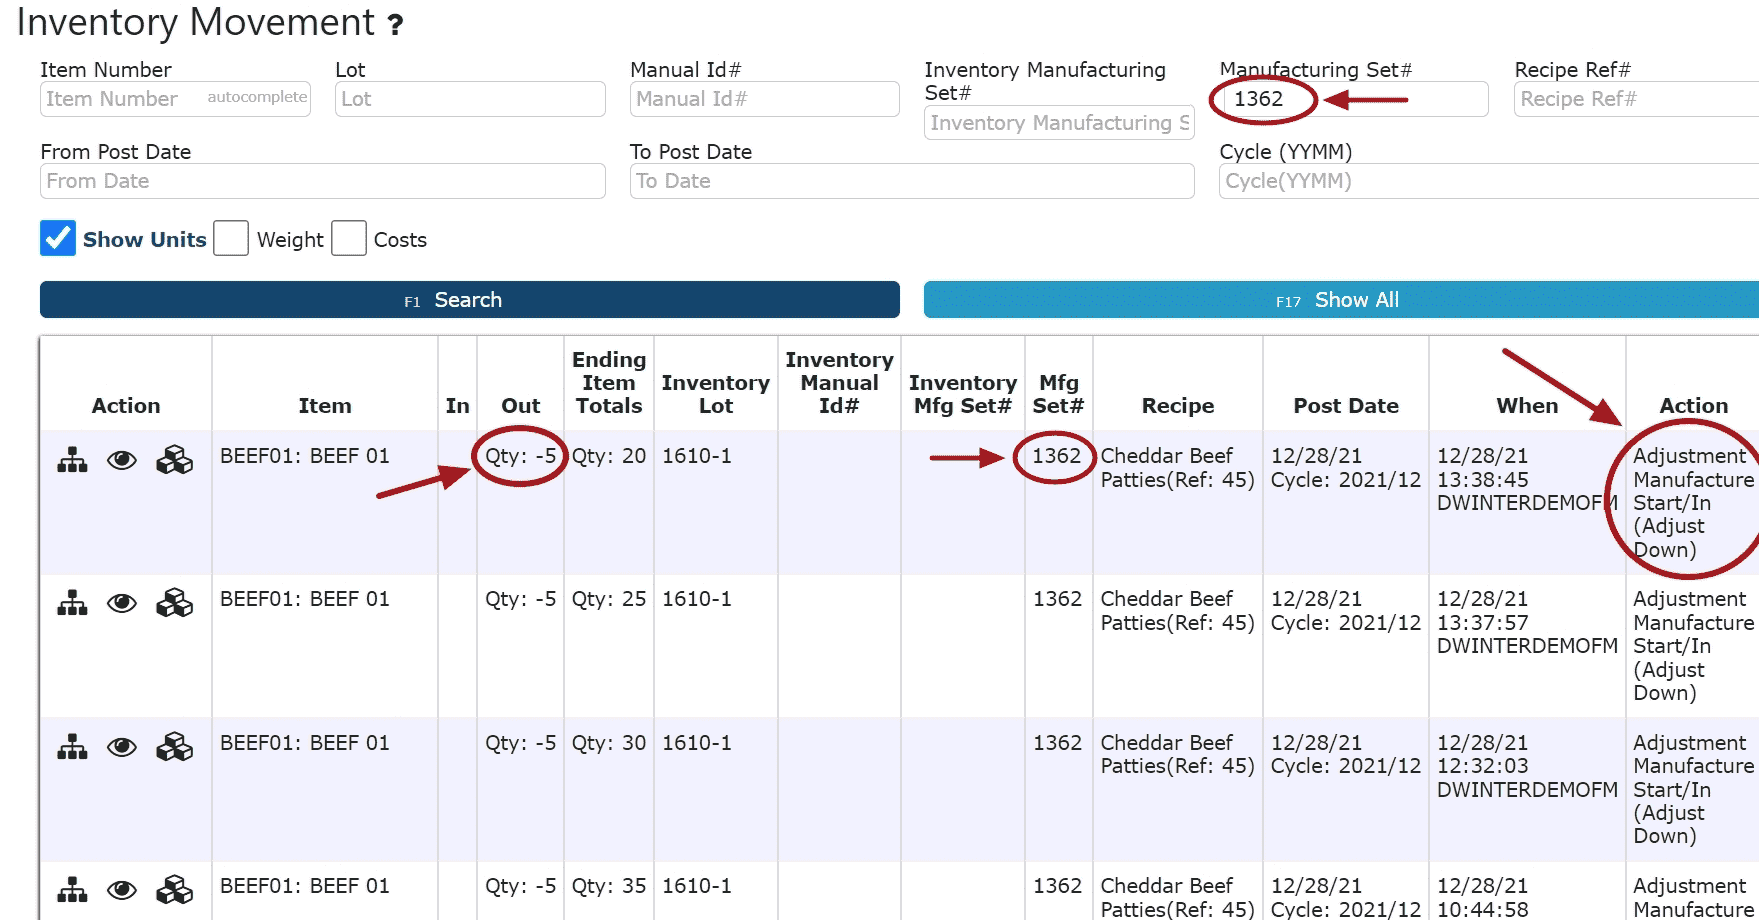
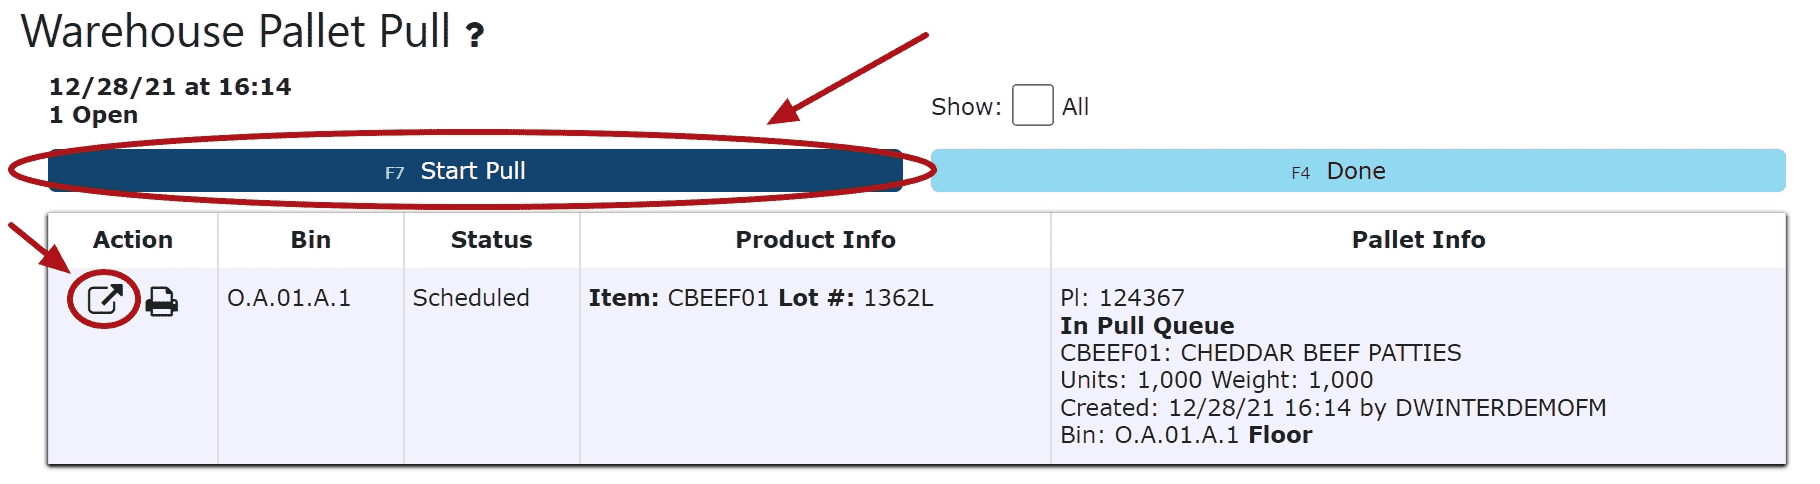
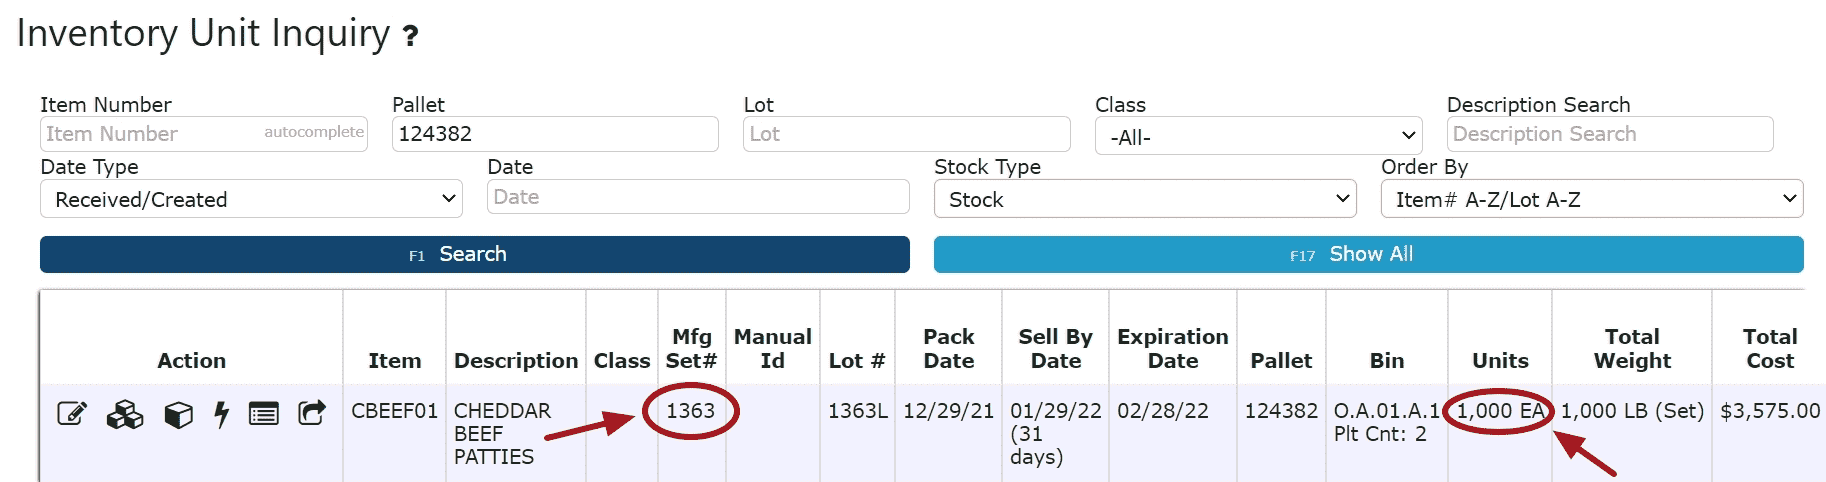
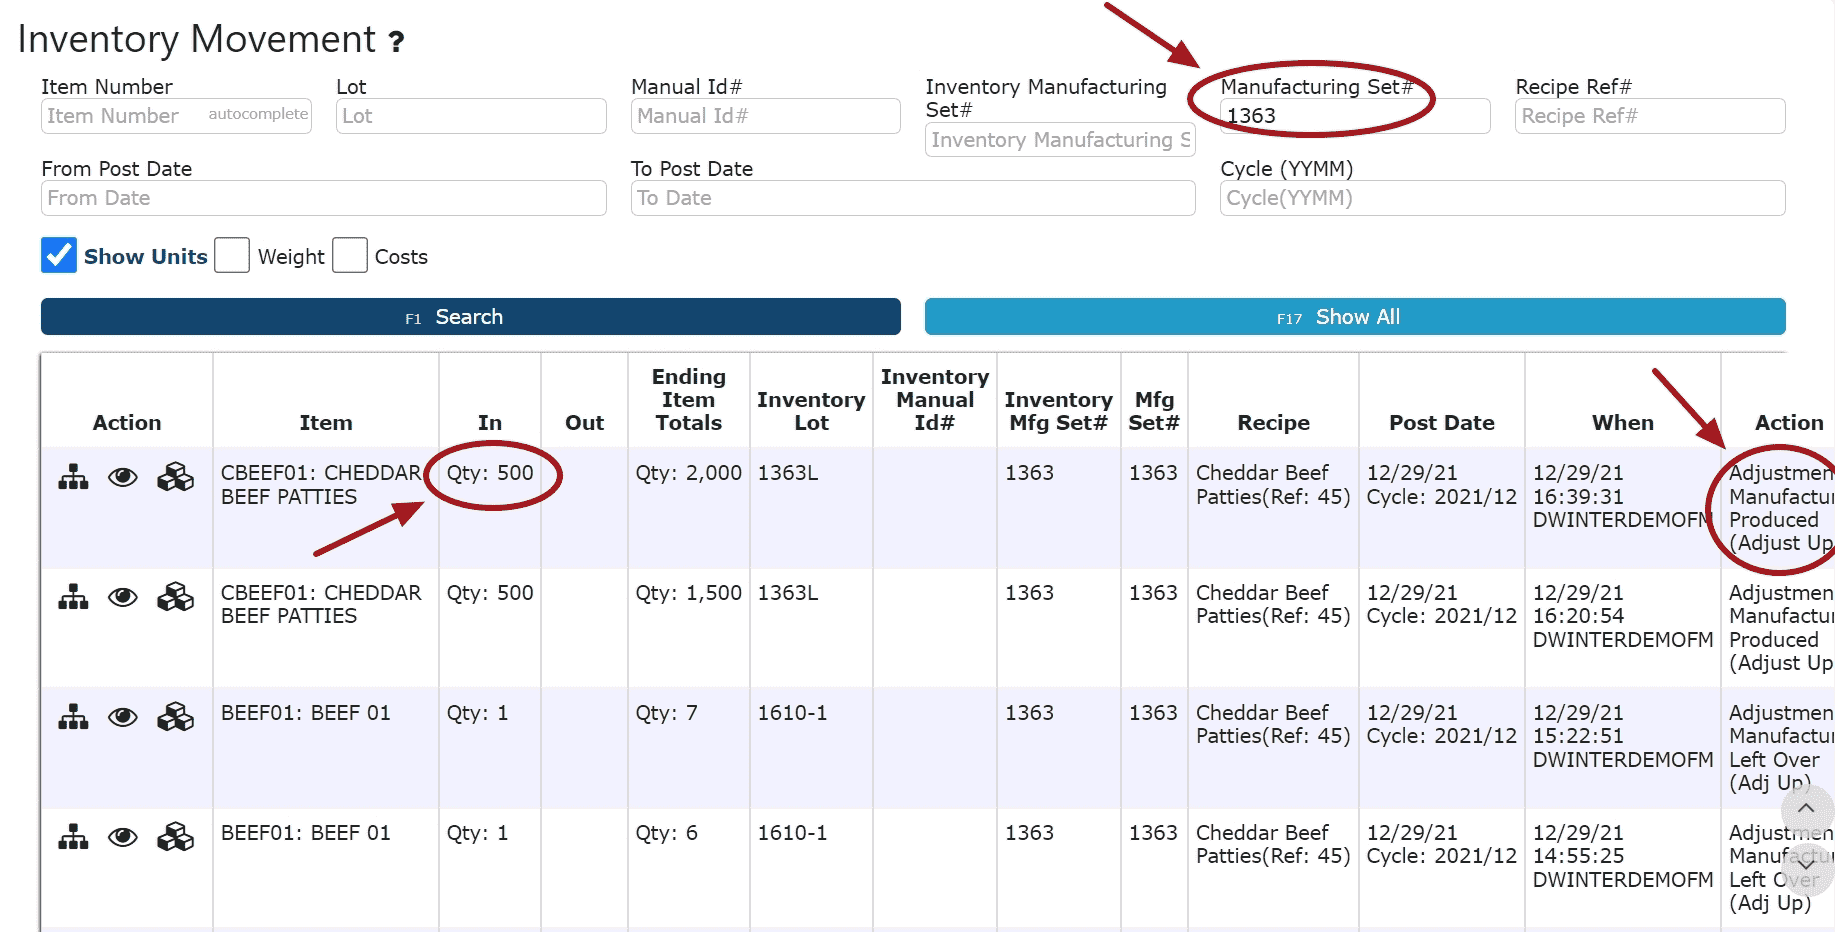
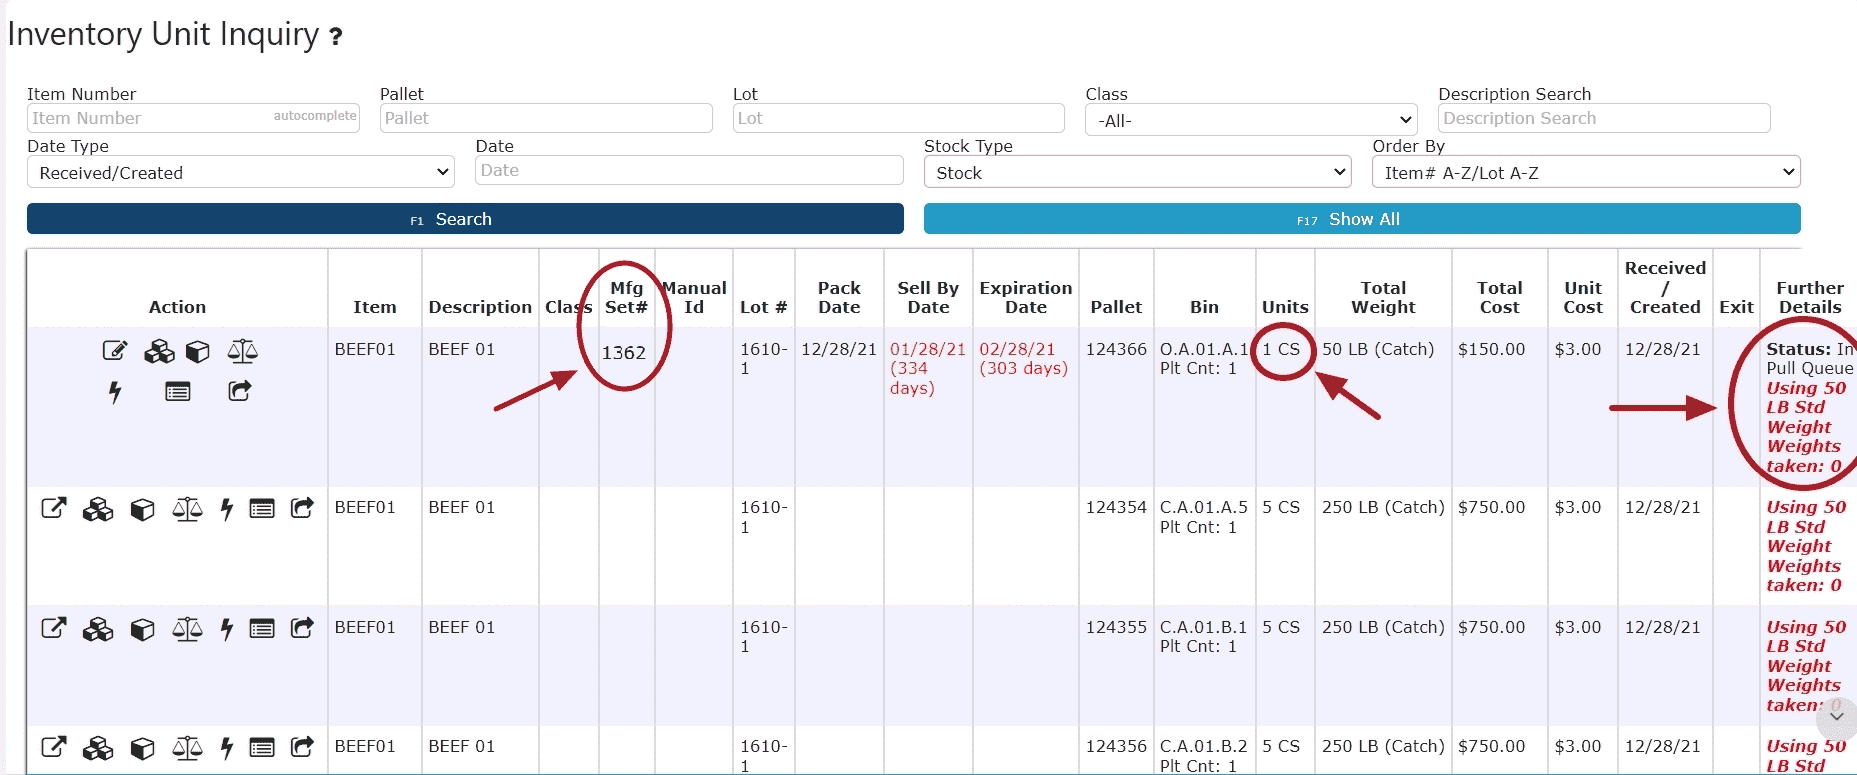
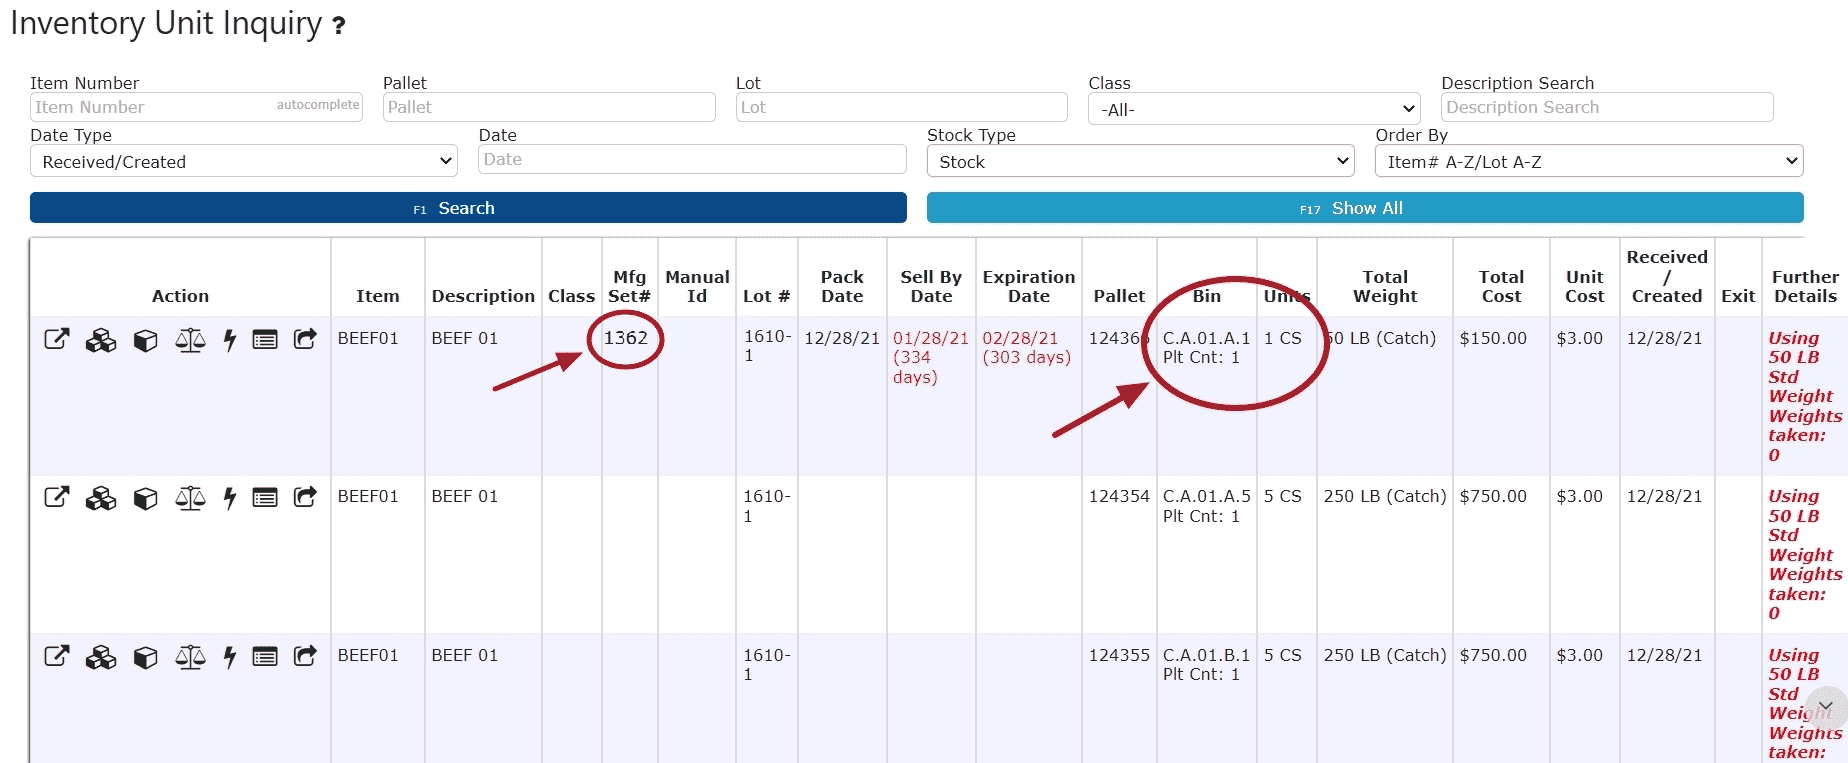
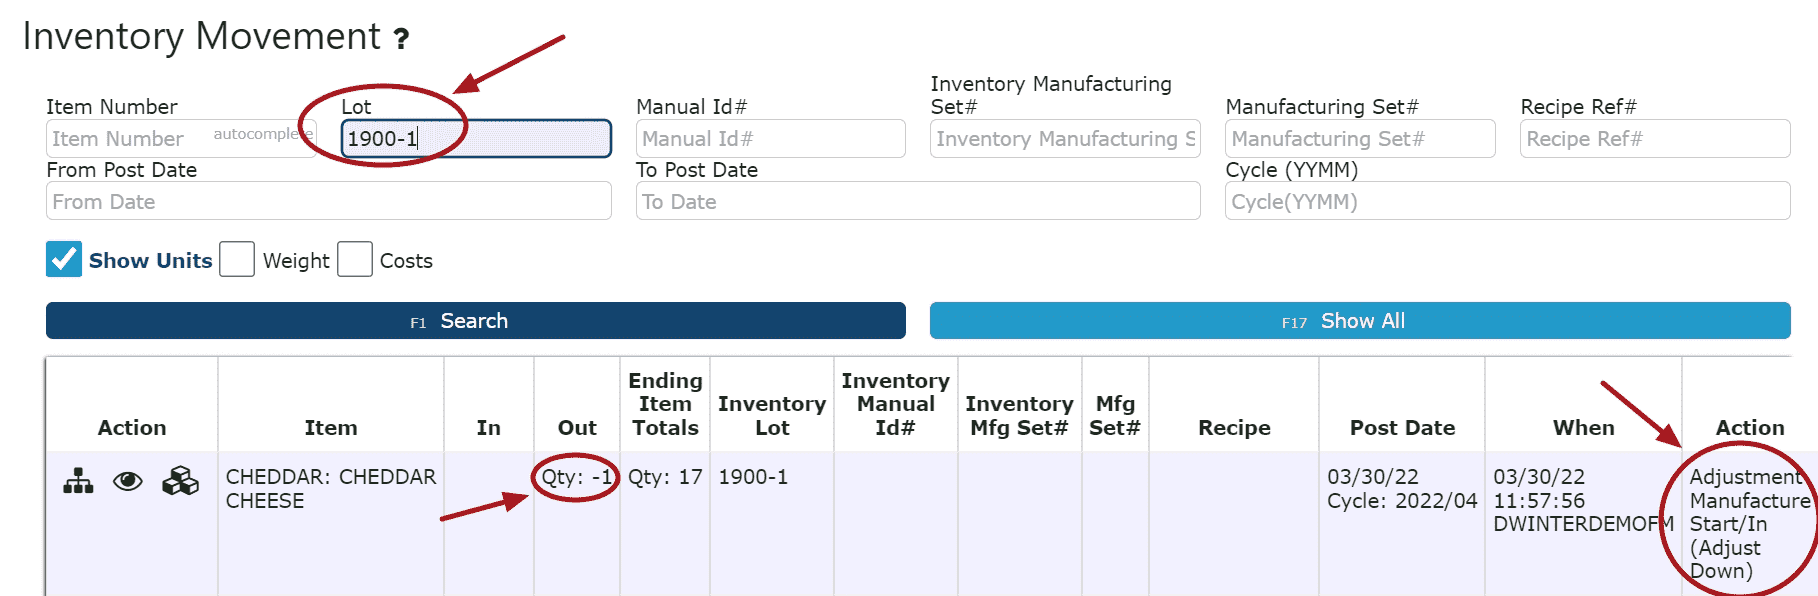
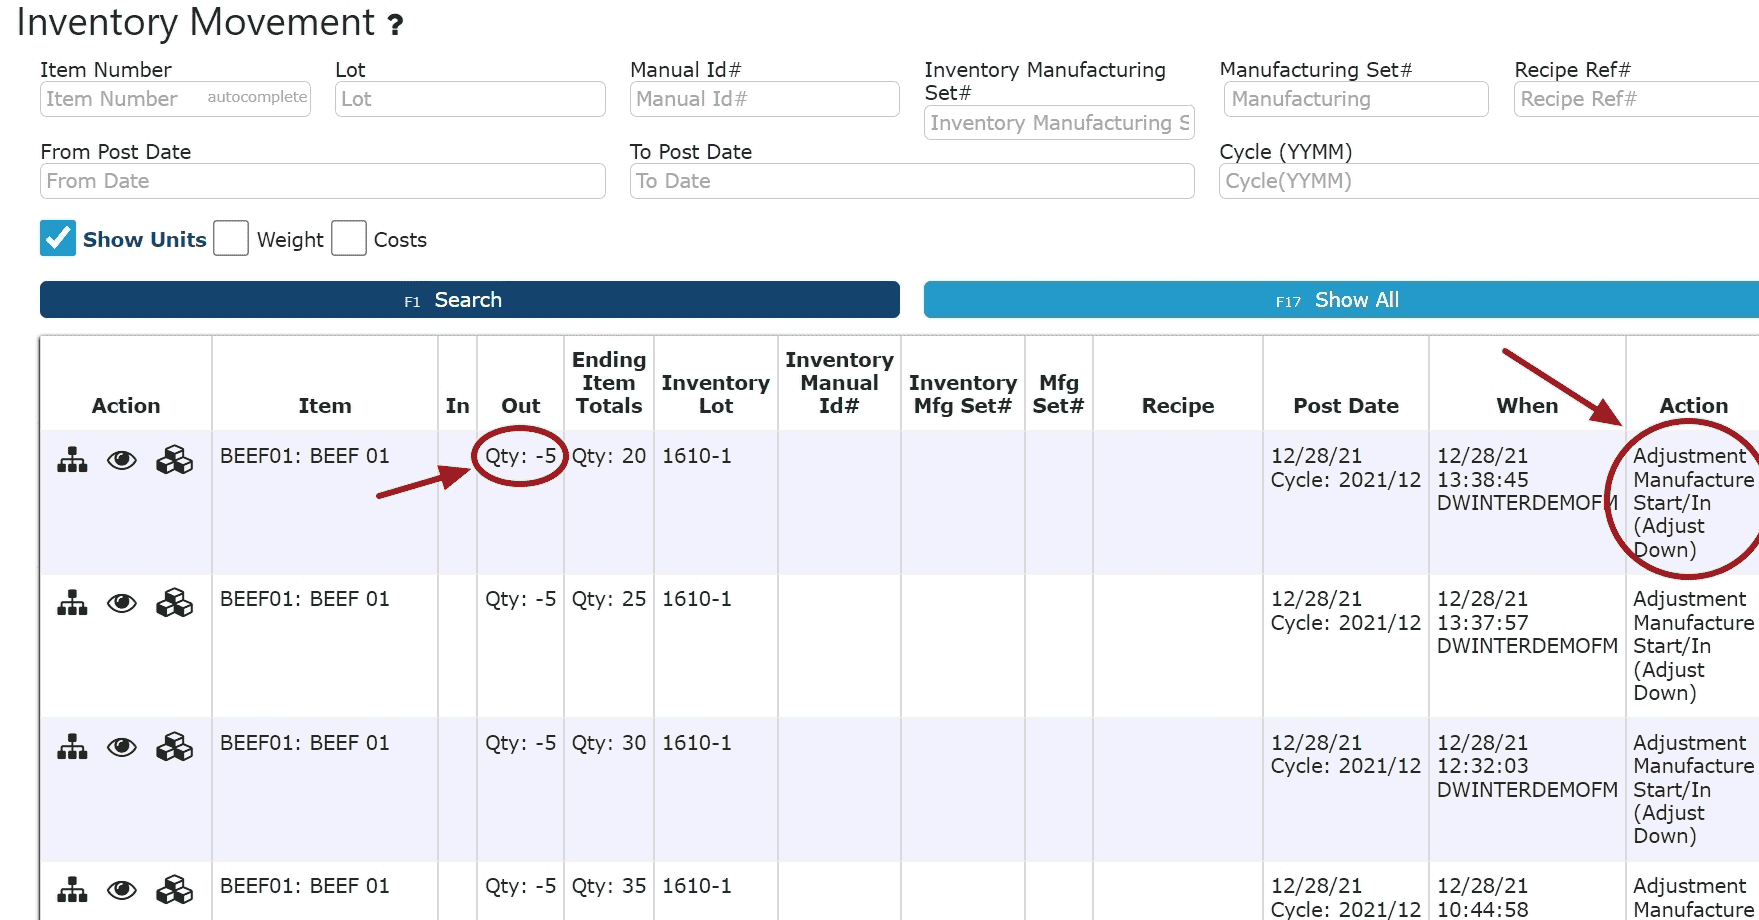
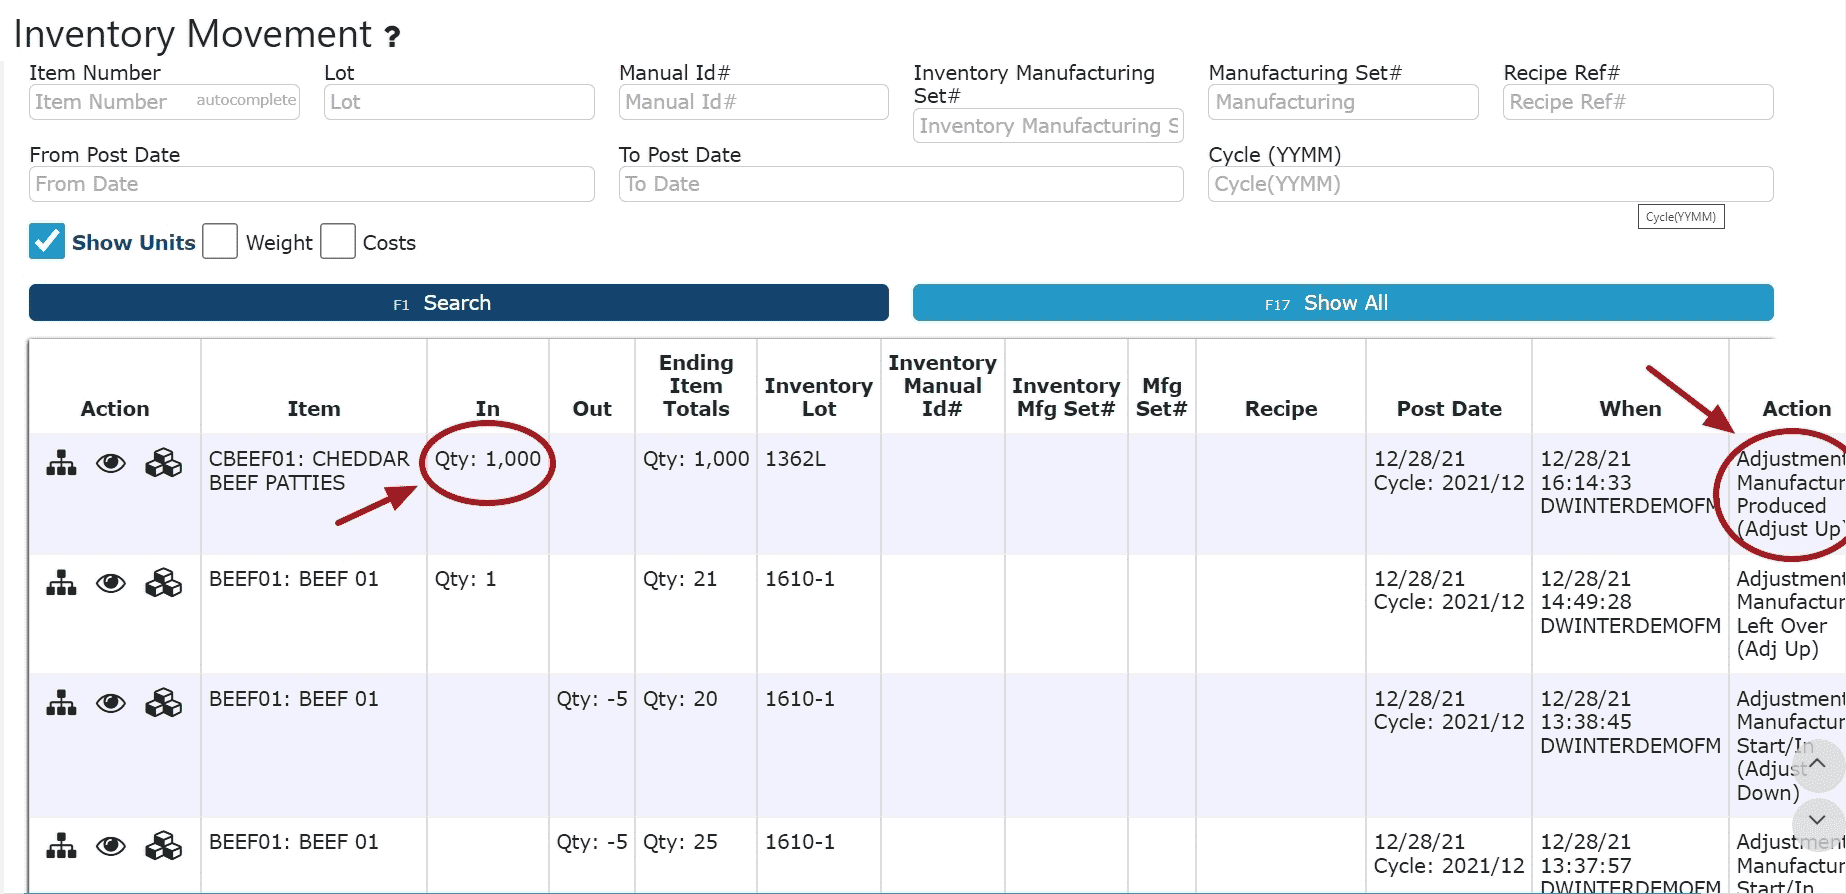
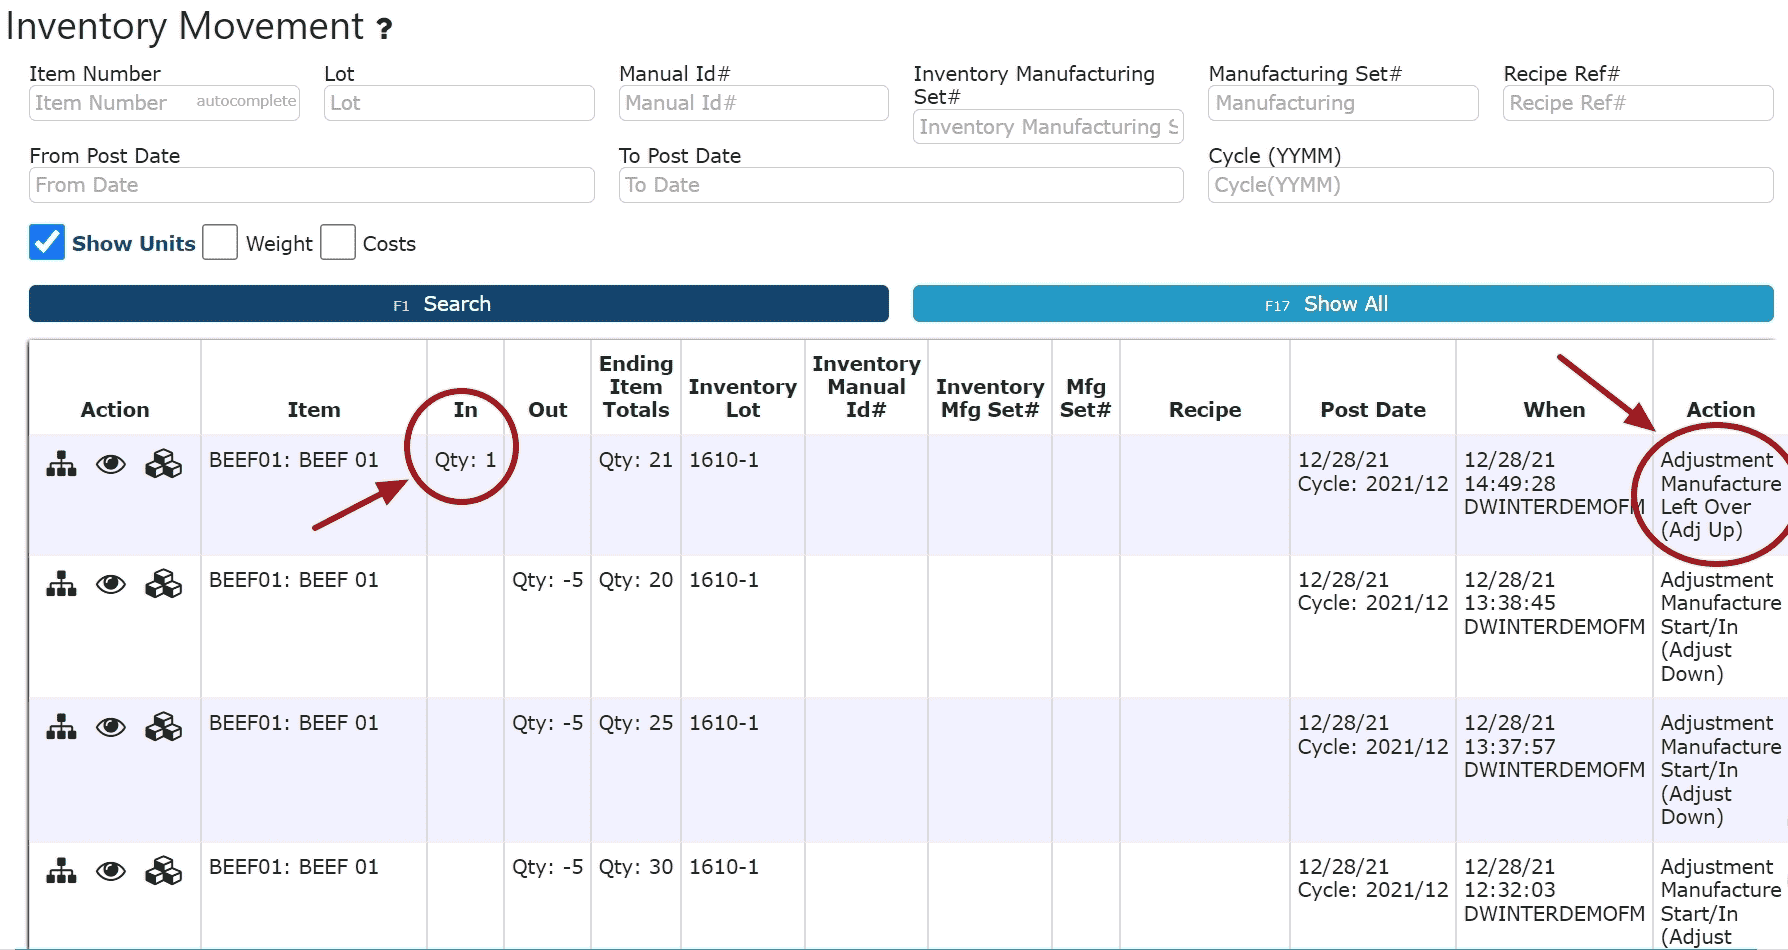
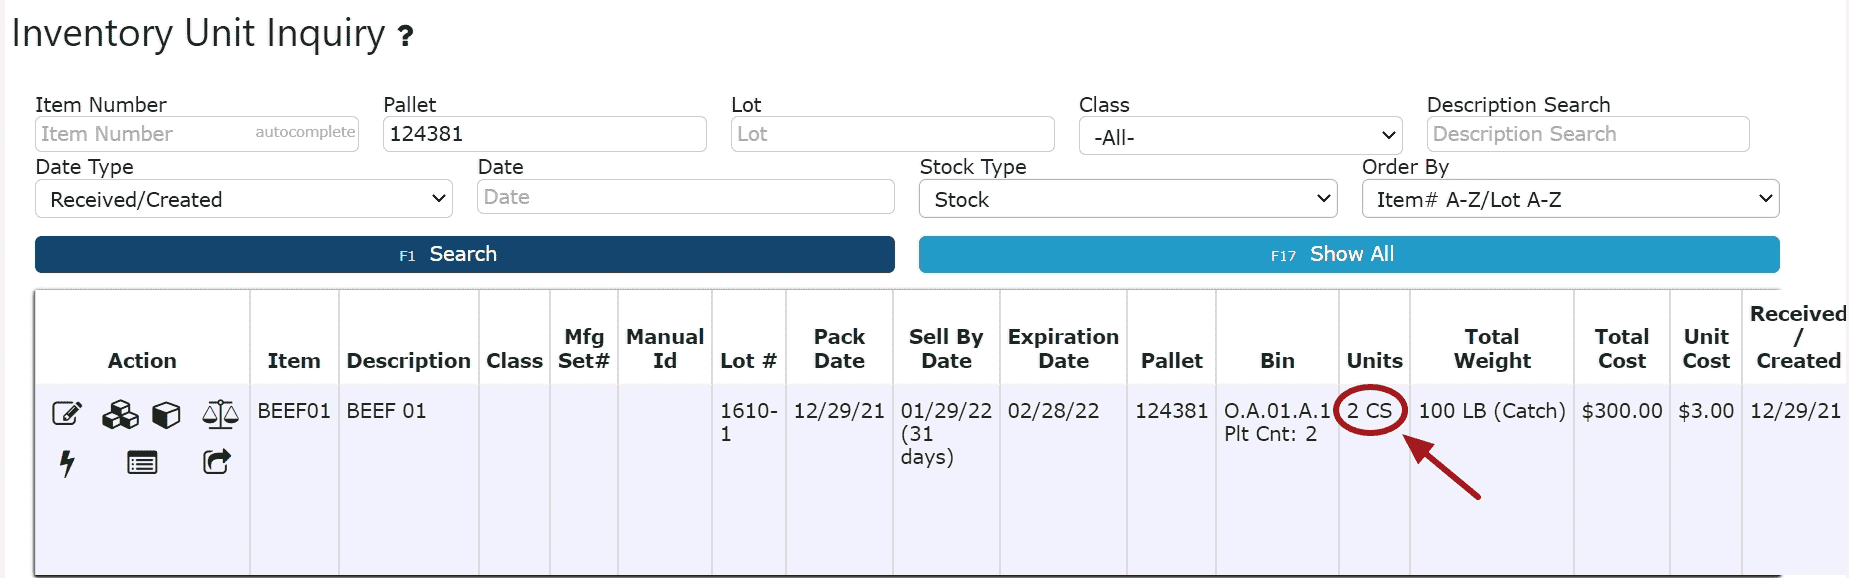
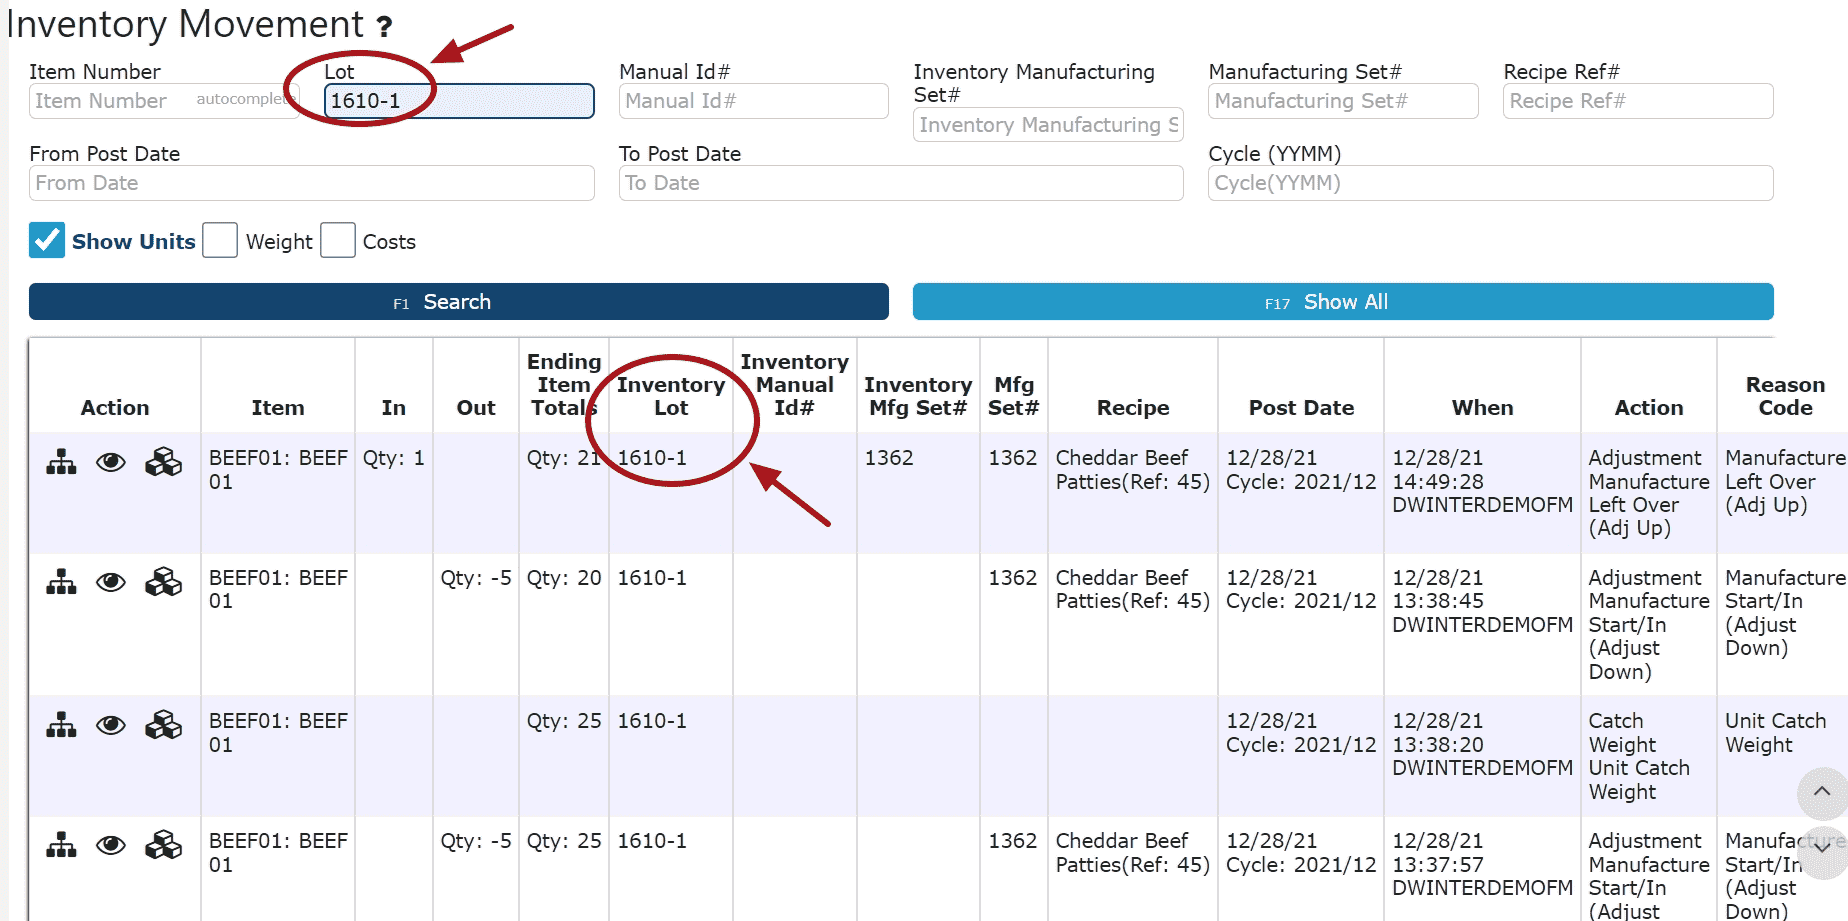
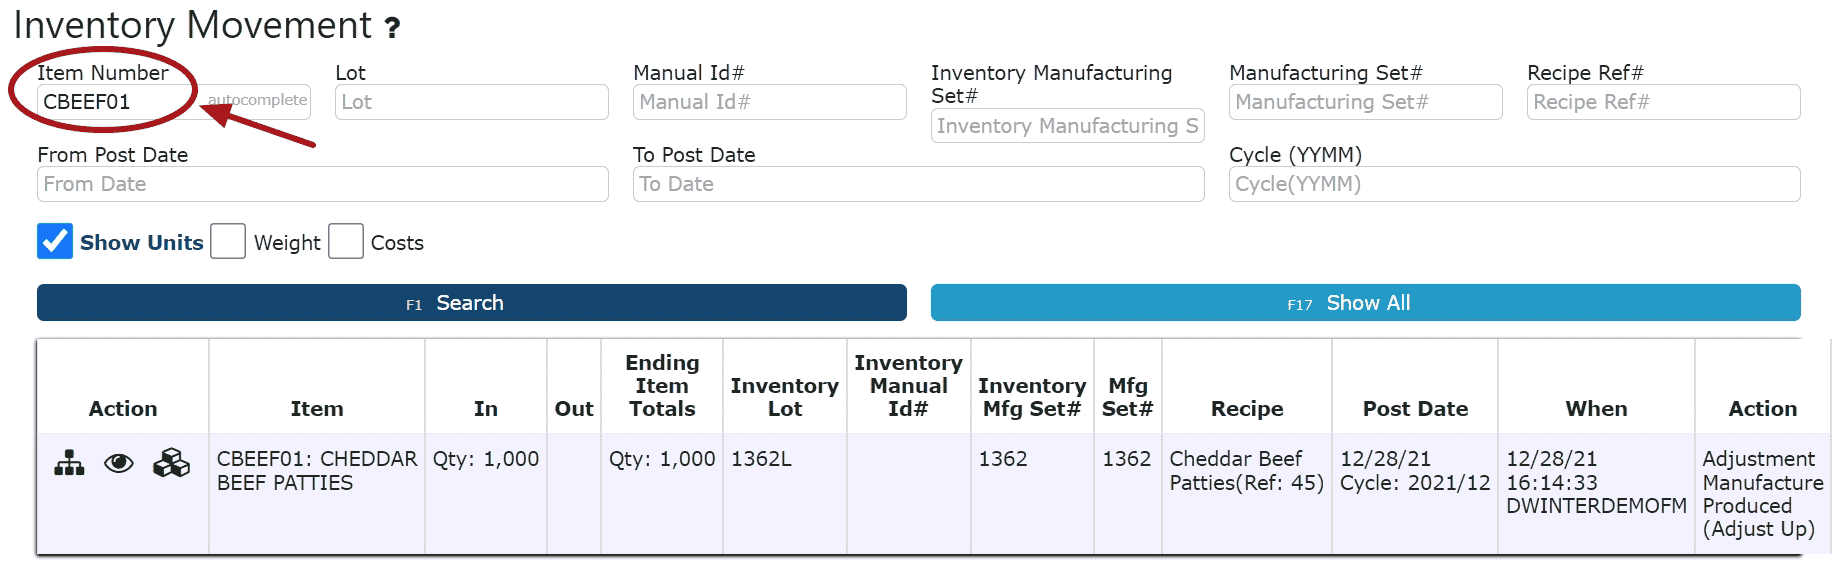
    6. Reporting: Review the Inventory Movement Report to see all product that went in and out during the manufacturing process.  Search by recipe, lot, item, MFS# and date.

    Proccess Without Using Recipes:

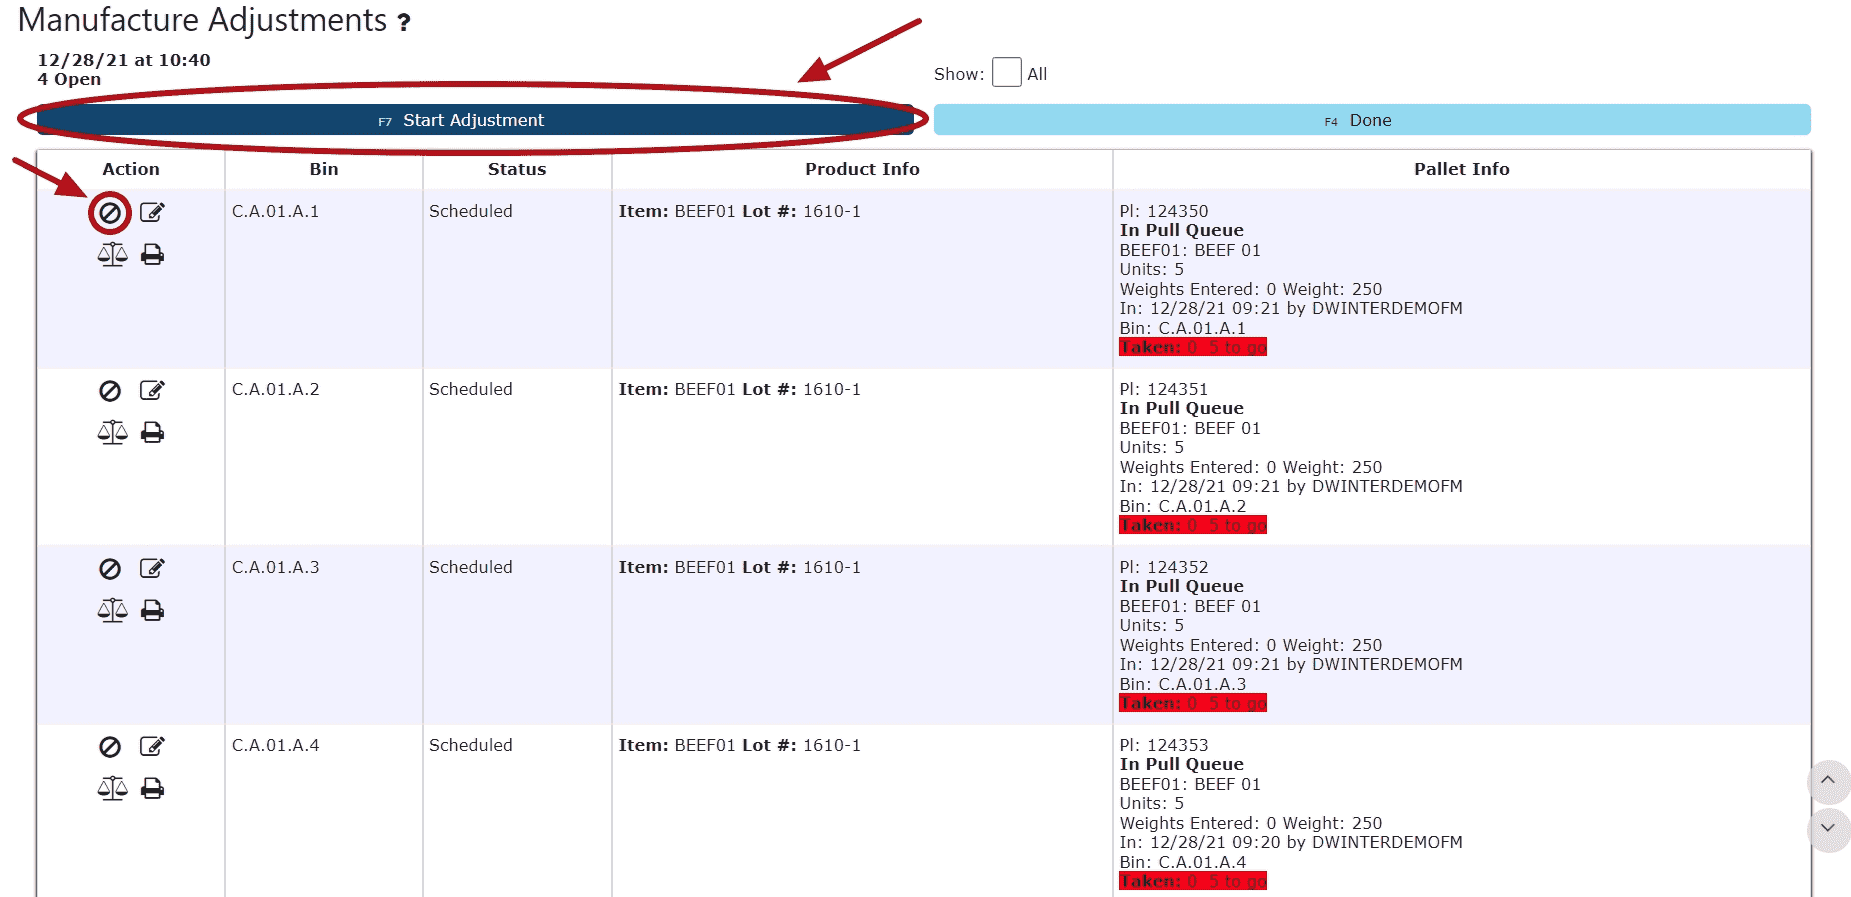
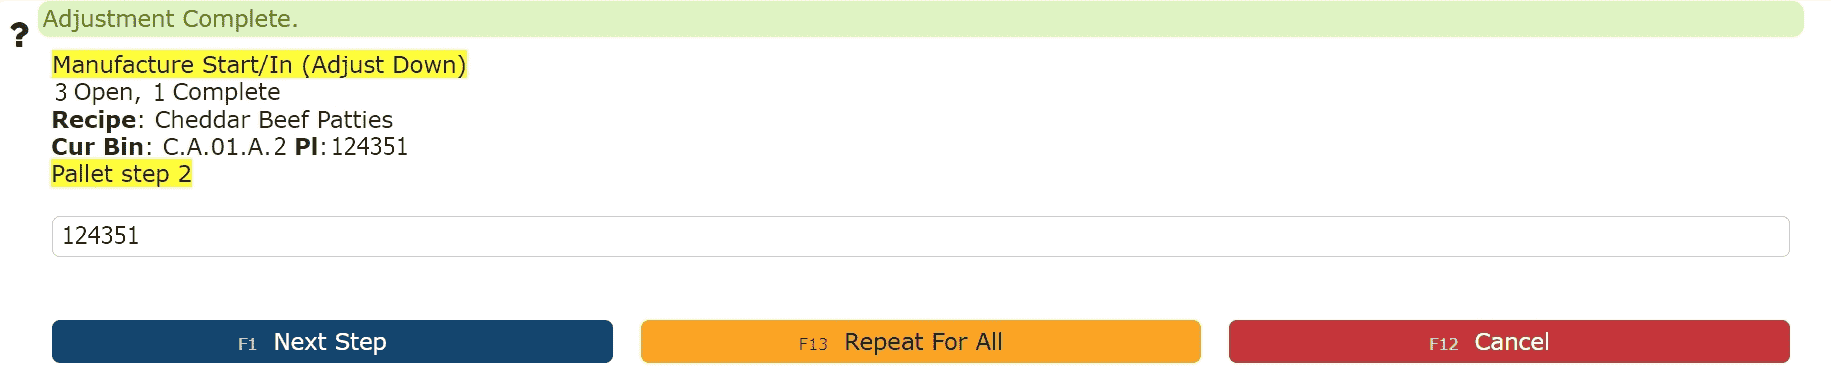
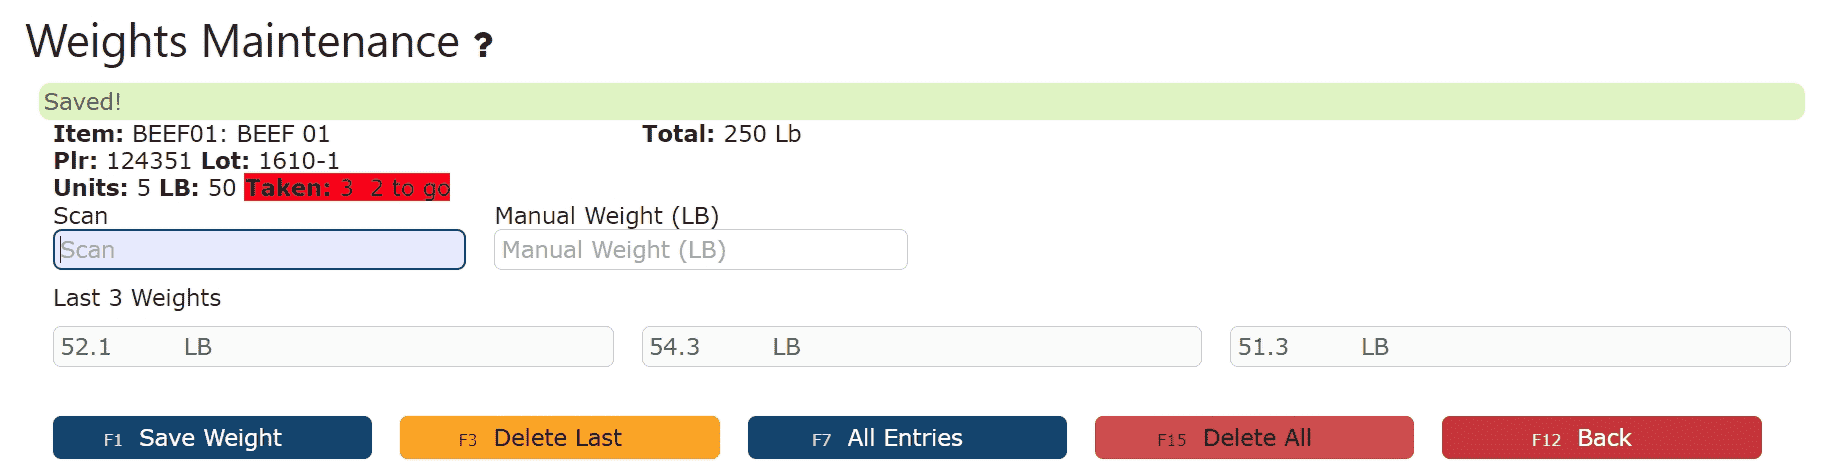
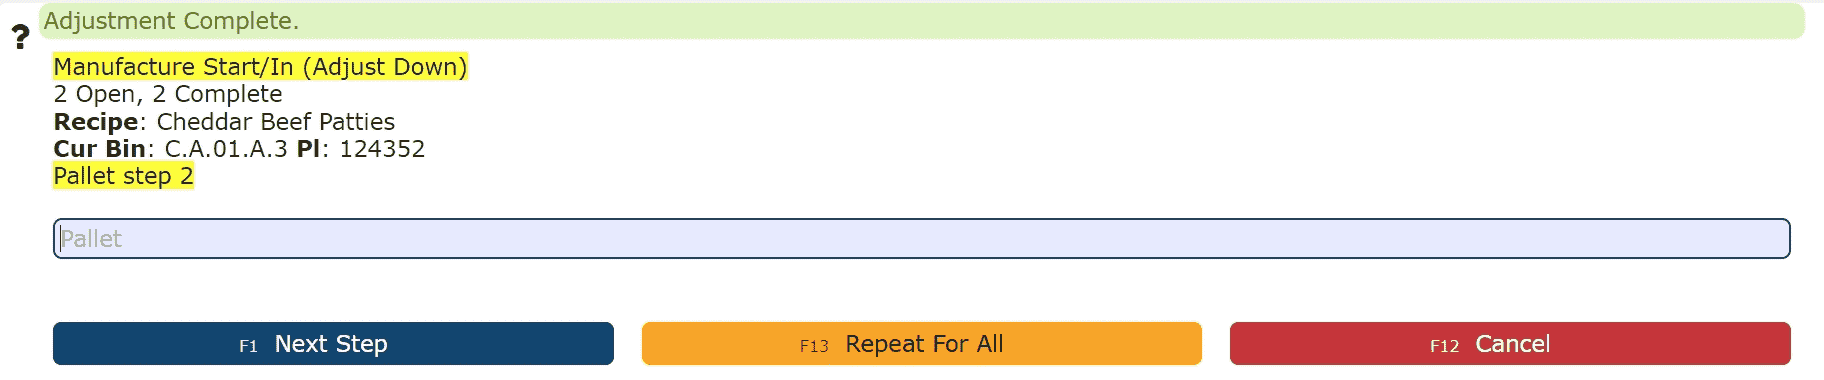
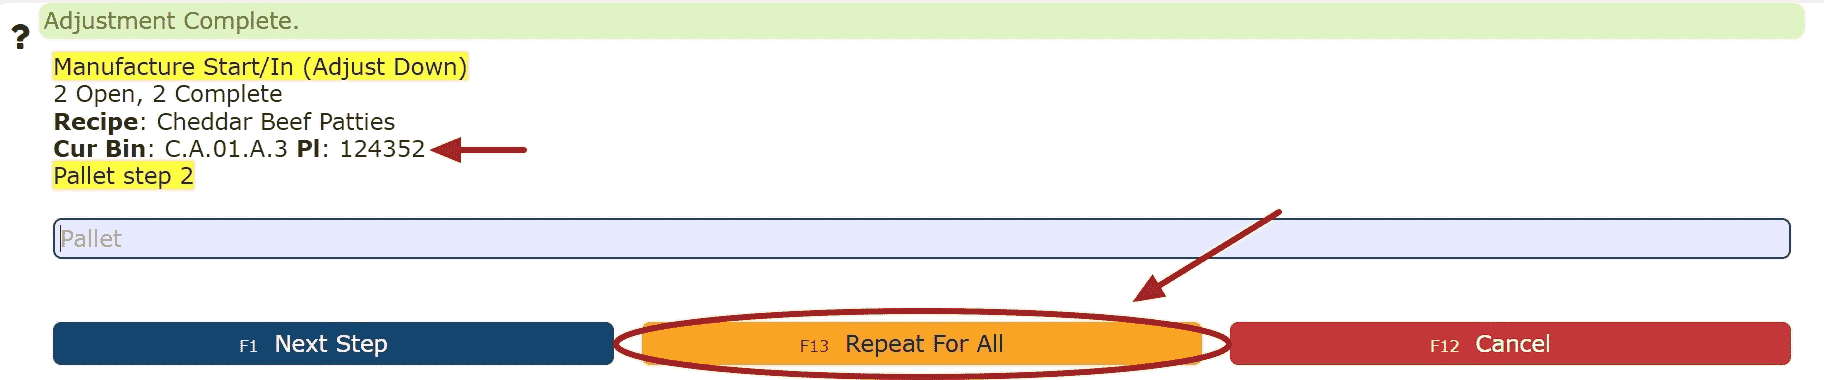
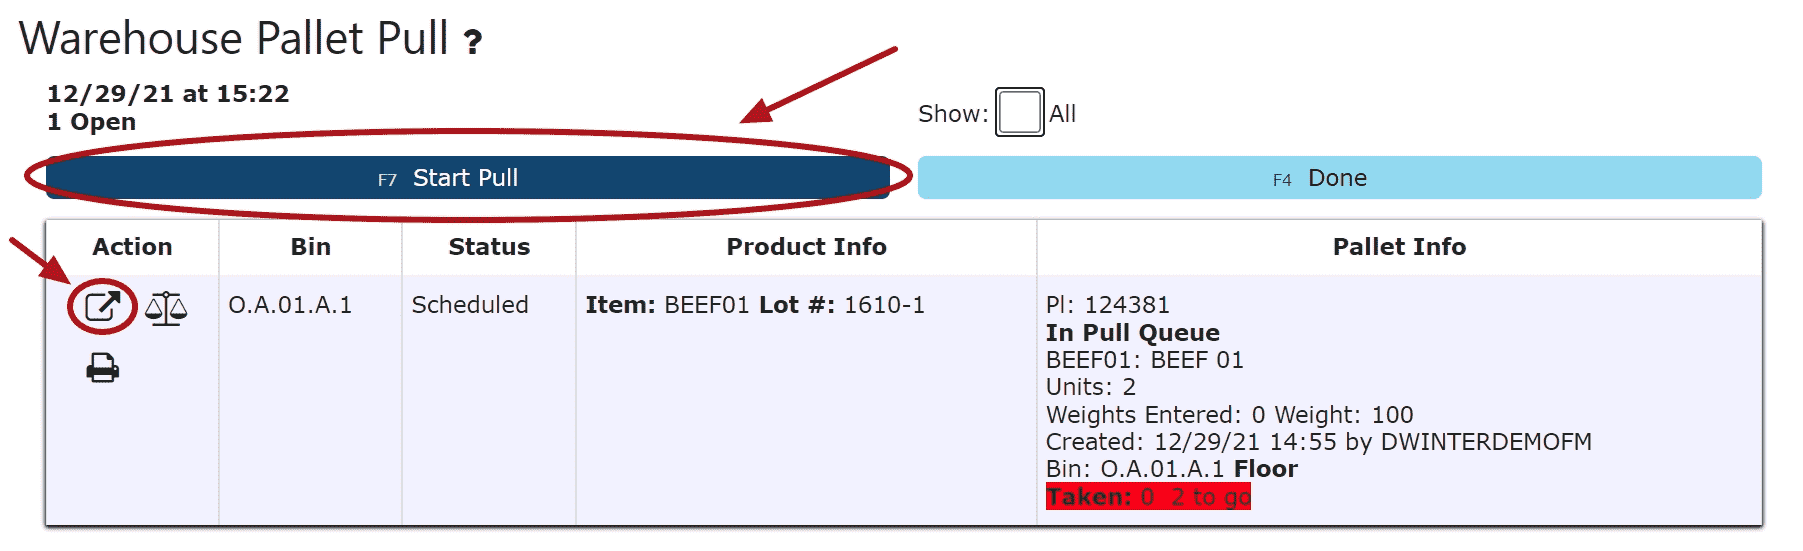
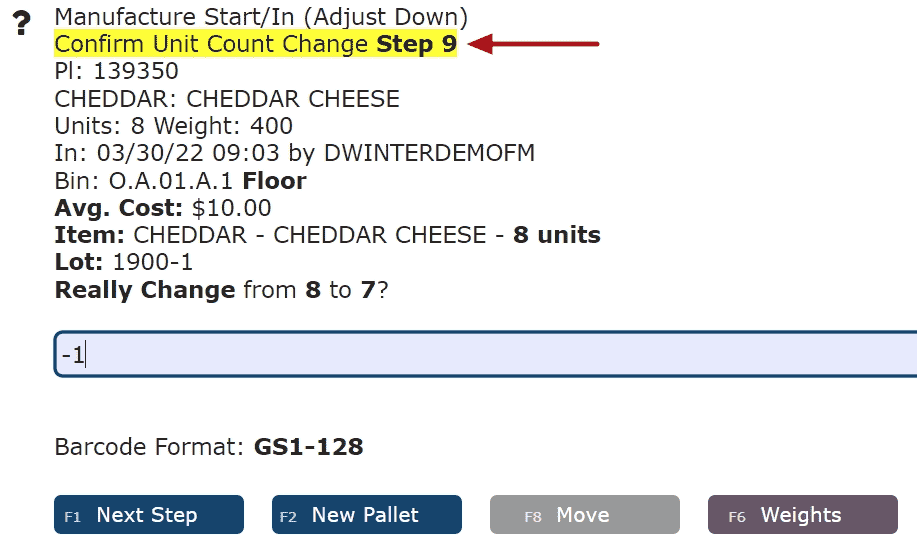
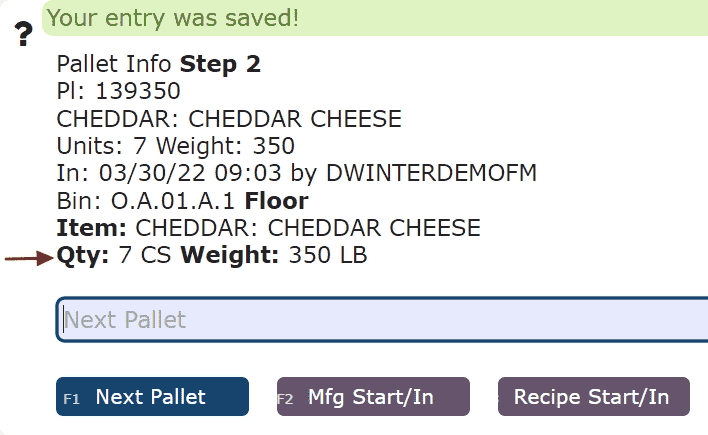
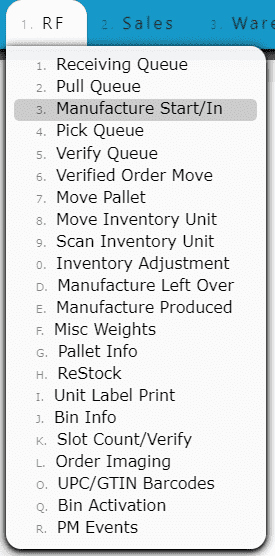
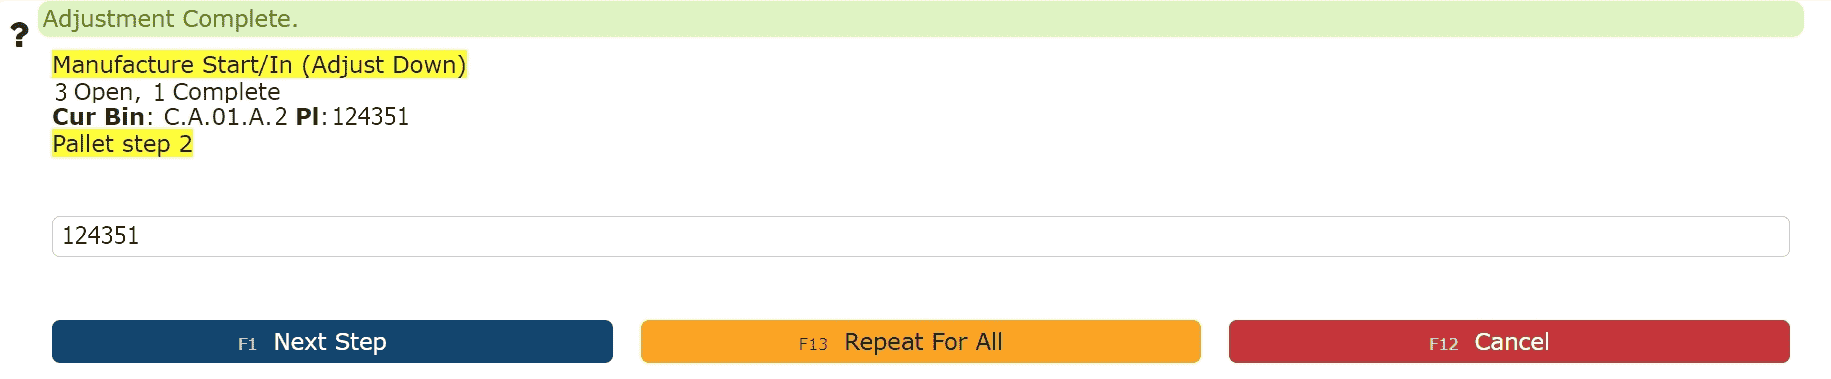
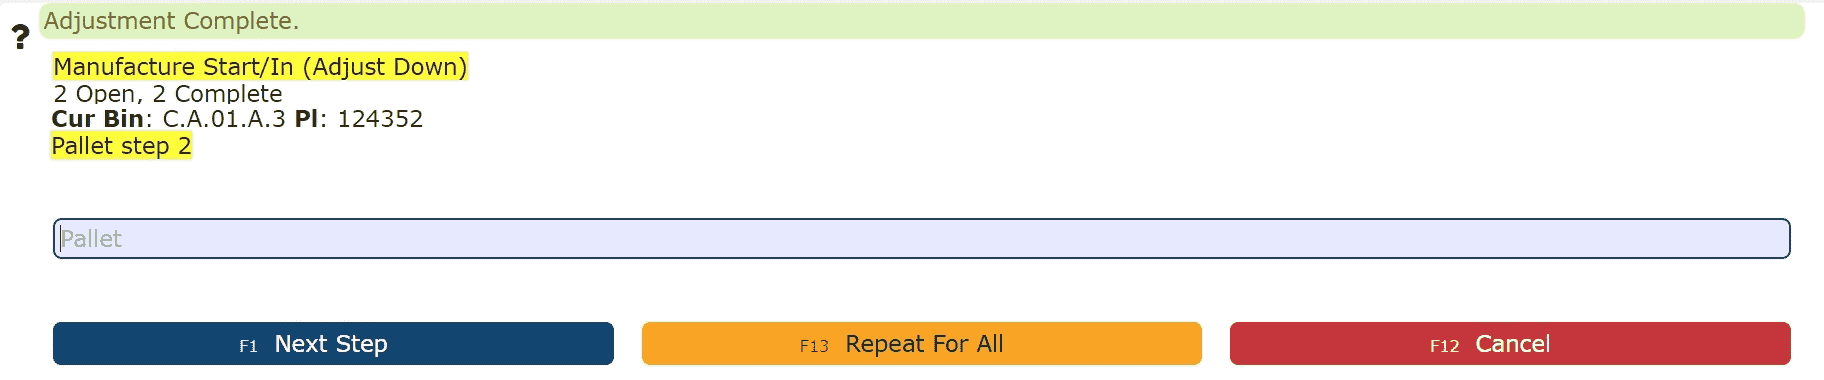
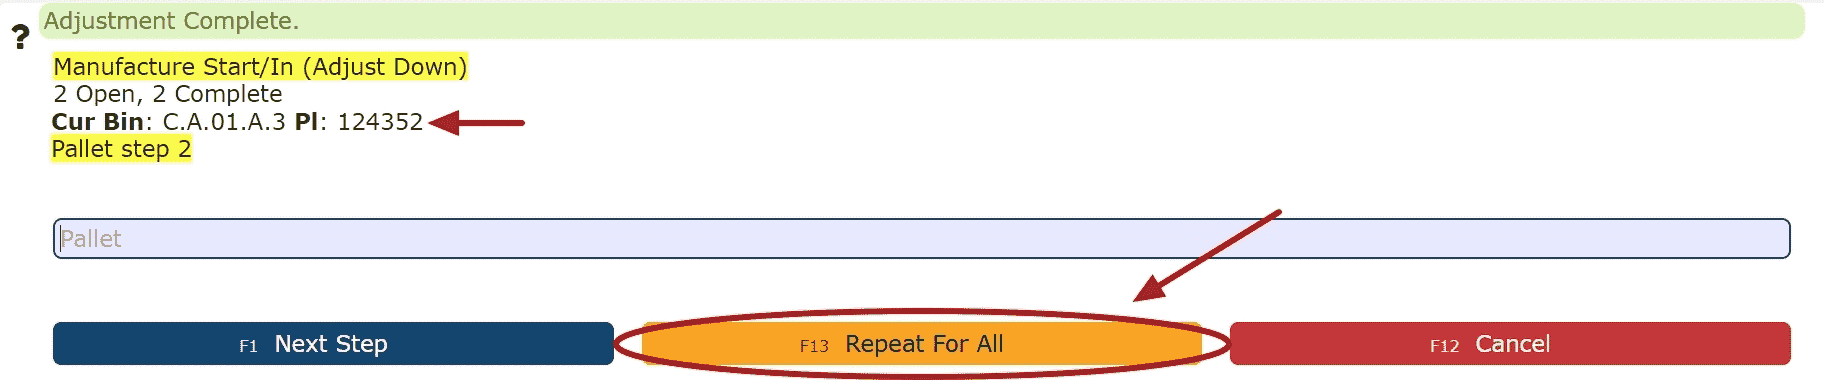
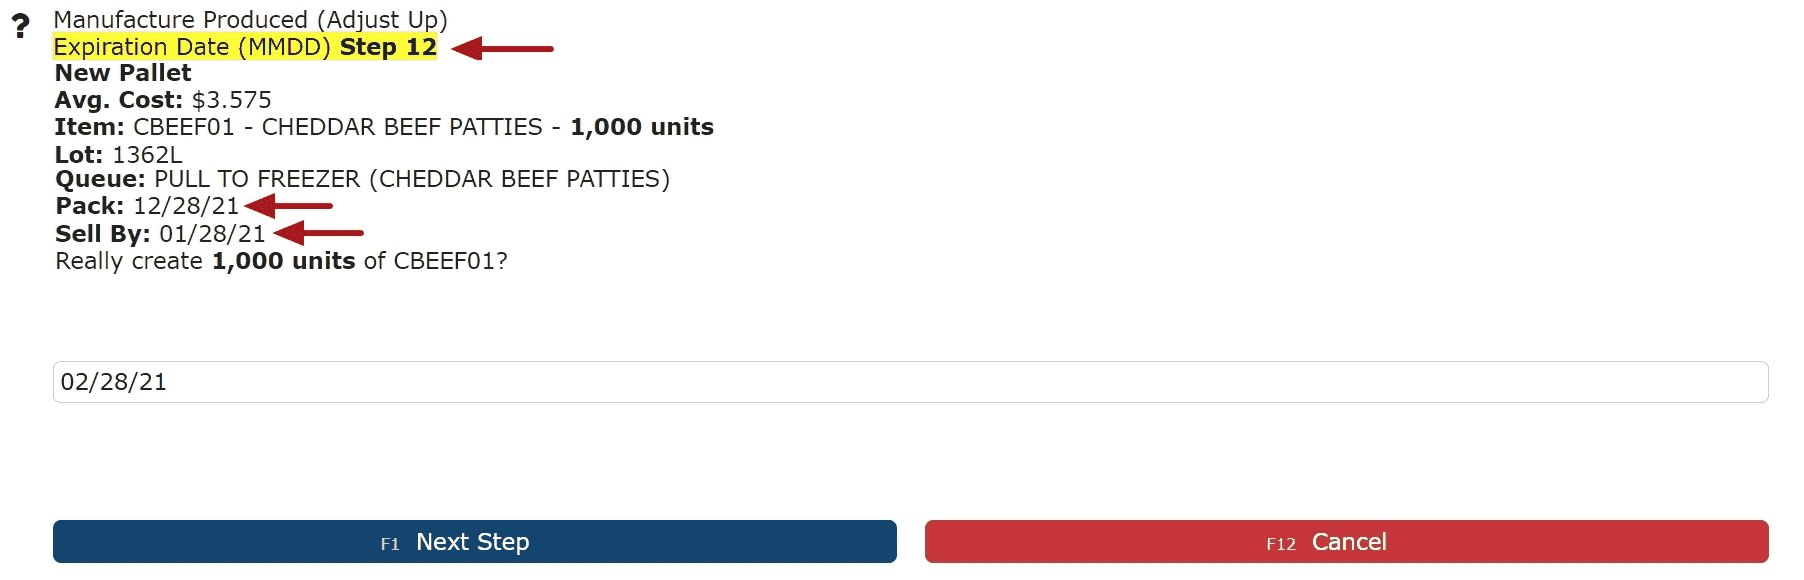
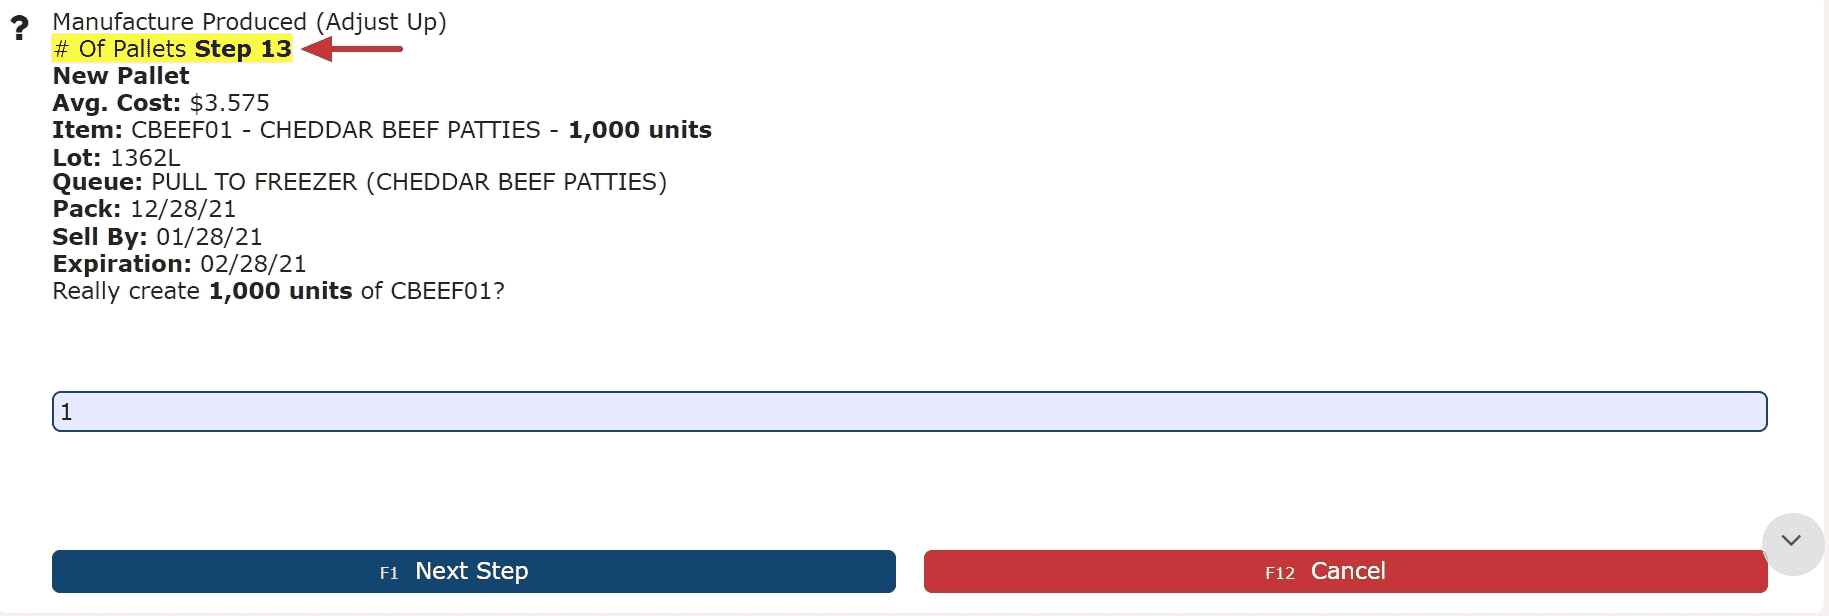
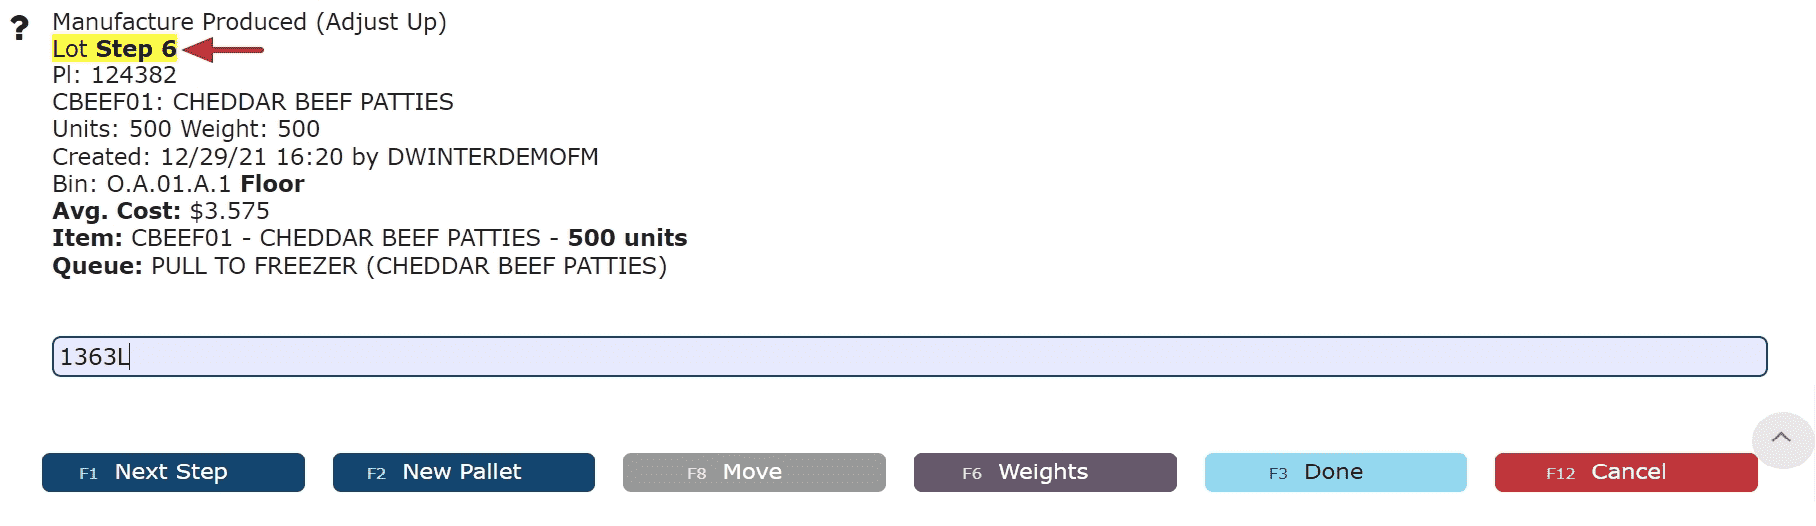
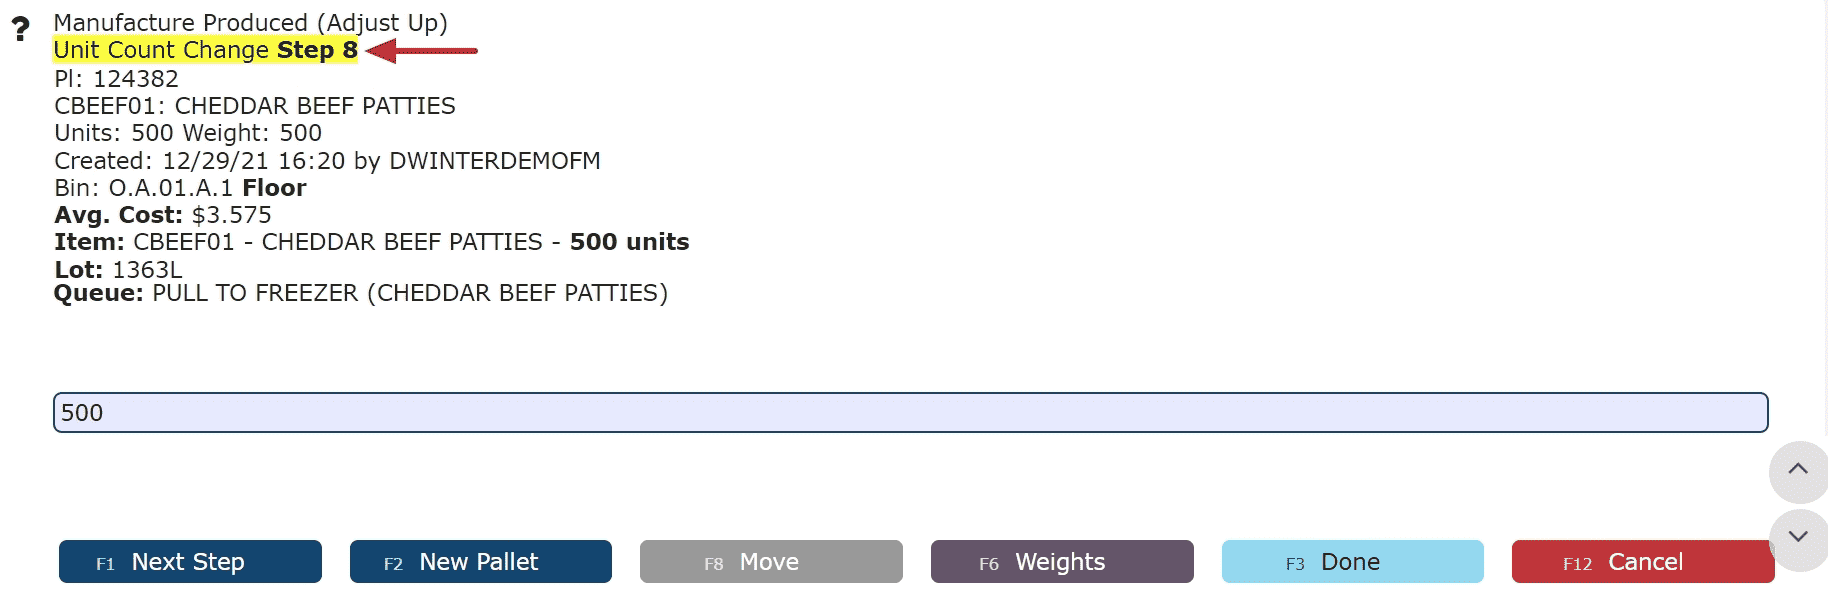
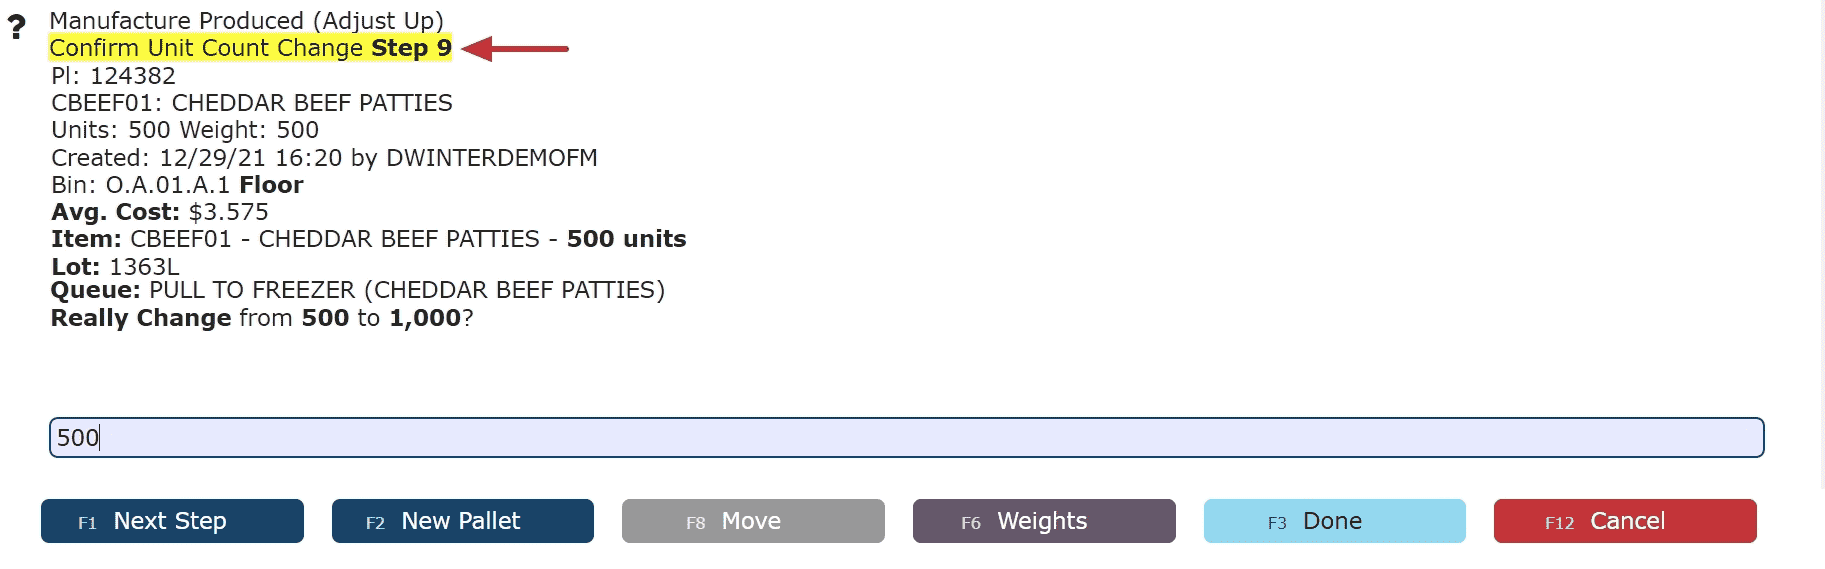
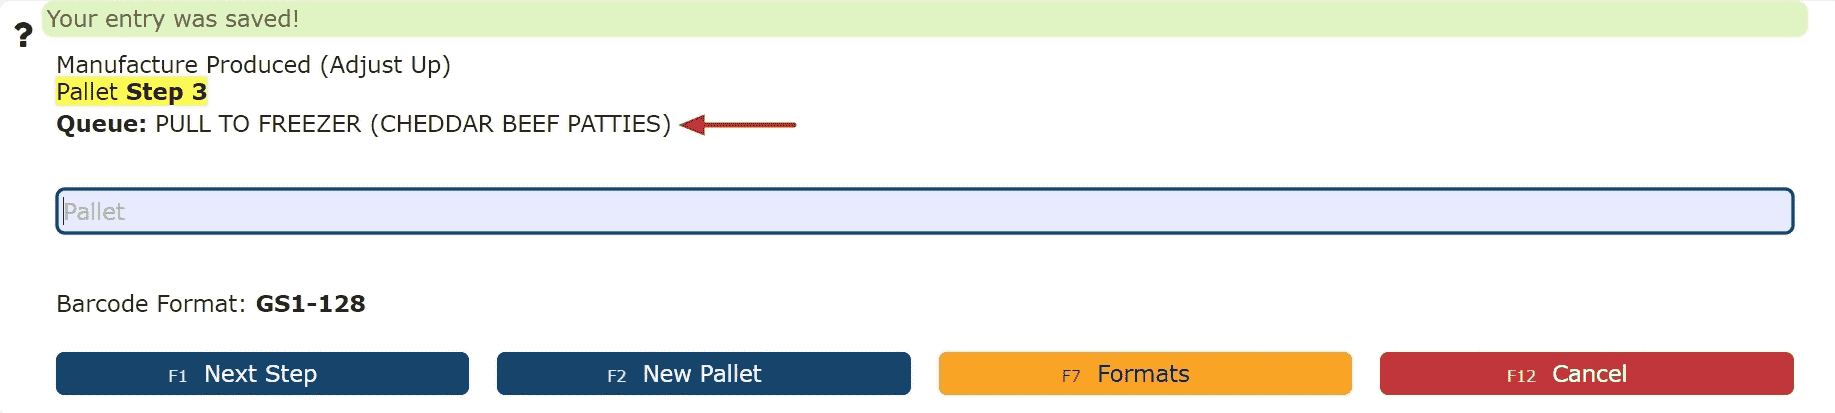
    1. Manufacture Start/In: Take the items/ingredients out of inventory. 

    2. Manufacture Produced: Place the items produced into inventory.

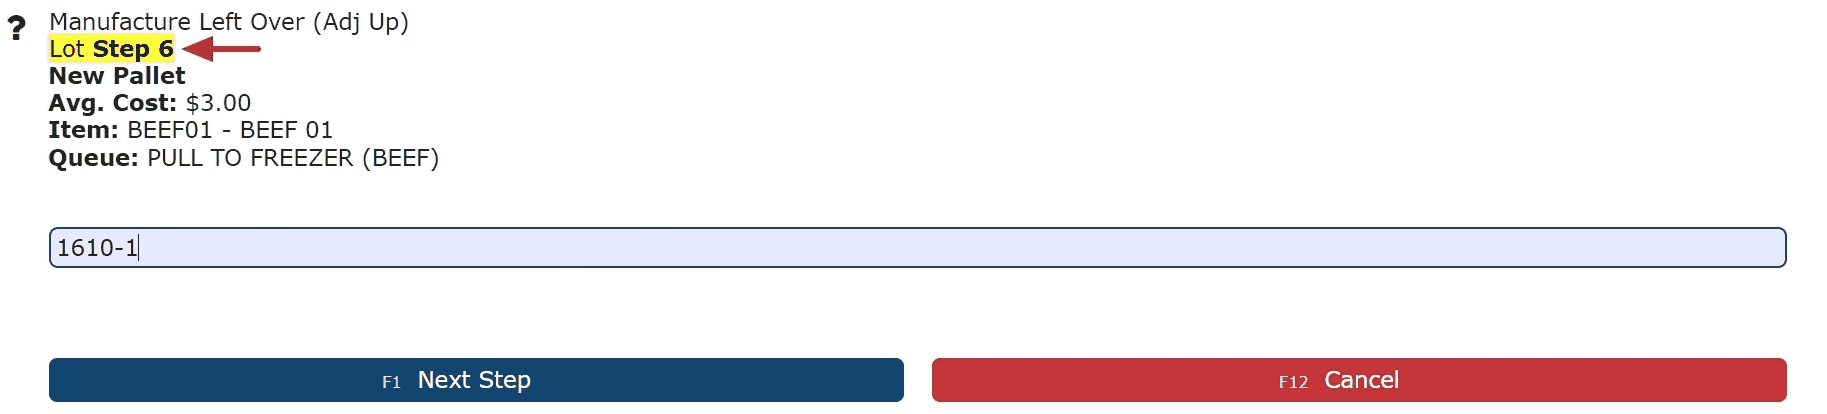
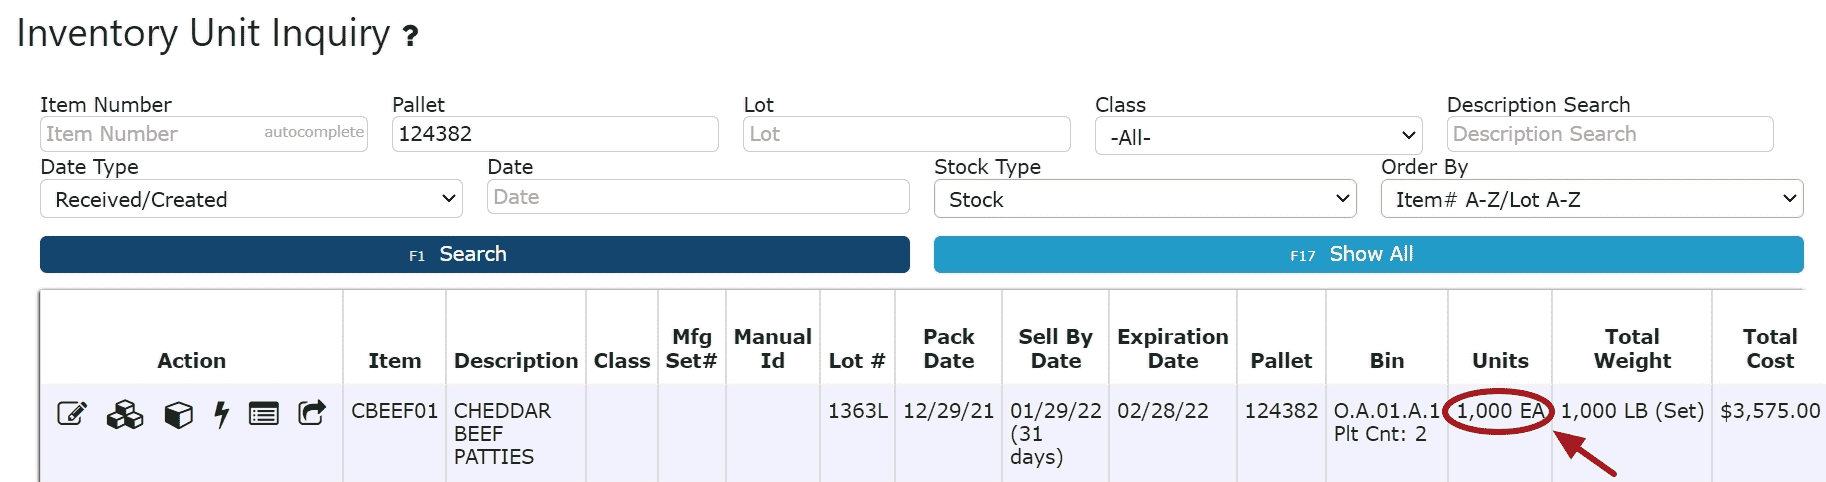
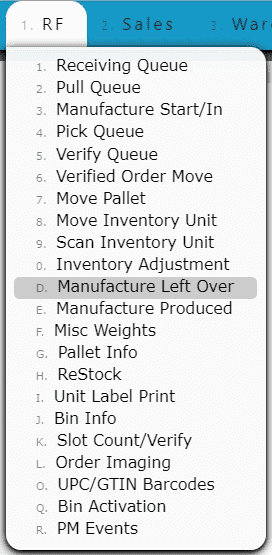
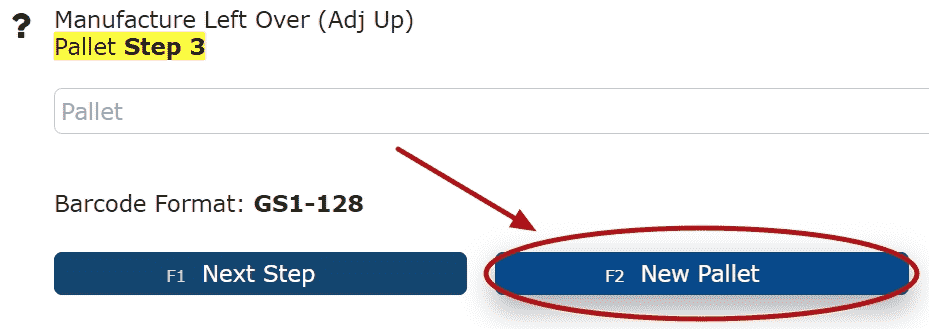
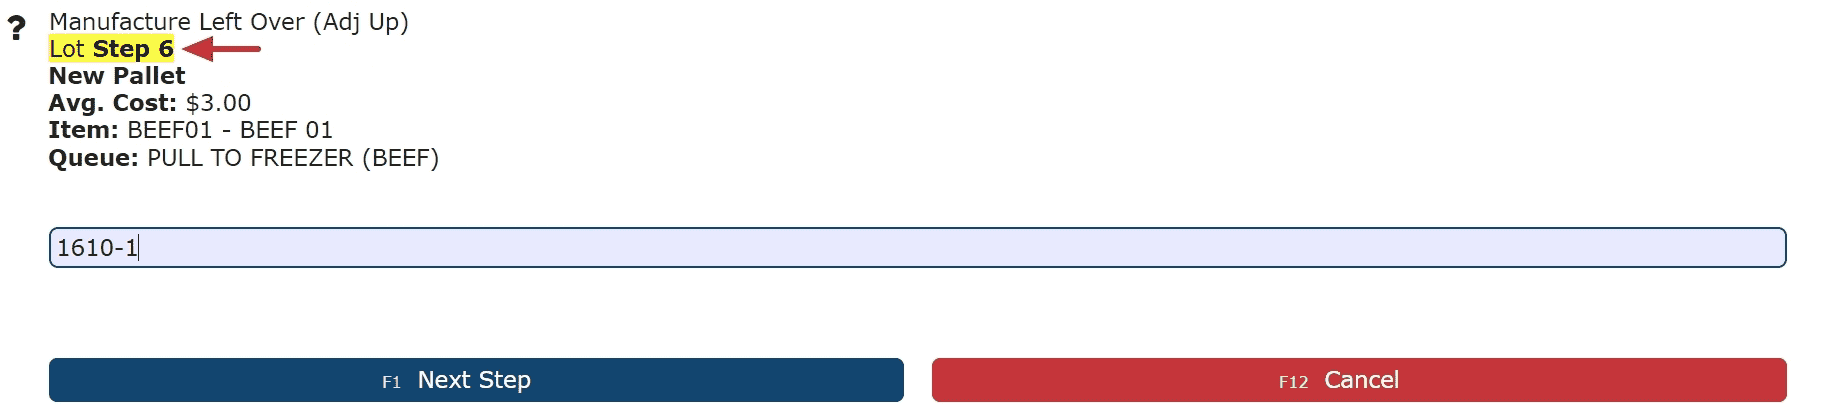
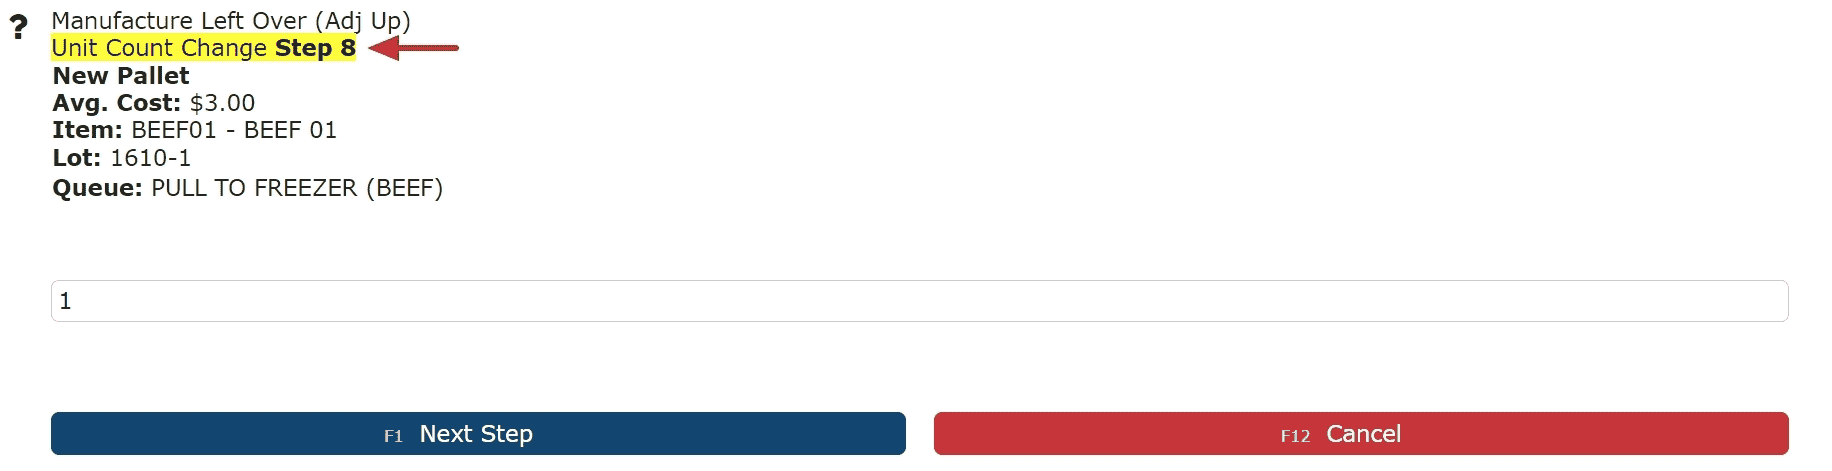
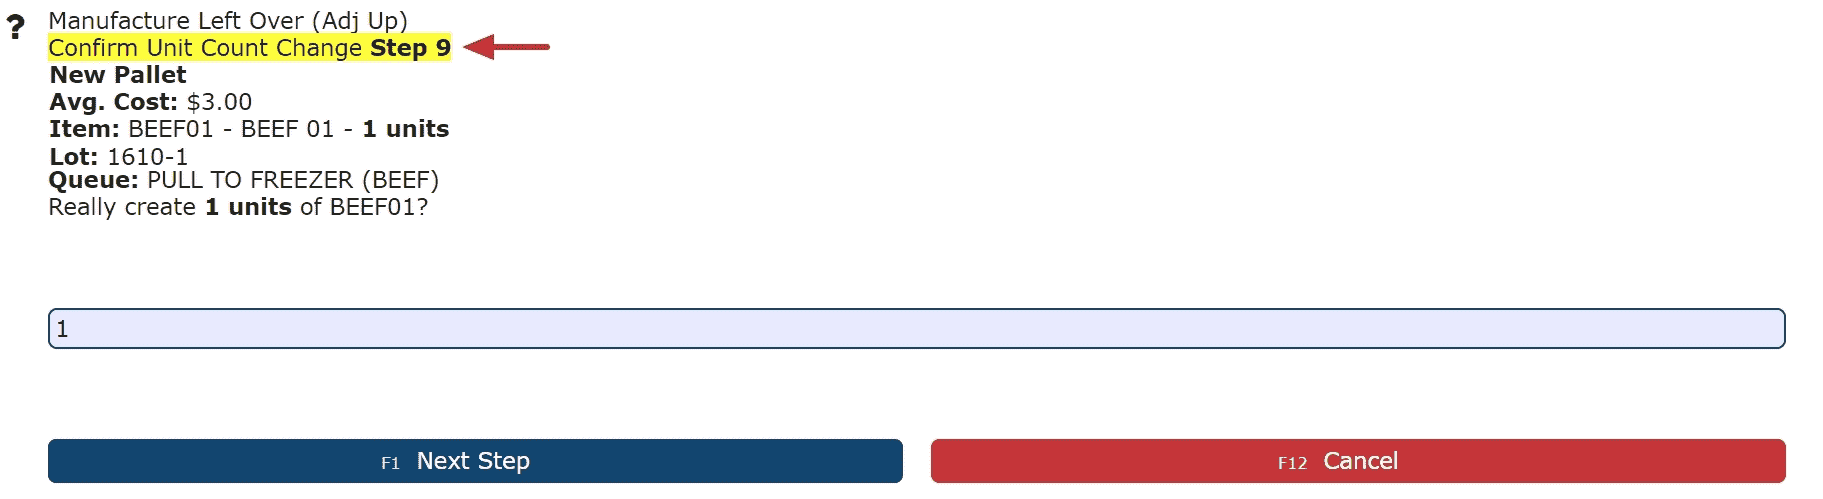
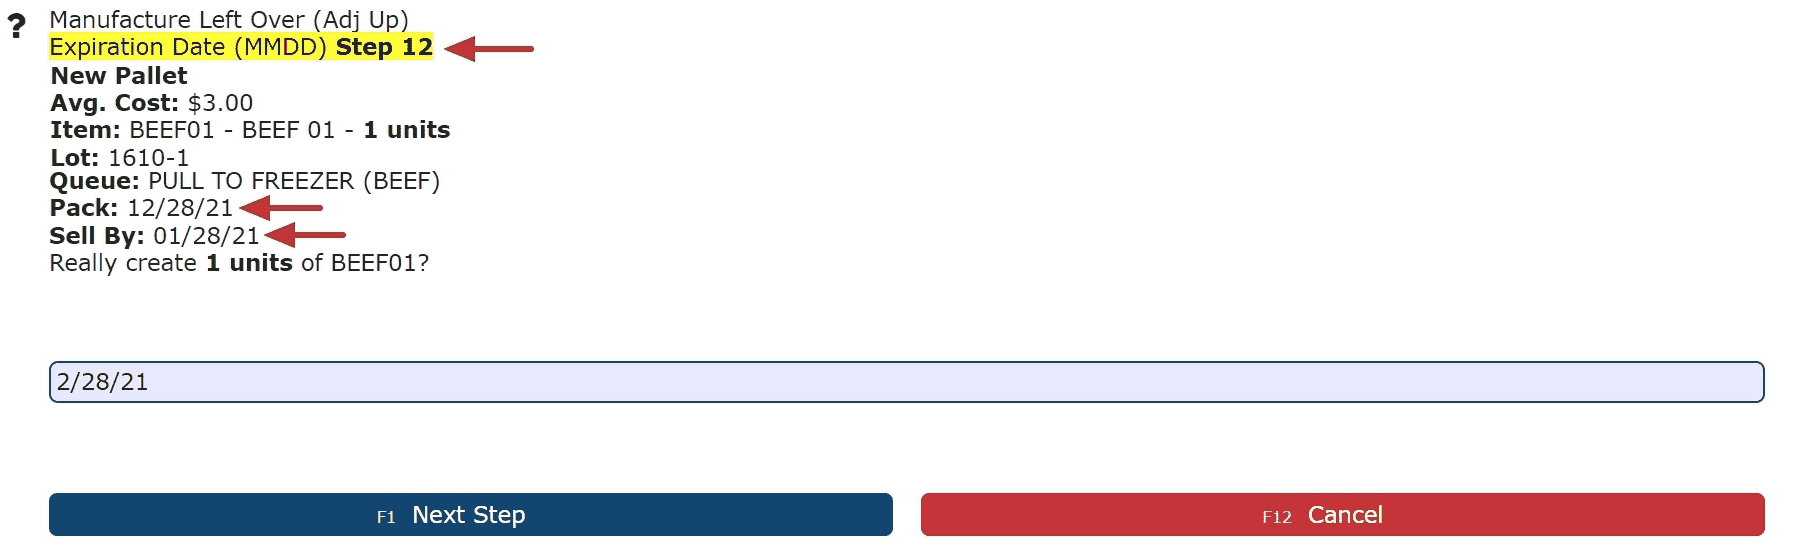
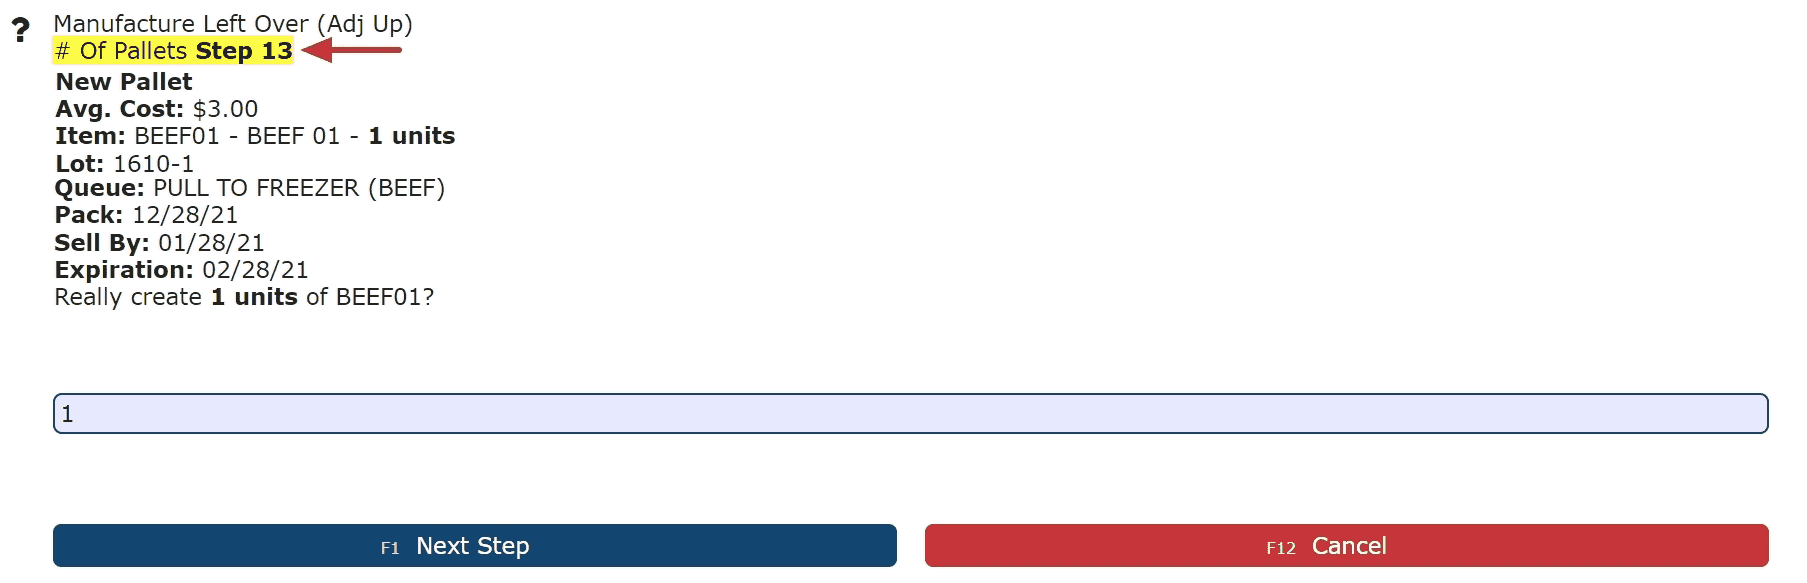
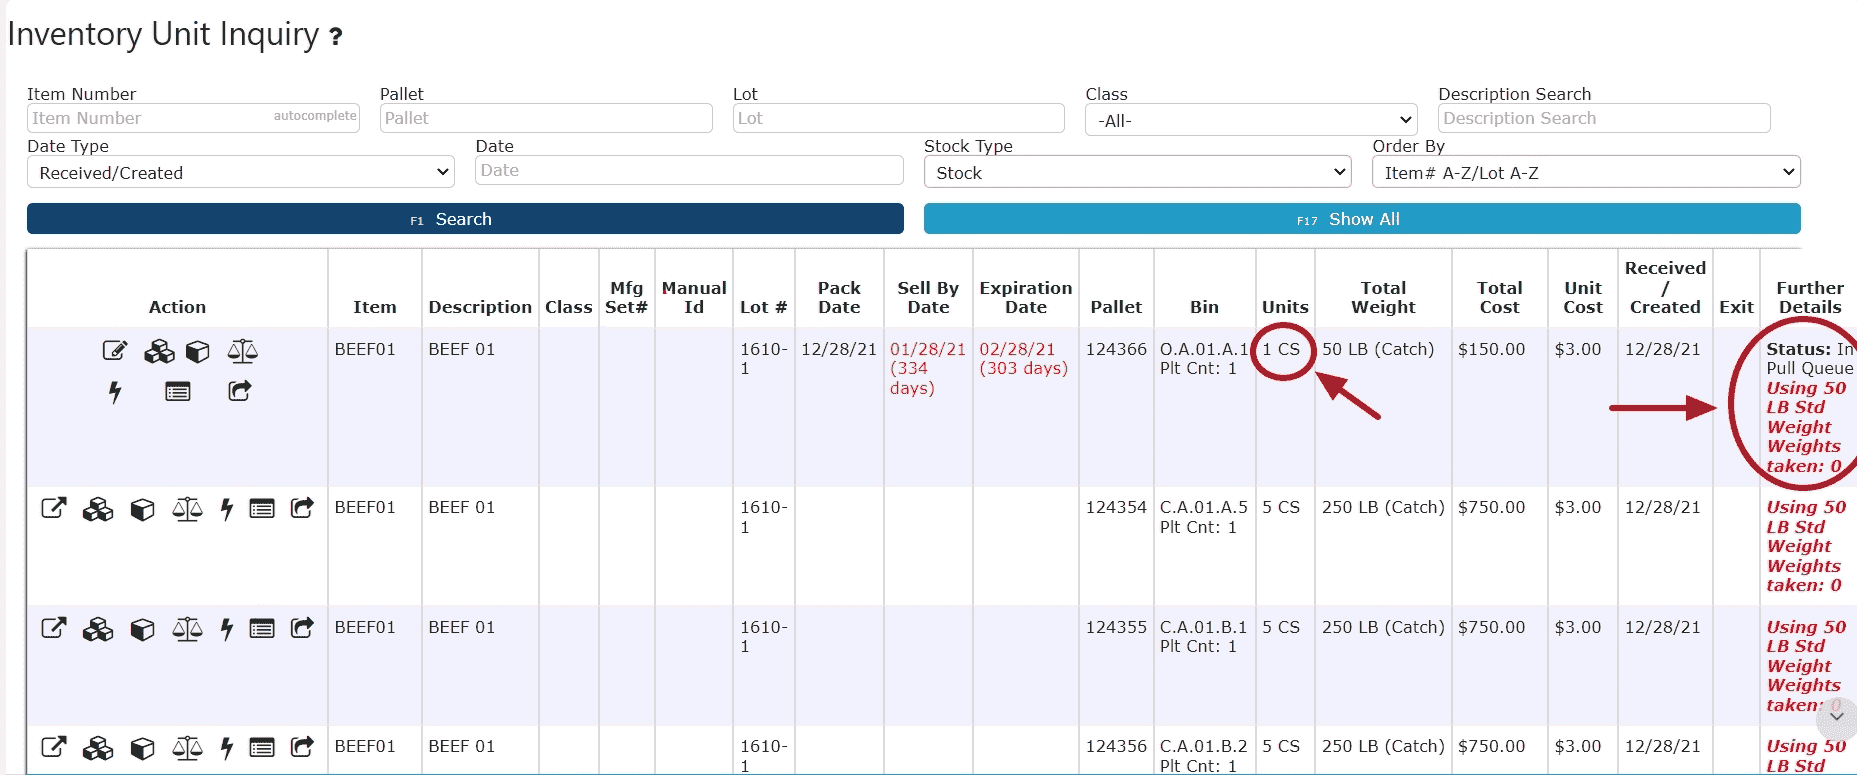
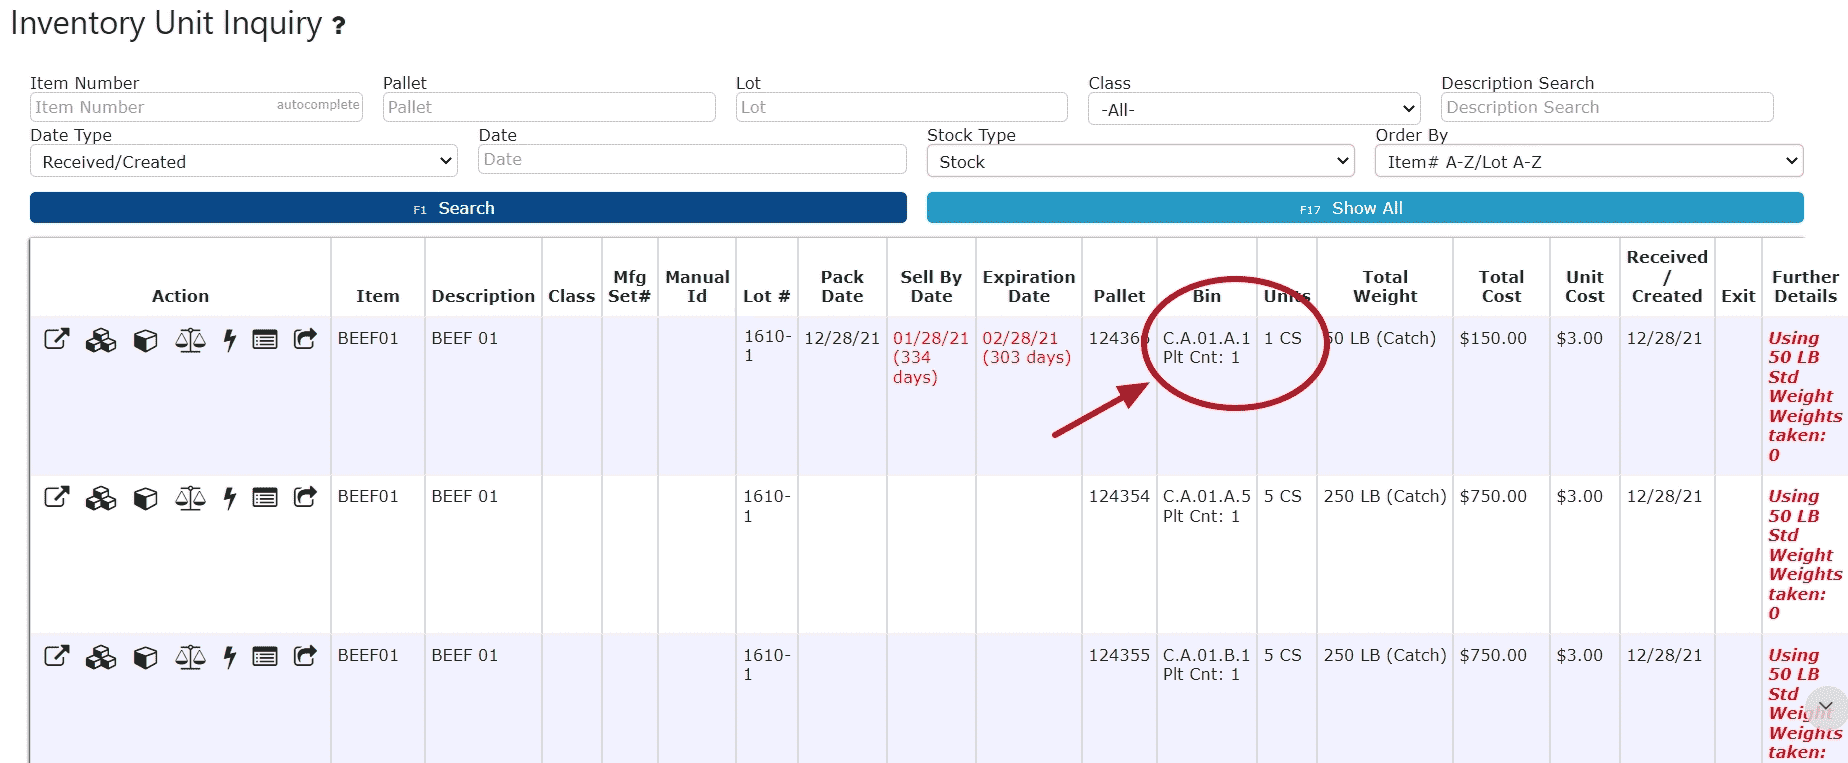
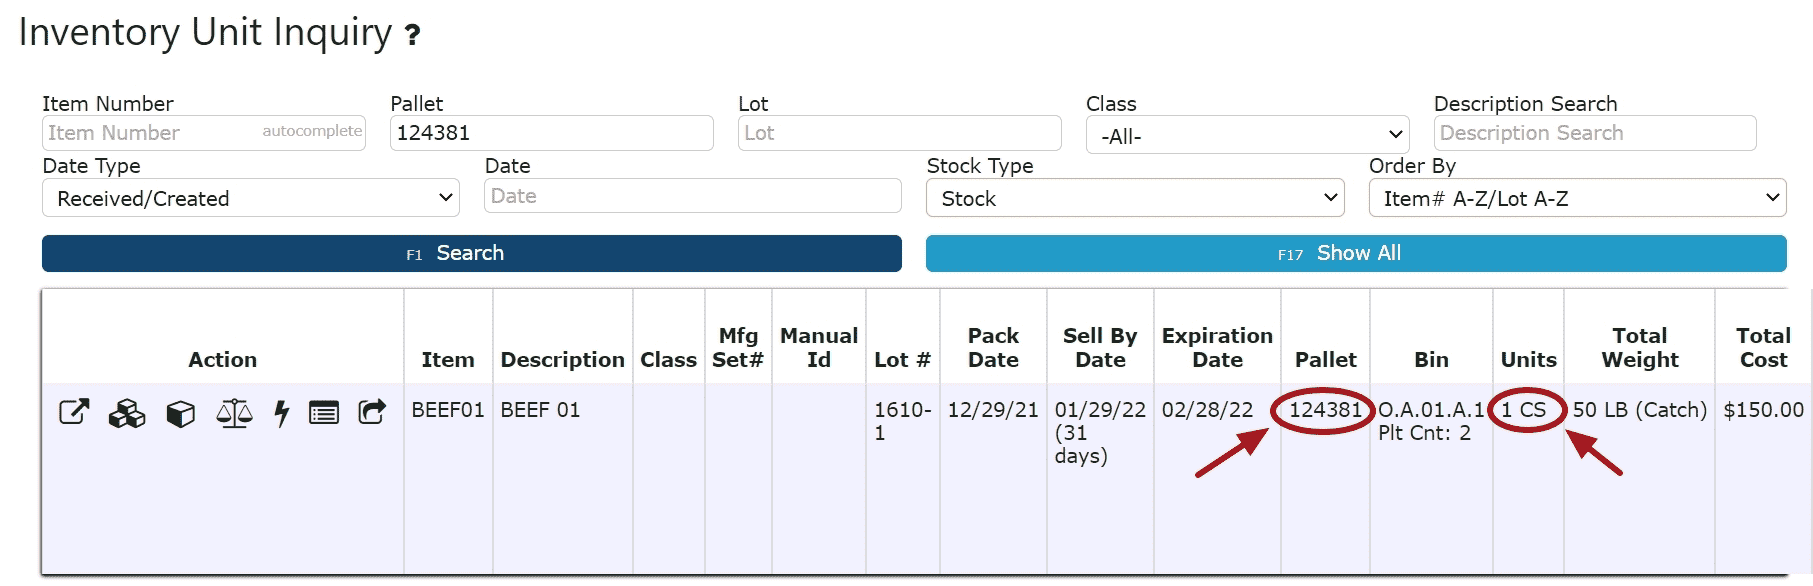
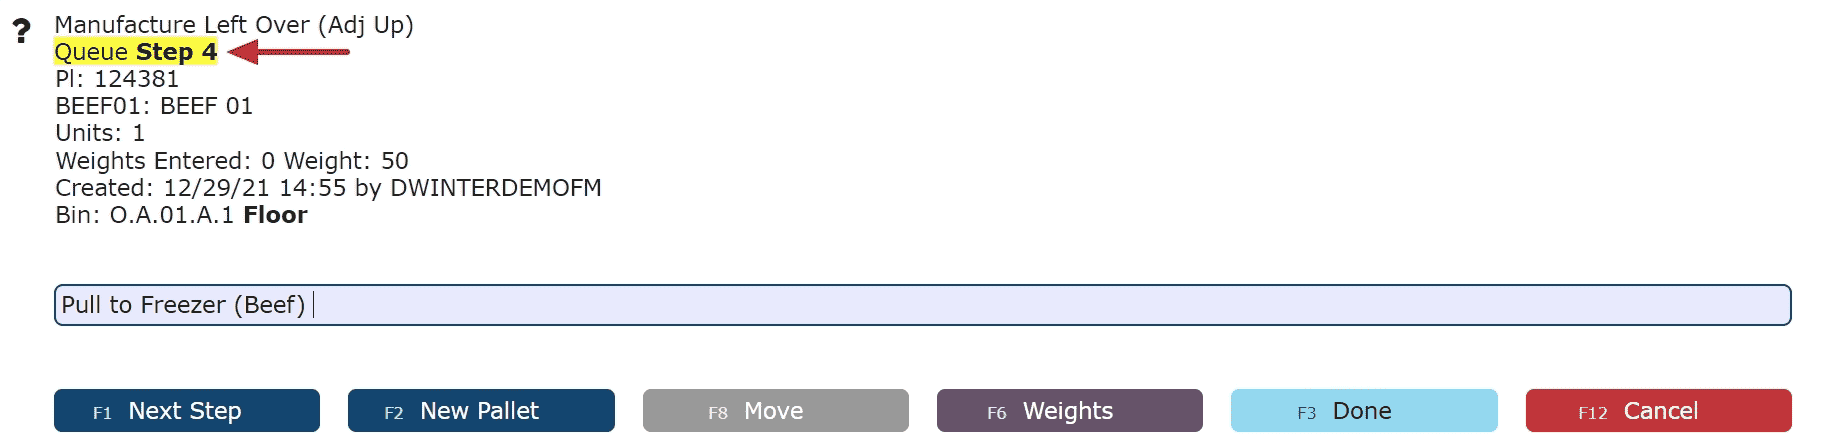
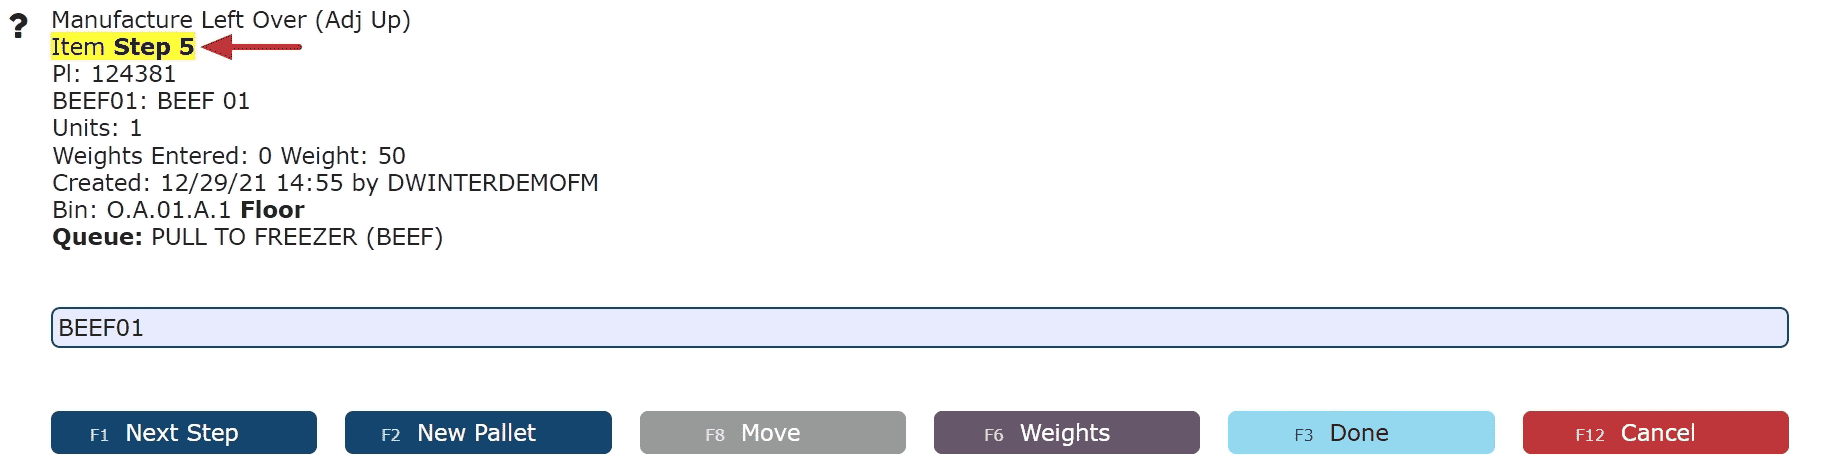
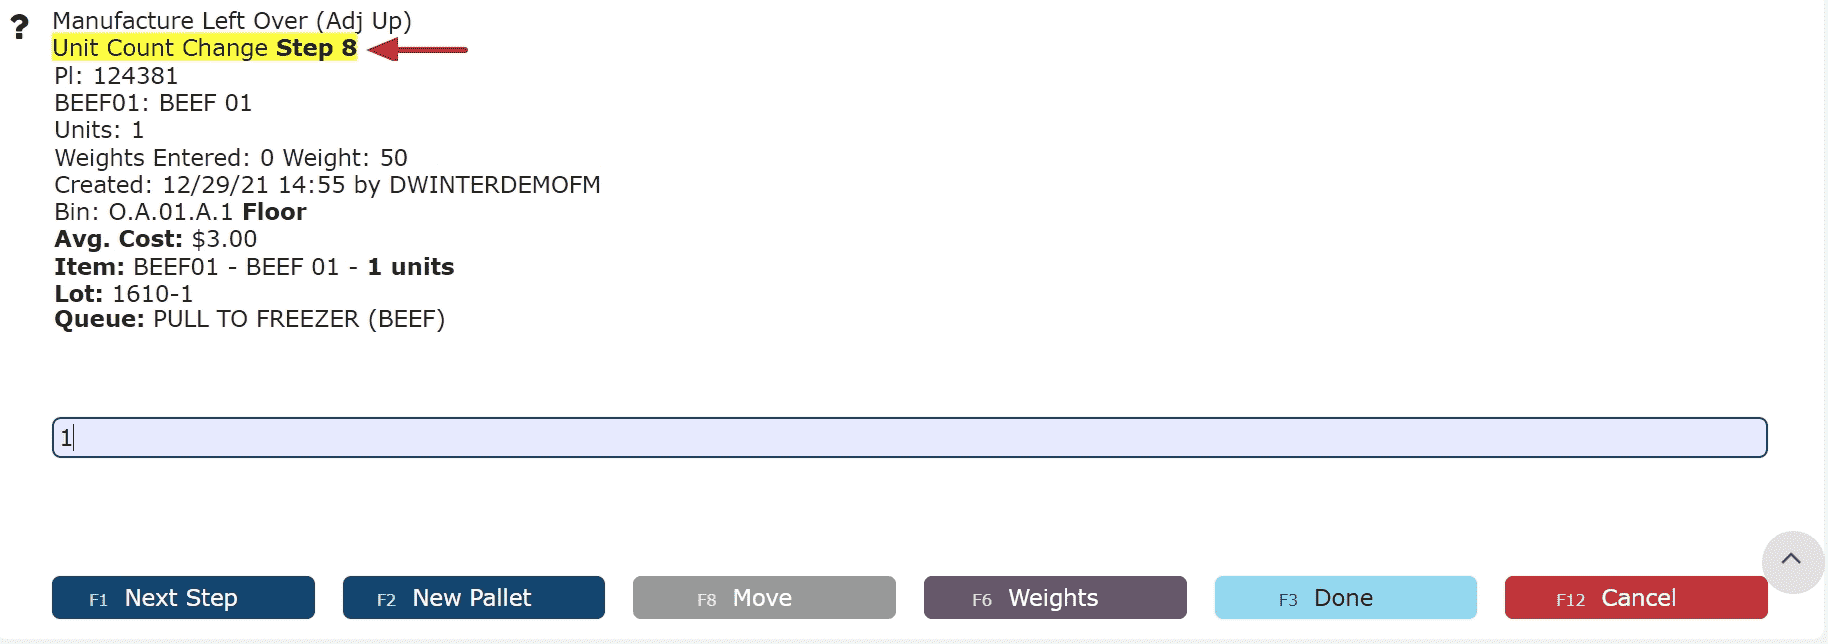
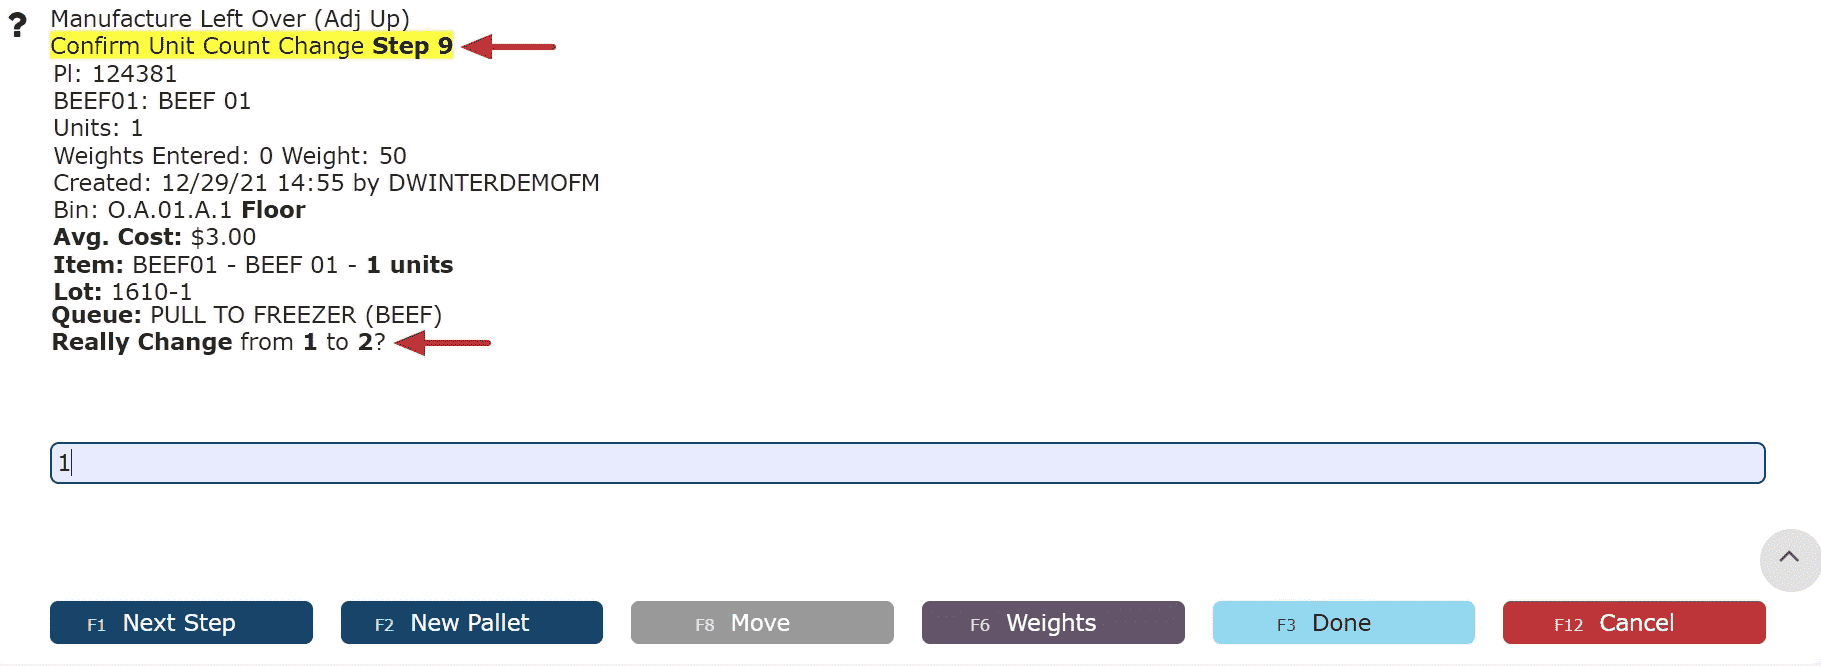
    3. Manufacture Leftover: Place any unused items/ingredients back into inventory. 

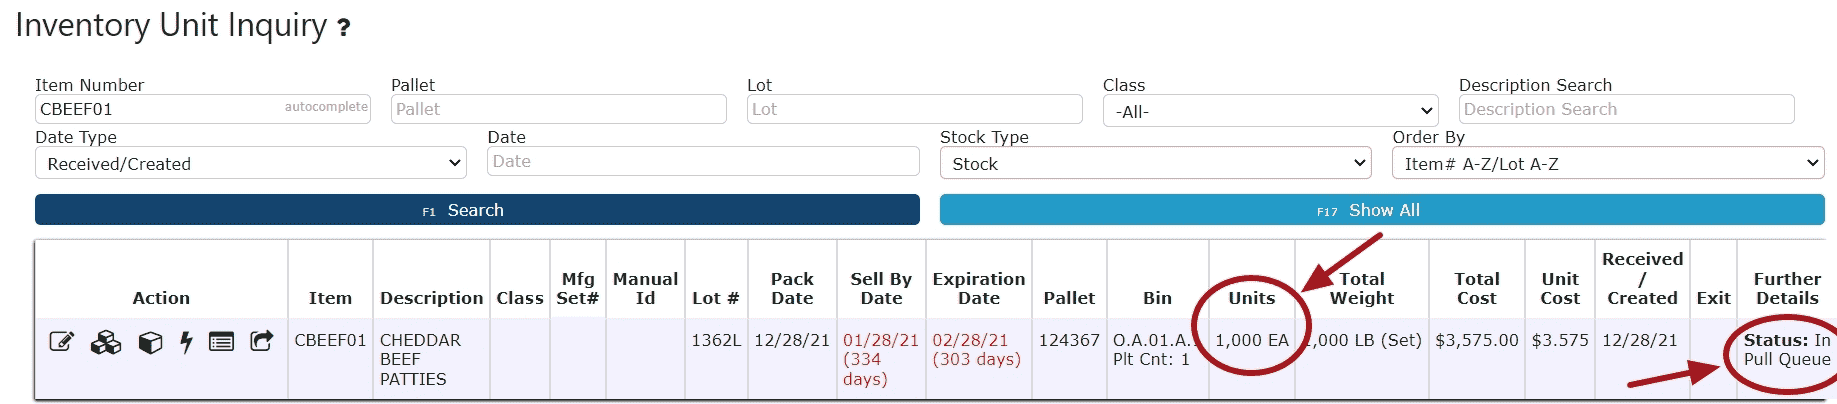
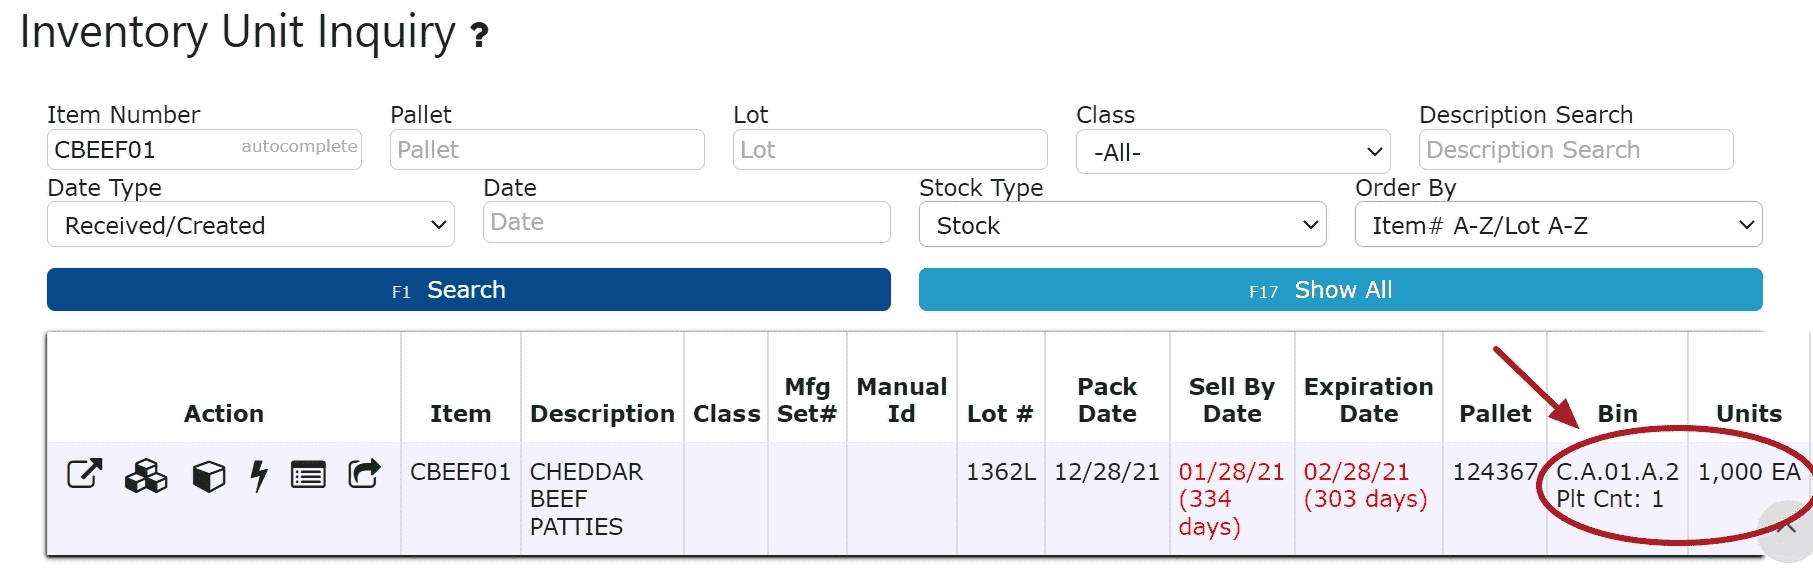
    4. Reporting: Review the Inventory Movement Report to see all product that went in and out during the manufacturing process.  Search by lot, item, and date.

Recipes

  • Creating a Recipe
    1. Go to the Warehouse Menu and click on the Recipes Sub-Menu 


    2. Click on the Add New Button and fill in the Recipe Description and Size 

    Note: Unit of Measure is optional 


    3. Click on the Save & Details Button 


    4. Add each item to the recipe by clicking on the Add/Update Button 


    5. Add each service to the recipe 


    6. Add each item produced to the recipe 


    Note: Recipes can be printed in order to scan the recipe reference during the manufacturing process 


  • Editing a Recipe
    1. Click on the Edit Recipe Icon 


    2. Make any changes to the recipe header as necessary, then click the Save & Details Button to edit the details 


    3. Click the Edit Recipe Line icon to make changes to the recipe line, then click the Add/Update Button to save 

  • Cloning a Recipe
    1. Click on the Clone Recipe Button to clone the entire recipe into a duplicate copy


    2. Once the clone has completed, you will be automatically redirected to the new recipe

    Note: The cloned recipe by default will retain the same name, appended by the recipe's unique reference #  


    3. The entire recipe and all of its details will be cloned into the new recipe, ready for editing 

  • Deleting a Recipe
    1. Click on the Edit Recipe Icon 


    2. Click on the Delete Button, then click okay to confirm 


    Note: Once a recipe is deleted, it is permanently removed.  
  • Deleting a Recipe Line
    1. Click on the Edit Recipe Line Icon 


    2. Click on the Delete Line Button, then click okay to confirm 

Manufacturing Set Number

  • Setting the MFS Manually
    1. Go to the Warehouse Menu and click on the Manufacturing Set# Sub-Menu 


    2. Note the Current MFS# and its corresponding date, then use the Move Back or Move Forward Buttons to move the MFS# forward or backwards 


    Note: The current MFS# is used as the default for any manufacturing processes performed.  

Recipe Start/In

  • Manufacturing Partial Pallets
    1. Go to the RF Menu and click on the Pallet Info Sub-Menu 


    2. Scan or enter the pallet id, then click the Next Pallet button 


    3. Click on the Recipe Start/In button 


    4. Scan or enter the recipe reference # 

    Note: Recipe reference barcodes are located within the recipe header and detail screens and can be printed for scanning convenience. 


    5. Enter the current MFS# 

    Note: The system's current MFS# will automatically be used by default.  Manually set the MFS# before starting the manufacture process.


    6. Enter either the unit count change(-) or the new unit count(+), then confirm 


    Note: Once saved, the inventory has been officially adjusted, removing the appropriate quantity.  All inventory adjustments can be viewed on the Inventory Movement Report.


    Inventory Movement

    Review the Inventory Movement Report to see all the ins and outs for a manufacturing run

    1.  Go to the Reports Menu and click on the Inventory Movement Sub-Menu 


  • Manufacturing Full Pallets
    1. Go to the Warehouse Menu and click on the Inventory Units Sub-Menu 


    2. Click on the Specify Pull Queue icon next to each whole pallet that will be used, select the date/time and assign a name

    Note: Assign the same date/time and name for all pallets that are to start together  


    3. Go to the RF Menu and click on the Recipe Start/In Sub-Menu


    4. Click on the Initiate Pull icon next to the pull to start manufacturing  


    5. Click on either the Start Adjustment Button or the Adjust Icon 


    6. Scan or enter the recipe reference (applicable only if MFS# is enabled)

    Note: The system's current MFS# will automatically be used by default.  Manually set the MFS# before starting the manufacture process.

     
    7. Scan or enter a pallet id for step 1, then click Next Step.  The first pallet will be indicated for reference, however pallets can be scanned/entered in any order.  


    Note:Once the pallet id is scanned, that entire pallet has been destroyed and officially removed from inventory


    8. If the pallet contains a catch weight item, weights are required ahead of destroying the pallet.  Scan or enter each unit's weight on the pallet. 

    Note: All catch weights will be memorialized within a misc. weights batch located under the RF Menu 


    9. After all weights have been enterd, re-enter or scan the pallet id again to confirm, then click Next Step 


    10. The adjustment has now been completed and the entire pallet has been removed from inventory


    11. Proceed to scan or enter the next pallet id to adjust, then repeat until all pallets from the pull have been destroyed 

    Note: Use the Repeat for All button to destroy the remainder of the pallets for a particular MFS# (this cannot be used if catch weights are needed)


    Miscellaneous Weights Batches

    Note: Mixed pallets will be combined into one Misc. Weights Batch


    1. Go to the RF Menu and click on the Misc. Weights Sub-Menu 


    Inventory Movement Report

    Review the Inventory Movement Report to see all the ins and outs for a manufacturing run

    1. Go to the Reports Menu and click on the Inventory Movement Report Sub-Menu 


Recipe Produced

  • Putting Produced Away Onto New Pallets

    1. Go to the RF Menu and click on the Recipe Produced Sub-Menu 


    2. Scan or enter the recipe reference 


    3. Click the New Pallet Button


    4. Enter a Queue Name (Optional) 

    Note: Pallets containing produced items will be automatically placed on the floor.  Specifying a Queue will place pallets into the Pull Queue, to then later be used to move the pallets into other locations or to be included in another Manufacture Start/In process that shortly follows.  


    5. Scan or enter the item produced 


    6. Scan or enter the lot 


    7. Enter the manufacturing set #

    Note: All recent manufacturing sets performed pertaining to the recipe being produced will be listed for reference.  Only MFS#s from the list will be accepted.  


    8.   Enter and confirm the unit count change (the amount you are adding to the pallet), or the new unit count (the total new unit count on the pallet, including the units that were already there if any, plus the new units being added) 


    9. Enter the pack date, sell by date, and expiration date 


    10. Enter and confirm the # of pallets

    Note: Pallet labels will automatically print once confirmation received  


    Note: Once confirmation has taken place, the produced inventory will be automatically created and labels will be automatically printed


    If Pallets Were Placed in a Queue 

    11. Go to the RF Menu and click on the Pull Queue Sub-Menu 


    12. Click on the Initiate Pull icon to move the pallet into a new bin, or the Recipe Start/In Icon to proceed to manufacture that item 


    If Moving Pallet to Another Bin: 

    13. Click on the Start Pull Button or the Pull icon to start moving the pallets into their new locations.

    Note: Weights can be assigned using the Take Weights icon ahead of moving the pallets 


    14. Scan or enter the pallet id 


    15. Scan or enter the new bin location, then confirm 


    16. The produced item has now been moved into C.A.01.A.2 in inventory 


    Inventory Movement Report 

    Review the Inventory Movement Report to see all the ins and outs for a manufacturing run


  • Putting Produced Away Onto Existing Pallets in Inventory
    1. Go to the RF Menu and click the Recipe Produced Sub-Menu 


    2.  Scan or enter the recipe reference


    4. Enter the pallet from inventory that the produced item will be placed onto 


    5. Enter a Queue Name (Optional) 


    6. Scan or enter the produced item 


    7. Scan or enter the lot 


    8. Enter the manufacturing set # 

    Note: All recent manufacturing sets performed pertaining to the recipe being produced will be listed for reference.  Only MFS#s from the list will be accepted.  


    9. Enter and confirm the unit count change (the amount you are adding to the pallet), or the new unit count (the total new unit count on the pallet, including the units that were already there, plus the new units being added)


    If Pallets were placed in a Queue:


    10. Go to the RF Menu and click on the Pull Queue Sub-Menu 

     
    11. Click on the Initiate Pull icon 
     
     
    12. Click on the Start Pull Button or the Pull icon to start moving the pallets into their new locations 
     
    Note: Weights can be assigned using the Take Weights icon ahead of moving the pallets
     
     
    13. Scan or enter the pallet id 
     
     
    14. Scan or enter the new bin location, then confirm 
     
     
    15. The produced item has now been moved into bin C.A.01.A.4 in inventory 
     
    Note: Produced items will retain the MFS# from the manufacturing set it came from as its own "Inventory MFS#" while it remains in inventory, and can only be put back onto pallets that contain the same MFS#.  Once it is used within another manufacturing set, that new MFS# will then be used for subsequent leftovers and so on. 


    Inventory Movement Report 
     
    Review the Inventory Movement Report to see all the ins and outs for a manufacturing run  

Recipe Leftover

  • Putting Leftover Away Onto New Pallets
    1. Go to the RF Menu and click on the Recipe Left Over Sub-Menu 


    2. Scan or enter the recipe reference 


    3. Click on the New Pallet Button 


    4. Enter a Queue Name (Optional) 
     
    Note: Pallets containing left over items will be automatically placed on the floor.  Specifying a Queue will place pallets into the Pull Queue, to then later be used to move the pallets into other locations


    5. Scan or enter the left over item  


    6. Scan or enter the lot 

    Note: A list will be displayed of all recent Manufacture Start/Ins of the leftover item 


    7. Enter the manufacturing set #


    8.   Enter and confirm the unit count 


    9. Enter the pack date, sell by date, and expiration date 


    10. Enter and confirm the # of pallets
     
    Note: Pallet labels will automatically print once confirmation received  


    If Pallets were placed in a Queue:


    11. Go to the  RF Menu and click on the Pull Queue Sub-Menu 


    12. Click on the Initiate Pull icon 


    13. Click on the Start Pull button or the Pull icon to start moving the pallets into their new locations 

    Note: Weights can be assigned using the Take Weights icon ahead of moving the pallets 


    14. Scan or enter the pallet id


    15. Scan or enter the new bin location, then confirm 


    16. The leftover item has now been moved into bin C.A.01.A.1 in inventory 

    Note: Leftover items will retain the MFS# from the manufacturing set it came from as its own "Inventory MFS#" while it remains in inventory.  Once it is used within another manufacturing set, that new MFS# will then be used for subsequent leftovers.  


    Inventory Movement Report 

    Review the Inventory Movement Report to see all the ins and outs for a manufacturing run 


  • Putting Leftover Away Onto Existing Pallets in Inventory

    1. Go to the RF Menu and click on the Recipe Leftover Sub-Menu 


    3. Scan or enter the recipe reference


    4. Enter the pallet from inventory that the leftover item will be placed onto 


    5. Enter a Queue Name (Optional)

    Note:Placing the pallet in a queue is recommended if the pallet needs to be moved to another bin location.  


    6. Scan or enter the left over item 


    7. Scan or enter the lot 

    Note: A list will be displayed of all recent Manufacture Start/Ins of the leftover item.  The lot put back must match one of the lots that went in.


    8. Enter the manufacturing set # 


    9. Enter and confirm the unit count change (the amount you are adding to the pallet), or the new unit count (the total new unit count on the pallet, including the units that were already there, plus the new units being added)


    If Pallets were placed in a Queue: 


    10. Go to the RF Menu and click on the Pull Queue Sub-Menu 


    11. Click on the Initiate Pull icon 


    12. Click on the Start Pull Button or the Pull icon to start moving the pallets into their new locations 

    Note: Weights can be assigned using the Take Weights icon ahead of moving the pallets


    13. Scan or enter the pallet id 


    14. Scan or enter the new bin location, then confirm 


    15. The leftover item has now been moved into bin C.A.01.A.3 in inventory 

    Note: Leftover items will retain the MFS# from the manufacturing set it came from as its own "Inventory MFS#" while it remains in inventory, and can only be put back onto pallets that contain the same MFS#.  Once it is used within another manufacturing set, that new MFS# will then be used for subsequent leftovers.


    Inventory Movement Report 

    Review the Inventory Movement Report to see all the ins and outs for a manufacturing run    


Manufacture Start/In

  • Manufacturing Partial Pallets
    1. Go to the RF Menu and click on the Pallet Info Sub-Menu 


    2. Scan or enter the pallet id, then click on the Next Pallet Button


    3. Click on the Mfg Start/In button 


    4. Enter either the unit count change(-) or the new unit count(+), then confirm 


    Note: Once saved, the inventory has been officially adjusted, removing the appropriate quantity.  All inventory adjustments can be viewed on the Inventory Movement Report.


    Inventory Movement

    Review the Inventory Movement Report to see all the ins and outs for a manufacturing run

    1.  Go to the Reports Menu and click on the Inventory Movement Sub-Menu 


  • Manufacturing Full Pallets
    1. Go to the Warehouse Menu and click on the Inventory Units Sub-Menu 


    2. Click on the Specify Pull Queue icon next to each whole pallet that will be used, select the date/time and assign a name

    Note: Assign the same date/time and name for all pallets that are to start together  


    3. Go to the RF Menu and click on the Manufacture Start/In Sub-Menu


    4. Click on the Initiate Pull icon next to the pull to start manufacturing  


    5. Click on either the Start Adjustment Button or the Adjust Icon 


    7. Scan or enter a pallet id, then click Next Step.  The first pallet will be indicated for reference, however pallets can be scanned/entered in any order.  


    Note:Once the pallet id is scanned, that entire pallet has been destroyed and officially removed from inventory


    8. If the pallet contains a catch weight item, weights are required ahead of destroying the pallet.  Scan or enter each unit's weight on the pallet. 

    Note: All catch weights will be memorialized within a misc. weights batch located under the RF Menu 


    9. After all weights have been enterd, re-enter or scan the pallet id again to confirm, then click Next Step 


    10. The adjustment has now been completed and the entire pallet has been removed from inventory


    11. Proceed to scan or enter the next pallet id to adjust, then repeat until all pallets from the pull have been destroyed 

    Note: Use the Repeat for All button to destroy the remainder of the pallets for a particular MFS# (this cannot be used if catch weights are needed)


    Miscellaneous Weights Batches

    Note: Mixed pallets will be combined into one Misc. Weights Batch


    1. Go to the RF Menu and click on the Misc. Weights Sub-Menu 


    Inventory Movement Report

    Review the Inventory Movement Report to see all the ins and outs for a manufacturing run

    1. Go to the Reports Menu and click on the Inventory Movement Report Sub-Menu 


Manufacture Produced

  • Putting Produced Away Onto New Pallets

    1. Go to the RF Menu and click on the Manufacture Produced Sub-Menu 


    2. Click the New Pallet Button 


    3. Enter a Queue Name (Optional) 

    Note: Pallets containing produced items will be automatically placed on the floor.  Specifying a Queue will place pallets into the Pull Queue, to then later be used to move the pallets into other locations


    4. Scan or enter the item produced 


    5. Scan or enter the lot 


    6.   Enter and confirm the unit count 


    7. Enter the pack date, sell by date, and expiration date 


    8. Enter and confirm the # of pallets

    Note: Pallet labels will automatically print once confirmation received  


    Note: Once confirmation has taken place, the produced inventory will be automatically created and labels will be automatically printed


    If Pallets Were Placed in a Queue 

    9. Go to the RF Menu and click on the Pull Queue Sub-Menu 


    10. Click on the Initiate Pull icon 


    12. Click on the Start Pull Button or the Pull icon to start moving the pallets into their new locations 

    Note: Weights can be assigned using the Take Weights icon ahead of moving the pallets 


    11. Scan or enter the pallet id 


    12. Scan or enter the new bin location, then confirm 


    13. The produced item has now been moved into C.A.01.A.2 in inventory 


    Inventory Movement Report 

    Review the Inventory Movement Report to see all the ins and outs for a manufacturing run


  • Putting Produced Away Onto Existing Pallets in Inventory
    1. Go to the RF Menu and click the Manufacture Produced Sub-Menu


    2. Enter the pallet from inventory that the produced item will be placed onto 


    3. Enter a Queue Name (Optional) 

    Note:Pallets containing produced items will be automatically placed on the floor.  Specifying a Queue will place pallets into the Pull Queue, to then later be used to move the pallets into other locations


    4. Scan or enter the produced item 


    5. Scan or enter the lot 


    6. Enter and confirm the unit count change (the amount you are adding to the pallet), or the new unit count (the total new unit count on the pallet, including the units that were already there, plus the new units being added)


    If Pallets were placed in a Queue:


    7. Go to the RF Menu and click on the Pull Queue Sub-Menu 

     
    8. Click on the Initiate Pull icon 
     
     
    9. Click on the Start Pull Button or the Pull icon to start moving the pallets into their new locations 
     
    Note: Weights can be assigned using the Take Weights icon ahead of moving the pallets
     
     
    10. Scan or enter the pallet id 
     
     
    11. Scan or enter the new bin location, then confirm 
     
     
    12. The produced item has now been moved into bin C.A.01.A.4 in inventory 


    Inventory Movement Report 
     
    Review the Inventory Movement Report to see all the ins and outs for a manufacturing run  


Manufacture Leftover

  • Putting Leftover Away Onto New Pallets
    1. Go to the RF Menu and click on the Manufacture Left Over Sub-Menu 


    2. Click on the New Pallet Button 


    3. Enter a Queue Name (Optional) 
     
    Note: Pallets containing left over items will be automatically placed on the floor.  Specifying a Queue will place pallets into the Pull Queue, to then later be used to move the pallets into other locations


    4. Scan or enter the left over item  


    5. Scan or enter the lot 


    6.   Enter and confirm the unit count 


    7. Enter the pack date, sell by date, and expiration date 


    8. Enter and confirm the # of pallets
     
    Note: Pallet labels will automatically print once confirmation received  


    If Pallets were placed in a Queue:


    9. Go to the  RF Menu and click on the Pull Queue Sub-Menu 


    10. Click on the Initiate Pull icon 


    11. Click on the Start Pull button or the Pull icon to start moving the pallets into their new locations 

    Note: Weights can be assigned using the Take Weights icon ahead of moving the pallets 


    12. Scan or enter the pallet id


    13. Scan or enter the new bin location, then confirm 


    14. The leftover item has now been moved into bin C.A.01.A.1 in inventory 


    Inventory Movement Report 

    Review the Inventory Movement Report to see all the ins and outs for a manufacturing run 

  • Putting Leftover Away Onto Existing Pallets in Inventory

    1. Go to the RF Menu and click on the Manufacture Leftover Sub-Menu 


    2. Enter the pallet from inventory that the leftover item will be placed onto 


    3. Enter a Queue Name (Optional)

    Note:Placing the pallet in a queue is recommended if the pallet needs to be moved to another bin location.  


    4. Scan or enter the left over item 


    5. Scan or enter the lot 


    6. Enter and confirm the unit count change (the amount you are adding to the pallet), or the new unit count (the total new unit count on the pallet, including the units that were already there, plus the new units being added)


    If Pallets were placed in a Queue: 


    7. Go to the RF Menu and click on the Pull Queue Sub-Menu 


    8. Click on the Initiate Pull icon 


    9. Click on the Start Pull Button or the Pull icon to start moving the pallets into their new locations 

    Note: Weights can be assigned using the Take Weights icon ahead of moving the pallets


    10. Scan or enter the pallet id 


    11. Scan or enter the new bin location, then confirm 


    12. The leftover item has now been moved into bin C.A.01.A.3 in inventory 


    Inventory Movement Report 

    Review the Inventory Movement Report to see all the ins and outs for a manufacturing run    


Reports

  • Inventory Movement
    Easily trace all steps of the manufacturing process, including all the ins and outs of every item used within a day's manufacturing run, within one concise inventory movement report. 


    Search by Recipe Ref: 


    Search by Manufacturing Set: 


    Search by Lot: 


    Search by Item: