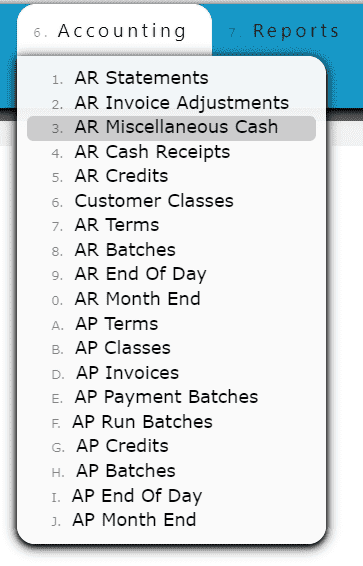
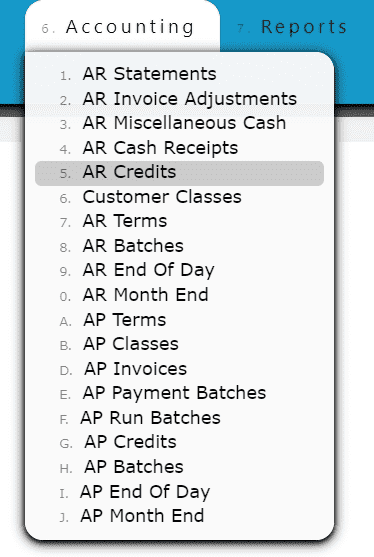
Any Accounts Receivable operation can be performed from within the Accounting Menu.
AR Transactions include:Cash Receipts
Credits
Invoice Adjustments
Miscellaneous Cash
Statement and Invoice Submissions
AR Transactions
Overview
AR Invoice Adjustments
-
Key Information
Adjust the total amount of an AR invoice down.Note: Invoice adjustments cannot be used to increase the total of an invoiceExample:WriteoffInvoice Adjustment Statuses:In Progress -> the adjustment is open and is able to be editedPosted -> the adjustment has been posted and cannot be editedReady to Post -> the adjustment has been closed and is ready for posting, it cannot be edited when closed, but can be reopened if edits are necessary
Note: Posting will only successfully go through if the adjustment date equals the current cutoff date
-
Creating and Posting an AR Invoice Adjustment
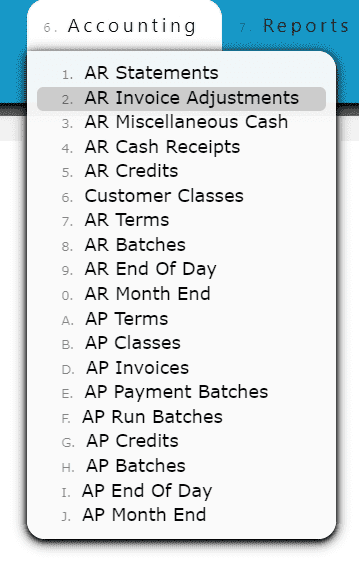
1. Go to the Accounting Menu and click on the AR Invoice Adjustment Sub-Menu
2. Click on the Add New Button
3. Enter the customer, adjustment date, type of invoice adjustment and any notes needed to label the adjustment
4. Click on the Distribute Adj Button
5. Distribute the amount of the adjustment towards any open invoice(s) listed
Add to Line (Adjusting a partial amount of an invoice):
Step 1: Click on the Add to Line Icon next to the invoice to be adjusted
Step 2: Enter the amount that the invoice must be adjusted down by (must be a negative value if adjusting an invoice, or a positive value if adjusting a credit)
Step 3: Click on the Add/Update Button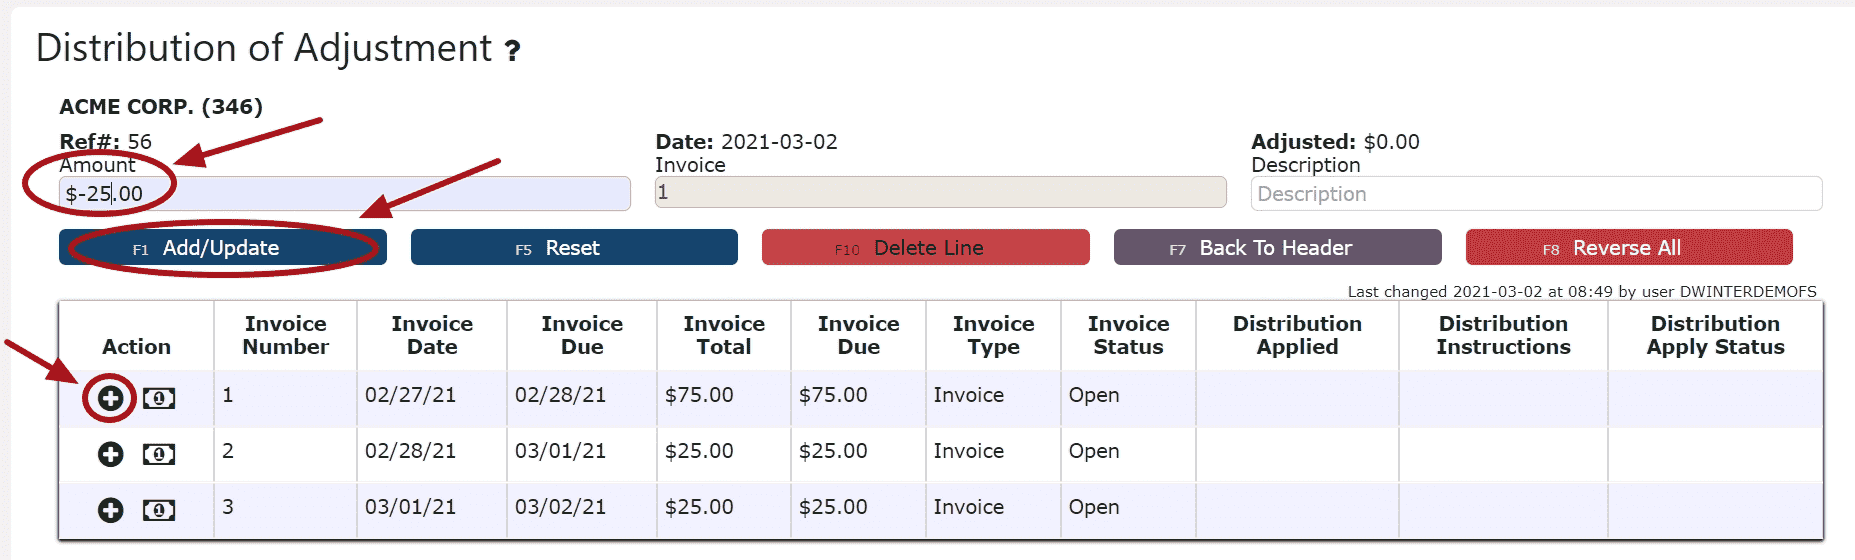
Adjusting the Entire Invoice or Credit Balance:
Step 1: Click on the Adjust Entire Invoice/Credit Balance Icon next to the invoice to be adjusted6. Click on the Back to Header Button

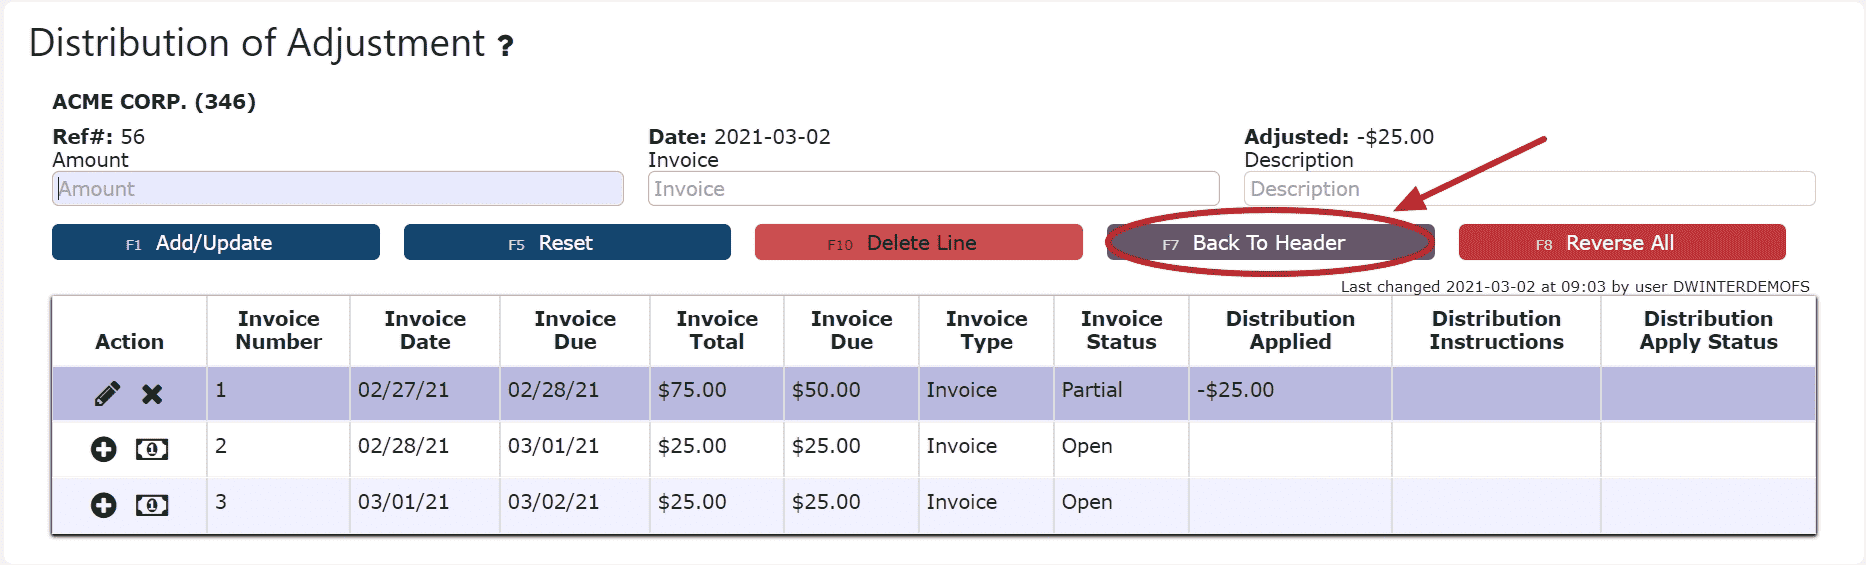
7. Click on the Close Adjustment Button
Note: Once closed, the adjustment is ready to post
8. Review the adjustment that is ready to post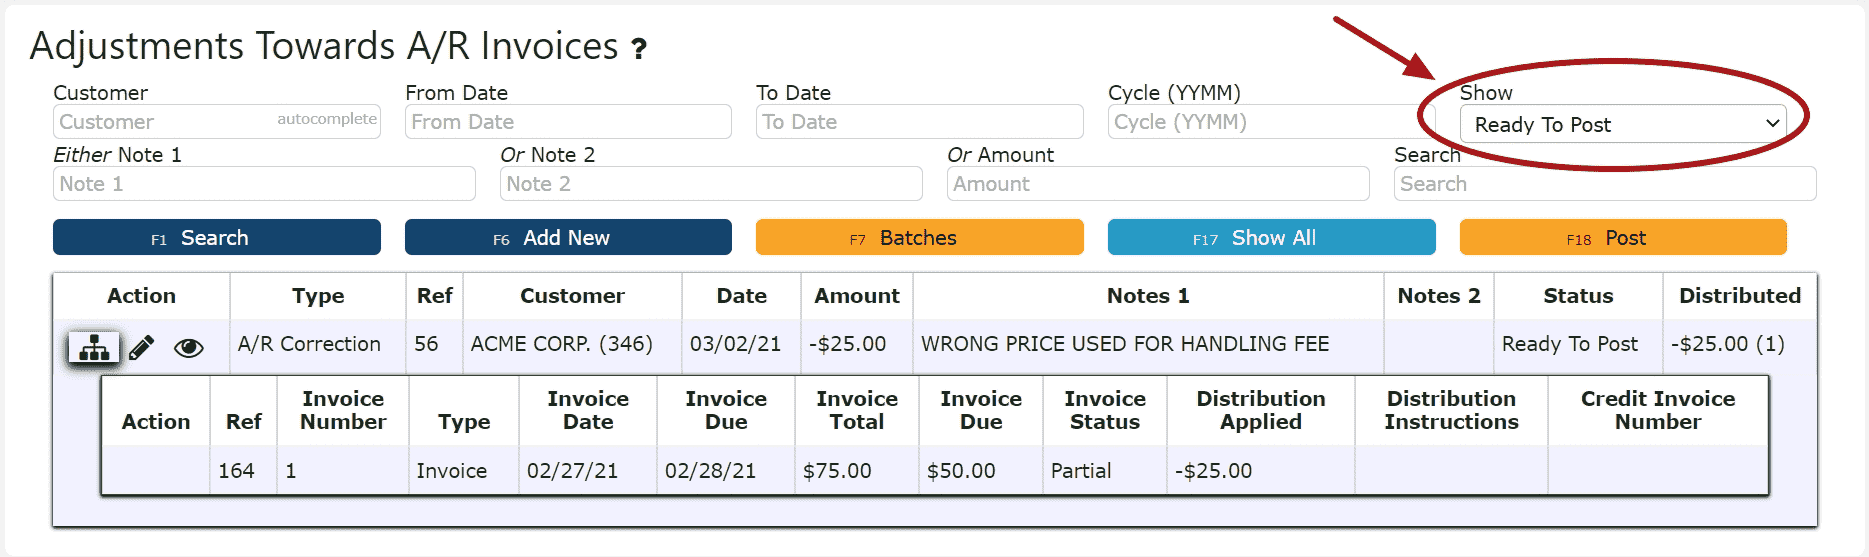
9. Click the Post Button
Note:Once Posted, AR Invoice Adjustments cannot be edited/canceled
Adjustments will only post successfully if their date matches the end of day cutoff date
Any adjustments left open/in progress will prevent the end of day process from automatically moving forward during the night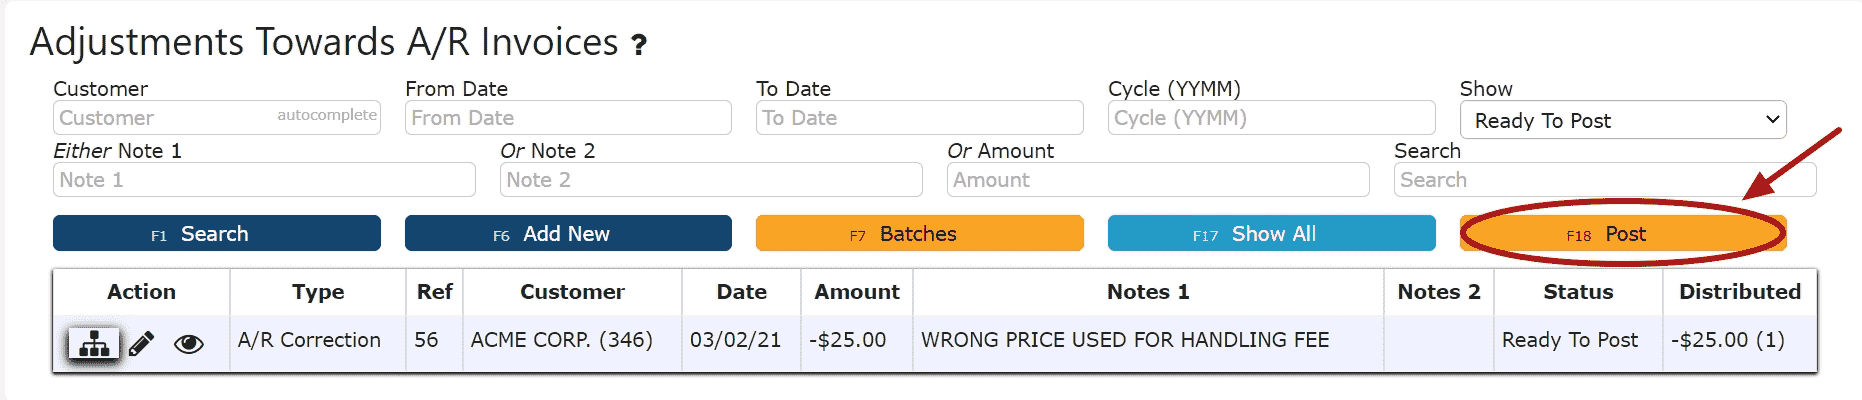
-
Editing an AR Invoice Adjustment
1. Click on the Edit Adj Icon (Pencil) next to the AR Invoice Adjustment to be edited
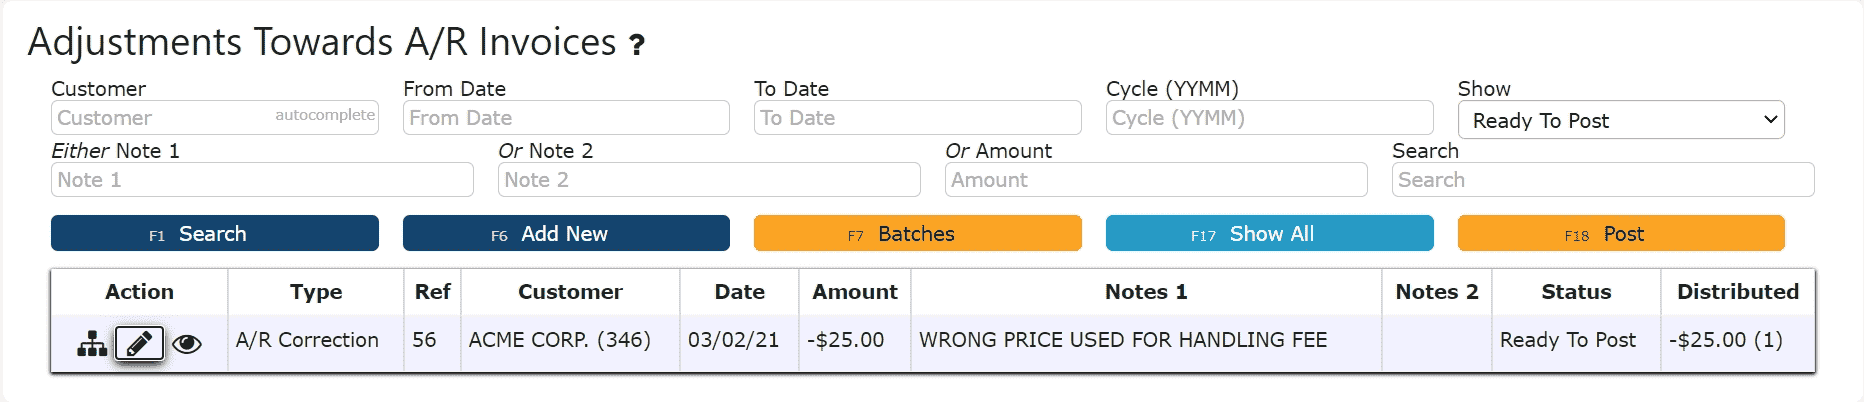
If Closed:
2. Click on the Open Adj Button to re-open the adjustment. 3. Make any necessary changes to the details of the AR Invoice AdjustmentReversing a Line (Reverses the distribution made to that particular invoice):Step 1: Click on the Reverse Line Icon (X) next to the invoice to reverse the adjustment associated with it
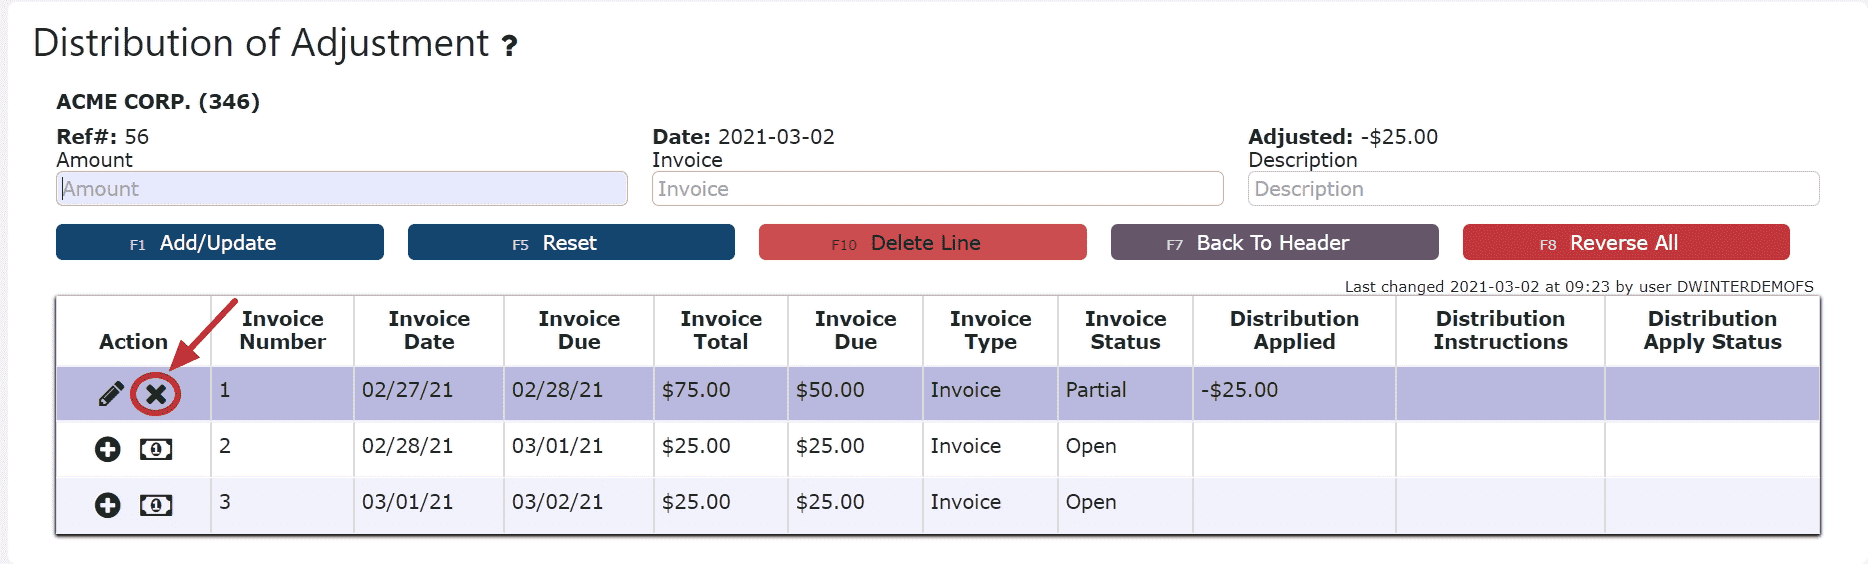 Deleting a Line: (Deletes the distribution made to that particular invoice):Step1: Click on the Edit Line Icon (Pencil)Step 2: Click on the Delete Line Button
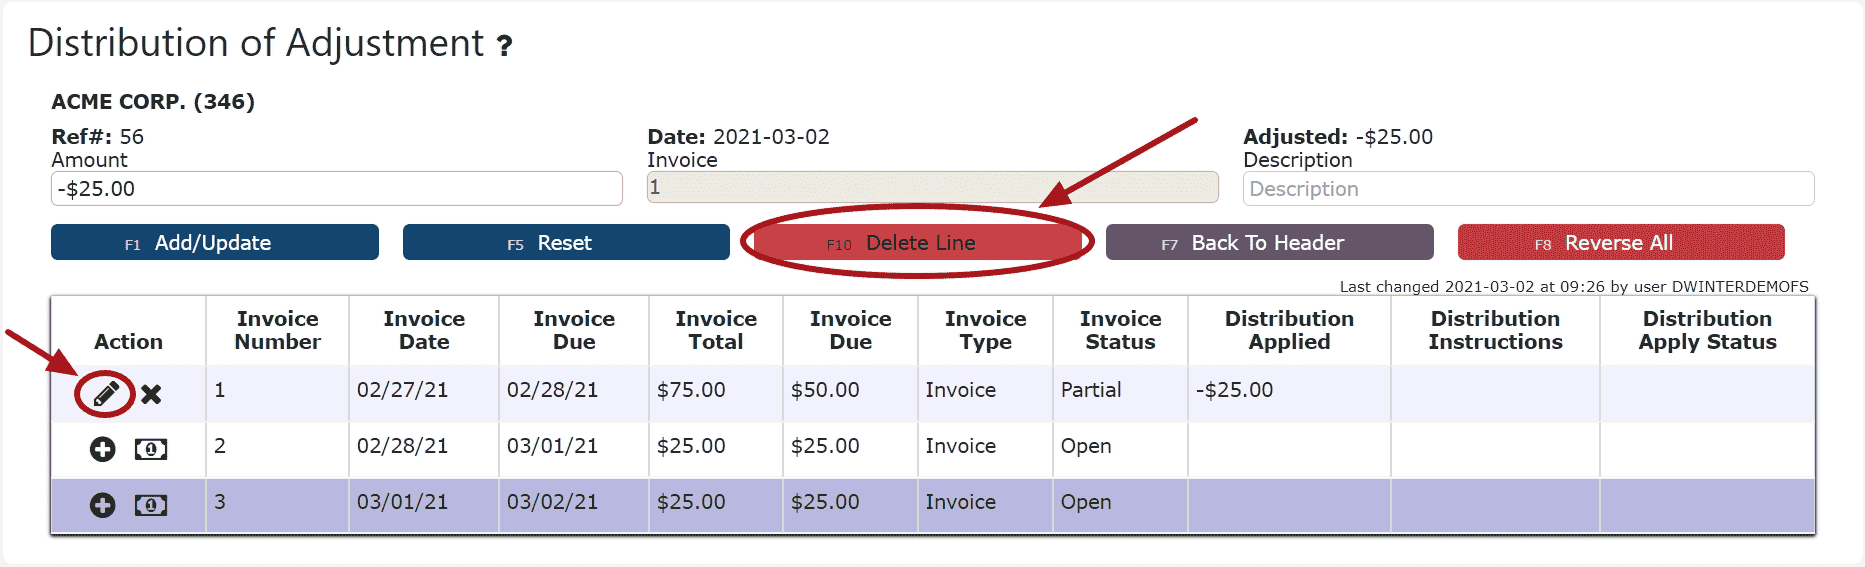 Reversing All Distributions (Deletes/Reverses all distributions made across all invoices:Step 1: Click on the Reverse All Button
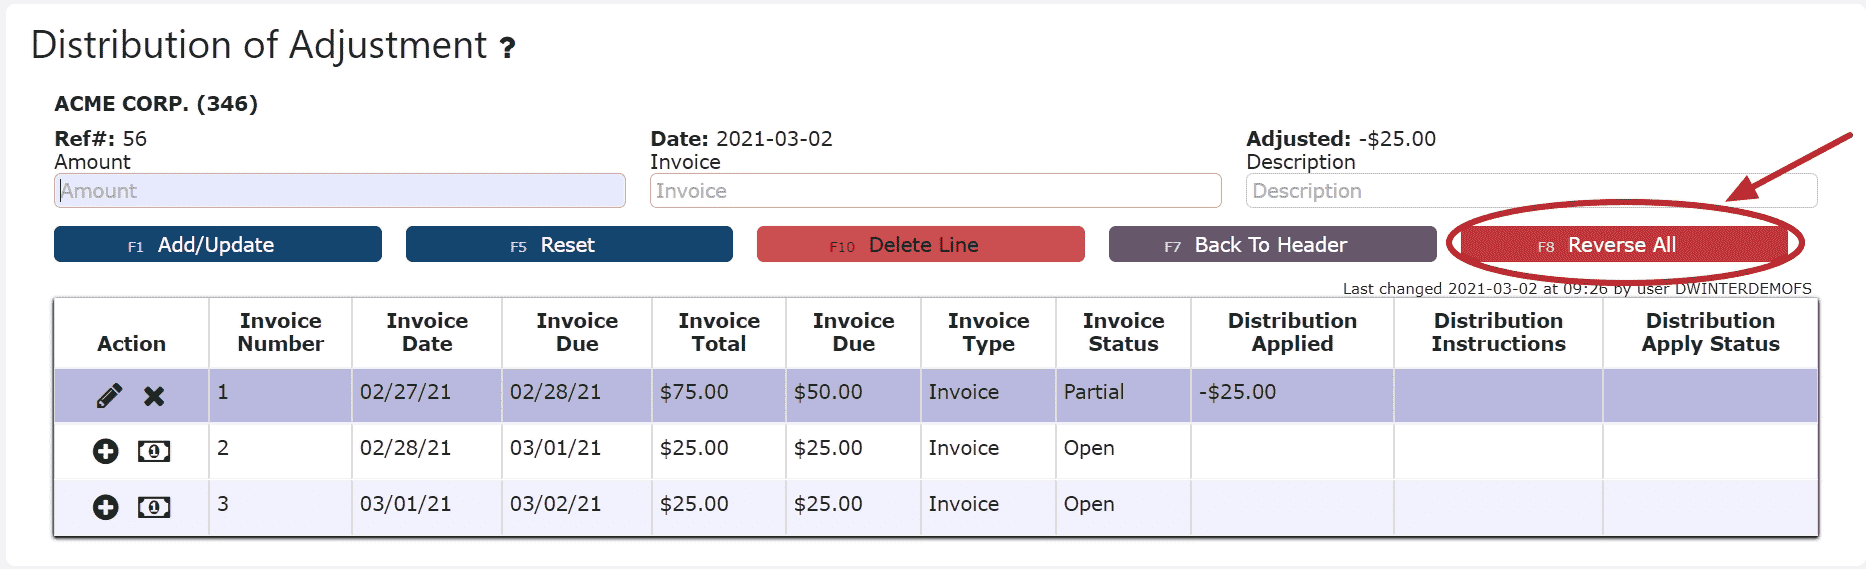 Editing a Line:Step 1: Click on the Edit Line Icon (Pencil)Step 2: Make Any necessary changes to the amount and/or description for that lineStep 3: Click on the Add/Update Button
4. Click on the Back to Header Button and make changes to the header of the adjustment as necessary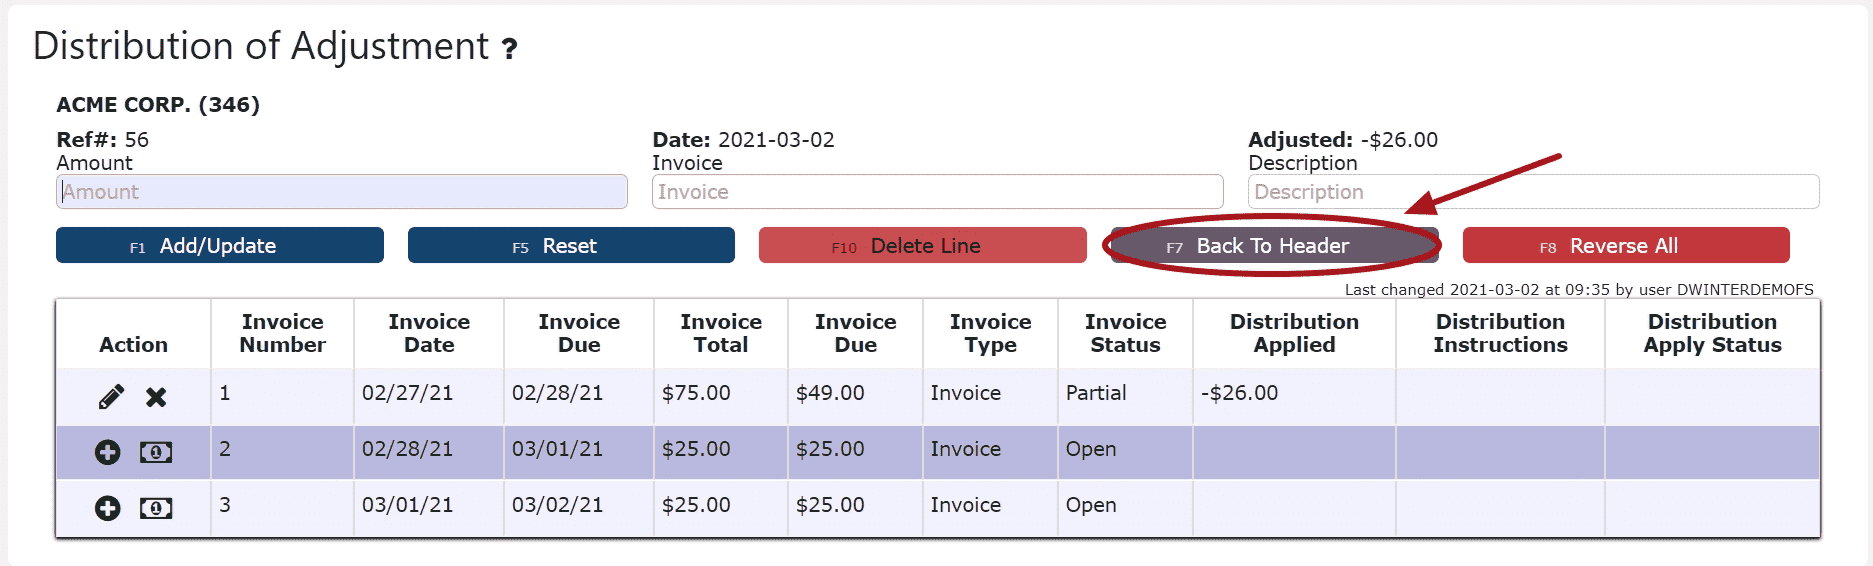

5. Click on the Close Adj Button if ready to close and post the adjustment
6. Click on the Post Button to post the adjustmentNote:Once Posted, AR Invoice Adjustments cannot be edited/canceledAdjustments will only post successfully if their date matches the end of day cutoff dateAny adjustments left open/in progress will prevent the end of day process from automatically moving forward during the night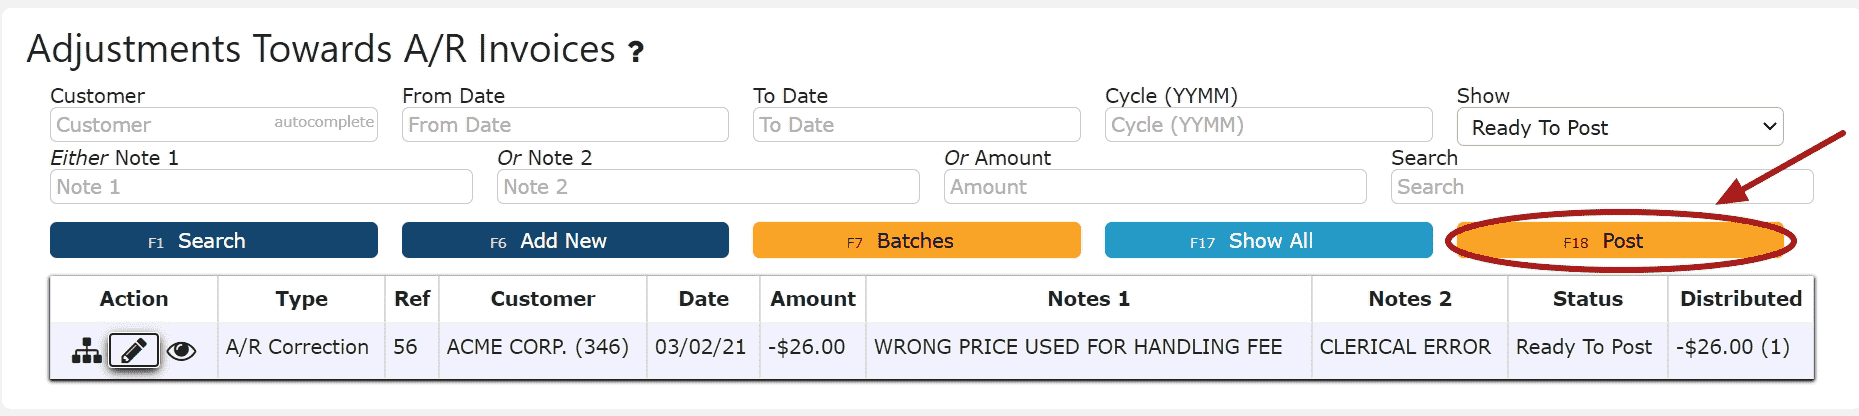
If Open:
2. Adjust any of the header information as necessary.
3. Click on the Distribute Adj Button to make changes to the details of the adjustment 4. Make any necessary changes to the details of the AR Invoice AdjustmentReversing a Line (Reverses the distribution made to that particular invoice):Step 1: Click on the Reverse Line Icon (X) next to the invoice to reverse the adjustment associated with itDeleting a Line: (Deletes the distribution made to that particular invoice):Step1: Click on the Edit Line Icon (Pencil)Step 2: Click on the Delete Line ButtonReversing All Distributions (Deletes/Reverses all distributions made across all invoices:Step 1: Click on the Reverse All ButtonEditing a Line:Step 1: Click on the Edit Line Icon (Pencil)Step 2: Make Any necessary changes to the amount and/or description for that lineStep 3: Click on the Add/Update Button5. Click on the Back to Header Button
6. Click on the Close Adj Button if ready to close and post the adjustment
7. Click on the Post Button to post the adjustmentNote:Once Posted, AR Invoice Adjustments cannot be edited/canceledAdjustments will only post successfully if their date matches the end of day cutoff dateAny adjustments left open/in progress will prevent the end of day process from automatically moving forward during the night
-
Deleting an AR Invoice Adjustment
1. Click on the Edit Adj Icon (Pencil) next to the AR Invoice Adjustment to be deleted
If Closed:
2. Click on the Open Button to re-open the AR Invoice Adjustment
3. Click on the Back to Header Button to return to the header of the adjustment
4. Click on the Delete Adj Button, then click Ok on the pop up prompt
Note:Once deleted, an AR Invoice Adjustment is permanently removed and can no longer be retrieved
If Open:
2. Click on the Delete Adj Button, then click Ok on the pop up prompt
Note:Once deleted, an AR Invoice Adjustment is permanently removed and can no longer be retrieved
AR Miscellaneous Cash
-
Key Information
Create and maintain any miscellaneous cash that has been received.Examples:InvestmentMiscellaneous DepositAR Miscellaneous Cash Statuses:In Progress -> the misc. cash entry is open and is able to be editedPosted -> the misc. cash entry has been posted and cannot be editedReady to Post -> the cash entry has been closed and is ready for posting, it cannot be edited when closed, but can be reopened if edits are necessary
Note: Posting will only successfully go through if the misc. cash record date equals the current cutoff date
-
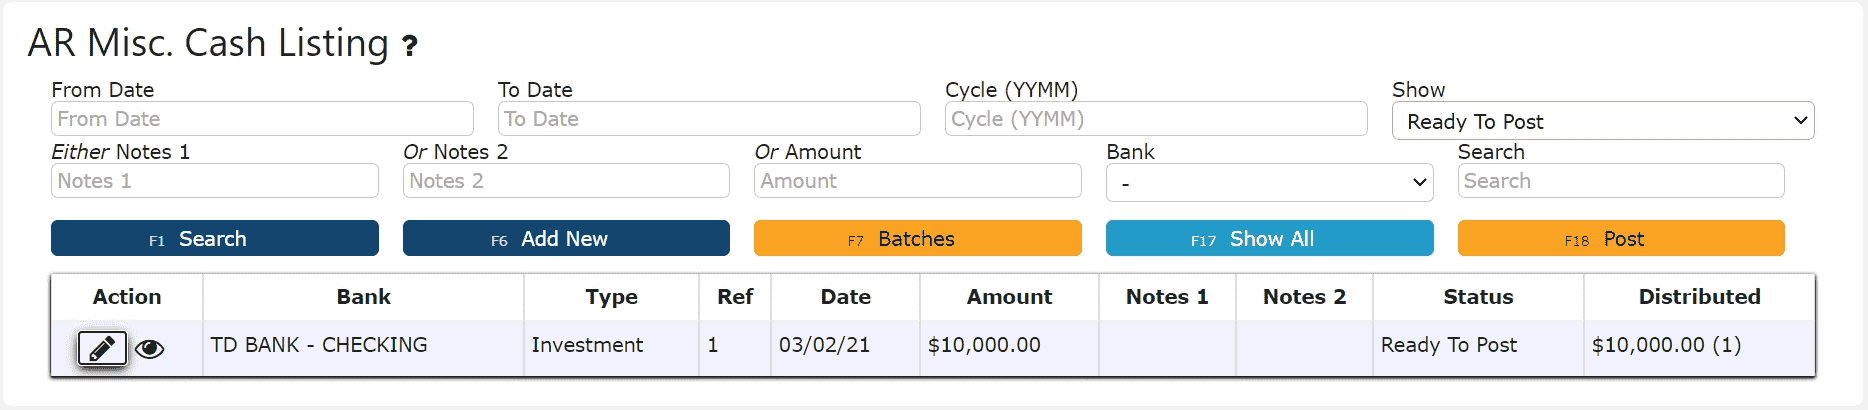
Creating and Posting an AR Miscellaneous Cash Entry
1. Go to the Accounting Menu and click on the AR Miscellaneous Cash Sub-Menu
 2. Click on the Add New Button
 3. Select the bank, and enter the customer, cash credit date, type of AR Misc. Cash deposit and any notes needed to label the entry. Click on the Save & Exit Button to save and close the entry.
 4. Review the Misc. Cash Entry that is ready to post
 5. Click the Post ButtonNote:Once Posted, AR Miscellaneous Cash Entries cannot be edited/canceledMiscellaneous Cash Entries will only post successfully if their date matches the end of day cutoff dateAny Miscellaneous Cash Entries left open/in progress will prevent the end of day process from automatically moving forward during the night
-
Editing an AR Miscellaneous Cash Entry
1. Click on the Edit Icon (Pencil) next to the AR Misc. Cash Entry to be edited
 If Closed:2. Click on the Open Button to re-open the Misc. Cash Entry. Adjust any of the header information as necessary.
 3. Click on the Close Button if ready to close and post the Misc. Cash Entry
 4. Click on the Post Button to post the Misc. Cash EntryNote:Once Posted, AR Misc. Cash Entries cannot be edited/canceledMisc. Cash Entries will only post successfully if their date matches the end of day cutoff dateAny Misc. Cash Entries left open/in progress will prevent the end of day process from automatically moving forward during the night
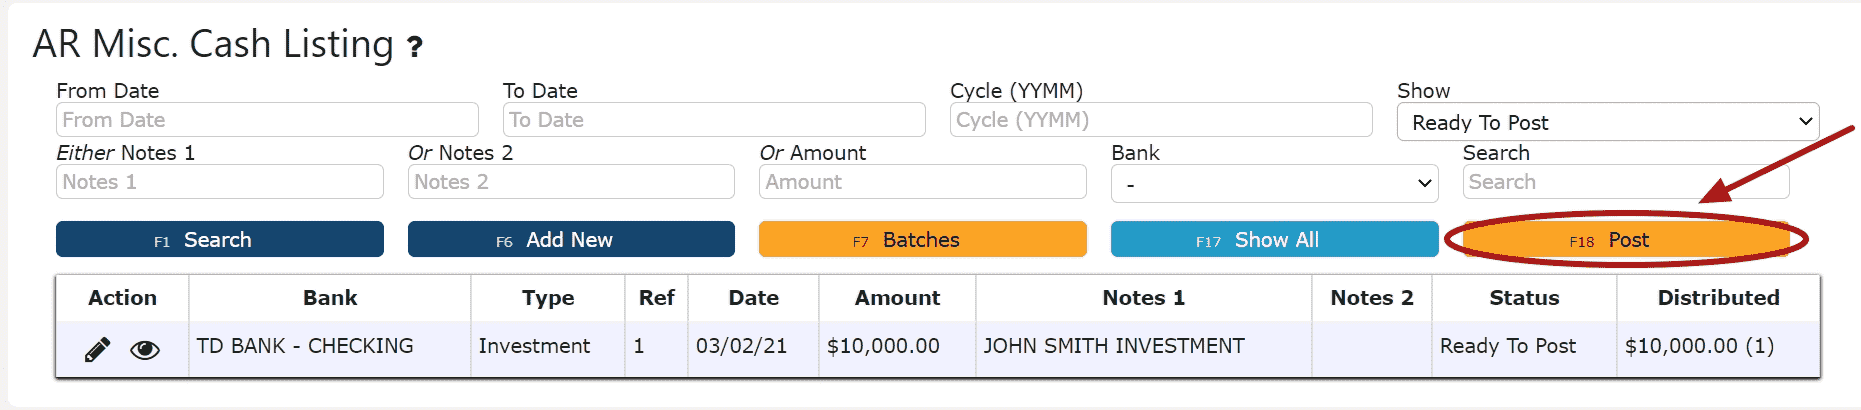 If Open:2. Adjust any of the header information as necessary.3. Click on the Close Button if ready to close and post the Misc. Cash Entry4. Click on the Post Button to post the entryNote:Once Posted, AR Misc. Cash Entries cannot be edited/canceled
Misc. Cash Entries will only post successfully if their date matches the end of day cutoff dateAny Misc. Cash Entries left open/in progress will prevent the end of day process from automatically moving forward during the night
-
Deleting an AR Miscellaneous Cash Entry
1. Click on the Edit Icon (Pencil) next to the AR Misc. Cash Entry to be deletedIf Closed:2. Click on the Open Button to re-open the AR Misc. Cash Entry3. Click on the Delete Button, then click Ok on the pop up promptNote:Once deleted, an AR Misc. Cash Entry is permanently removed and can no longer be retrieved
 If Open:2. Click on the Delete Button, then click Ok on the pop up promptNote:Once deleted, an AR Misc. Cash Entry is permanently removed and can no longer be retrieved
AR Cash Receipts
-
Key Information
Apply payments received and on account credits towards open invoices.Examples:ChecksCash
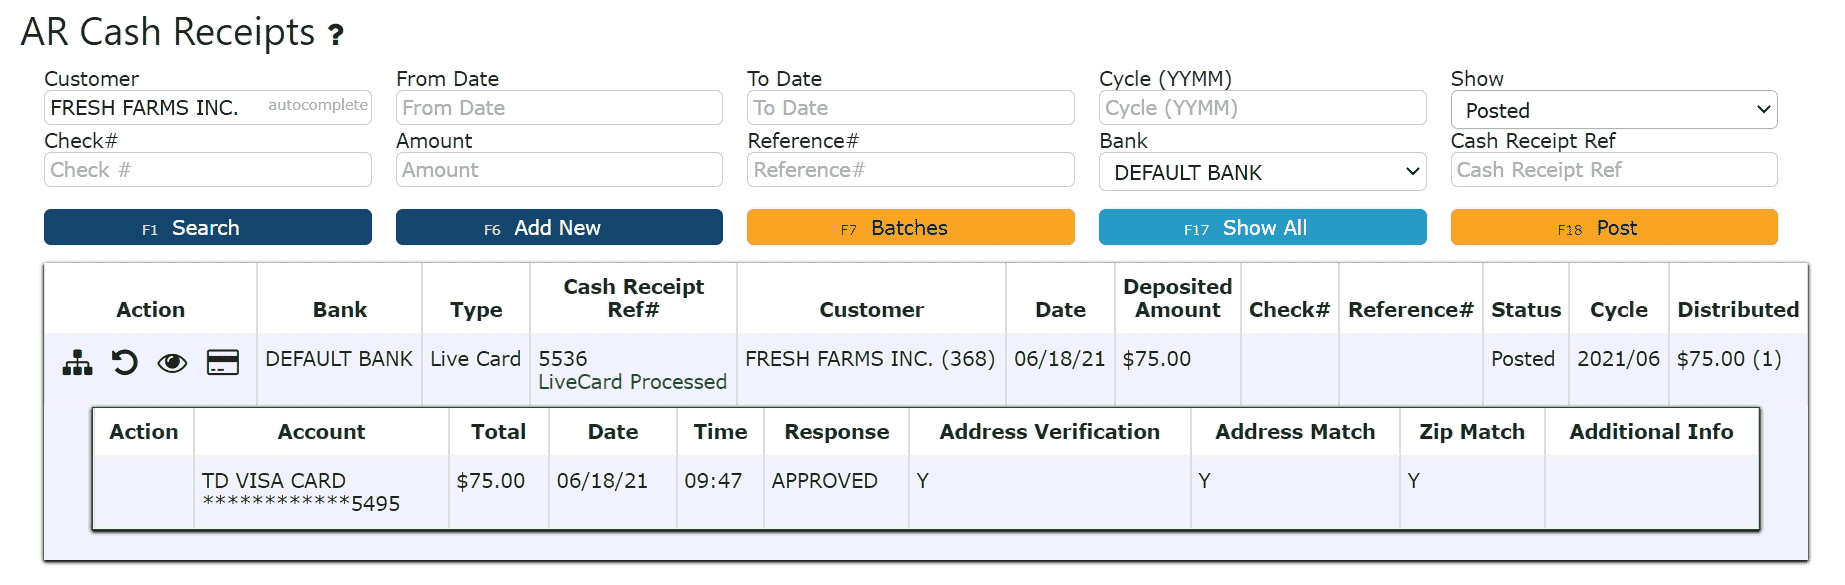
LiveCards: Process a credit card payment in real-timeExternally Processed Credit Cards: Use an external credit card processor to process the actual credit cardExternally Processed ACH/Transfer/Wire: Use an external processor to proccess the actual ACH/Transfer/Wire transactionAR Cash Receipt Statuses:In Progress -> the cash receipt is open and is able to be editedPosted -> the cash receipt has been posted and cannot be editedReady to Post -> the cash receipt has been closed and is ready for posting, it cannot be edited when closed, but can be reopened if edits are necessary
Note: Posting will only successfully go through if the cash receipt date equals the current cutoff date
-
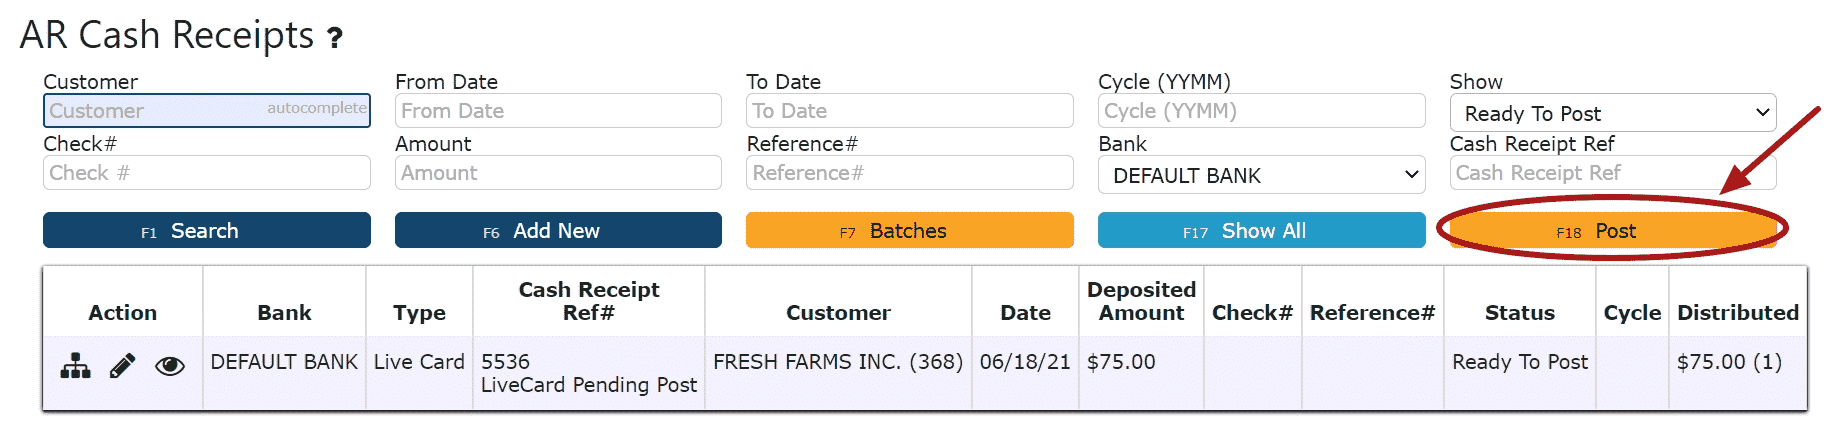
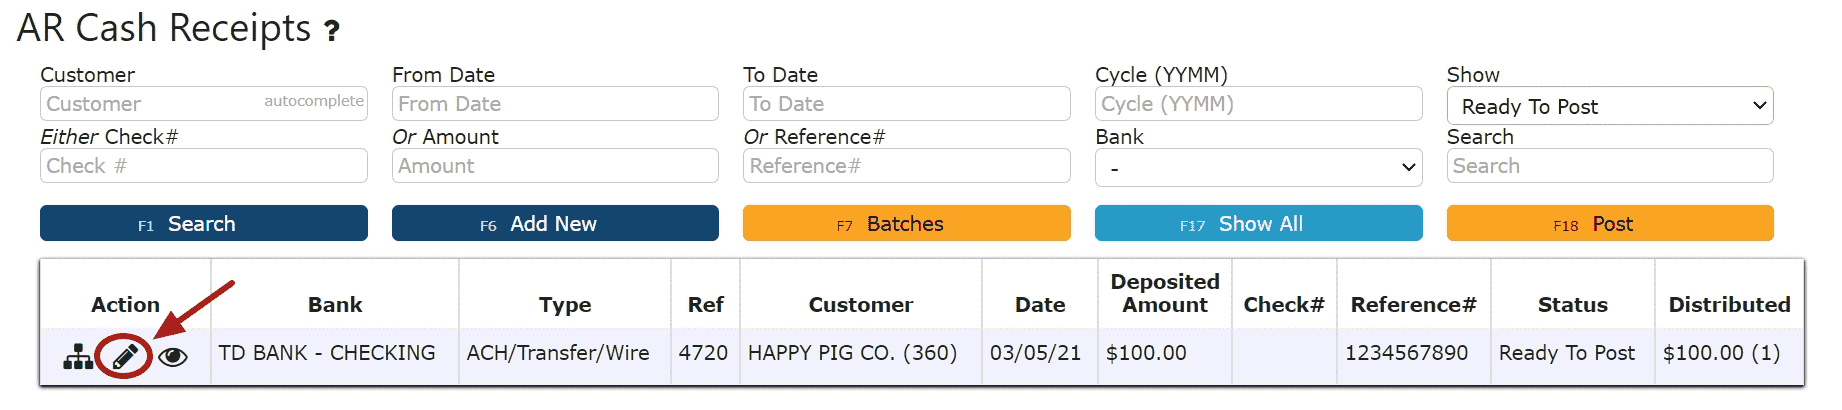
Creating and Posting an AR Cash Receipt
1. Go to the Accounting Menu and click on the AR Cash Receipts Sub-Menu

2. Click on the Add New Button
3. Enter the customer who made the payment, select a payment date, payment type, and total payment amount. Enter a check # or reference # if applicable.
Note:Reference numbers are required for Credit Card and ACH/Transfer/Wire Payments. Once a Credit Card or ACH/Transfer/Wire Payment has been completed from an outside source, the reference number generated from that transaction must be included as part of the corresponding AR Cash Receipt.
Check numbers are required for all payments made by check
4. Click on the Distribute $ Button
5. Distribute the amount of the payment towards any open invoice(s) listedAdd to Line (paying a partial amount of the invoice):
Step 1: Click on the Add to Line Icon next to the invoice to be paid
Step 2: Enter the amount of the invoice to pay
Step 3: Click on the Add/Update Button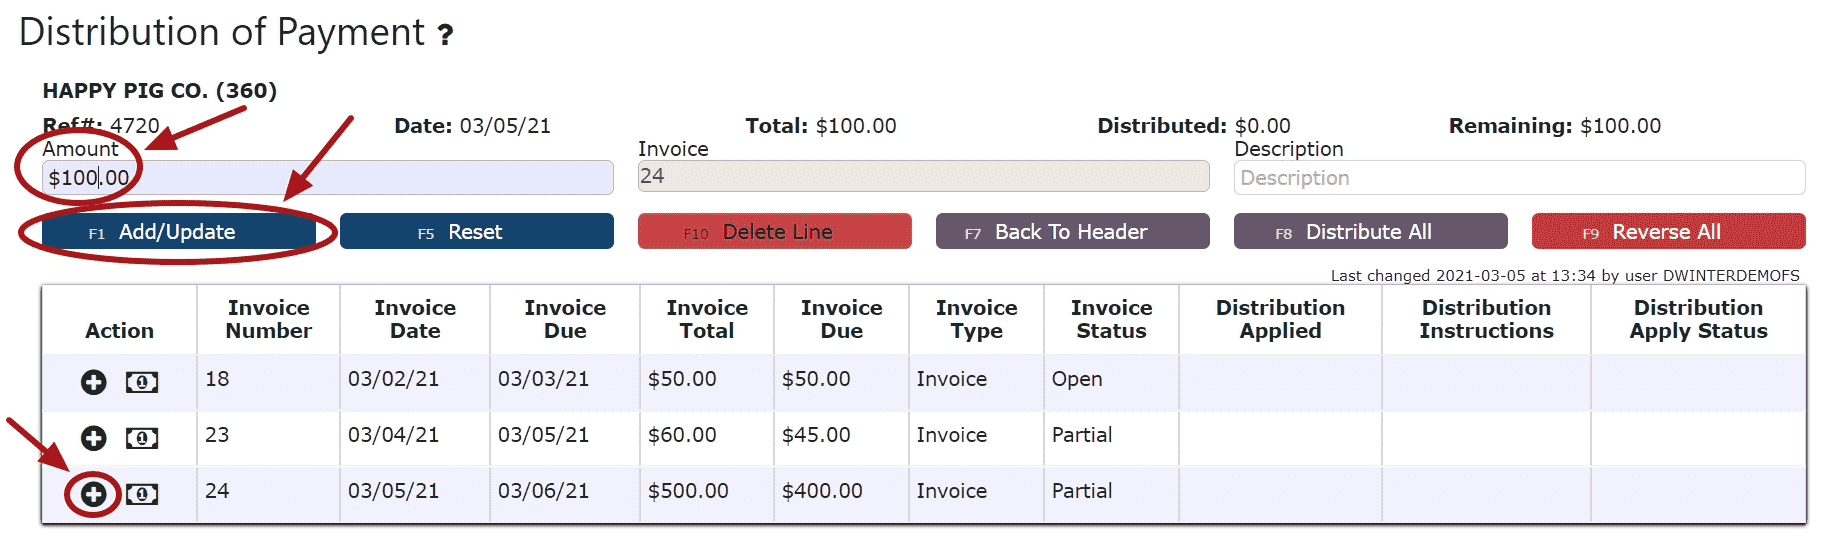
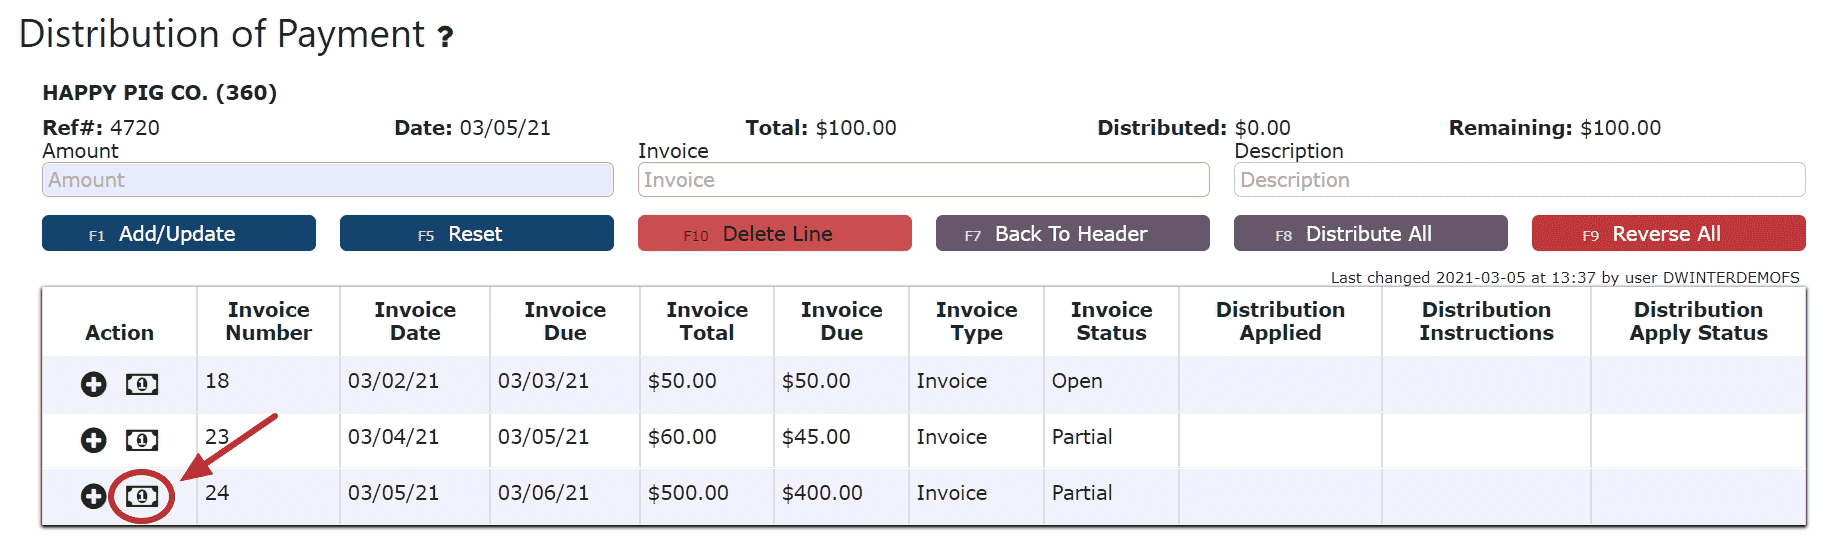
Auto Pay Remaining Balance (applies the entire remaining payment amount to the invoice):
Step 1: Click on the Auto Pay Remaining Balance Icon
Distribute All (distributes the entire amount of the payment to the invoices starting from the top of the list, up until the payment amount runs out):
Step 1: Click on the Distribute All Button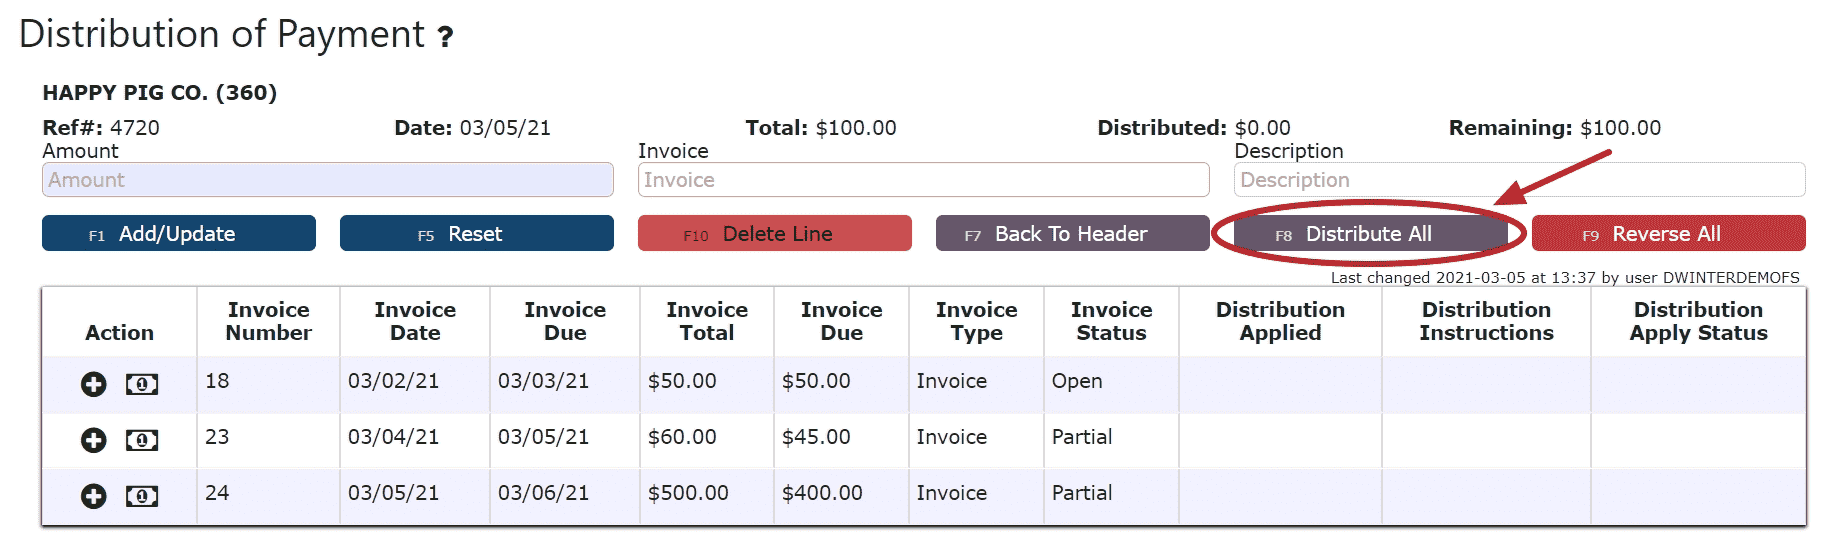
6. Click on the Back to Header Button
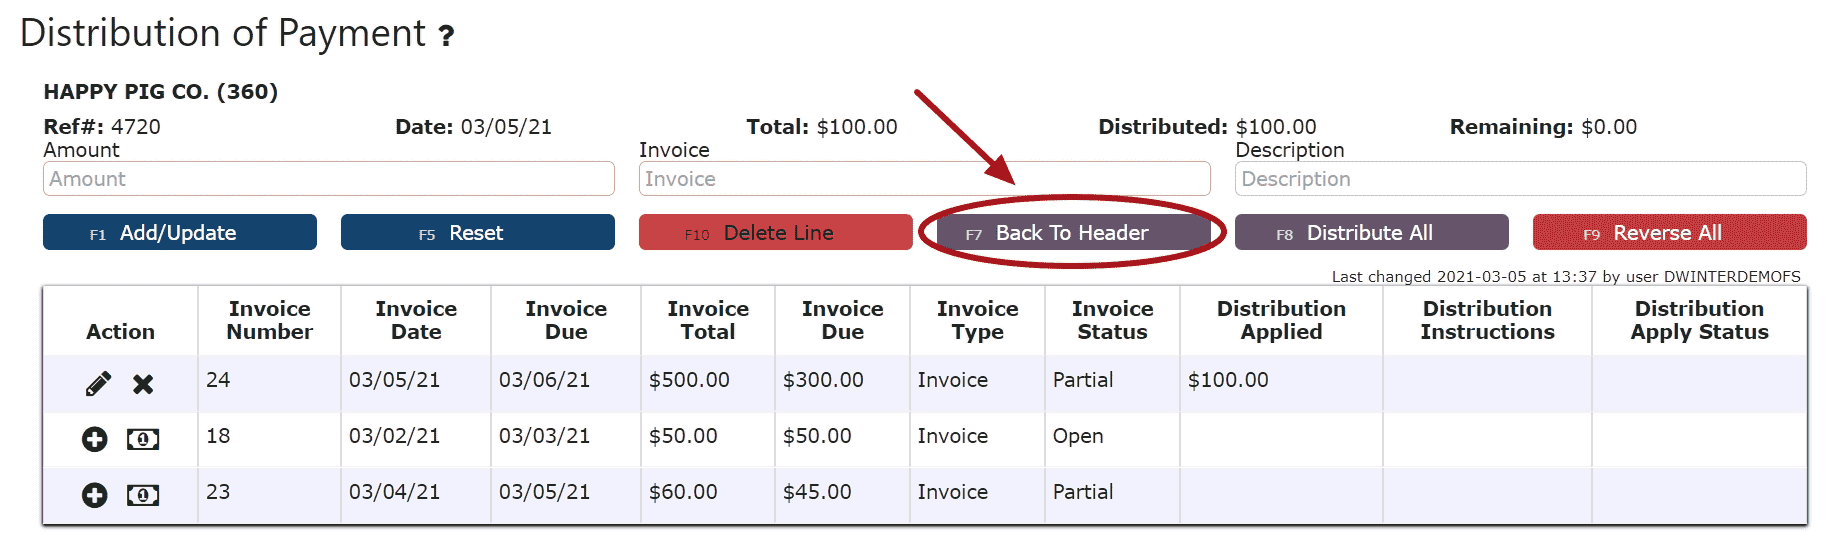
7. Click on the Close Payment Button
Note: Once closed, the cash receipt is ready to post
8. Review the Cash Receipt that is ready to post
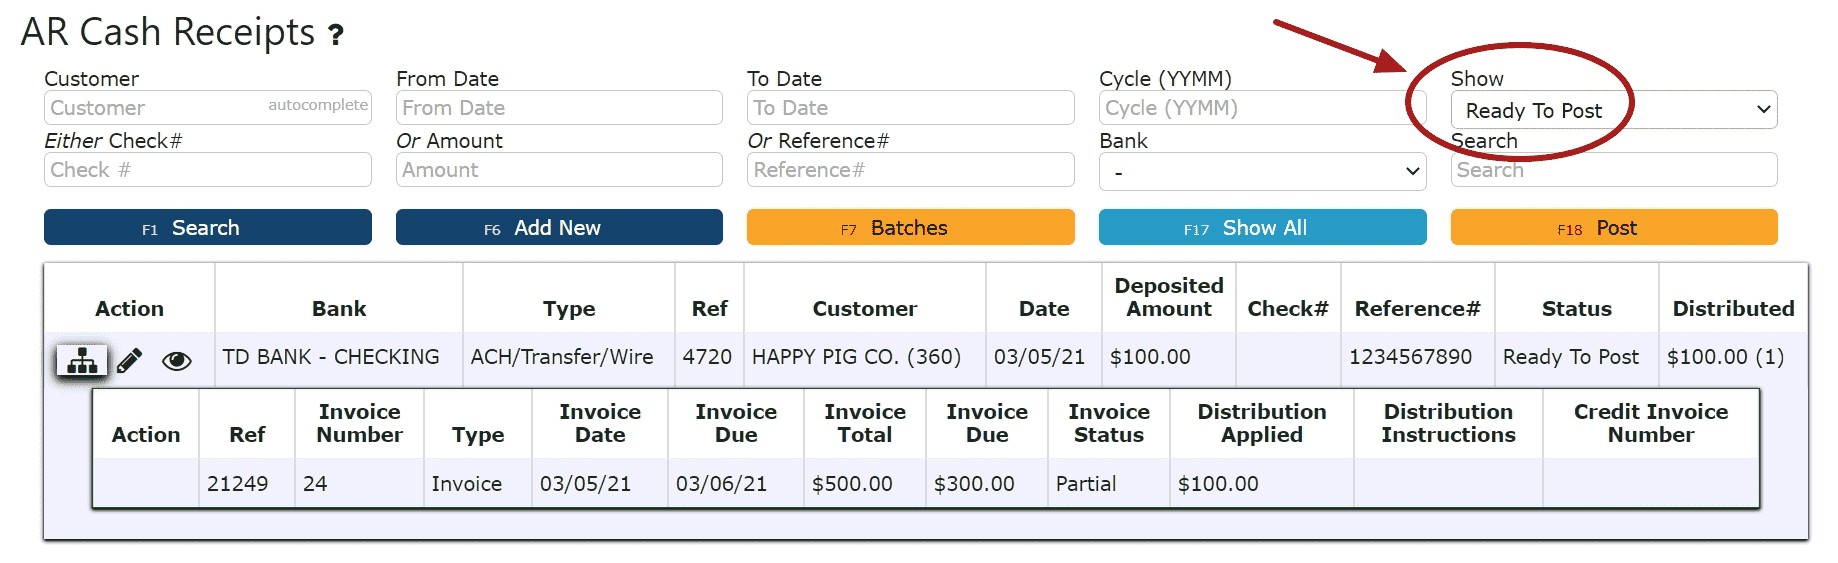
9. Click the Post Button
Note: Cash Receipts will only post successfully if their date matches the end of day cutoff date. Any Cash Receipts left open/in progress will prevent the end of day process from automatically moving forward during the night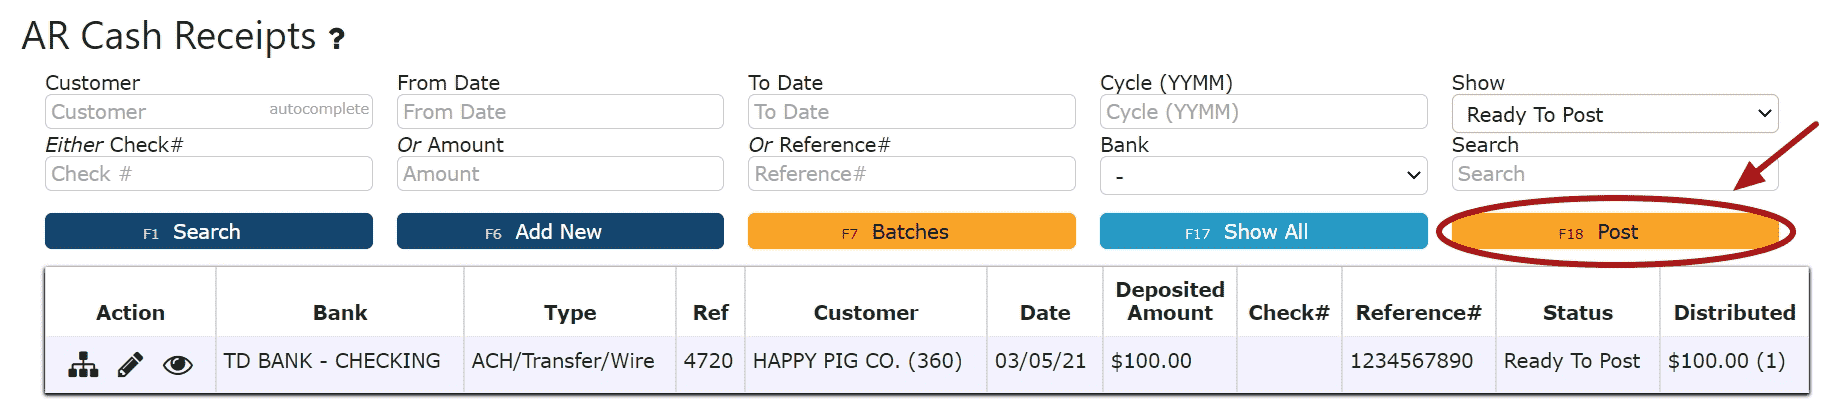
-
Using LiveCards
Inspired LiveCard Transactions
Credit cards can be used to submit a live payment for a cash receipt. As opposed to externally processed credit card transactions that are processed elsewhere outside of the Inspired system, these "Live" credit card transactions will be processed immediately upon posting, and eliminate the need for other external credit card processors.
Your applicable merchant fees will apply accordingly.
Note: Inspired Technology Systems does not save nor store any credit card information on our servers.
Secure tokens are used instead. Account tokenization involves completely removing sensitive data and replacing it with a randomly generated value called a token.
Setting up Inspired LiveCards:
LiveCards(credit cards) can be maintained for each customer, and are assigned through the customer master list, or directly from within a cash receipt
1. Go to the Sales Menu and click on the Customers Sub-Menu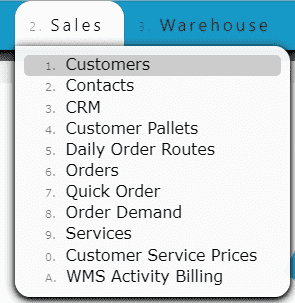
2. Click on the LiveCards Icon to view and maintain that customer's list of credit cards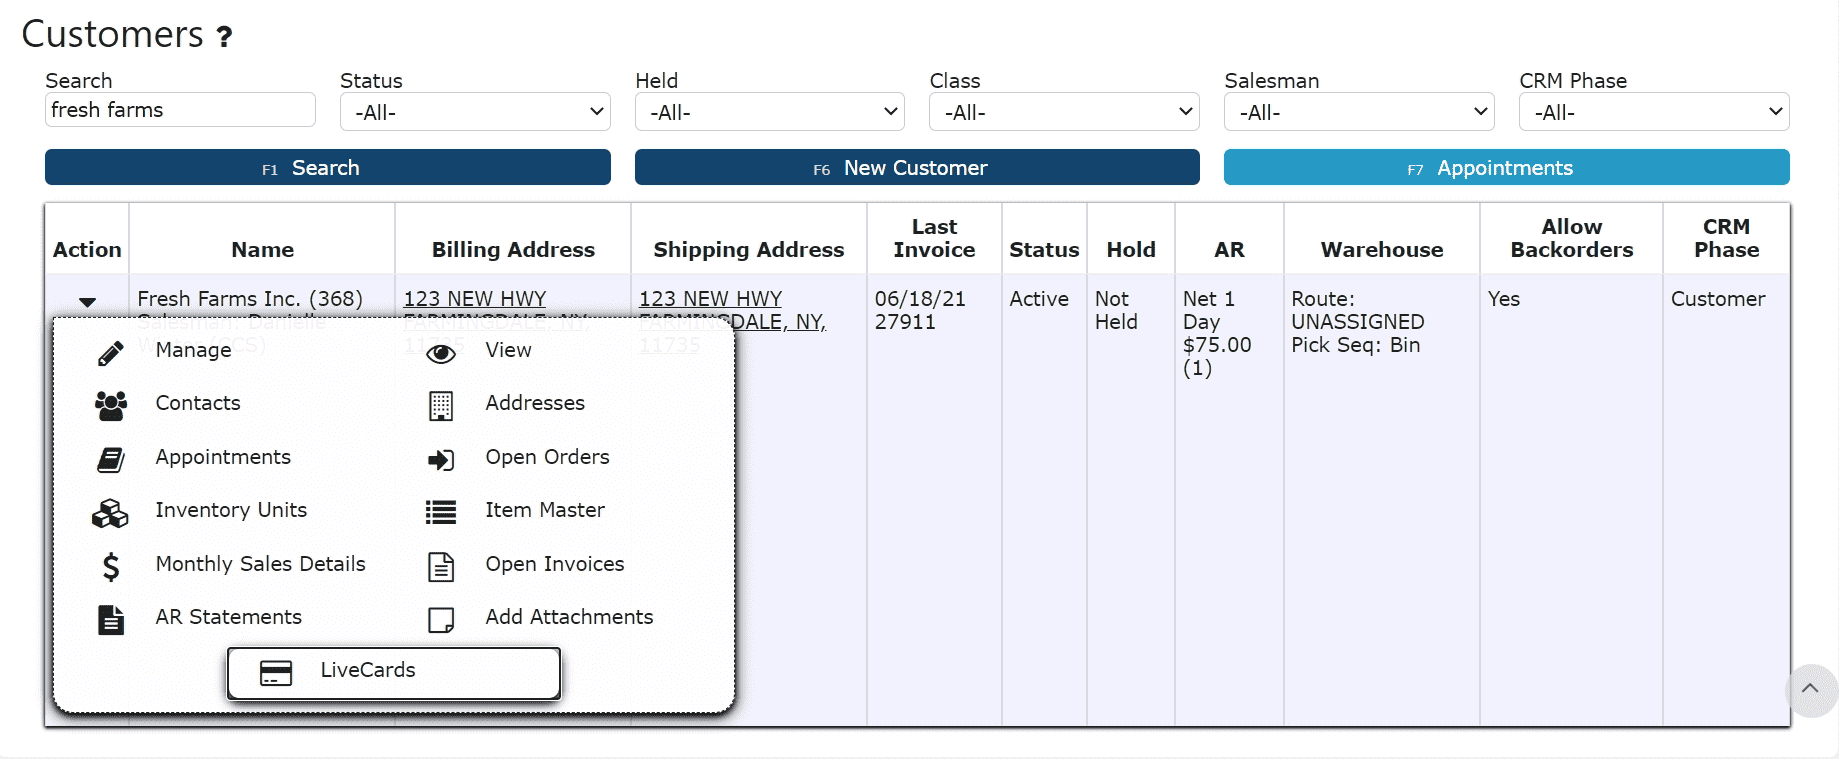
3. Create and maintain customers' LiveCards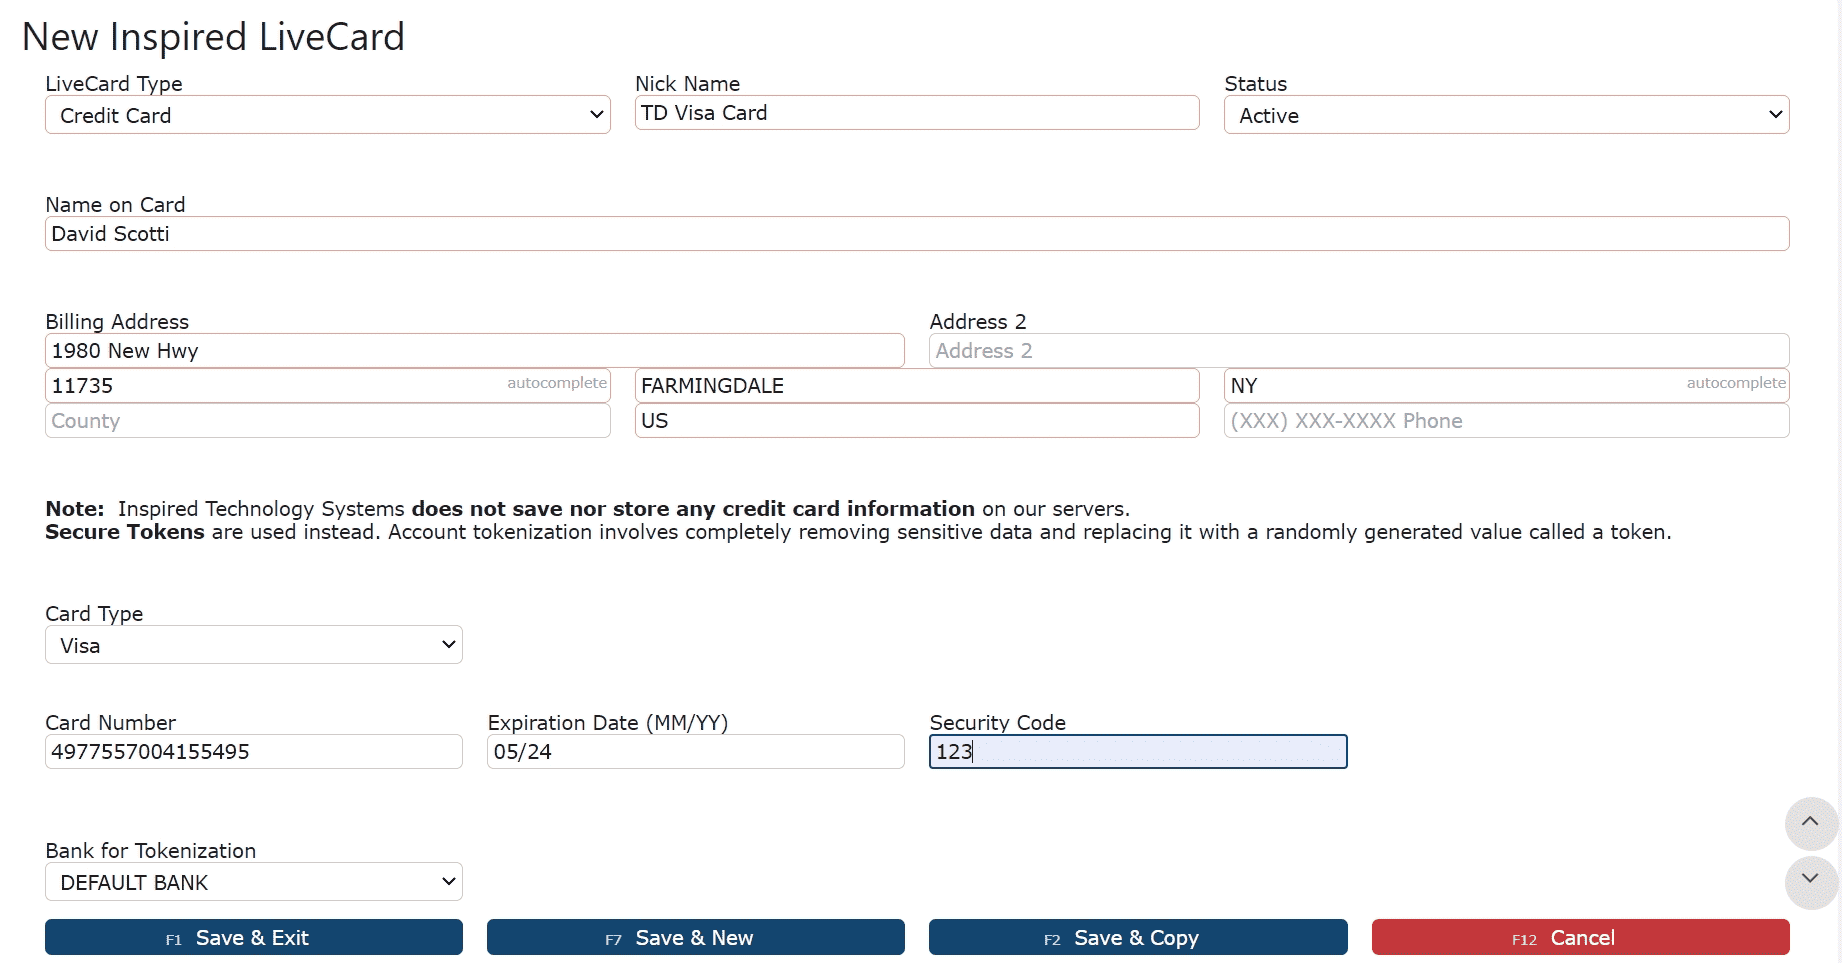
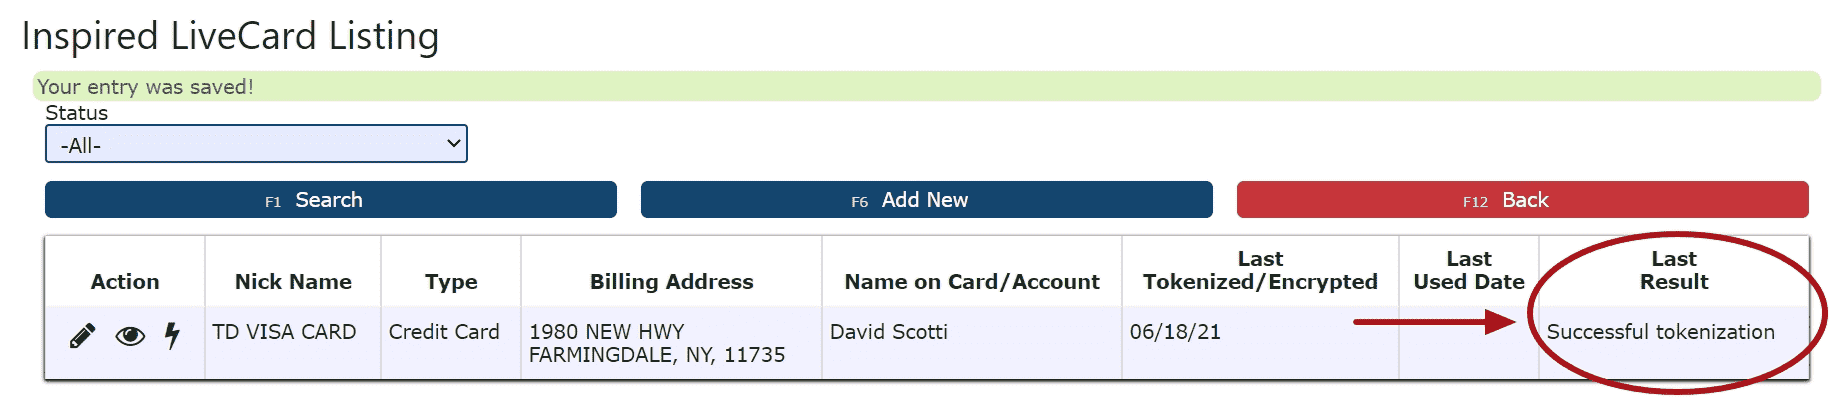
Note: LiveCards must be tokenized successfully in order to use.
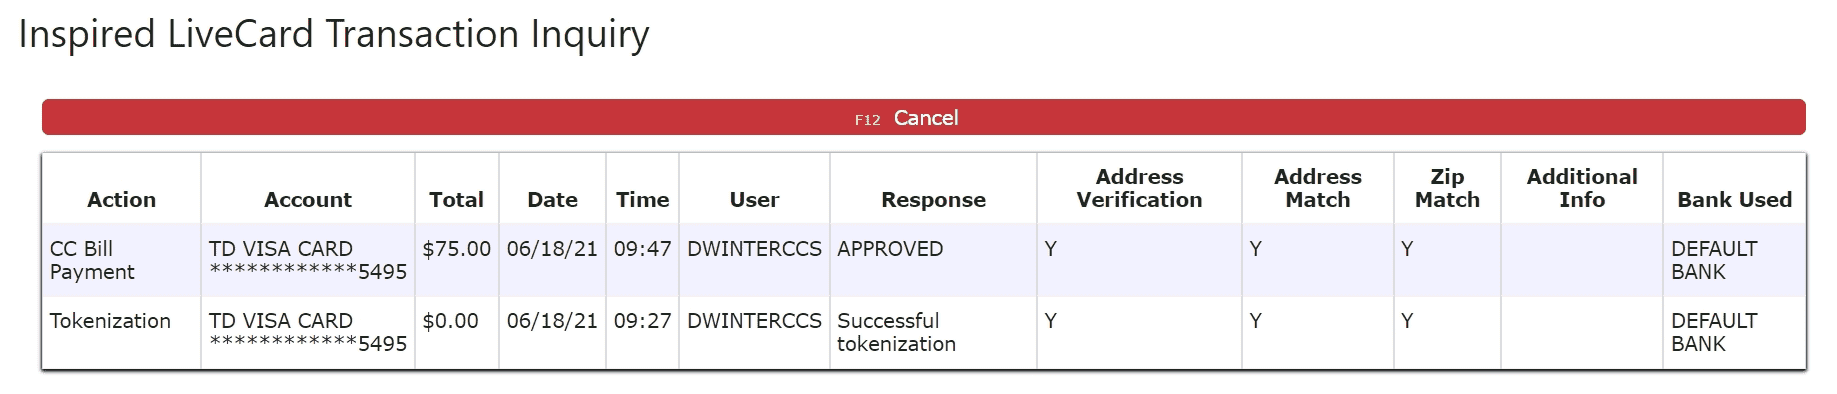
4. View transaction history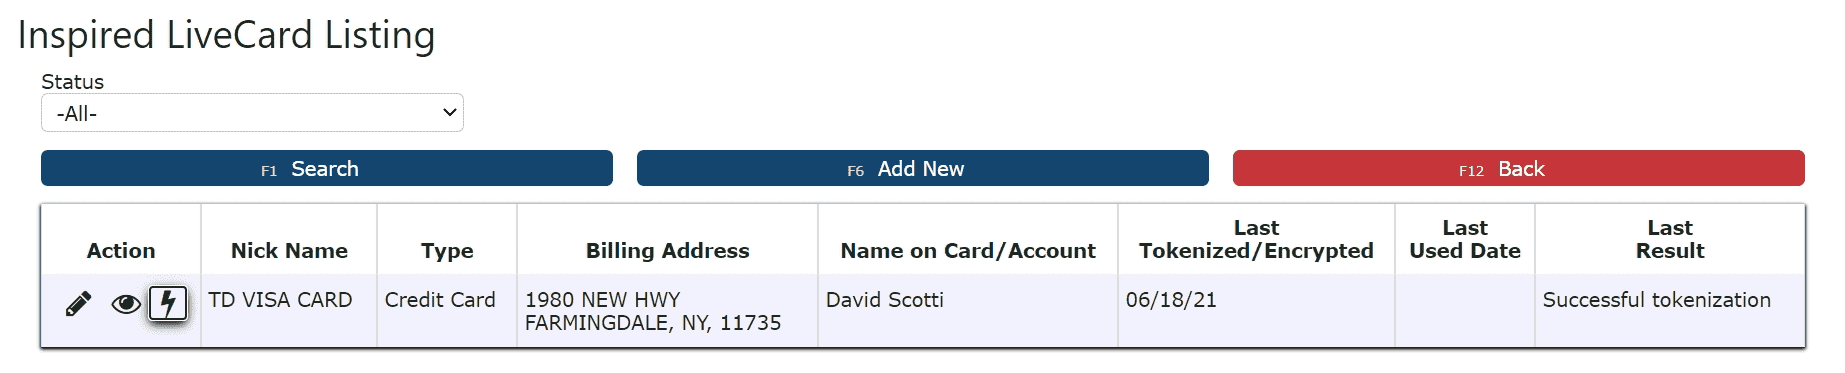
Using a LiveCard in a Cash Receipt:
1. Select the Live Card option as the payment type, and the LiveCard to use for the transaction
Note: Add/edit LiveCards using the Manage LiveCards Button
2. Click on the Distribute Button to start distributing the payment
3. Choose the Pay All Button or click on the Dollar Icon next to each invoice to pay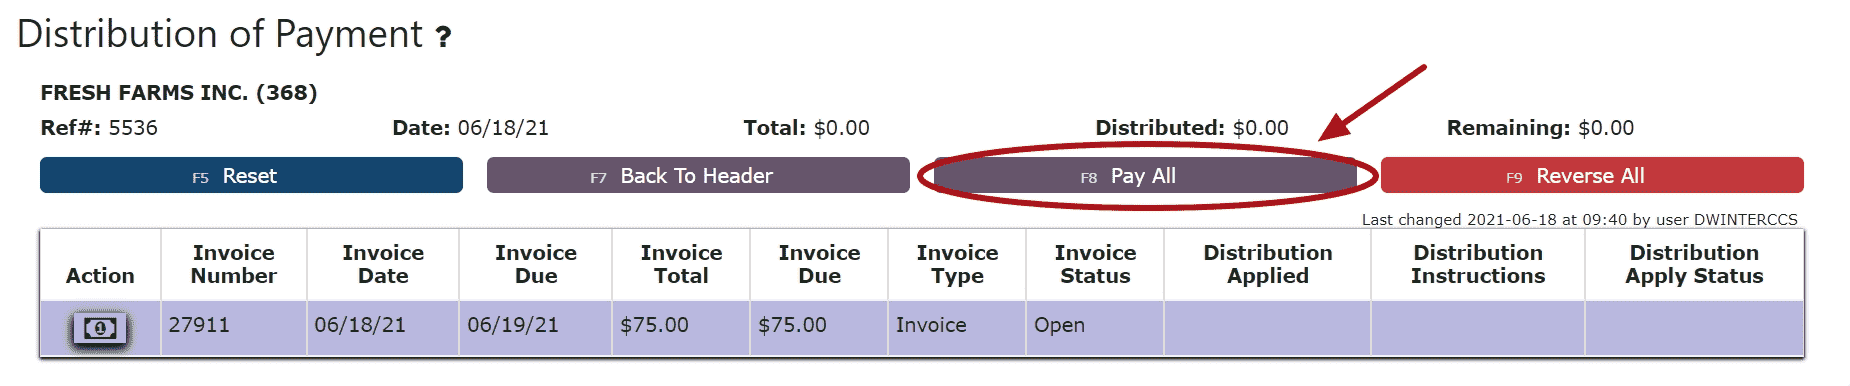
4. Click the Back to Header Button and proceed to close and post the Cash Receipt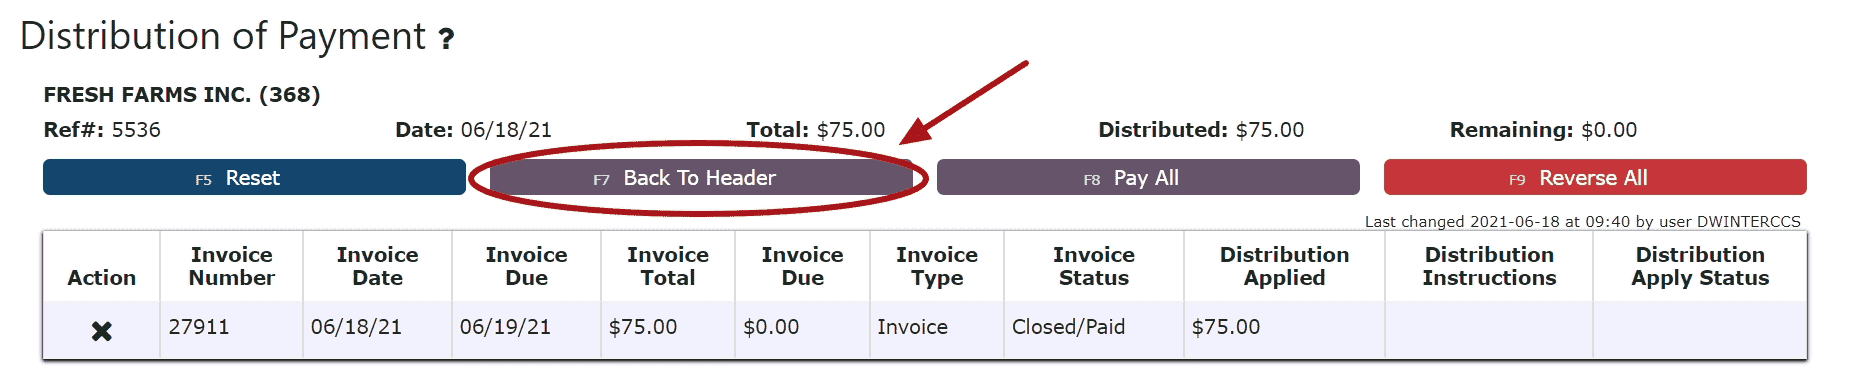

-
Applying an On Account Credit through an AR Cash Receipt
1. Go to the Accounting Menu and click on the AR Cash Receipts Sub-Menu2. Click on the Add New Button
3. Enter the customer, select a payment date, payment type and enter a total payment amount
For On Account Credits Only:
Select Apply Credit as the payment type
Enter $0 for the total payment amount
For On Account Credits + Additional Payments:
Select the payment type for the additional payment(s) to be applied
Enter the amount for the total amount of the additional payments (not including the on account credits to be applied) 4. Click on the Distribute $ Button
 5. Select the credit(s) and the amount(s) to apply towards the open invoice(s)Add to Line (Selecting a partial amount of the credit):Step 1: Click on the Add to Line Icon next to the credit to applyStep 2: Enter the amount of the credit to use (must be a negative value)Step 3: Click on the Add/Update Button
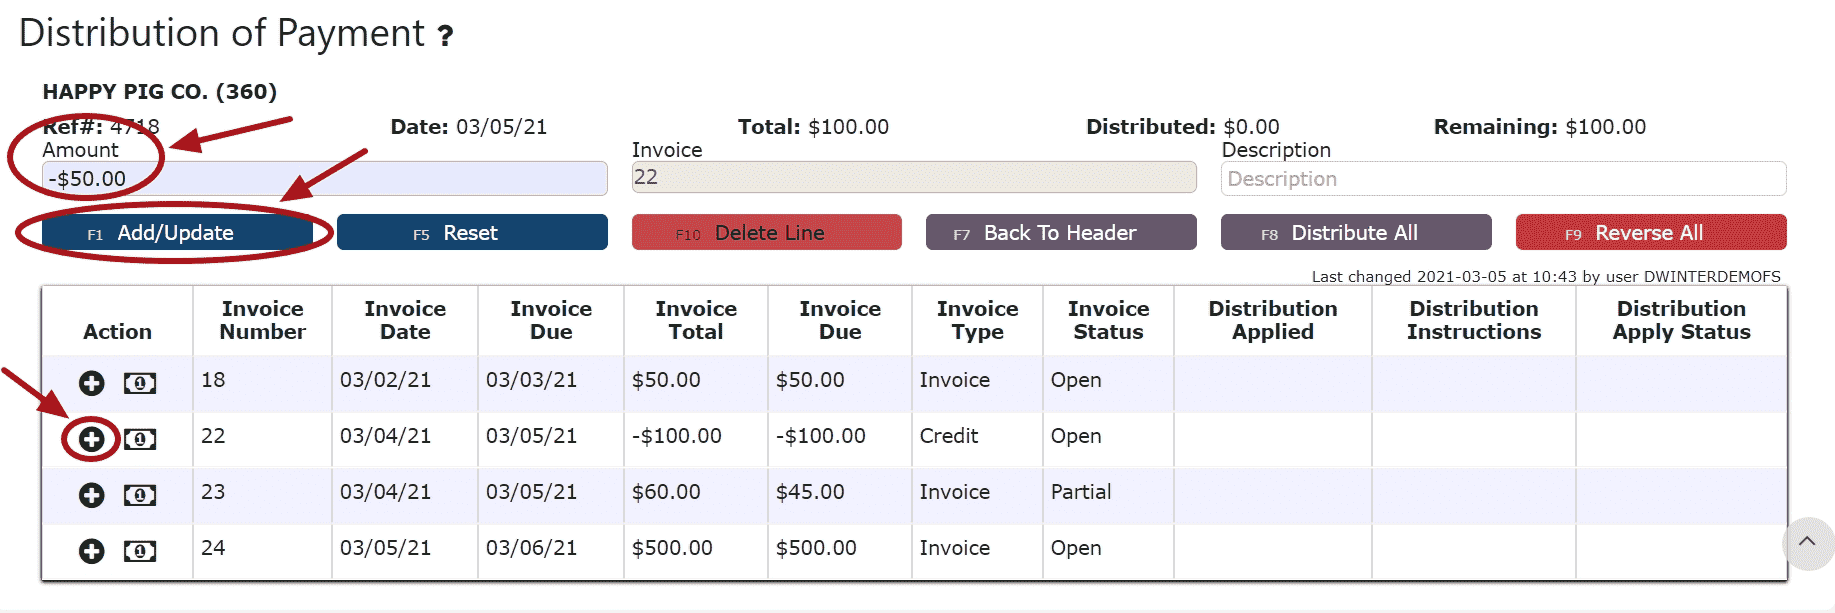 Take Full Credit Balance (applying the full amount of the credit):Step 1: Click on the Take Full Credit Balance Icon
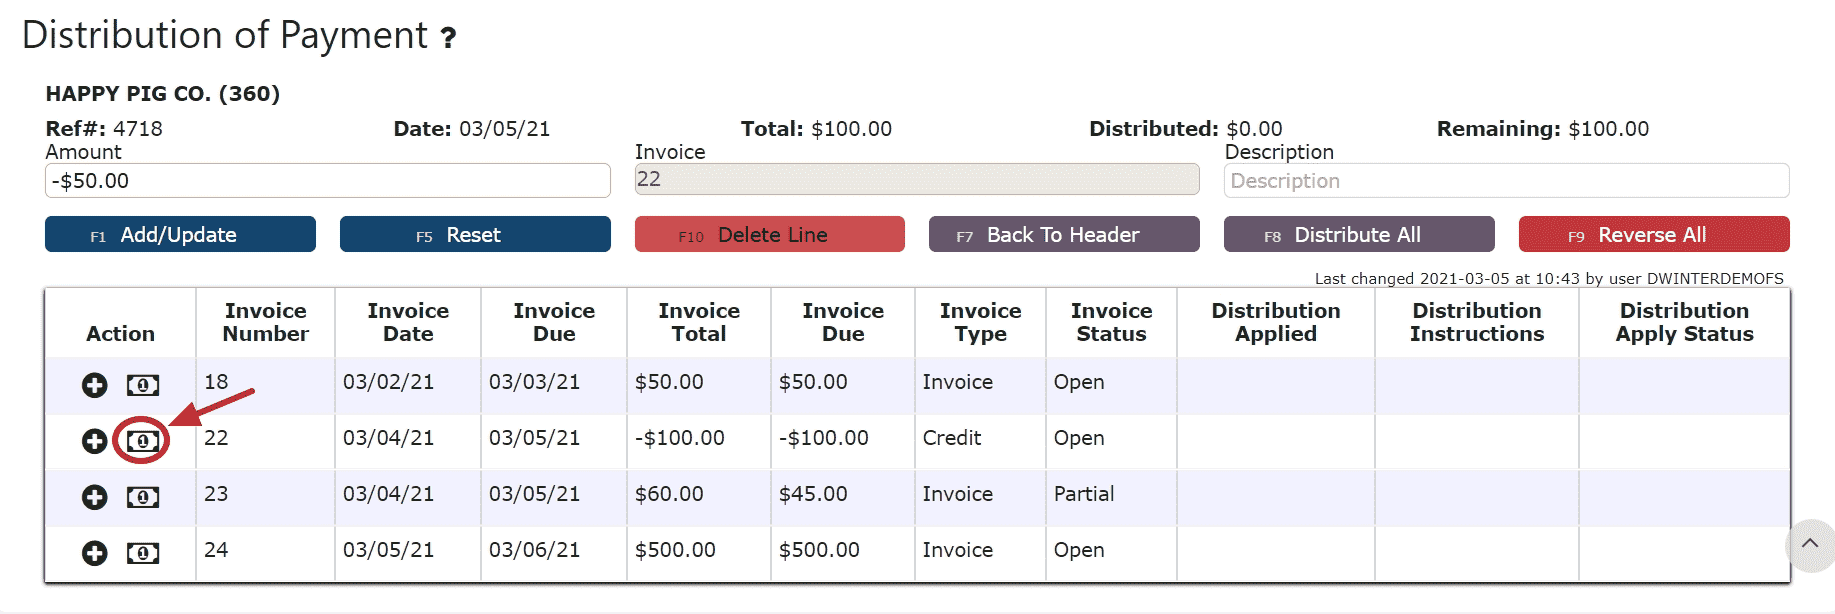 6. Distribute the amount of the credit(s) towards any open invoice(s) listed
Add to Line (paying a partial amount of the invoice):Step 1: Click on the Add to Line Icon next to the invoice to be paidStep 2: Enter the amount of the invoice to payStep 3: Click on the Add/Update Button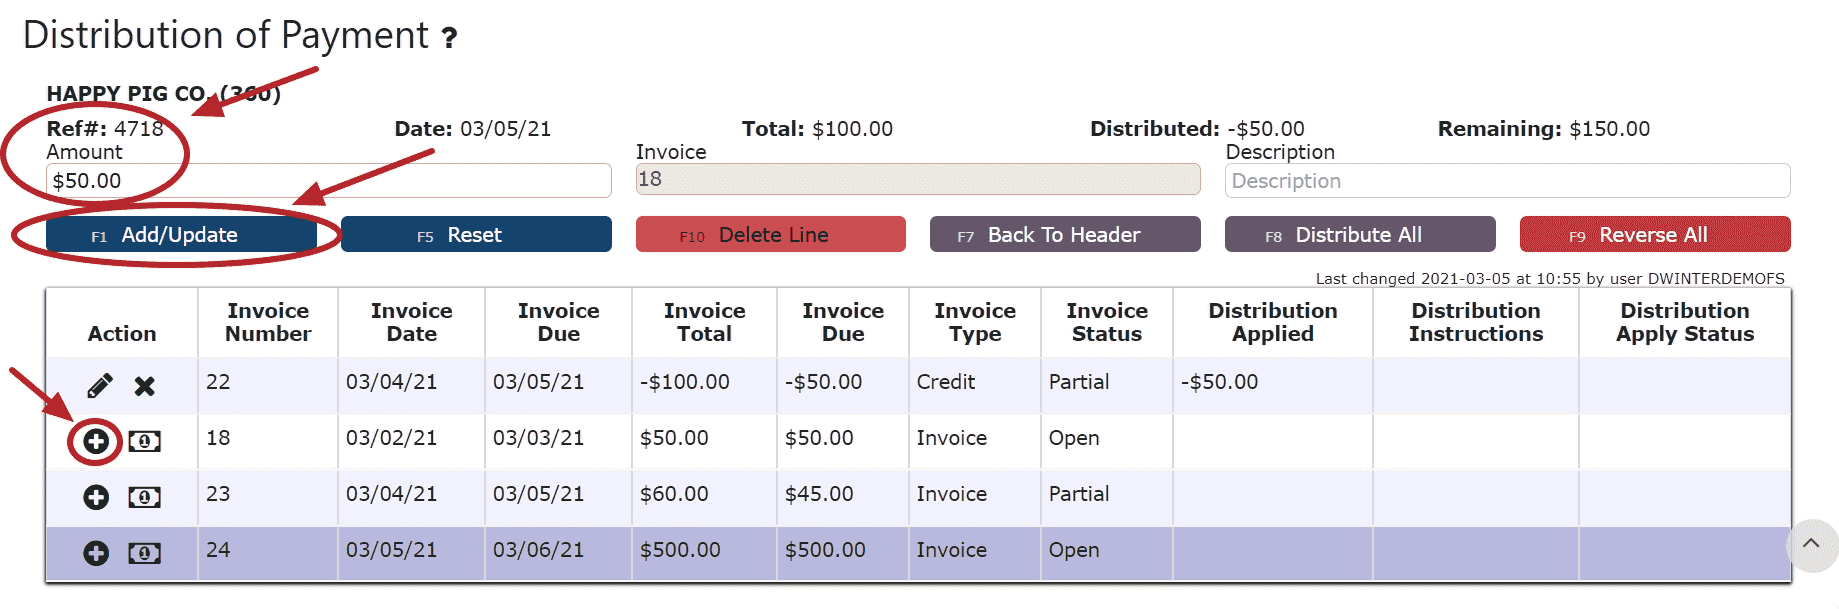 Auto Pay Remaining Balance (paying the entire amount of the invoice):Step 1: Click on the Auto Pay Remaining Balance Icon
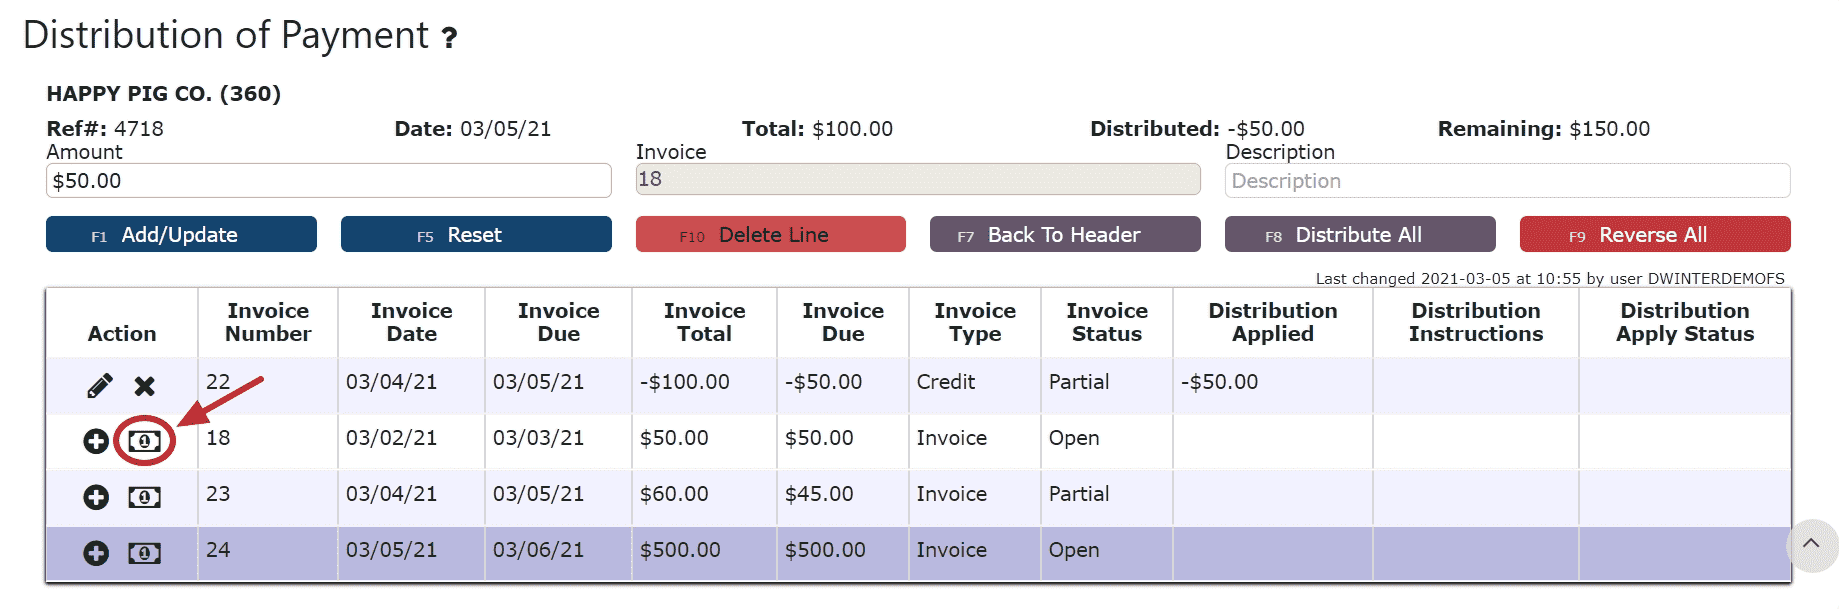
For On Account Credits + Additional Payments Only:
7. Apply the total payment amount towards any remaining open invoices using the Add to Line Icon or Auto Pay Remaining Balance Icon next to the open invoice to pay
Note: The total amount of the payment must equal the total amount distributed to open invoices in order to close the payment. The remaining amount to apply will indicate how much of the total payment is still left to distribute and will indicate $0 when all has successfully been applied.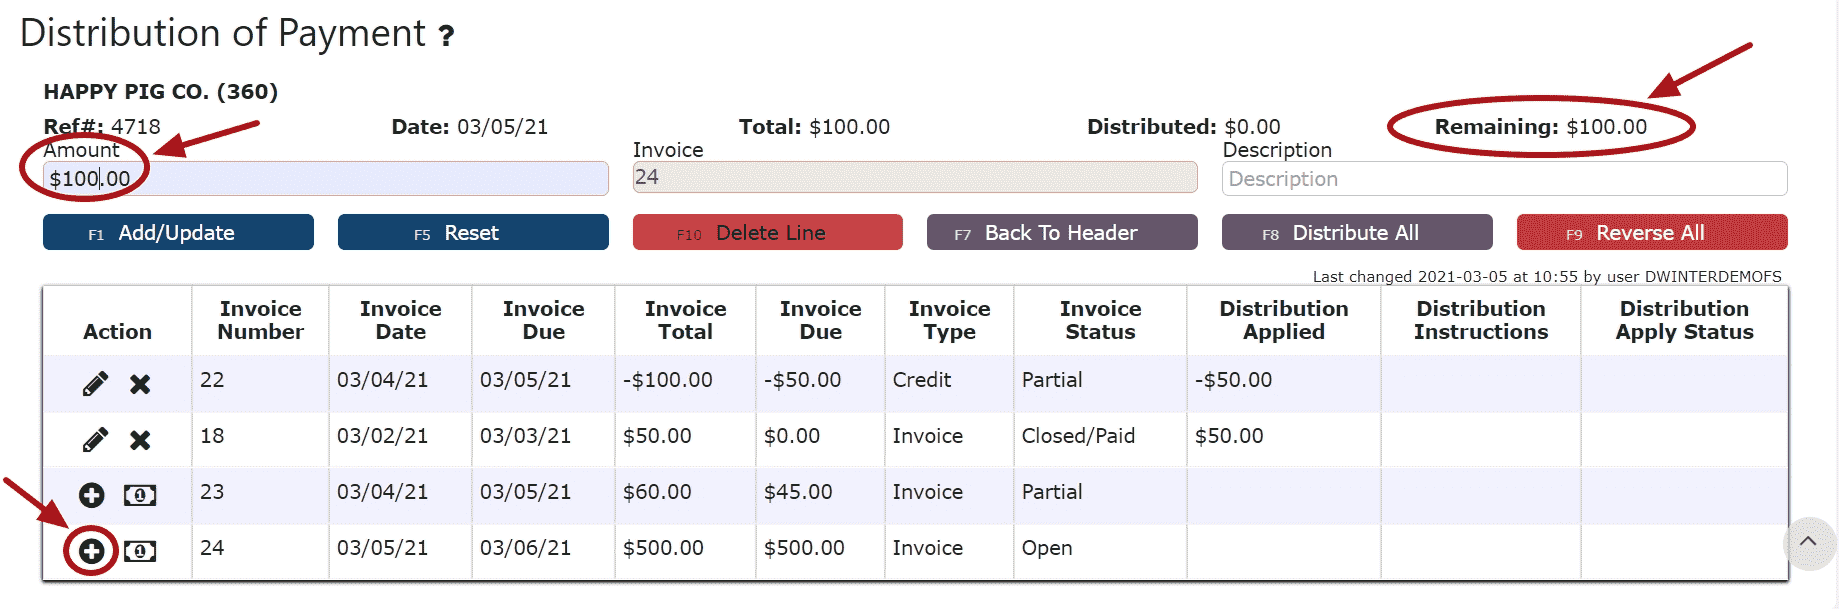 8. Click on the Back to Header Button
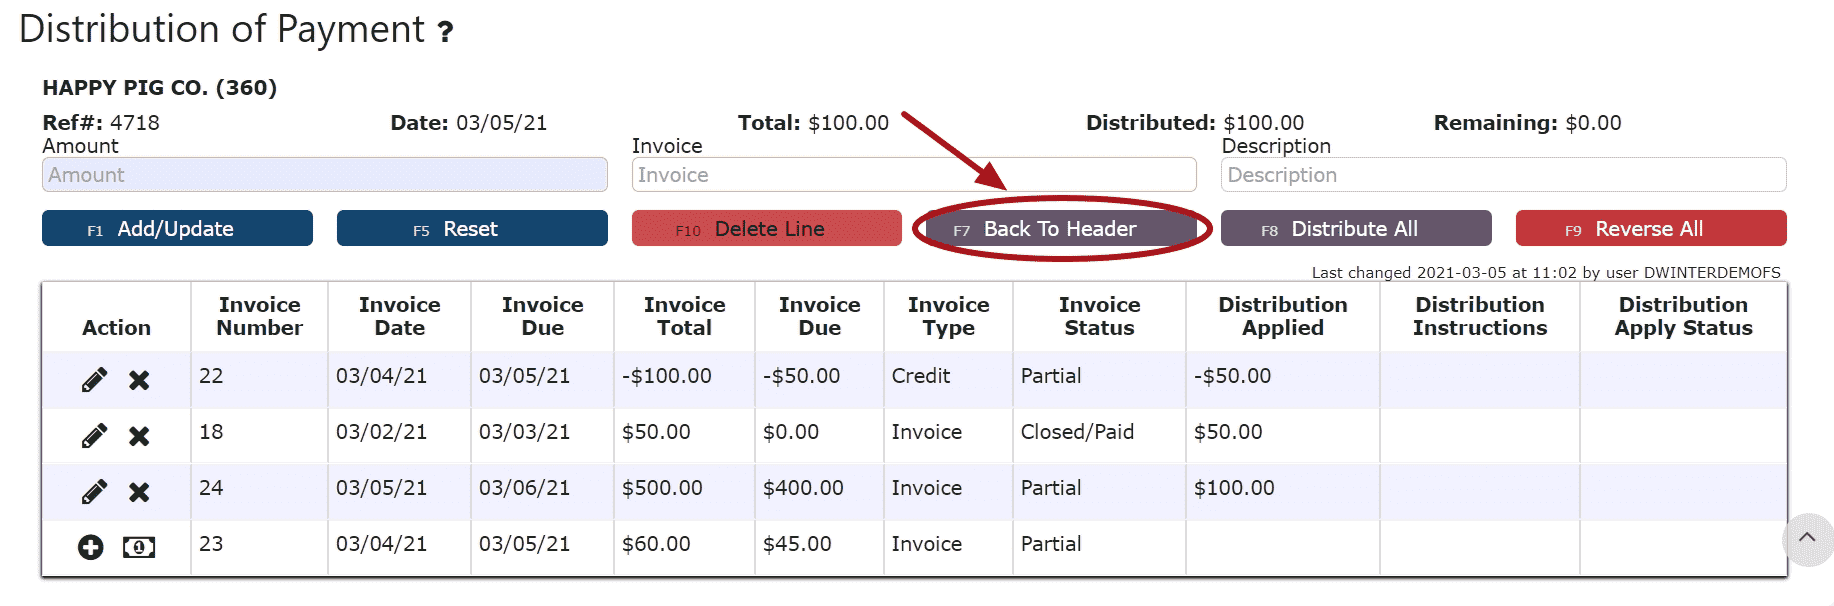 9. Click on the Close Payment ButtonNote: Once closed, the cash receipt is ready to post
 10. Review the Cash Receipt that is ready to post
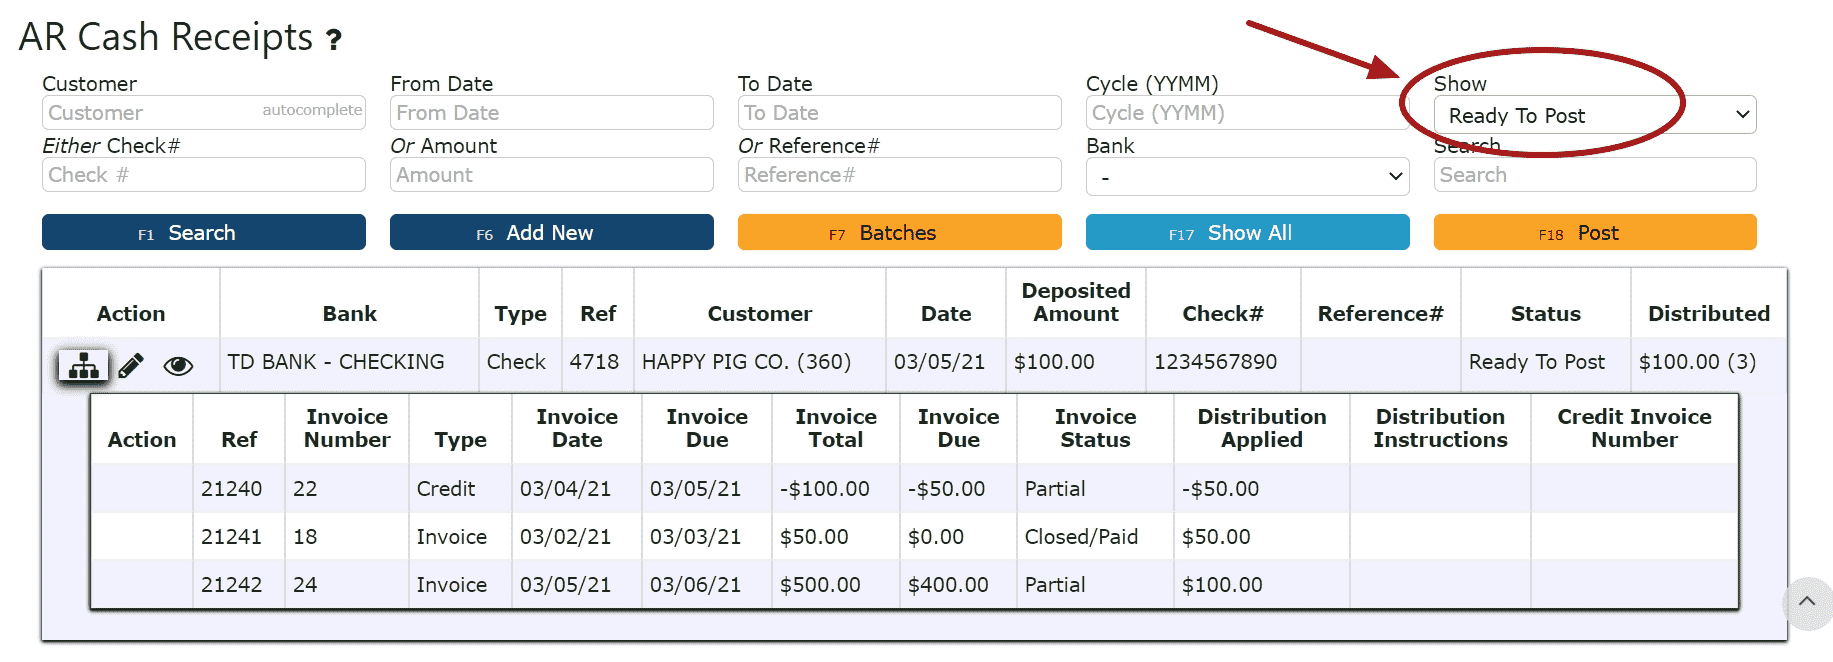 11. Click the Post ButtonNote:Cash Receipts will only post successfully if their date matches the end of day cutoff dateAny Cash Receipts left open/in progress will prevent the end of day process from automatically moving forward during the night
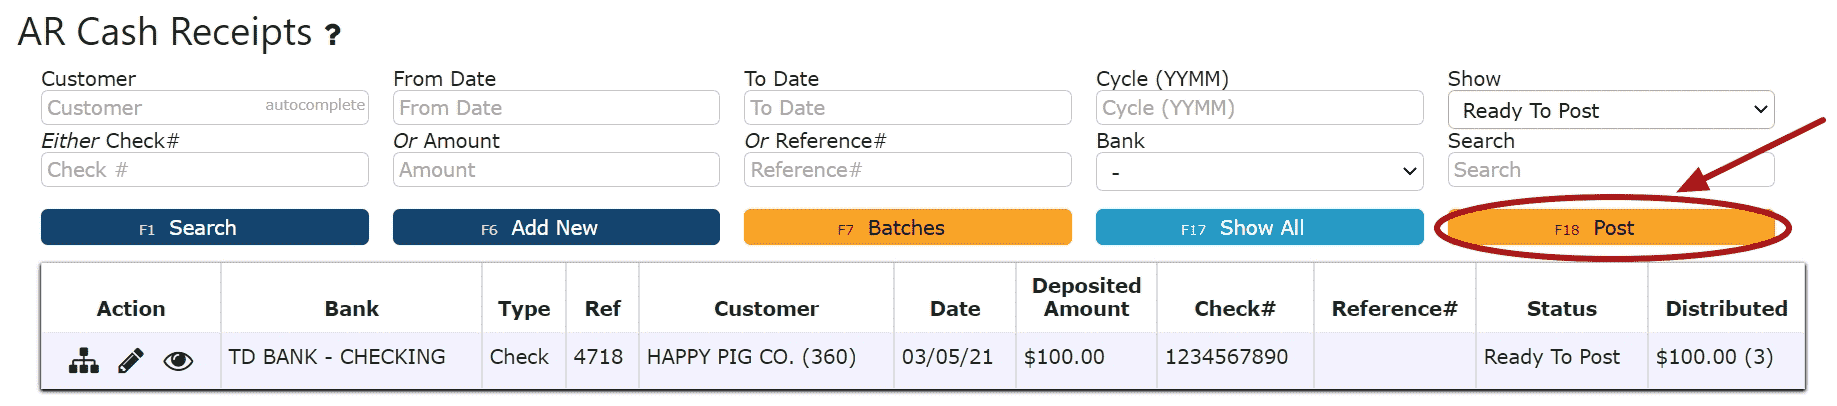
-
Creating an Overpayment AR Cash Receipt
1. Go to the Accounting Menu and click on the AR Cash Receipts Sub-Menu2. Click on the Add New Button3. Enter the customer who made the payment, select a payment date, payment type, and total payment amount. Enter a check # or reference # if applicable.Note:Reference numbers are required for Credit Card and ACH/Transfer/Wire Payments. Once a Credit Card or ACH/Transfer/Wire Payment has been completed from an outside source, the reference number generated from that transaction must be included as part of the corresponding AR Cash Receipt.Check numbers are required for all payments made by check
 4. Click on the Distribute $ Button
 5. Distribute the amount of the payment towards any open invoice(s) listedAdd to Line (paying a partial amount of the invoice):Step 1: Click on the Add to Line Icon next to the invoice to be paidStep 2: Enter the amount of the invoice to payStep 3: Click on the Add/Update Button
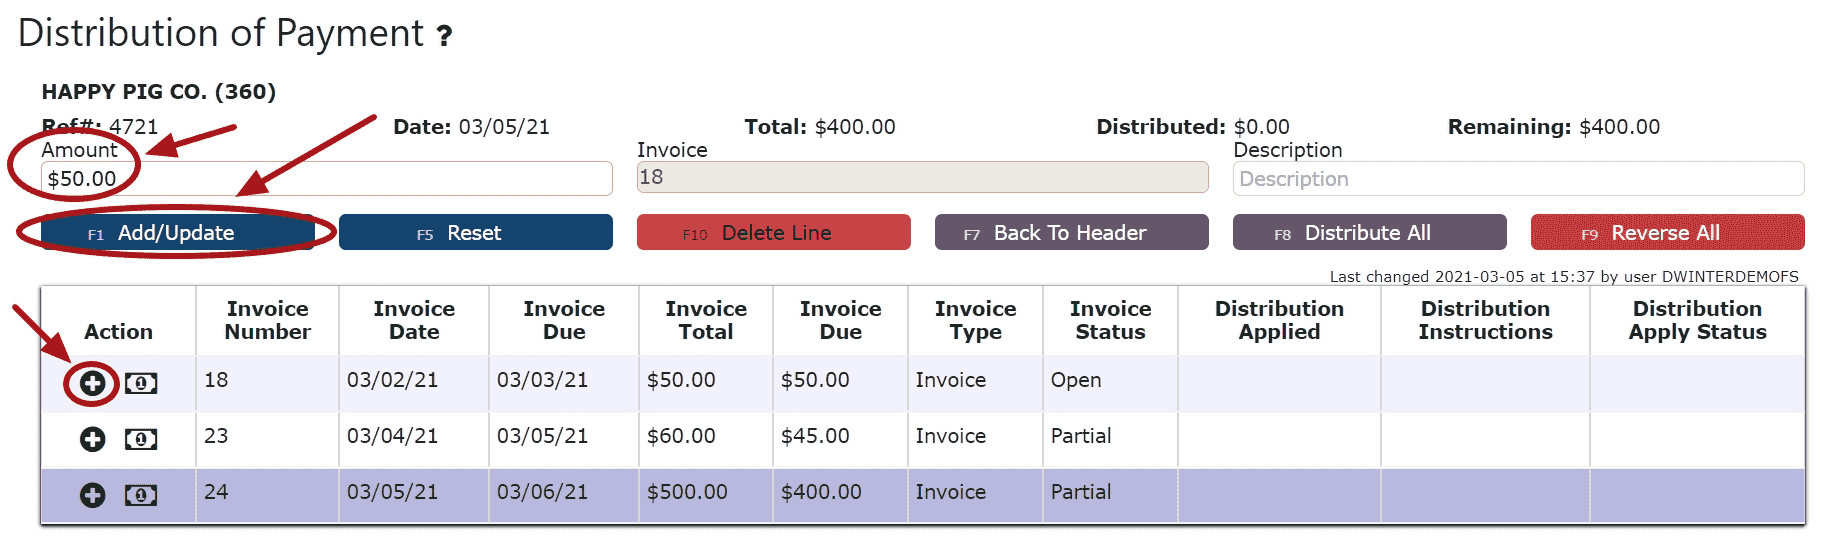 Auto Pay Remaining Balance (paying the entire amount of the invoice):Step 1: Click on the Auto Pay Remaining Balance Icon
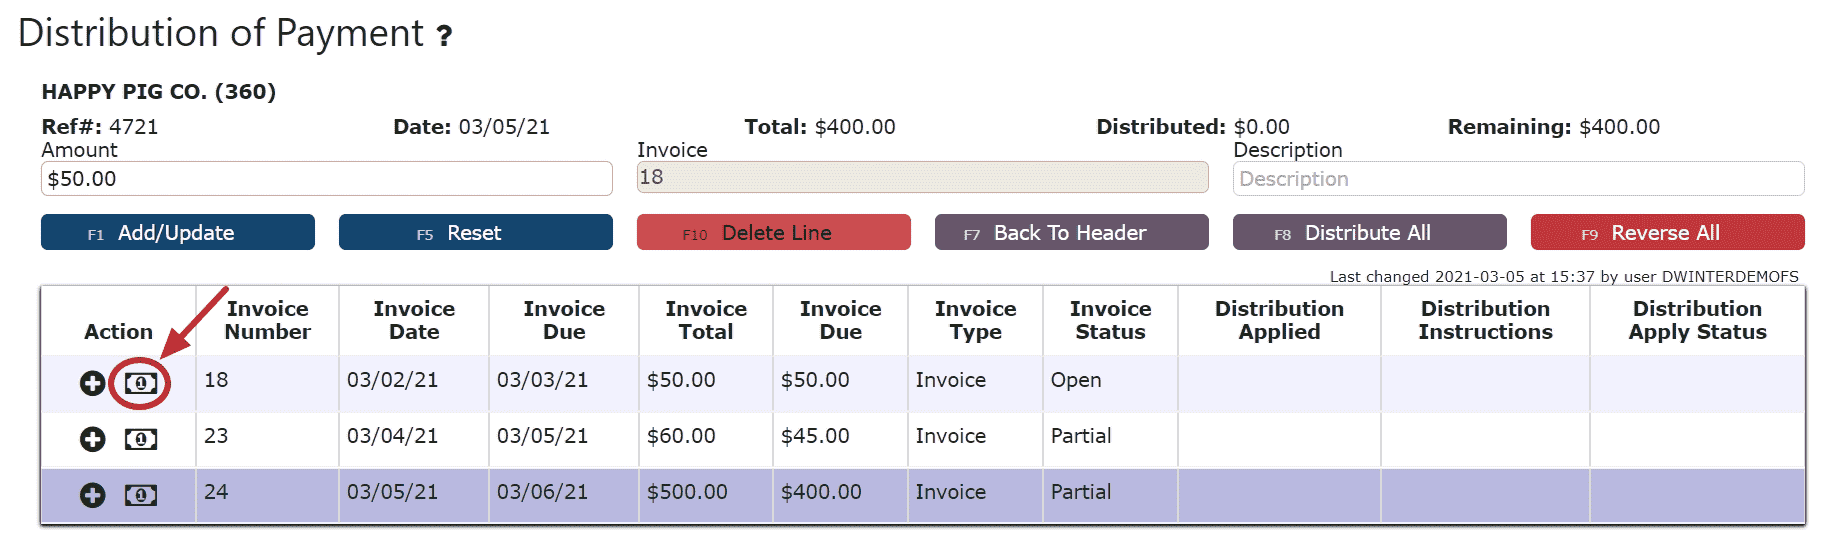 Distribute All (distributes the entire amount of the payment to the invoices starting from the top of the list, up until the payment amount runs out):Step 1: Click on the Distribute All Button
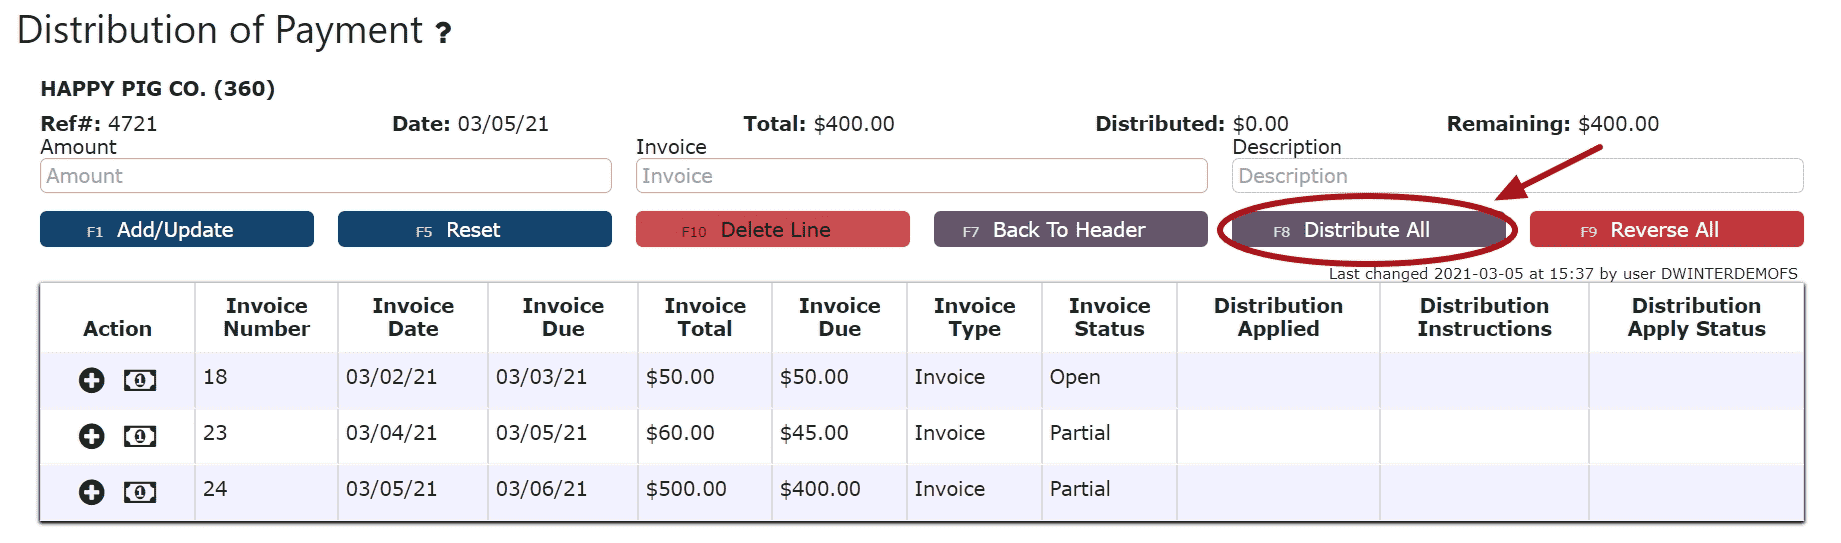 6. Click on the Back to Header Button
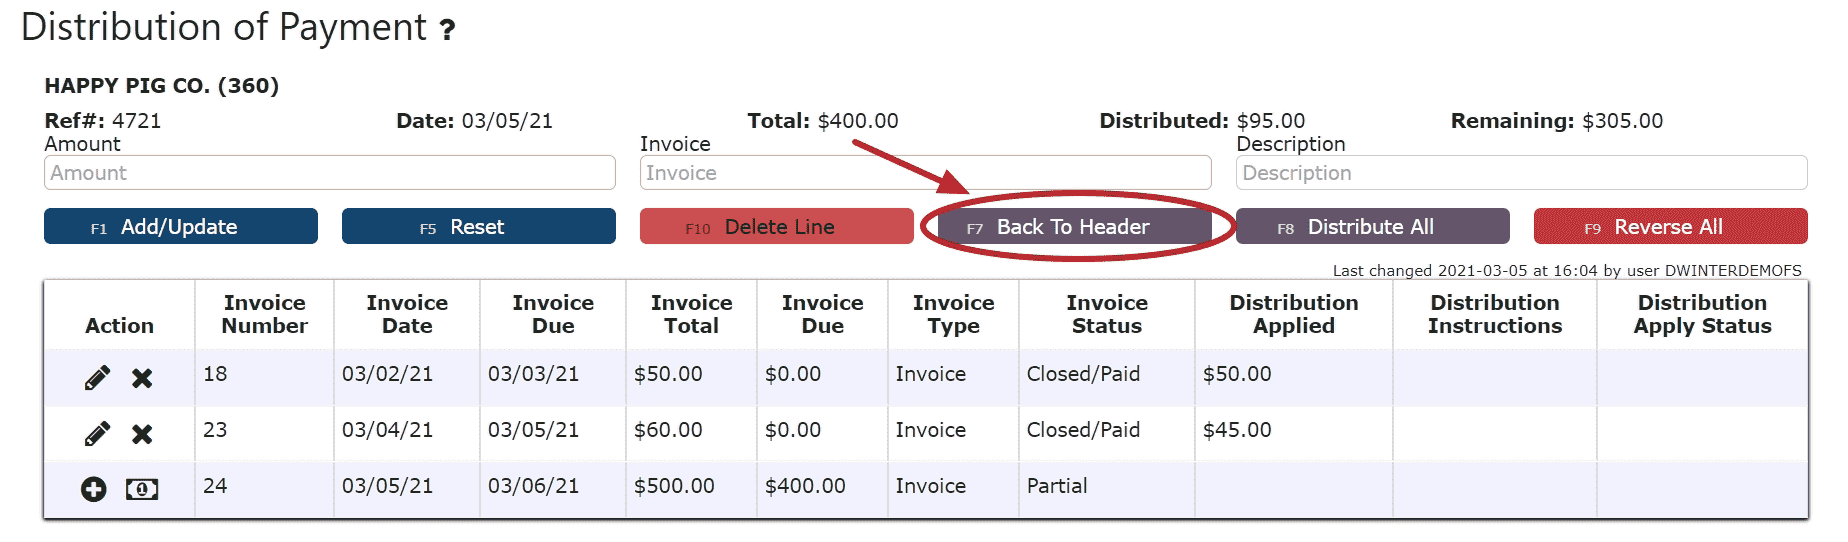 7. Click on the $ on Account Icon, then click Ok on the pop up prompt, to apply the remainder of the payment on account. The AR Cash Receipt will automatically close and be placed in Ready to Post Status.
 8. Review the Cash Receipt that is ready to post
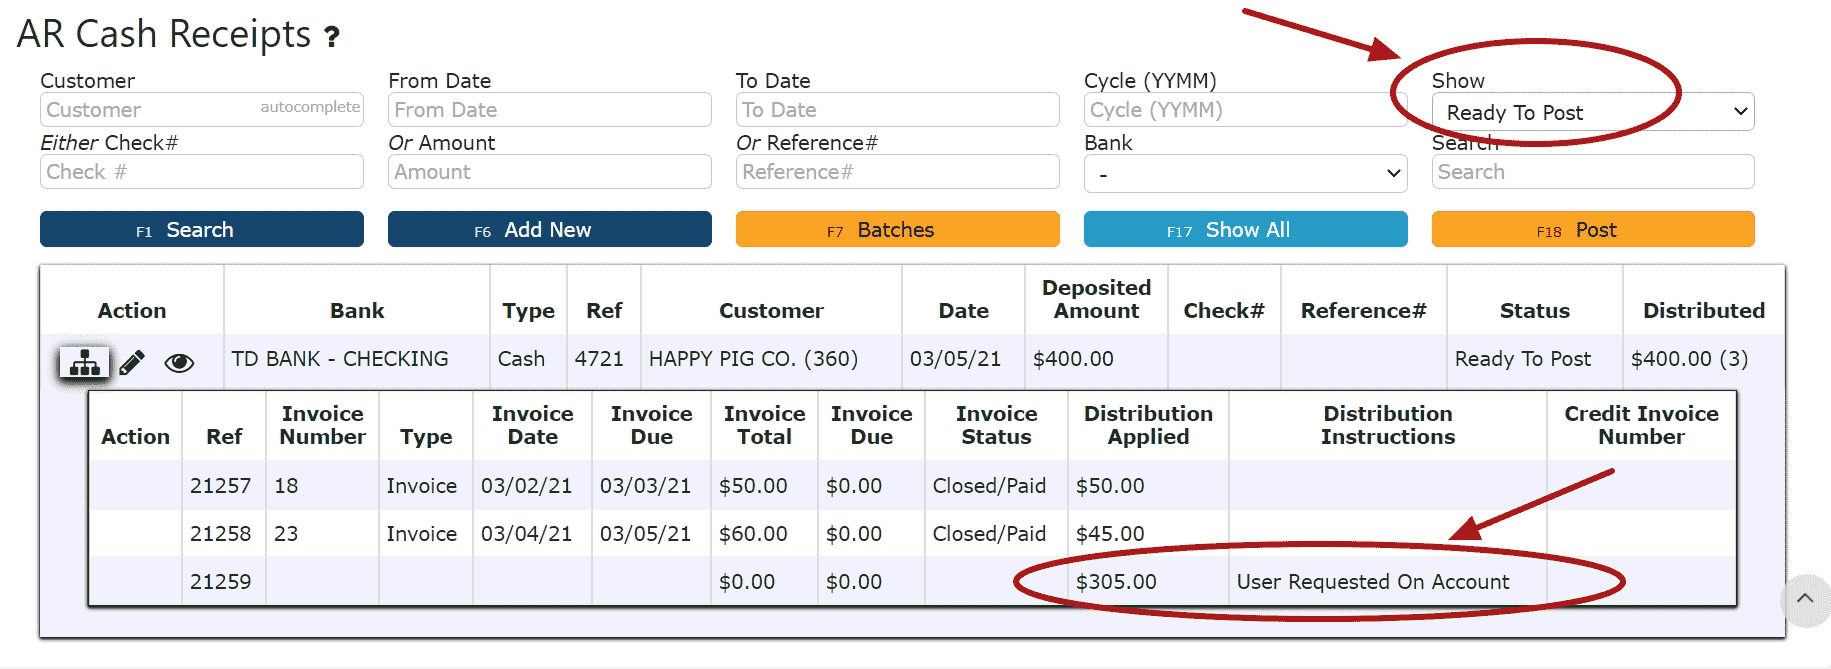 9. Click the Post ButtonNote:Cash Receipts will only post successfully if their date matches the end of day cutoff dateAny Cash Receipts left open/in progress will prevent the end of day process from automatically moving forward during the night
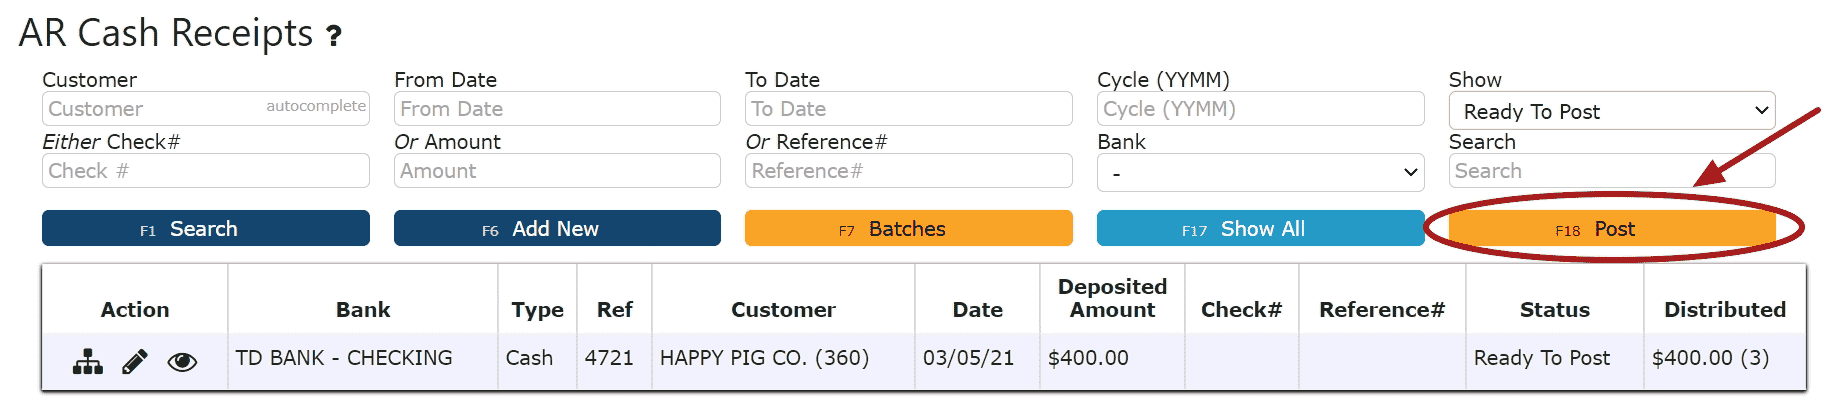
-
Editing an AR Cash Receipt
1. Click on the Edit Payment Icon (Pencil) next to the AR Cash Receipt to be edited
 If Closed:2. Click on the Open Button to re-open the AR Cash Receipt.
 3. Make any necessary changes to the details of the AR Cash Receipt
Reversing a Line (Reverses the distribution made to that particular invoice/credit):
Step 1: Click on the Reverse Line Icon (X) next to the invoice/credit to reverse payment on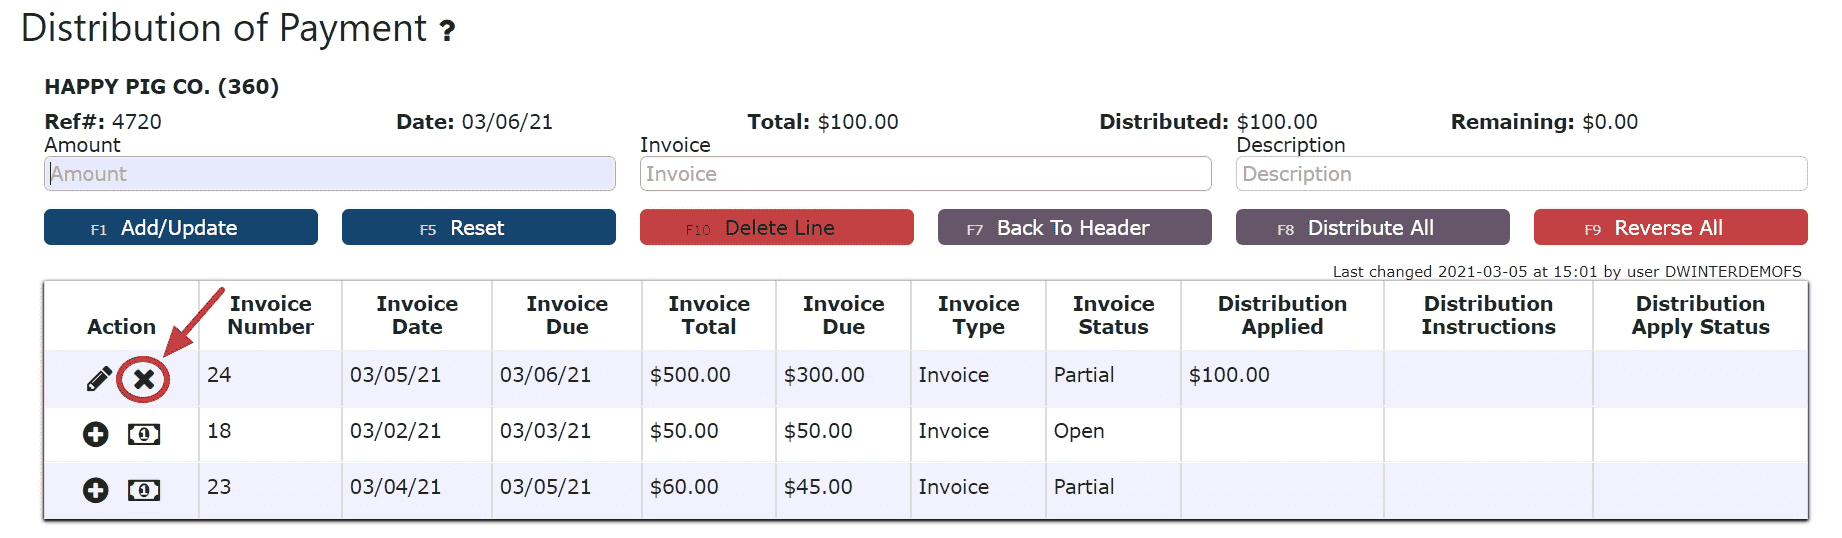
Deleting a Line: (Deletes the distribution made to that particular invoice/credit):
Step1: Click on the Edit Line Icon (Pencil)
Step 2: Click on the Delete Line Button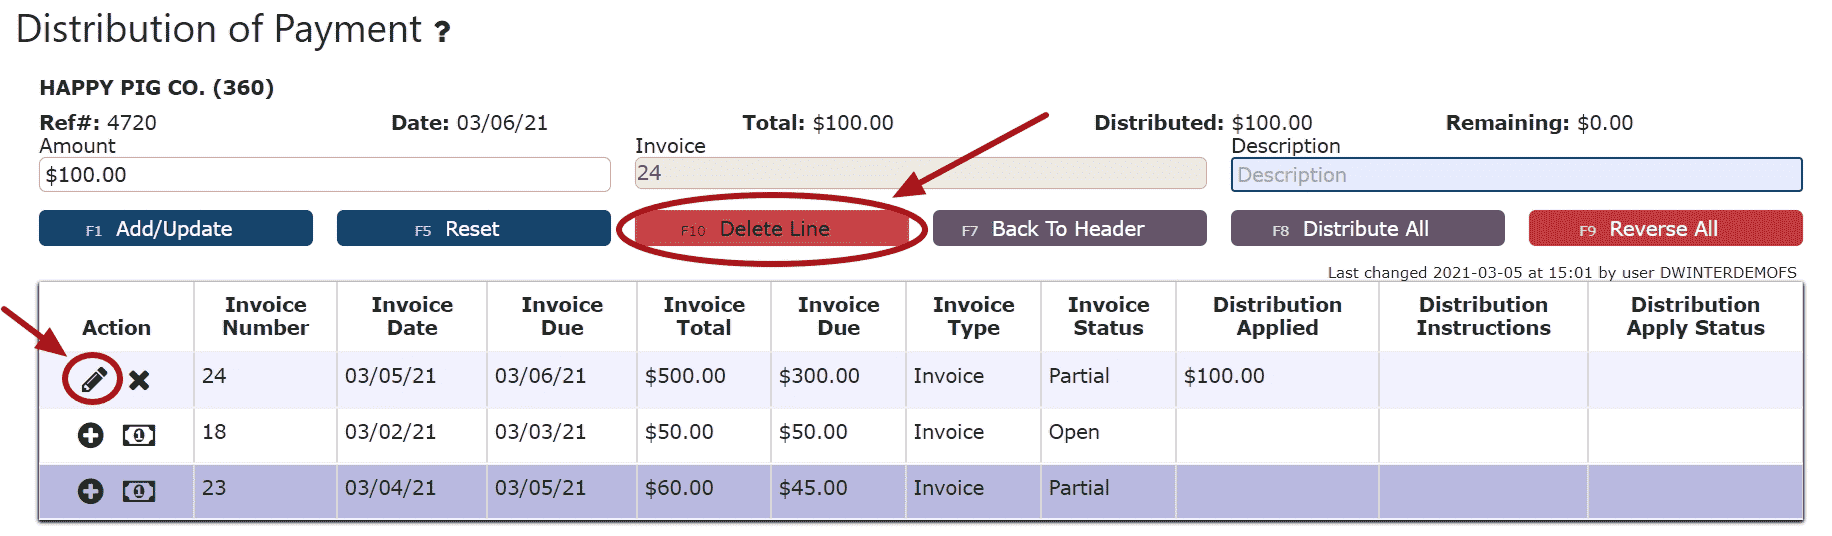
Reversing All Distributions (Deletes/Reverses all distributions made across all invoices/credits:
Step 1: Click on the Reverse All Button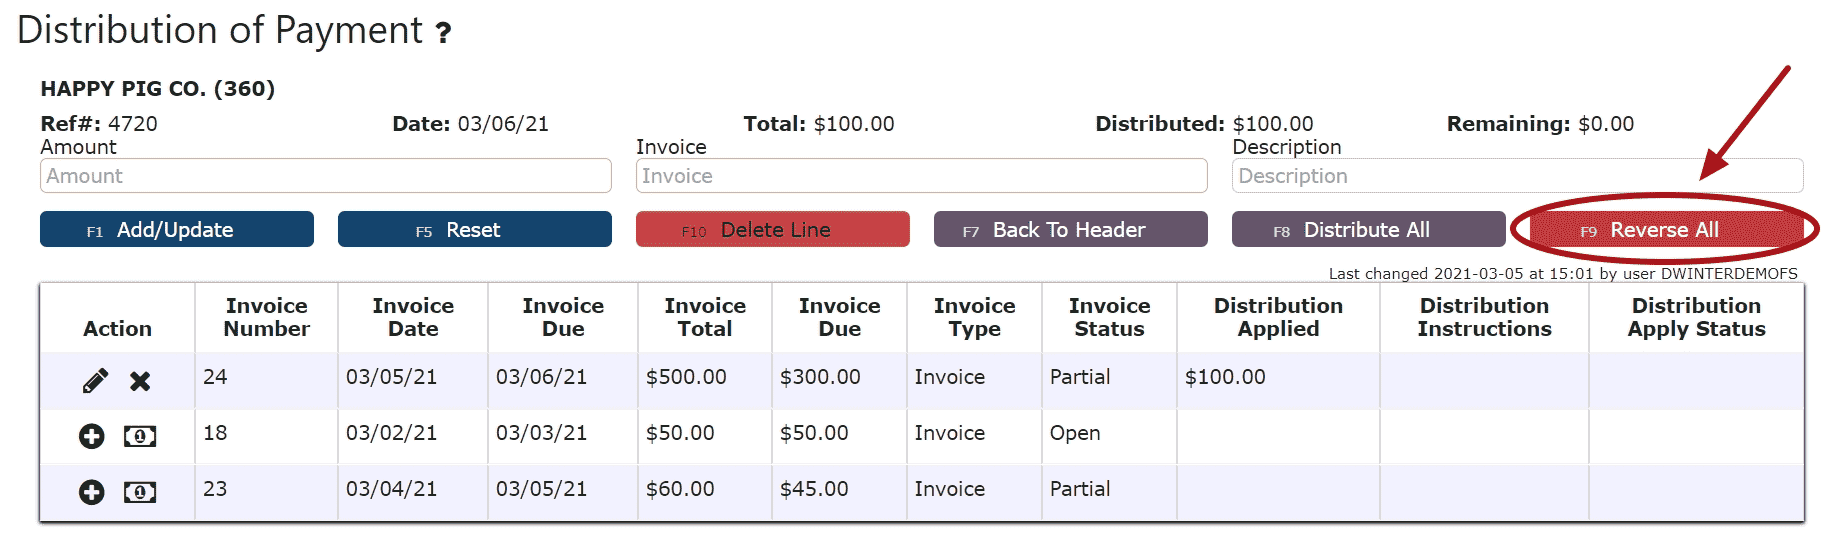
Editing a Line:
Step 1: Click on the Edit Line Icon (Pencil)
Step 2: Make Any necessary changes to the amount and/or description for that line
Step 3: Click on the Add/Update Button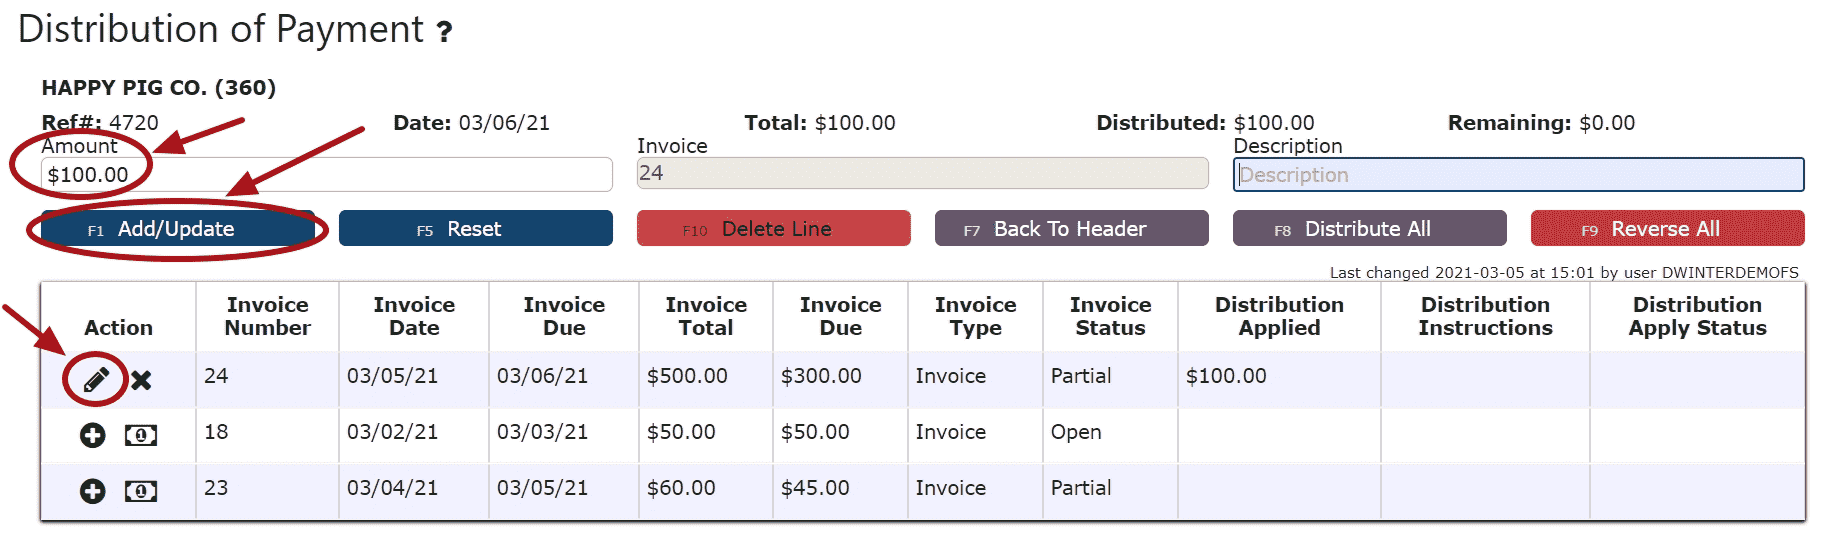
5. Click on the Back to Header Button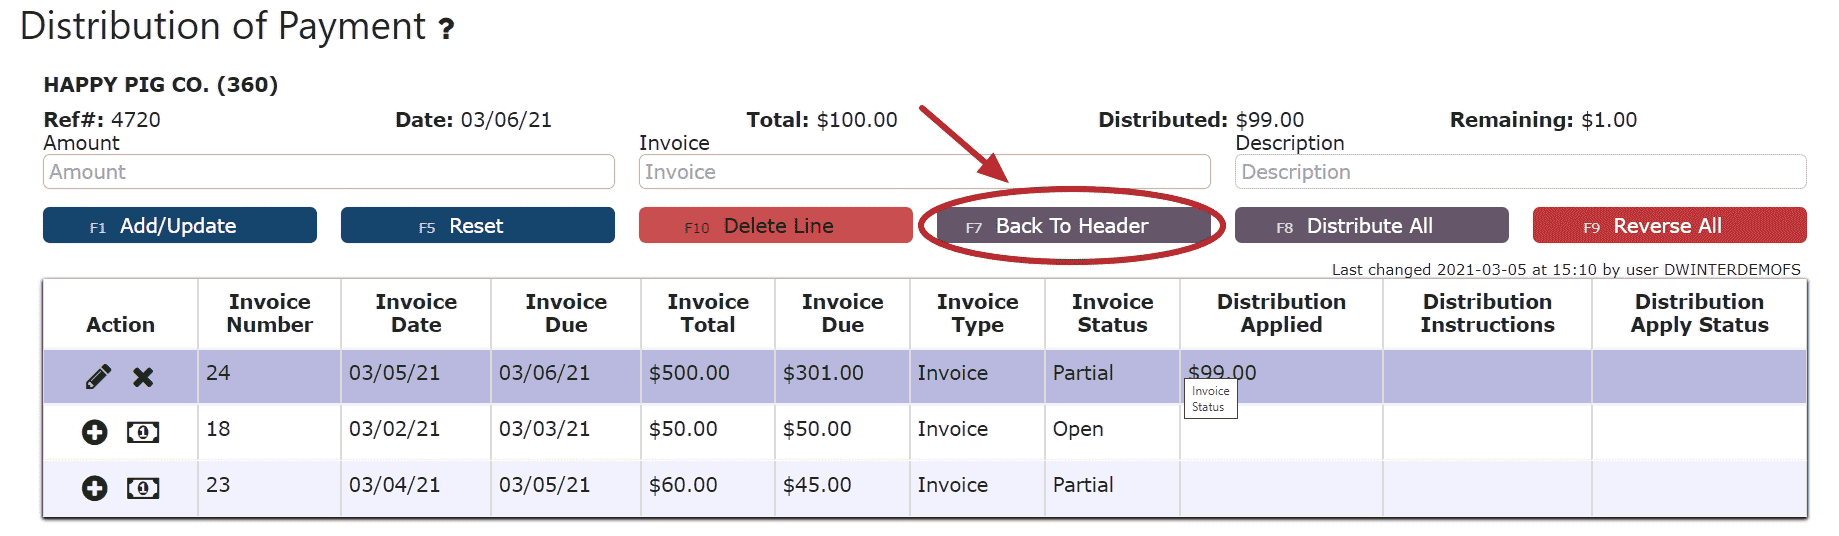 6. Make any necessary changes to the Header, click the Distribute $ Button to save any Total Payment changes, then go back to the header and click on the Close Button if ready to close and post the AR Cash Receipt
 7. Click on the Post Button to post the AR Cash ReceiptNote: AR Cash Receipts will only post successfully if their date matches the end of day cutoff dateAny AR Cash Receipts left open/in progress will prevent the end of day process from automatically moving forward during the night
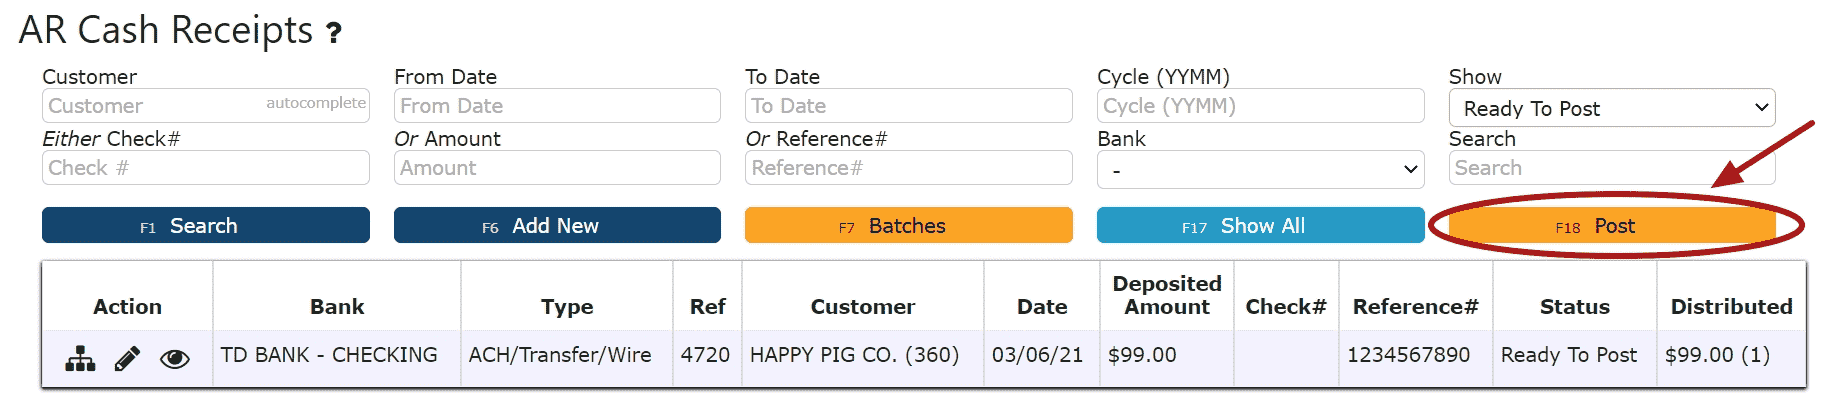 If Open:2. Adjust any of the header information as necessary.
 3. Click on the Distribute $ Button to make changes to the details of the AR Cash Receipt
 4. Make any necessary changes to the details of the AR Cash Receipt
Reversing a Line (Reverses the distribution made to that particular invoice/credit):
Step 1: Click on the Reverse Line Icon (X) next to the invoice/credit to reverse payment on
Deleting a Line: (Deletes the distribution made to that particular invoice/credit):
Step1: Click on the Edit Line Icon (Pencil)
Step 2: Click on the Delete Line Button
Reversing All Distributions (Deletes/Reverses all distributions made across all invoices/credits:
Step 1: Click on the Reverse All Button
Editing a Line:
Step 1: Click on the Edit Line Icon (Pencil)
Step 2: Make Any necessary changes to the amount and/or description for that line
Step 3: Click on the Add/Update Button
5. Click on the Back to Header Button6. Click on the Close Button if ready to close and post the AR Cash Receipt7. Click on the Post Button to post the entryNote:AR Cash Receipts will only post successfully if their date matches the end of day cutoff dateAny AR Cash Receipts left open/in progress will prevent the end of day process from automatically moving forward during the night
-
Deleting an AR Cash Receipt
1. Click on the Edit Payment Icon (Pencil) next to the AR Cash Receipt to be deletedIf Closed:2. Click on the Open Button to re-open the AR Cash Receipt

3. Click on the Back to Header Button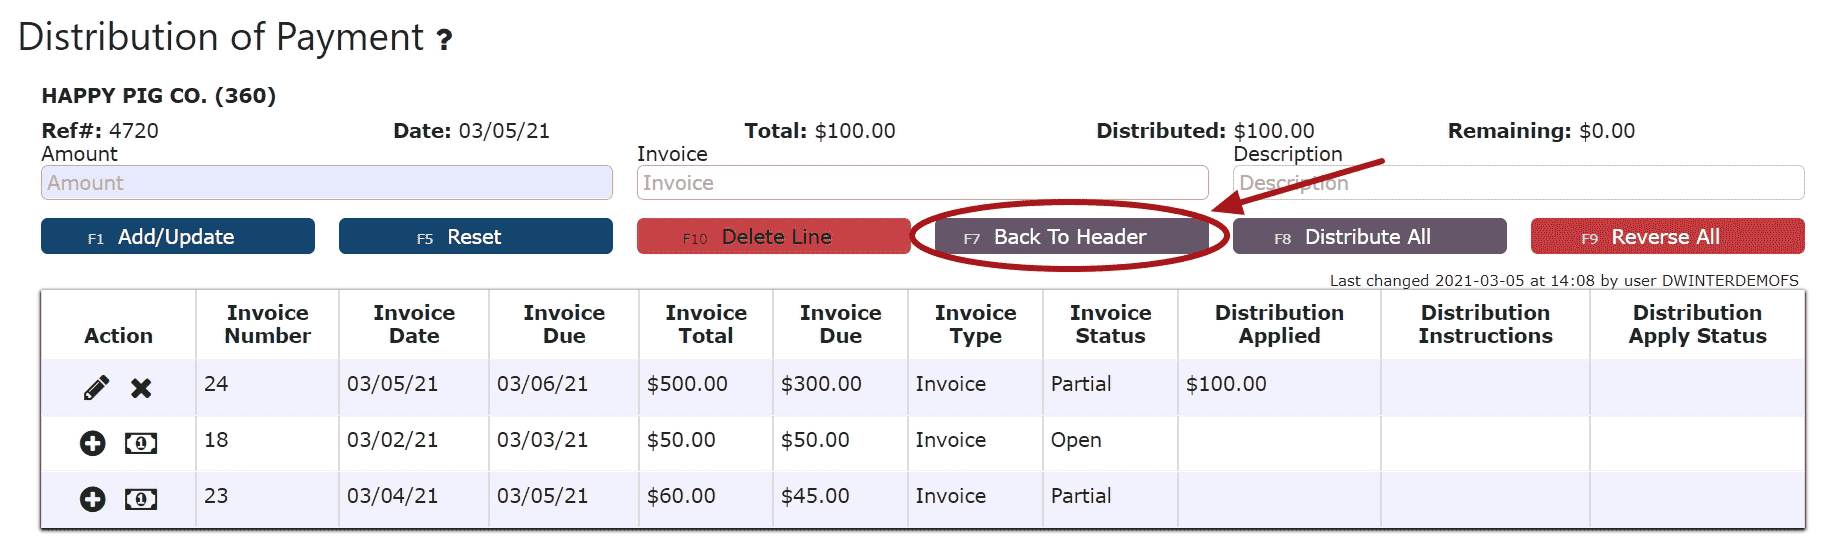 4. Click on the Delete Payment Button, then click Ok on the pop up promptNote:Once deleted, an AR Cash Receipt is permanently removed and can no longer be retrieved
 If Open:2. Click on the Delete Payment Button, then click Ok on the pop up promptNote: Once deleted, an AR Cash Receipt is permanently removed and can no longer be retrieved
AR Credits
-
Key Information
Create and maintain on account credits and credits against invoices.Credit Statuses:In Progress -> the credit is open and is able to be editedPosted -> the credit has been posted and cannot be editedReady to Post -> the credit has been closed and is ready for posting, it cannot be edited when closed, but can be reopened if edits are necessary
Note: Posting will only successfully go through if the credit date equals the current cutoff date
-
Creating and Posting Against Invoice Credits
1. Go to the Accounting Menu and click on the AR Credits Sub-Menu
 2. Click on the Add New Button
 3. Enter the customer, the credit date, select Against Invoice as the credit type, fill in the credit amount, the invoice #, and select the reason for the credit (A reason code here at the header is required if choosing to use the auto credit/credit all options when distributing). Fill in any additional notes if applicable.
 4. Click on the Distribute Credit Button
 5. Distribute the amount of the credit towards any open invoice(s) listedEdit Line (crediting a partial amount of the invoice):Step 1: Click on the Edit Line Icon next to the invoice to be creditedStep 2: Enter the Invoice Quantity to Credit and select a reason for the creditNote: Credits against invoices must be done per quantity, otherwise On Account Credits must be used
Step 3: Click on the Add/Update Button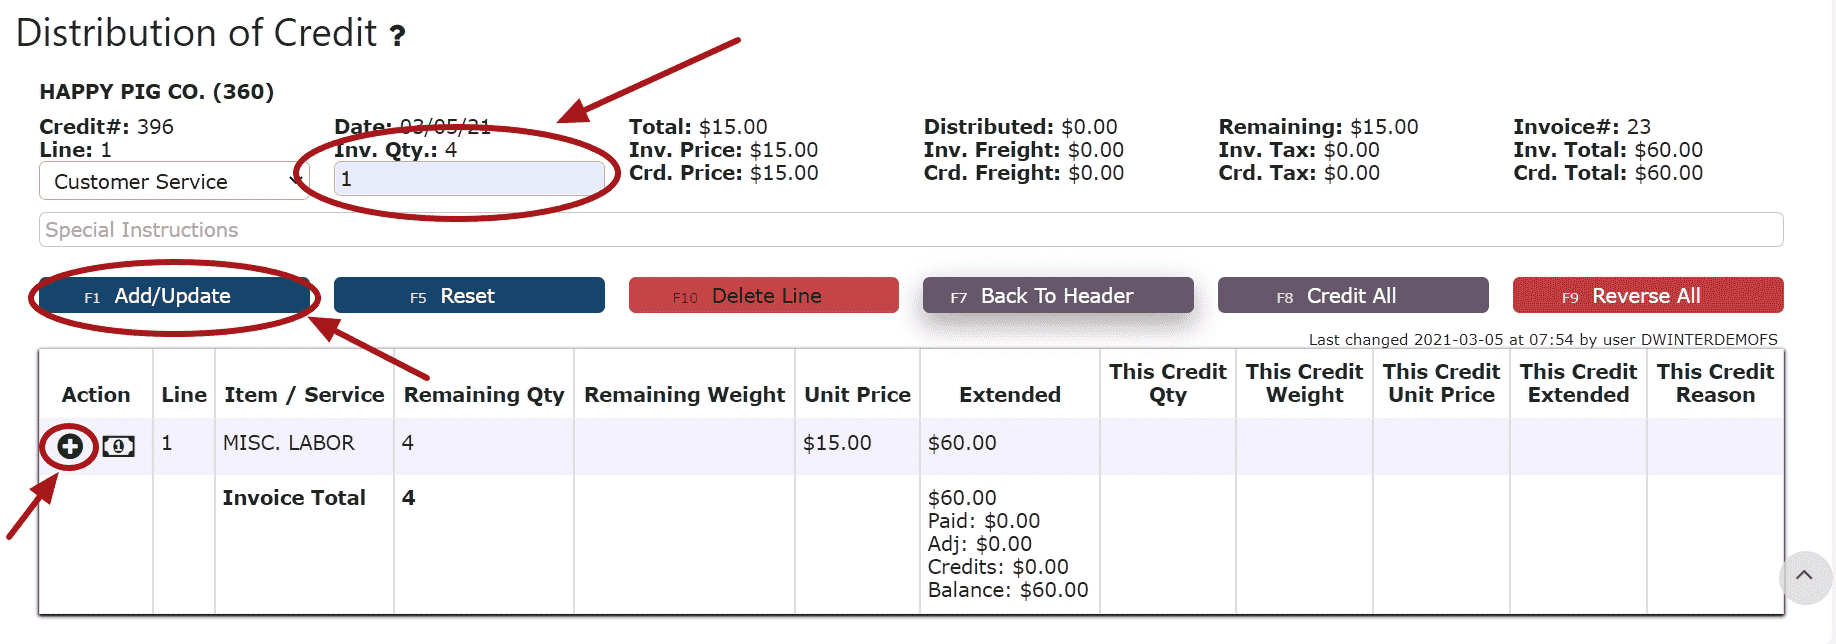 Auto Credit Remaining Balance (crediting the entire amount of the invoice):Note: A reason at the header is required if choosing to use the auto credit/credit all options when distributingStep 1: Click on the Auto Credit Remaining Balance Icon
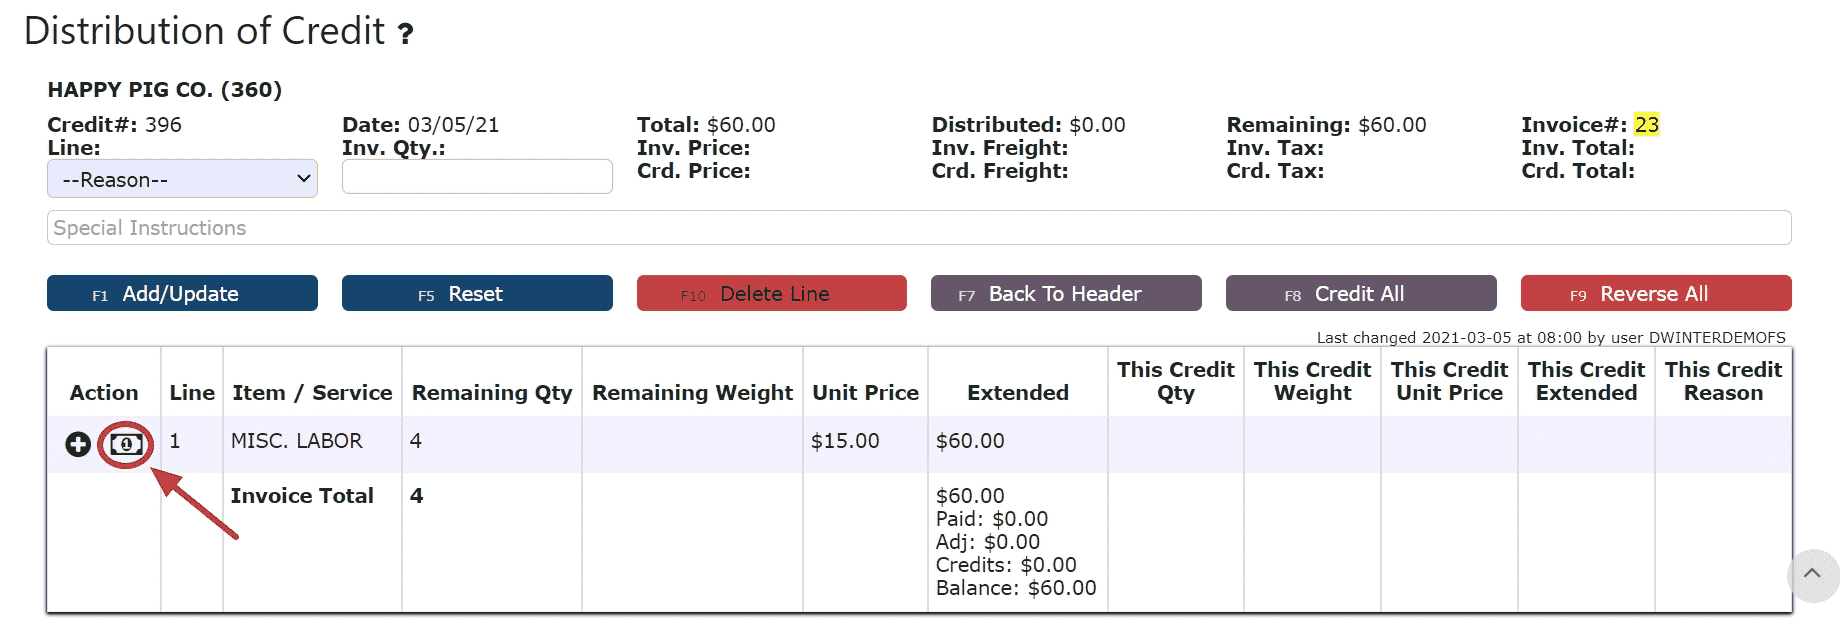 Credit All (distributes credits to all the invoices for the full remaining amounts):Step 1: Click on the Credit All Button
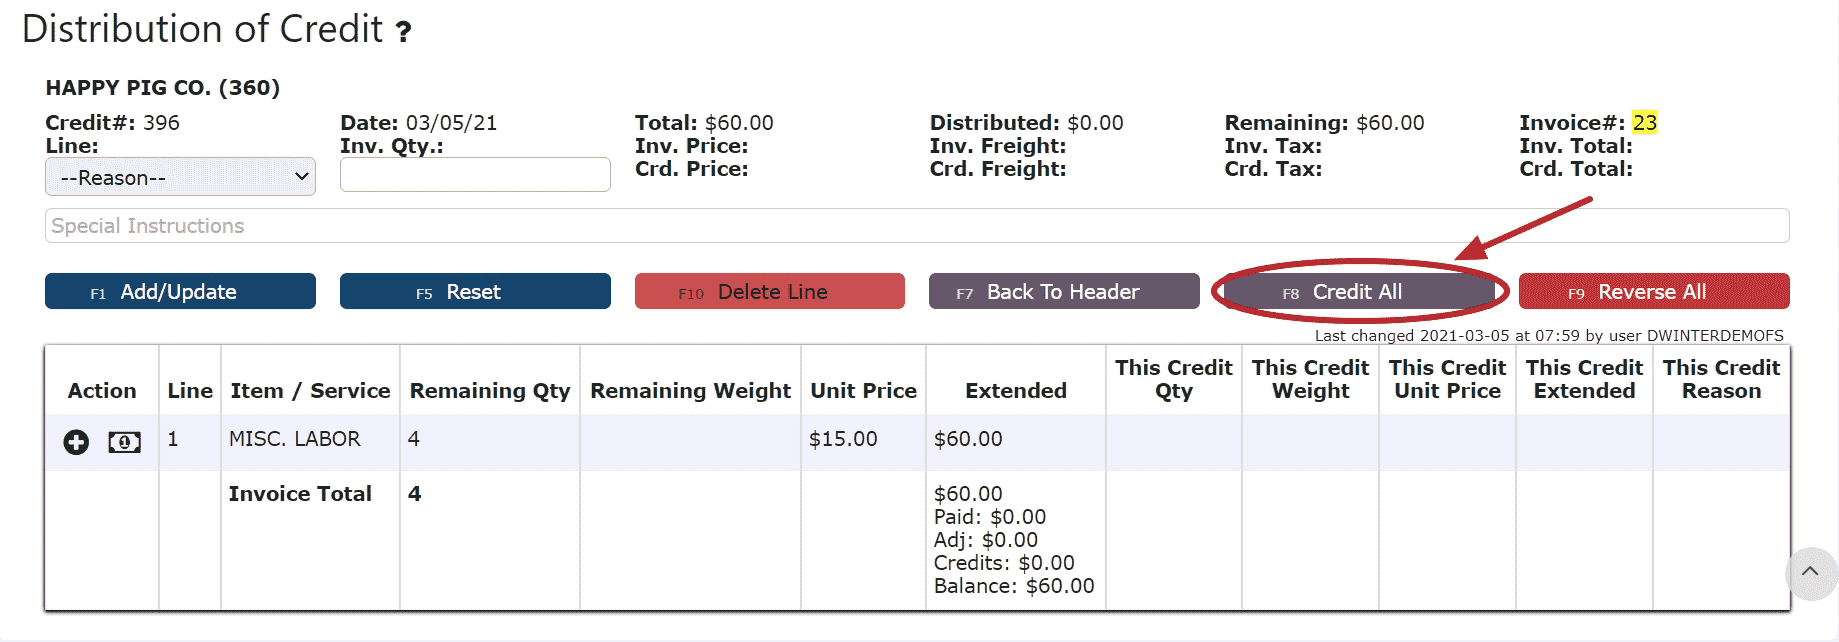 6. Click on the Back to Header Button
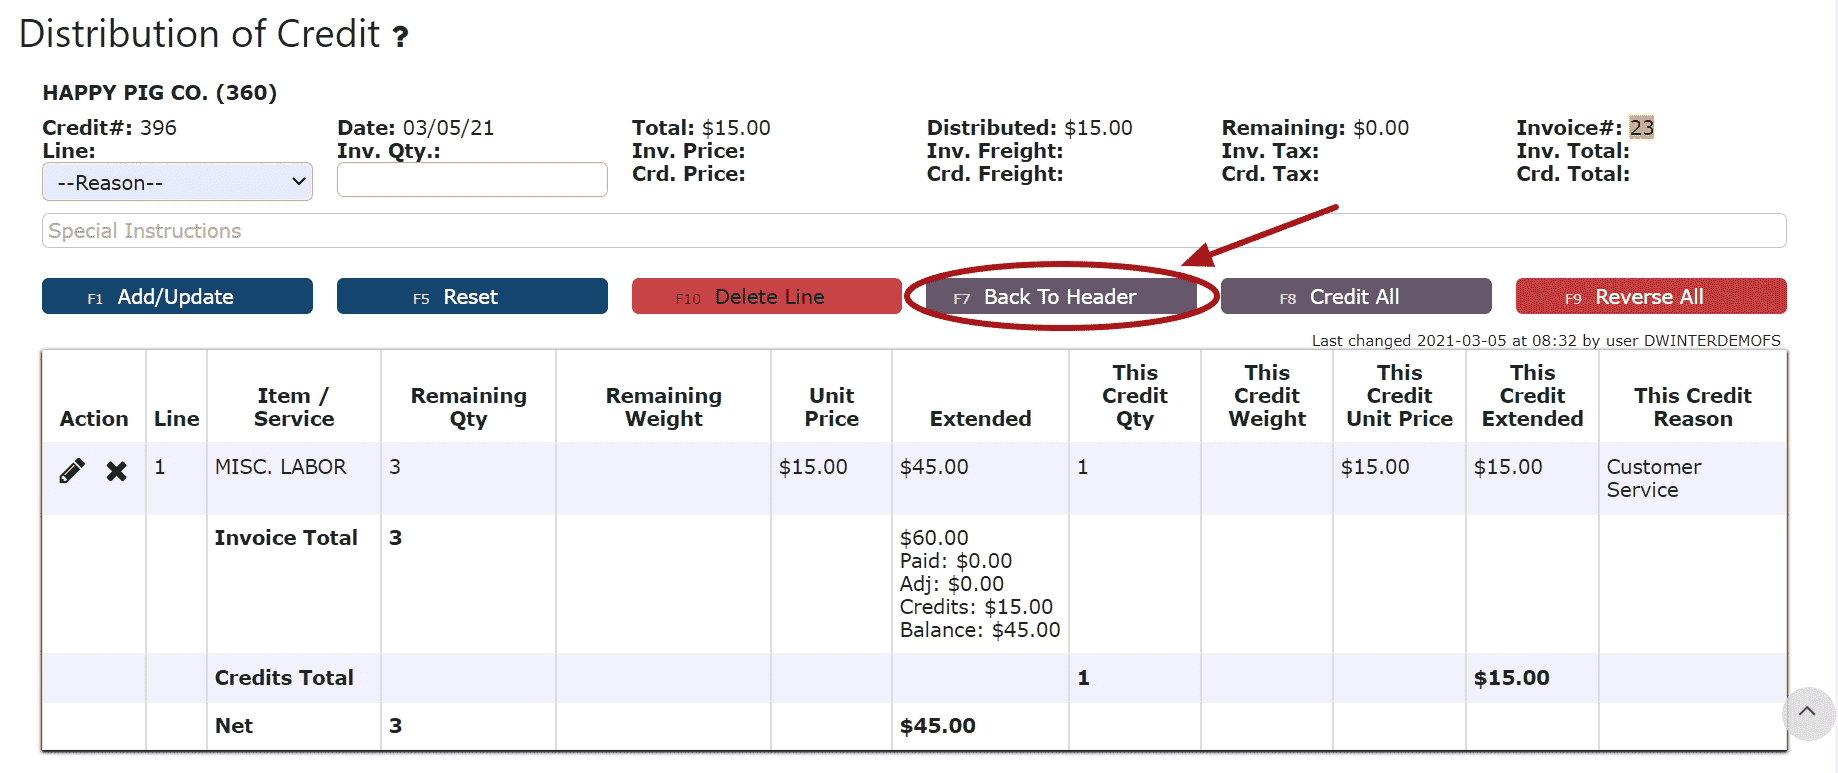 7. Click on the Close Credit ButtonNote: Once closed, the credit is ready to post
 8. Review the Credit that is ready to post
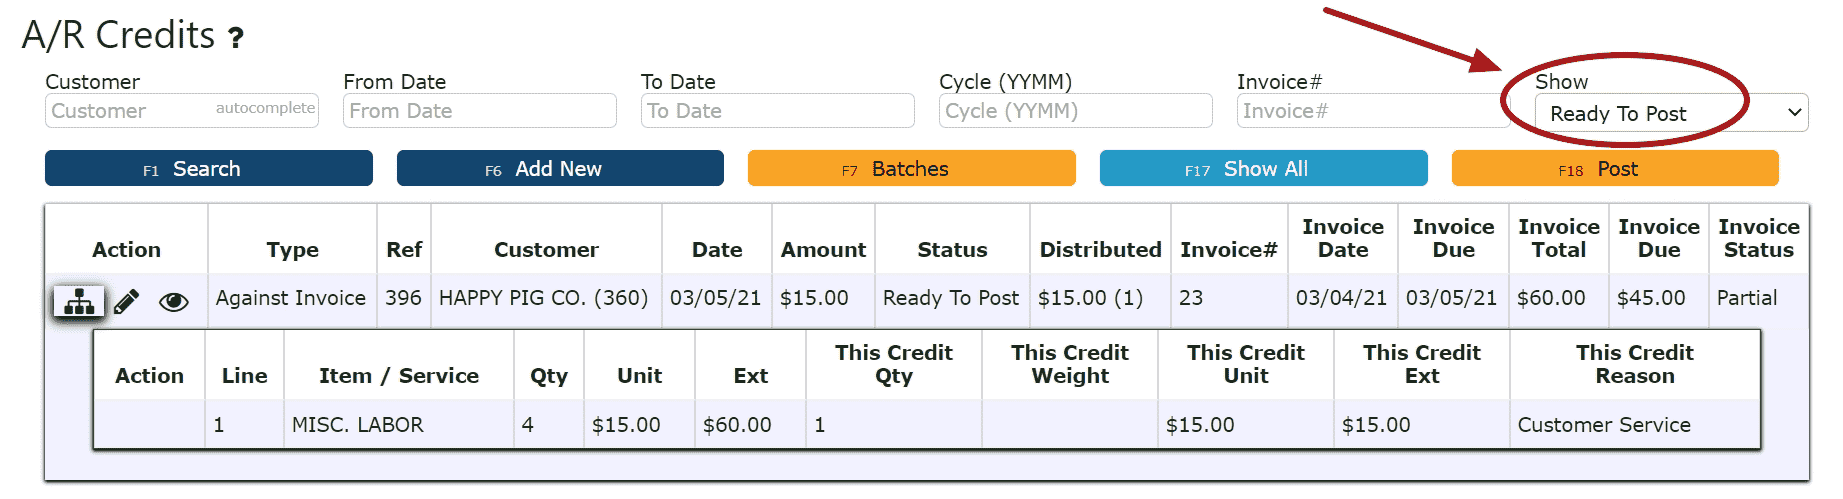 9. Click the Post ButtonNote:Credits will only post successfully if their date matches the end of day cutoff dateAny Credits left open/in progress will prevent the end of day process from automatically moving forward during the night
-
Creating and Posting On Account Credits
1. Go to the Accounting Menu and click on the AR Credits Sub-Menu
2. Click on the Add New Button
3. Enter the customer, the credit date, select On Account Credit as the credit type, fill in the credit amount, and select the reason for the credit. Fill in any additional notes if applicable.
4. Click on the Save & Exit Button
5. The On Account Credit has been automatically closed and is now Ready to Post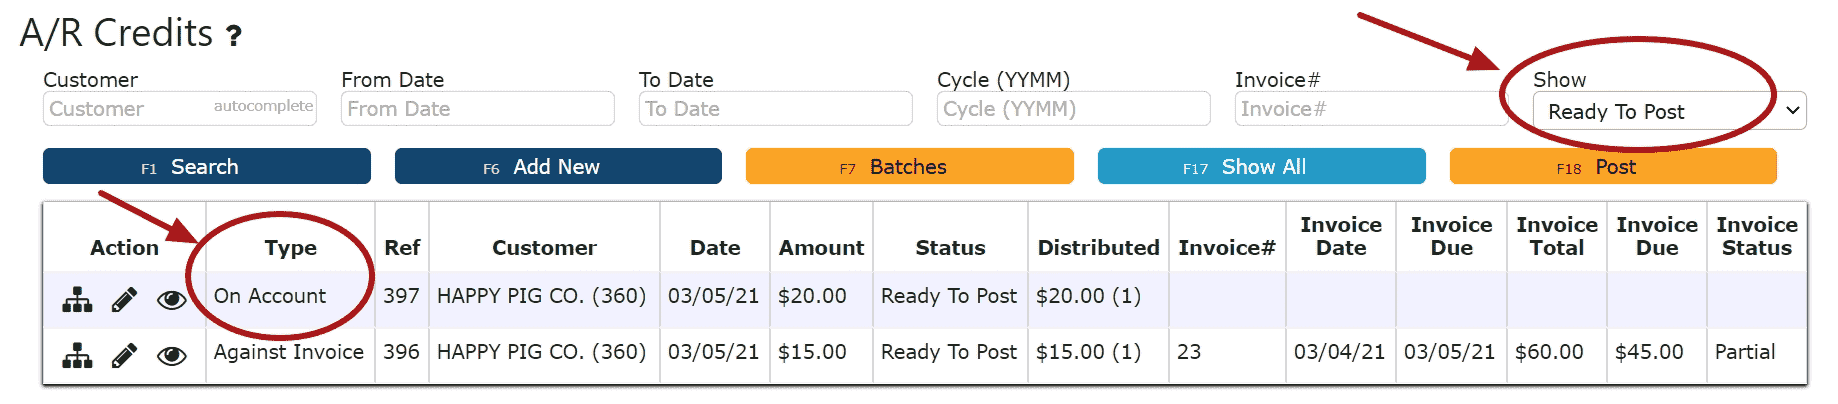
6. Review the On Account Credit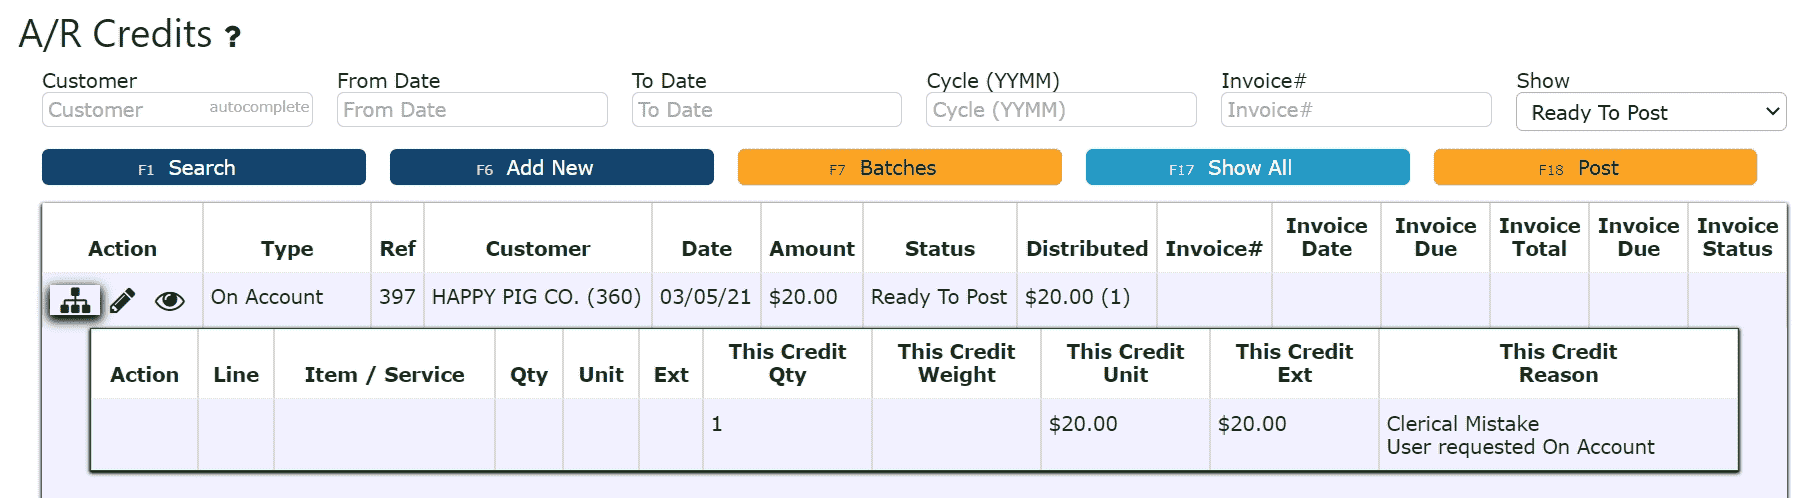
7. Click on the Post ButtonNote:Credits will only post successfully if their date matches the end of day cutoff dateAny Credits left open/in progress will prevent the end of day process from automatically moving forward during the night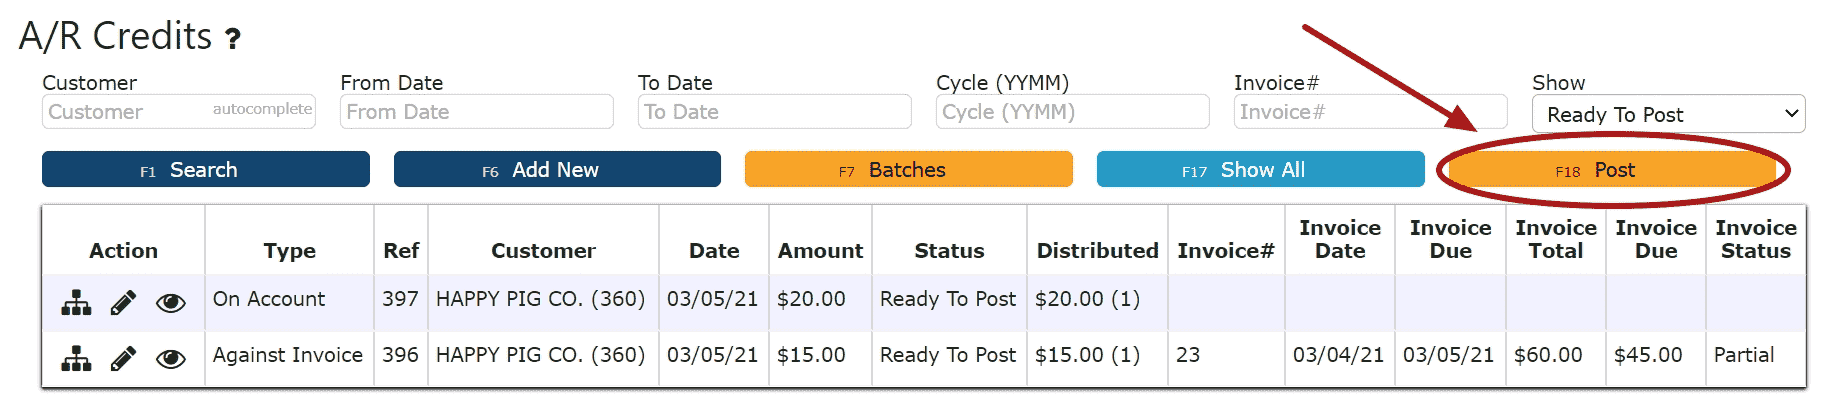
8. The On Account Credit is now ready to be applied to any open invoice through a cash receipt. Proceed to follow the steps for Applying an On Account Credit through an AR Cash Receipt.
-
Editing AR Credits
1. Click on the Edit Credit Icon (Pencil) next to the AR Credit to be edited
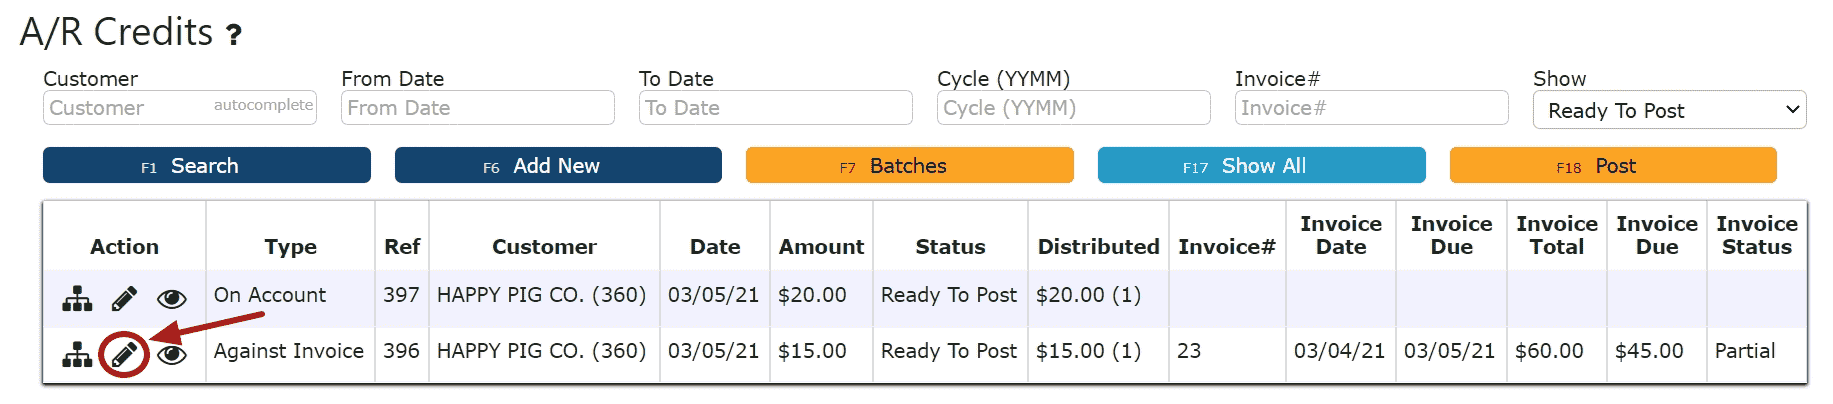 If Closed:2. Click on the Open Credit Button to re-open the AR Credit.
 4. Make any necessary changes to the details of the AR Credit (Against Invoice Credits Only)Reversing a Line (Reverses the distribution made to that particular invoice):Step 1: Click on the Reverse Line Icon (X) next to the invoice to reverse the credit applied to that invoice
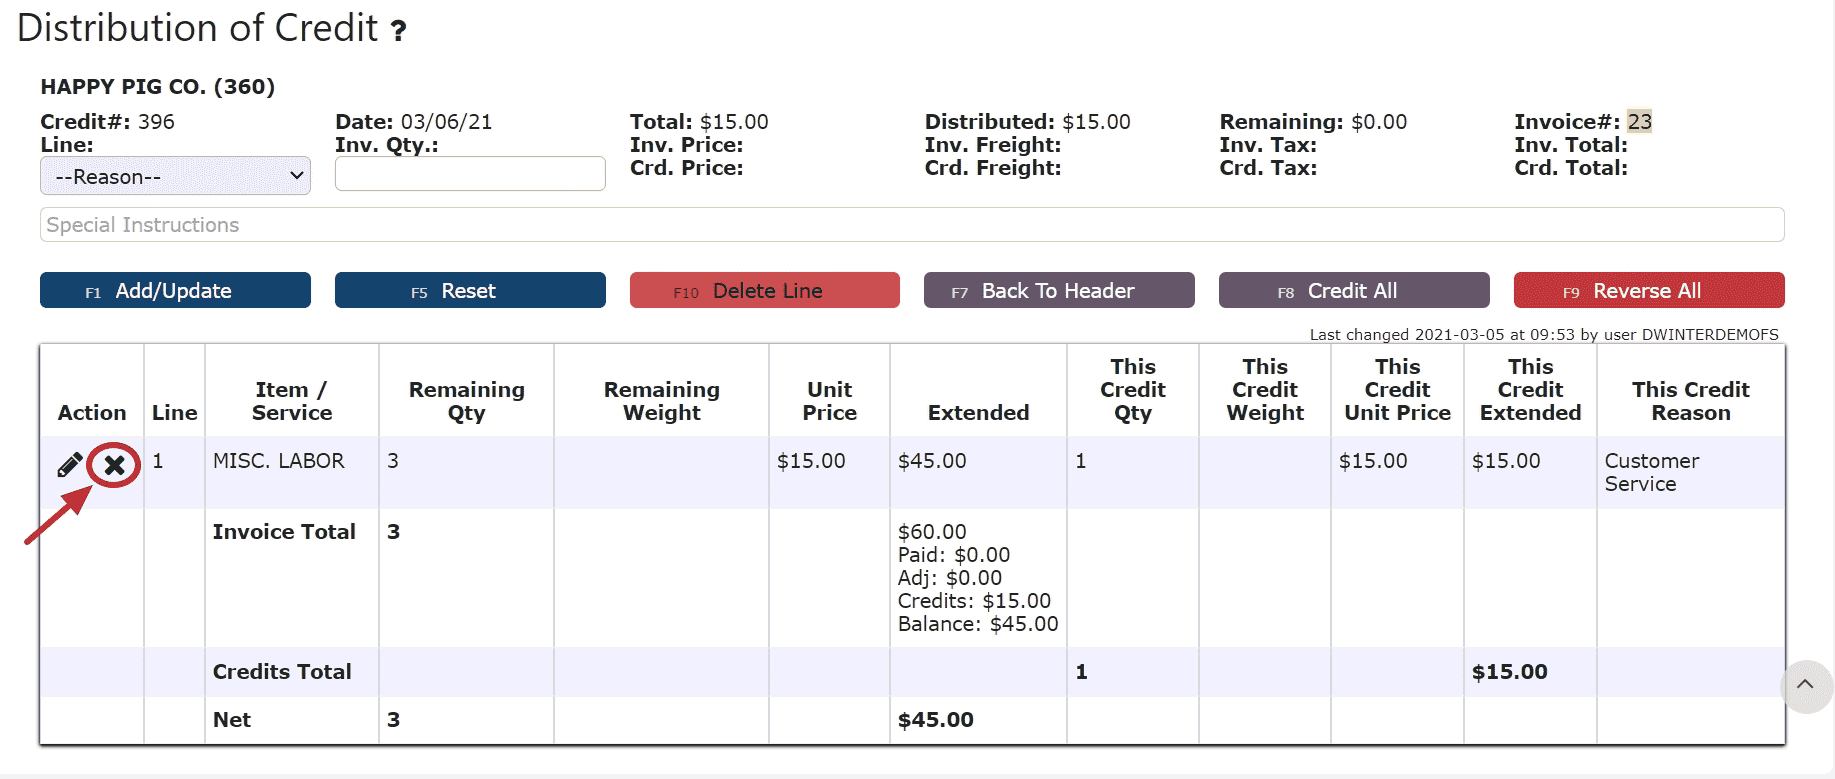 Deleting a Line: (Deletes the distribution made to that particular invoice):Step1: Click on the Edit Line Icon (Pencil)Step 2: Click on the Delete Line Button
Step 3: Click OK on the pop prompt to confirm the submission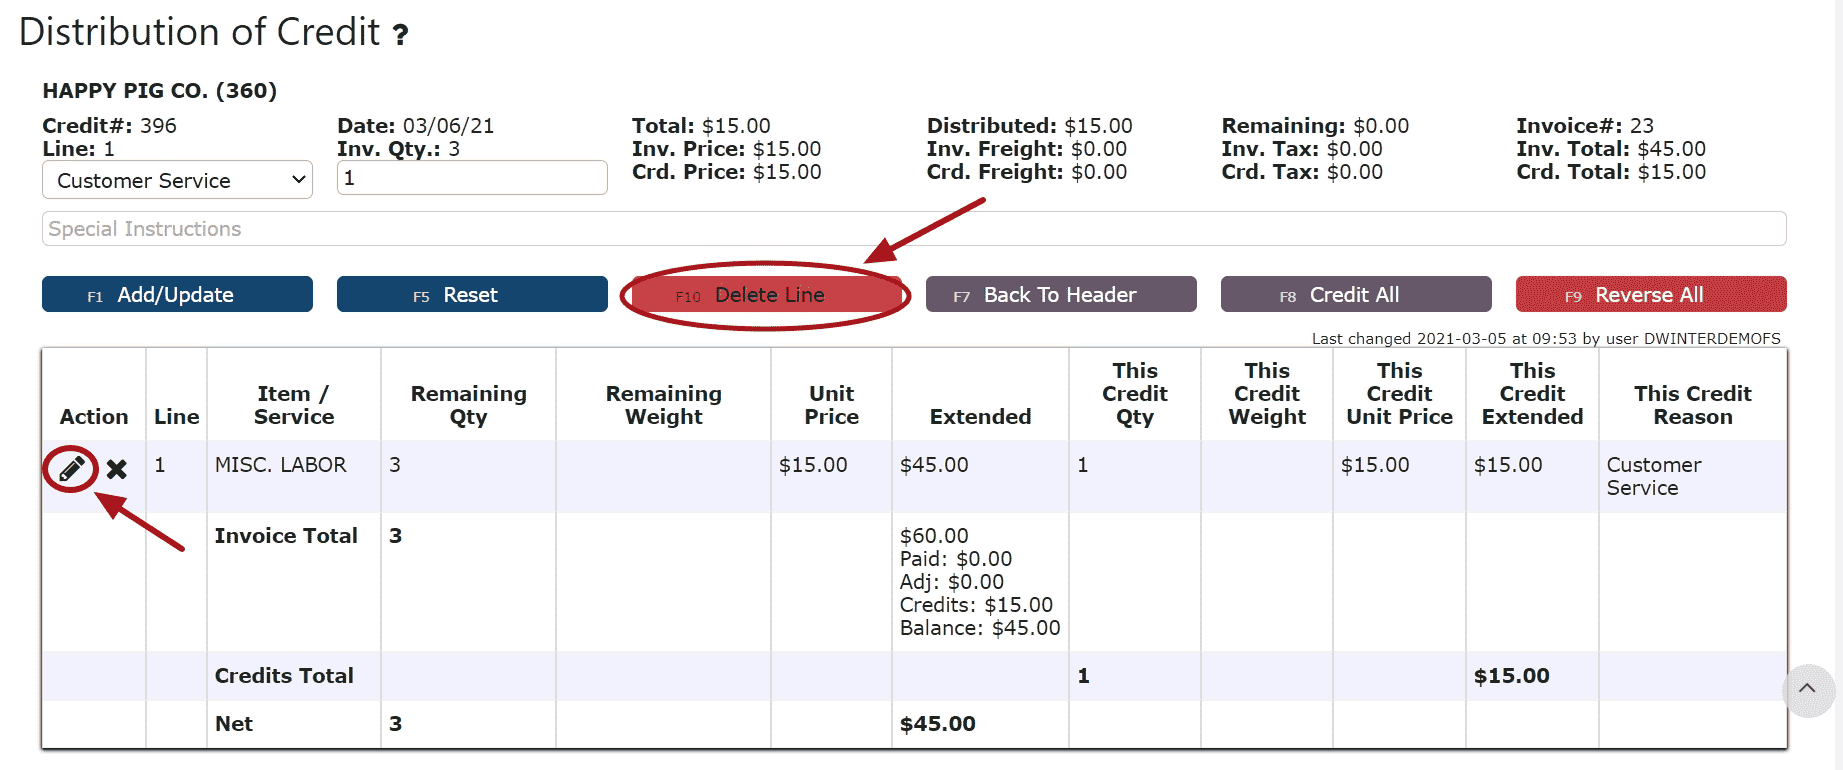 Reversing All Distributions (Deletes/Reverses all distributions made across all invoices:Step 1: Click on the Reverse All Button
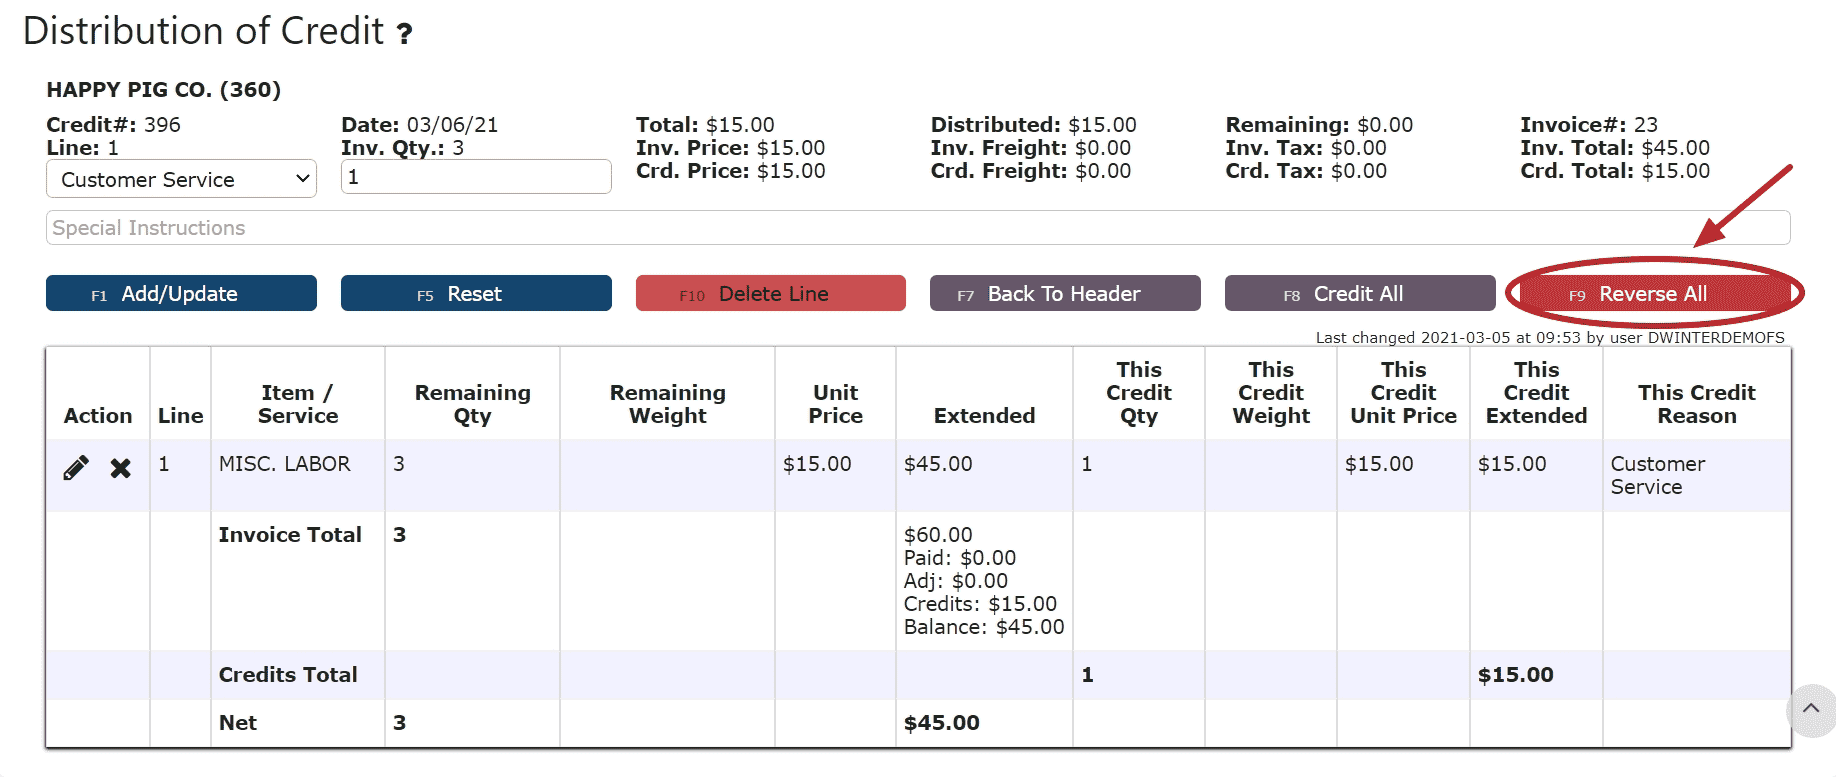 Editing a Line:Step 1: Click on the Edit Line Icon (Pencil)Step 2: Make Any necessary changes to the amount and/or description for that lineStep 3: Click on the Add/Update Button
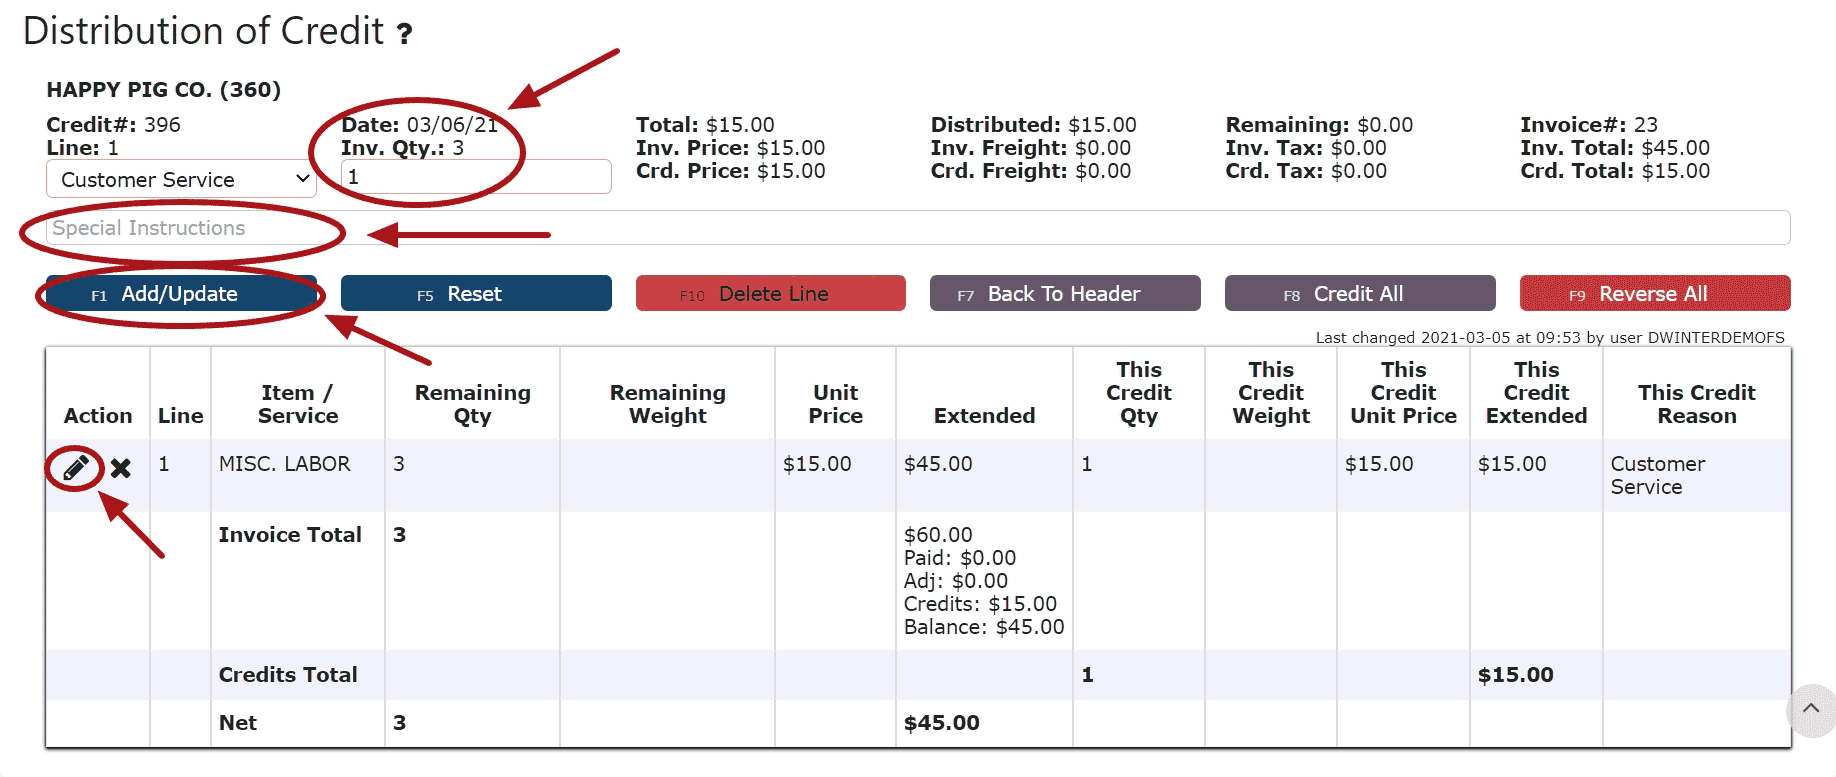 5. Click on the Back to Header Button
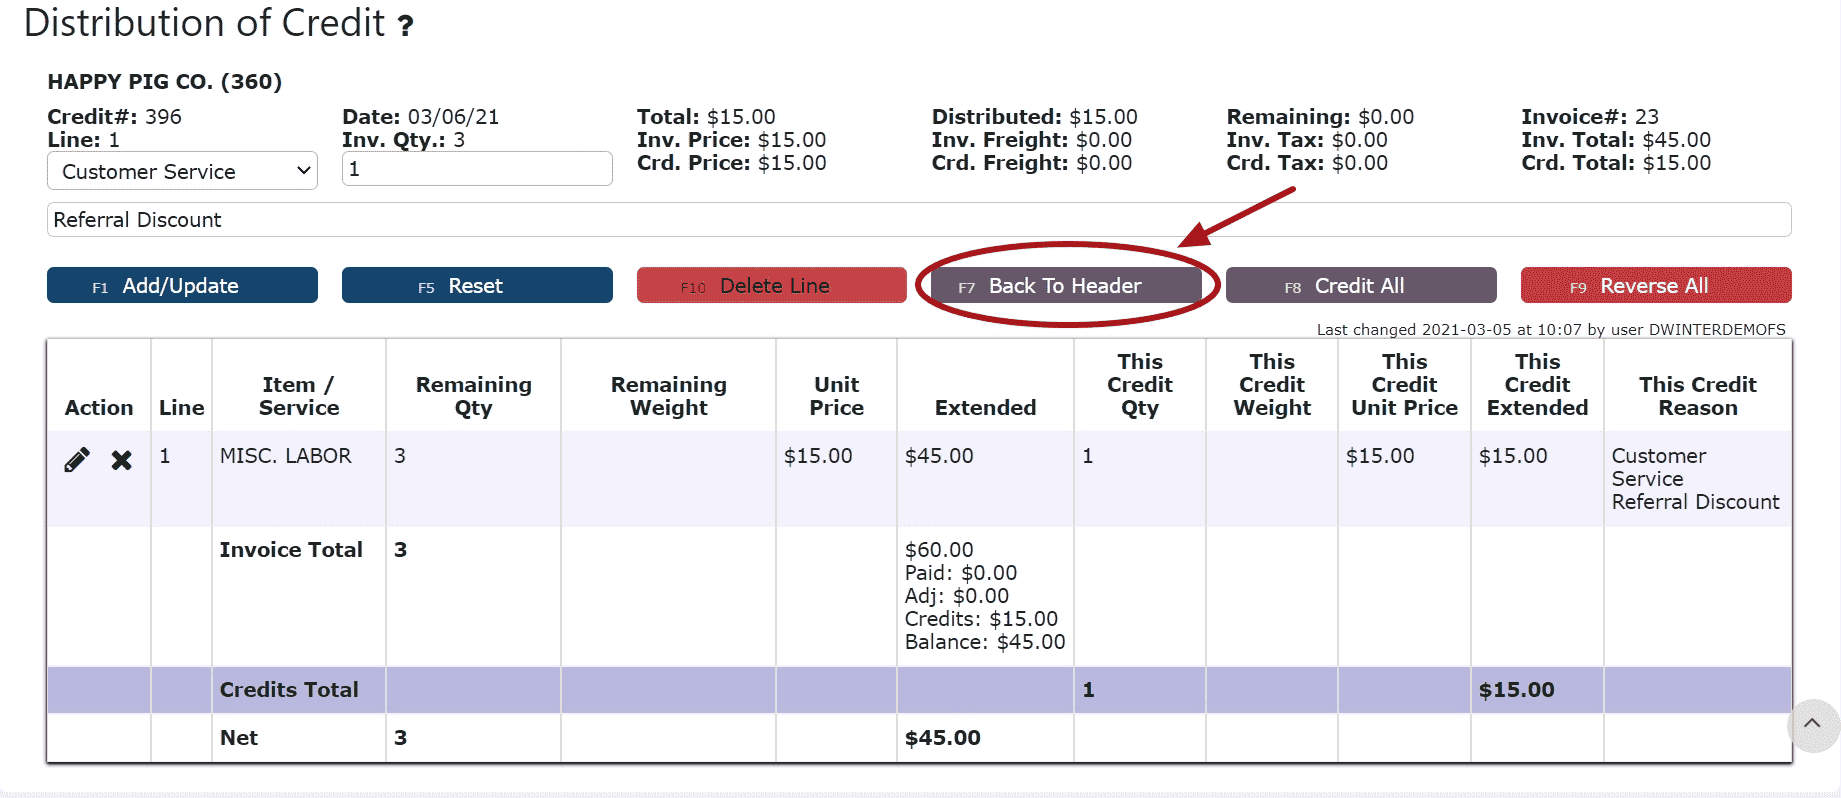 6. Make any necessary changes to the header, then click on the Close Credit Button if ready to close and post the AR Credit
 7. Click on the Post Button to post the AR CreditNote:AR Credits will only post successfully if their date matches the end of day cutoff dateAny AR Credits left open/in progress will prevent the end of day process from automatically moving forward during the night
 If Open:2. Adjust any of the header information as necessary.
 3. Click on the Distribute Credit Button to make changes to the details of the AR Credit (Against Invoice Credits Only)
 4. Make any necessary changes to the details of the AR CreditReversing a Line (Reverses the distribution made to that particular invoice):Step 1: Click on the Reverse Line Icon (X) next to the invoice/credit to reverse payment onDeleting a Line: (Deletes the distribution made to that particular invoice):Step 1: Click on the Edit Line Icon (Pencil)Step 2: Click on the Delete Line ButtonReversing All Distributions (Deletes/Reverses all distributions made across all invoices):Step 1: Click on the Reverse All ButtonEditing a Line:Step 1: Click on the Edit Line Icon (Pencil)Step 2: Make Any necessary changes to the amount and/or description for that lineStep 3: Click on the Add/Update Button5. Click on the Back to Header Button6. Click on the Close Credit Button if ready to close and post the AR Credit7. Click on the Post Button to post the entryNote:AR Credits will only post successfully if their date matches the end of day cutoff dateAny AR Credits left open/in progress will prevent the end of day process from automatically moving forward during the night
-
Deleting an AR Credit
1. Click on the Edit Credit Icon (Pencil) next to the AR Credit to be deletedIf Closed:2. Click on the Open Credit Button to re-open the AR Credit
For Against Invoice Credits:Note:Once deleted, an AR Credit is permanently removed and can no longer be retrieved3. Click on the Back to Header Button
4. Click on the Delete Credit Button, then click Ok on the pop up prompt
For On Account Credits:3. Click on the Delete Credit Button, then click Ok on the pop up promptNote:Once deleted, an AR Credit is permanently removed and can no longer be retrieved If Open:2. Click on the Delete Credit Button, then click Ok on the pop up promptNote:Once deleted, an AR Credit is permanently removed and can no longer be retrieved
-
Applying an On Account Credit through an AR Cash Receipt
1. Go to the Accounting Menu and click on the AR Cash Receipts Sub-Menu2. Click on the Add New Button
3. Enter the customer, select a payment date, payment type and enter a total payment amount
For On Account Credits Only:
Select Apply Credit as the payment type
Enter $0 for the total payment amount
For On Account Credits + Additional Payments:
Select the payment type for the additional payment(s) to be applied
Enter the amount for the total amount of the additional payments (not including the on account credits to be applied)4. Click on the Distribute $ Button5. Select the credit(s) and the amount(s) to apply towards the open invoice(s)Add to Line (Selecting a partial amount of the credit):Step 1: Click on the Add to Line Icon next to the credit to applyStep 2: Enter the amount of the credit to use (must be a negative value)Step 3: Click on the Add/Update ButtonTake Full Credit Balance (applying the full amount of the credit):Step 1: Click on the Take Full Credit Balance Icon6. Distribute the amount of the credit(s) towards any open invoice(s) listed
Add to Line (paying a partial amount of the invoice):Step 1: Click on the Add to Line Icon next to the invoice to be paidStep 2: Enter the amount of the invoice to payStep 3: Click on the Add/Update ButtonAuto Pay Remaining Balance (paying the entire amount of the invoice):Step 1: Click on the Auto Pay Remaining Balance Icon
For On Account Credits + Additional Payments Only:
7. Apply the total payment amount towards any remaining open invoices using the Add to Line Icon or Auto Pay Remaining Balance Icon next to the open invoice to pay
Note: The total amount of the payment must equal the total amount distributed to open invoices in order to close the payment. The remaining amount to apply will indicate how much of the total payment is still left to distribute and will indicate $0 when all has successfully been applied.8. Click on the Back to Header Button9. Click on the Close Payment ButtonNote: Once closed, the cash receipt is ready to post10. Review the Cash Receipt that is ready to post11. Click the Post ButtonNote:Cash Receipts will only post successfully if their date matches the end of day cutoff dateAny Cash Receipts left open/in progress will prevent the end of day process from automatically moving forward during the night
-
Credit / Rebills
What is a Credit Rebill?
A credit rebill is used when an AR sales order has been billed incorrectly. This feature significantly reduces the time needed to correct pricing errors on invoices that have already been posted.
When performing a full credit rebill, the system automatically returns the related inventory from the original sales order, along with the same pallet numbers. The newly generated credit-rebilled order will appear in Ready to Manifest status. From there, you can make any necessary price adjustments directly on the order, then proceed to manifest and reissue the invoice. The Sales Details page will display all updates and adjustments made to the affected invoice.
If only certain lines within a sales order were billed incorrectly, you can instead perform a partial credit rebill. This option recreates the original order after the rebill is posted, leaving it in Open status with newly-generated pallet numbers. The specific items included in the partial credit rebill will be placed into the Restock Queue and must be restocked before completing the rebill process.
Note: Full and partial credit rebills can also be performed for service items if a service was billed at an incorrect rate.
Full Credit Rebill:
1. Begin by locating the invoiced order you wish to fully rebill. Note down the invoice number associated with this order. You can easily find it by navigating to Sales → Orders, entering your order number in the search bar, and clicking Search. The order should appear on your screen.
2. Once you’ve identified the invoice number, navigate to Accounting → Accounts Receivable → AR Credits.
3. On the AR Credits page, you’ll be shown any existing AR credits currently in Ready to Post status by default. To initiate a new credit rebill, click the Add New button (dark blue) located near the top of the screen.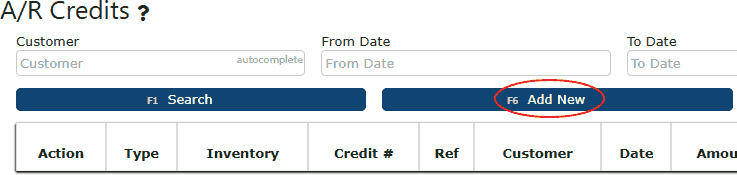
4. You’ll now be on the New Credit entry screen, where you’ll see several available fields such as Customer, Invoice Number, and Reason. The first step here is to open the Inventory dropdown on the right-hand side of the screen. From the three available options — Credit Rebill, Credit/Return, and Credit Only (default) — select Credit Rebill.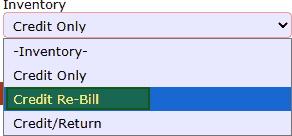

5. Once Credit Rebill is selected, a short description will appear explaining how a full credit rebill differs from a partial one. Review this information carefully before proceeding. Next, begin entering the required details: customer name, credit date, credit amount (equal to the total of the invoice being corrected), invoice number, reason for the rebill, and any additional notes as needed. When everything looks correct, click Distribute Credit (dark blue button) to move forward with the process.
6. This will open the invoice associated with the credit, displaying all items sold to the customer. To issue a credit rebill for the entire order, simply click the Credit All button (dark purple). This will automatically distribute the full credit amount across the entire invoice.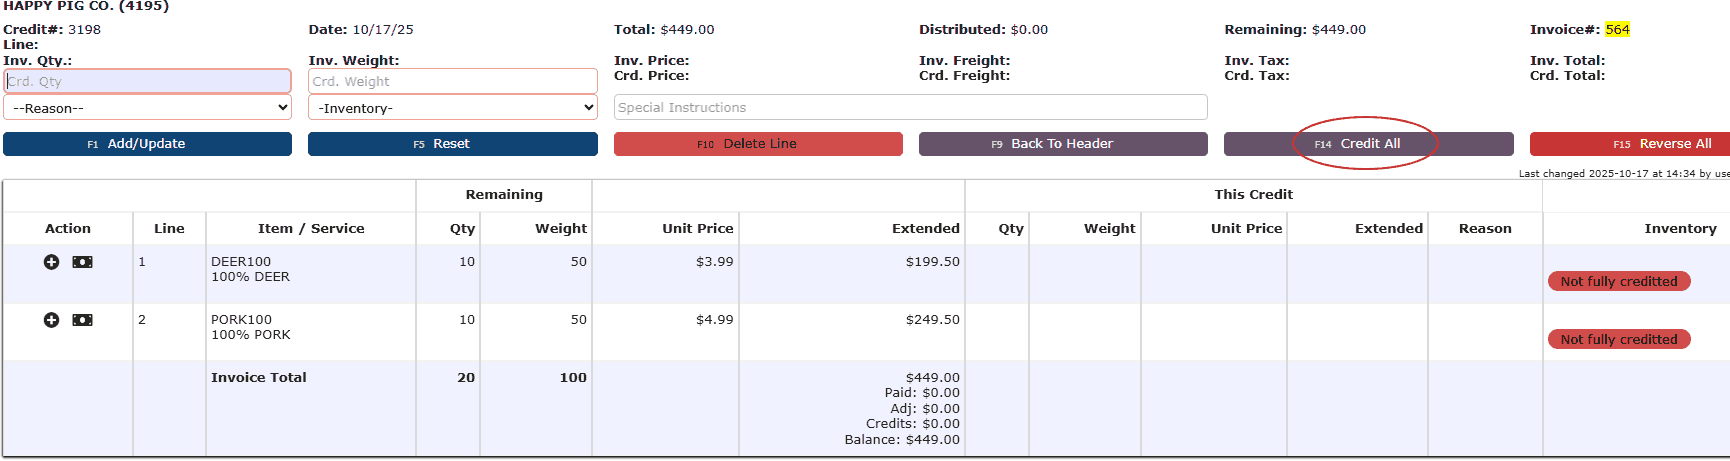
7. After applying the credit, click Back to Header (dark purple) to return to the main credit screen. Once there, select the Close Credit button (light blue) to finalize and close the credit entry.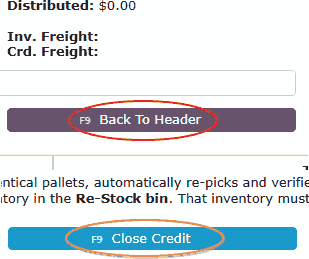
8. When the credit is closed, it will now appear under Ready to Post status. Click the Post button to proceed. A confirmation message will appear asking if you’re sure you want to post the credit rebill — click OK to complete the posting process.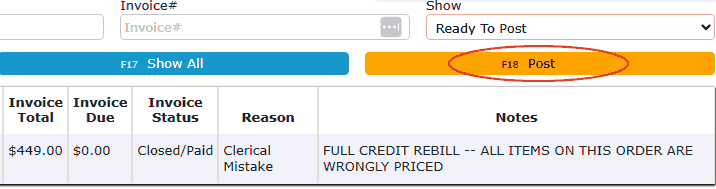
9. After the full credit rebill has been posted, a new sales order will automatically generate. To locate and review it:
• Navigate back to Sales → Orders.
• Use the Customer Name and, if applicable, the Customer PO Number fields to narrow down your search results.
• Check the Internal Notes under the customer’s name — your new rebill order will include a note stating: “This is a Credit/Re-Bill from Order XXXXXX” (where the X’s represent the original order number).
• Check the Internal Notes under the original order — your original sales order will include a note stating: "This was Credited/Re-Billed into Order XXXXXX" (where the X's represent the new order number).
• You’ll see that this newly created order is already in Ready to Manifest status.
• A full credit rebill automatically restores all inventory from the original invoice and prepares the new order for processing.
• To update pricing on the rebilled order: Click the Pencil icon to enter the Order Header.
• Scroll to the bottom of the page and select Save & Details to open and adjust the order lines as needed.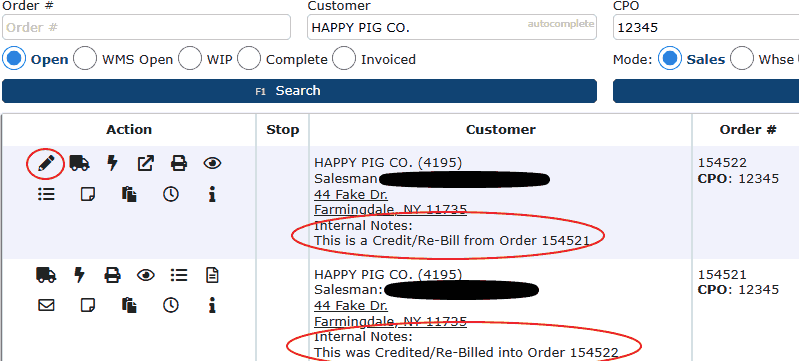
10. Once you are viewing the Order Lines, you can update item pricing as needed. To adjust the price of an individual line, click the Dollar Sign icon located under the Action column, enter the new amount, and then select Add/Update to apply the change. After confirming that all prices are updated and correct, proceed to "ghost-manifest" the order. Finally, return to the Order Header to generate and post the new invoice accordingly.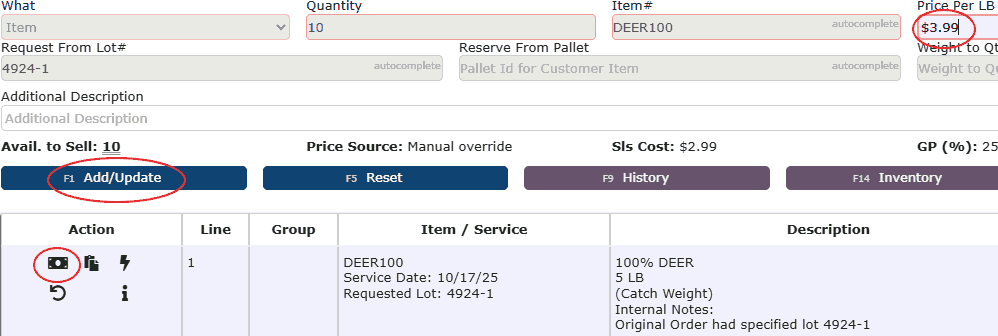
Partial Credit Rebill:
1. To initiate a partial credit rebill, begin by following steps 1 through 5 from the Full Credit Rebill process. The setup for both full and partial rebills is identical up to this point—the difference occurs during the actual rebilling stage. Since the exact amount to be partially rebilled is not yet known, enter $0.00 as the credit amount for now. Once entered, click the Distribute Credit button to proceed.
2. Once you’re on the Distribution of Credit page, click the plus (+) icon under the Action column for each line item you wish to partially rebill. In the Inv. Qty field, enter the quantity of the product being rebilled, then click on the Add/Update button.
If the item is a catch weight or set weight product, you’ll also need to specify the weight being partially rebilled. The entered weight does not need to match the original weight exactly—it can be any appropriate amount.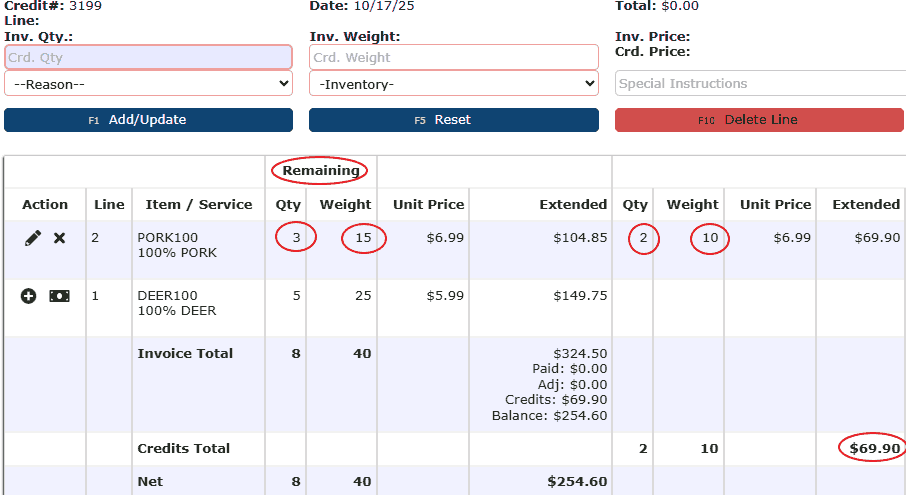
3. After clicking the Add/Update button, the selected line item will be updated for the partial credit rebill. Repeat this process for any additional items that need to be partially rebilled. Once all applicable lines have been credited, review the remaining amount displayed at the top of the screen. This value should appear with a negative (-) sign, since no credit amount has been entered yet. You’ll use this number—without the negative sign—in the Credit Amount field. With that number in mind, click the purple Back to Header button to continue.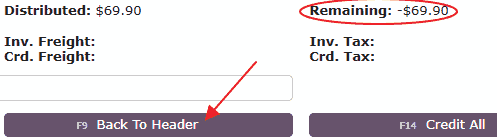
4. You’ll now return to the Change Credit screen. Enter the total credit amount (the number noted earlier) into the Credit Amount field, then click Distribute Credit to apply and confirm your updates. This will bring you back to the distribution screen. From there, click the dark purple Back to Header button once more to finalize and save your credit details.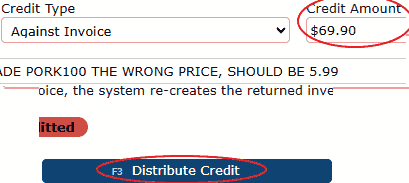
5. Next, click the light blue Close Credit button. This will return you to the main A/R Credits screen. At the top right of the page, open the Show dropdown menu and select Ready to Post to locate the credit rebill you just created. The new partial credit rebill should now appear in the list.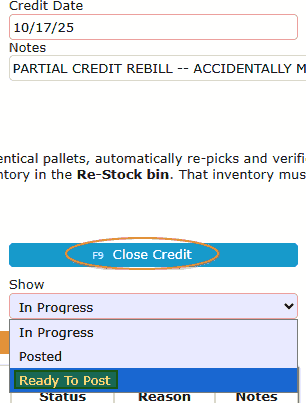
6. Review your partial credit rebill carefully to ensure all details are correct. Once verified, click the orange Post button. A confirmation message will appear asking, “Are you sure?” Click OK to confirm and officially post the partial credit rebill.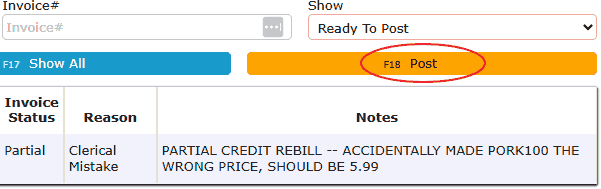
7. After posting, the system will automatically create a new sales order in Open status. For partial rebills and returns, the related items will appear in the Restock Queue. If the products are catch weight items, their weights will need to be re-entered — this applies to both partial rebills and partial returns. Before continuing, go to RF → Restock to place the rebilled inventory back into stock.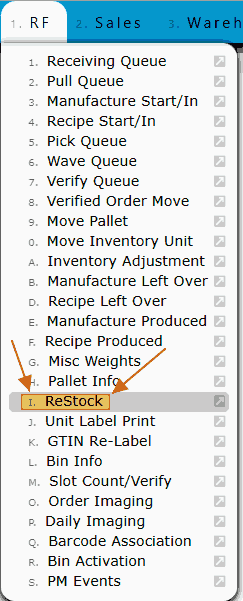
8. Within the Restock Queue, you’ll see the items from your partial credit rebill ready to be placed back into inventory.
• All partially rebilled items will be placed on a newly generated pallet per order line. You can print pallet labels as needed directly from the Restock page using the printer icon under the Action column.
ReStocking Actions:
• Single Box Icon: Click the single box icon, then press the Floor button twice (or type in what bin the pallet will go to). This will move the inventory out of the restock queue and back to the warehouse floor.
• Three Box Icon: Take note of the current pallet number, then select the three box icon. Once clicked, you’ll see a To Pallet textbox, along with the original bin and pallet details displayed at the top of the screen. Click the Move button (grey) on the right-hand side, and enter the pallet number you noted earlier into the To Pallet field. You’ll then be prompted to enter the To Bin number. Either click the Floor button twice to move the pallet back to the warehouse floor, or manually type the desired bin location twice to confirm. Once complete, the inventory will be successfully restocked and removed from the restock queue.
9. After confirming that the rebilled items are back in stock, navigate to Sales → Orders. In the Customer textbox at the top of the screen, enter the customer associated with the partial rebill. If applicable, also enter the Customer PO number, then click Search. Your newly generated rebill order should now appear in the results list with a status of Open.
• Click the pencil icon to enter the order header.
• Adjust the prices for the rebilled line items as needed.
• Once all edits are complete, proceed to "ghost" release, wave (if applicable), pick, verify, manifest, and finally invoice the new sales order.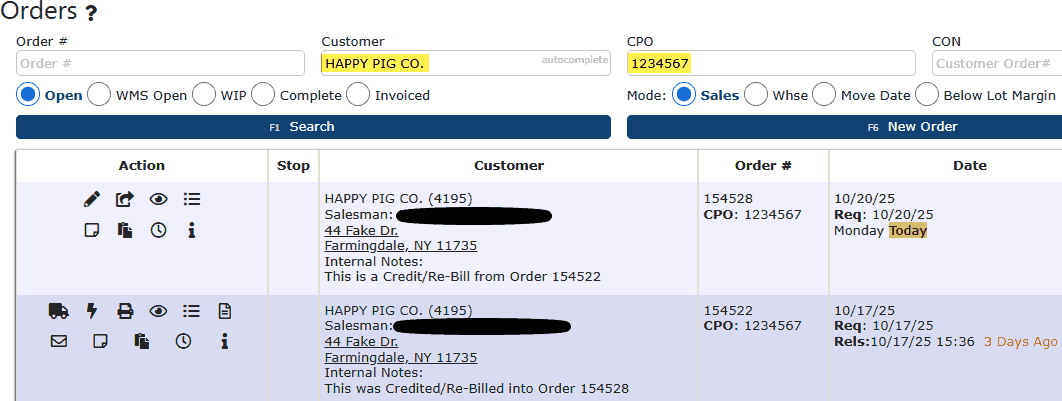
-
Credit Returns
What is a Credit Return?
A credit return is pretty self-explanatory by its name -- a credit return is when a customer sends back & returns the items part of a sales order for any reason, whether it's because the product in question is spoiled, damaged, or they changed their minds on the item. When doing a credit return, there will be an option for a full credit return or a partial credit return. Once a return is done, the sales details page will show all of the sales numbers changing for the sales order in question.
• If the return applies to the full invoice, the system restores the original inventory using the same pallet configuration. This inventory must be returned to stock before continuing the workflow.
• If the return applies to a partial invoice, the system generates the returned items in the Re-Stock bin, creating a new pallet for each affected order line. For catch weight products, new weights will need to be recorded. Once restocked, the items can then be re-picked and verified as usual.
Full Credit Return
1. Begin by identifying the invoiced order that has been completely returned. Take note of the corresponding invoice number. To locate it, navigate to Sales → Orders, enter the order number into the search field, and click Search. The related order will then appear in your results.
2. Once you’ve identified the invoice number, navigate to Accounting → Accounts Receivable → AR Credits.
3. On the AR Credits page, the system will automatically display any existing AR credits currently in Ready to Post status. To begin a new credit return, click the Add New button (dark blue) located at the top of the screen.
4. You will now be on the New Credit entry screen, which includes several key fields such as Customer, Invoice Number, and Reason. Begin by opening the Inventory dropdown menu located on the right-hand side of the page. From the three available options — Credit Rebill, Credit/Return, and Credit Only (default) — select Credit Return.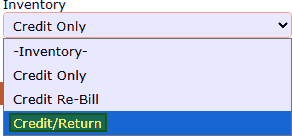
5. After selecting Credit Return, a brief description will appear outlining the difference between a full and partial credit return. Take a moment to review this information before continuing. Then, complete the necessary fields — including Customer, Credit Date, Credit Amount (matching the total of the invoice being corrected), Invoice Number, Reason, and any Notes as needed. Once all information has been verified, click the Distribute Credit button (dark blue) to proceed.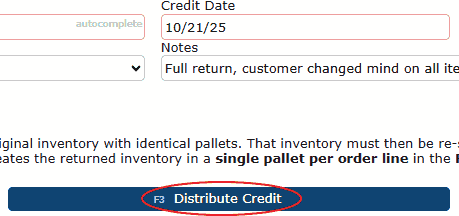
6. This action will open the invoice linked to the credit, showing all items that were sold to the customer. To process a full credit return for the entire order, click the Credit All button (dark purple). The system will then automatically apply the full credit amount across every line item on the invoice.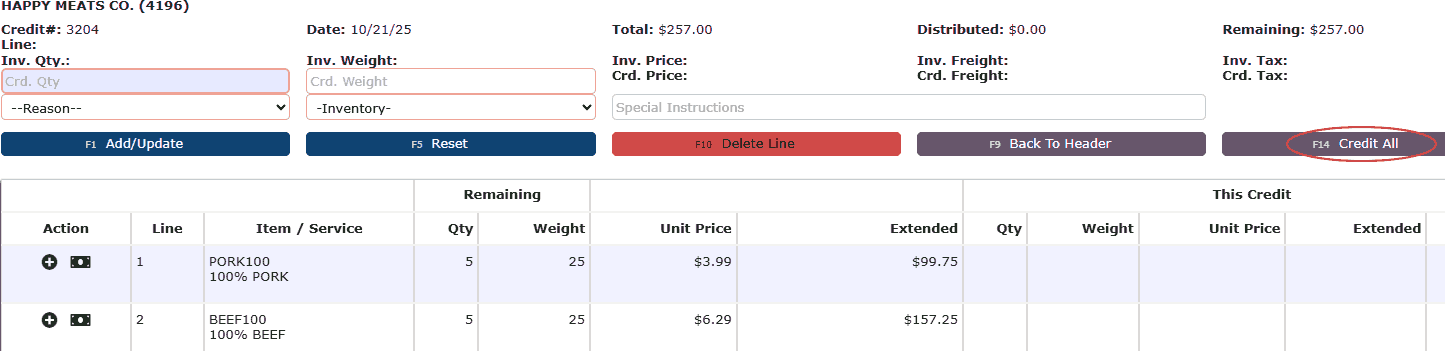
7. After distributing the credit, click Back to Header (dark purple) to return to the main credit screen. Once back on the header, select Close Credit (light blue) to complete and close out the credit transaction.
8. Once the credit has been closed, it will move to Ready to Post status. To finalize, click the Post button. A confirmation prompt will appear asking you to confirm the action — select OK to officially post the credit return.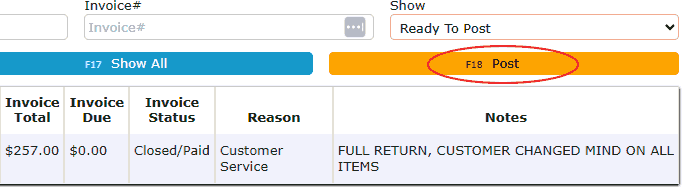
9. After the full credit return has been posted, all of the items on that return will pop up in the restock queue back on their original pallets. All catch weight items will still have their original weights attached upon the credit return being done. To check the restock queue to begin putting away the returned inventory, go to RF → ReStock.
10. Once you are in the restock queue, you will see any other items in the restock queue that are not yet put away (if applicable), plus all of the lines of items that have just been returned that still need to be put away.
Restocking Actions:
• Single Box Icon: Click the single box icon, then select the Floor button twice (or manually enter the destination bin). This action removes the inventory from the restock queue and places it back on the warehouse floor.
• Three Box Icon: Take note of the current pallet number, then select the three box icon. Once clicked, you’ll see a To Pallet textbox, along with the original bin and pallet details displayed at the top of the screen. Click the Move button (grey) on the right-hand side, and enter the pallet number you noted earlier into the To Pallet field. You’ll then be prompted to enter the To Bin number. Either click the Floor button twice to move the pallet back to the warehouse floor, or manually type the desired bin location twice to confirm. Once complete, the inventory will be successfully restocked and removed from the restock queue.
Partial Credit Return
1. To initiate a partial credit return, begin by following steps 1 through 5 from the Full Credit Return process. The setup for both full and partial rebills is identical up to this point—the difference occurs during the actual rebilling stage. Since the exact amount to be partially rebilled is not yet known, enter $0.00 as the credit amount for now. Once entered, click the Distribute Credit button to proceed.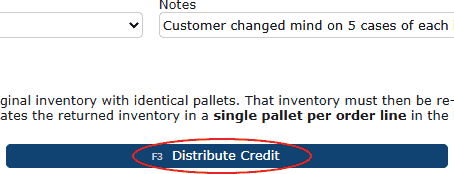
2. This will open the invoice associated with the credit, displaying all items originally sold to the customer. To perform a partial credit return, click the plus icon next to each line item you wish to partially rebill.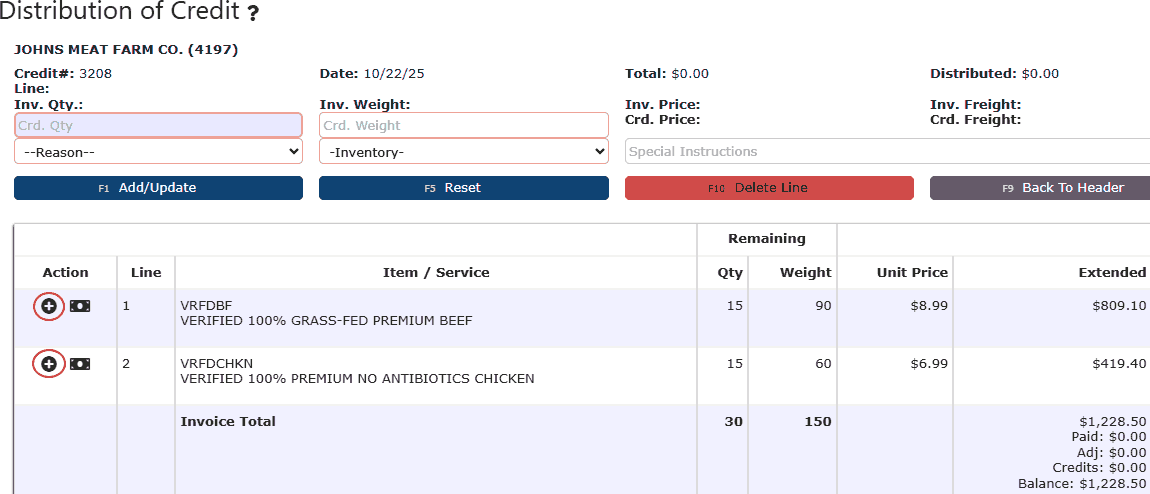
3. After selecting the plus icon on the desired line, enter the quantity being partially returned in the Inv. Qty. field. If the product is a set weight or catch weight item, also enter the corresponding weight being returned. The entered weight does not need to exactly match the original — it can reflect any accurate partial amount. Once you’ve entered the values, click the Add/Update button (dark blue) to apply the change. Repeat this step for all additional lines that require a partial return.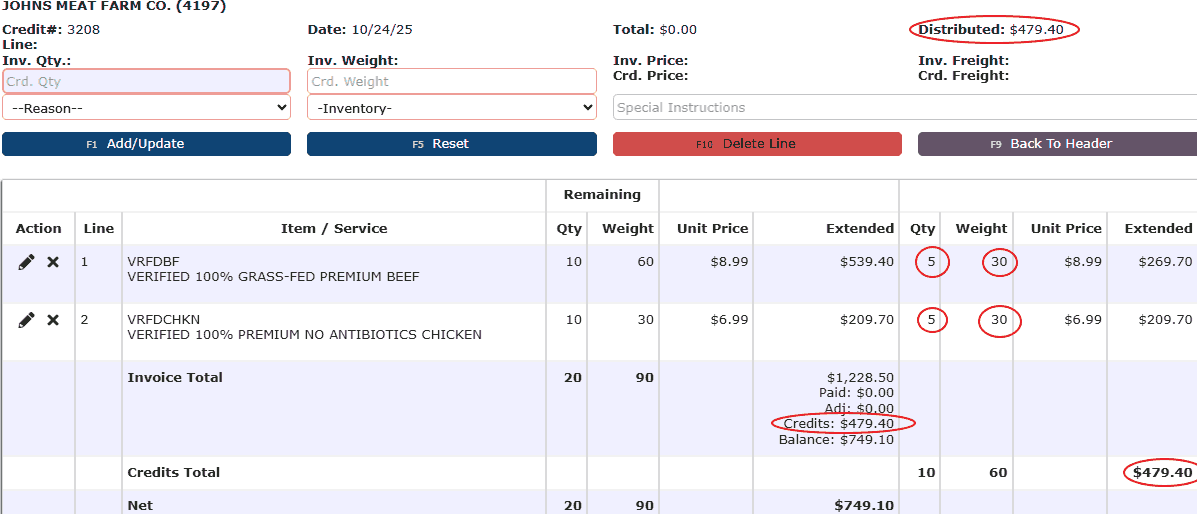
4. When all applicable lines have been updated, review the Distributed or Remaining amount displayed at the top of the page. Note the positive value (for example, $479.40), as this represents the total partial return amount to be entered in the credit header. Then, click the Back to Header button (purple) at the top of the page.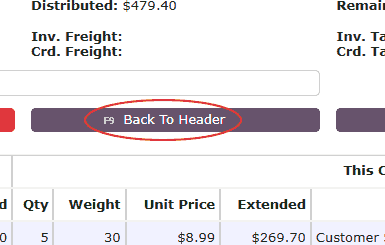
5. Once back on the credit header screen, enter the noted positive amount into the Credit Amount field. Next, click the Distribute Credit button again to save and apply the value. When the distribution page reappears, no further edits are needed—simply click Back to Header (purple) once more to finalize and lock in the changes.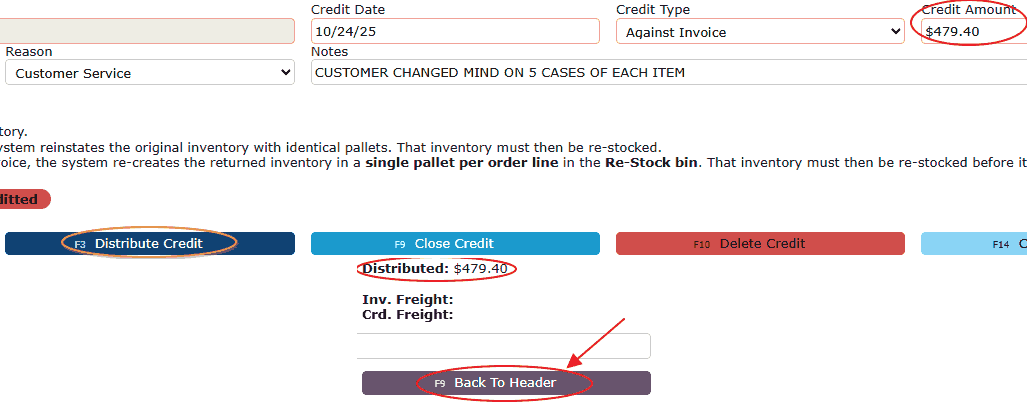
6. This step officially finalizes your partial return credit amount. Once confirmed, click the Close Credit button (light blue) to complete and close the credit entry. After closing, you’ll return to the A/R Credits screen. In the upper-right corner, open the Show dropdown menu and switch the view from In Progress to Ready to Post. Your partial return credit should now appear in the list.
7. Next, click the Post button (orange). A confirmation prompt will appear asking, “Are you sure?” Confirm your selection by clicking OK on the pop-up. This action will officially post your partial credit return.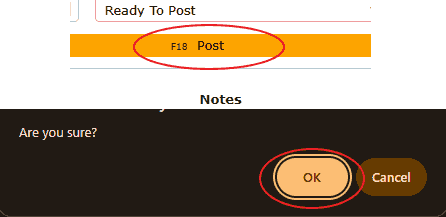
8. The partial credit return is now officially posted. For partial returns, all returned order lines are consolidated onto a newly generated pallet. You can now proceed with restocking these items back into inventory. To begin, navigate to RF → ReStock Queue, where your partially returned items will appear.
Restocking Actions:
• Single Box Icon: Select the single box icon, then tap the Floor button twice (or manually enter the appropriate bin location). This will remove the inventory from the restock queue and return it to the warehouse floor.
• Three Box Icon: First, note the current pallet number, then click the three box icon. After selecting it, a To Pallet textbox will appear, along with the original bin and pallet information displayed at the top of the screen. Click the Move button (grey) on the right-hand side, and enter the pallet number you recorded earlier in the To Pallet field. Next, you’ll be prompted to provide the To Bin number. Either select the Floor button twice to send the pallet back to the warehouse floor, or manually input the desired bin location twice to confirm. Once completed, the items will be successfully restocked and cleared from the restock queue.
-
Miscellaneous Invoice Allowances
Miscellaneous Invoice Allowance Credit Overview
A Miscellaneous Invoice Allowance in the Inspired system allows users to apply a credit directly to an invoice without affecting inventory or specific item quantities. This is commonly used for adjustments such as pricing discrepancies, service credits, or customer accommodations.
Unlike line-level credits, this method applies a monetary adjustment to invoice totals (e.g., merchandise or services) while leaving the original items and inventory unchanged. This feature is available within Accounts Receivable (AR Credits) and can be used independently or in combination with other credit types such as line-level credits, rebills, or returns (combination use - FM only).
What is a Misc. Invoice Allowance?
• A non-inventory credit applied directly to an invoice
• Does not impact quantities or stock levels
• Applies to:
—> Merchandise totals
—> Service totals
• Commonly used for:
—> Pricing adjustments
—> Customer satisfaction credits
—> Billing corrections not tied to specific items
How to Apply a Misc. Invoice Allowance
1. Navigate to Accounting → Accounts Receivable → AR Credits.
2. Click the Add New button near the top of the page.
3. In the Credit Type dropdown:
—> Select Misc. Invoice AllowanceNote: The default credit type is typically Against Invoice Lines
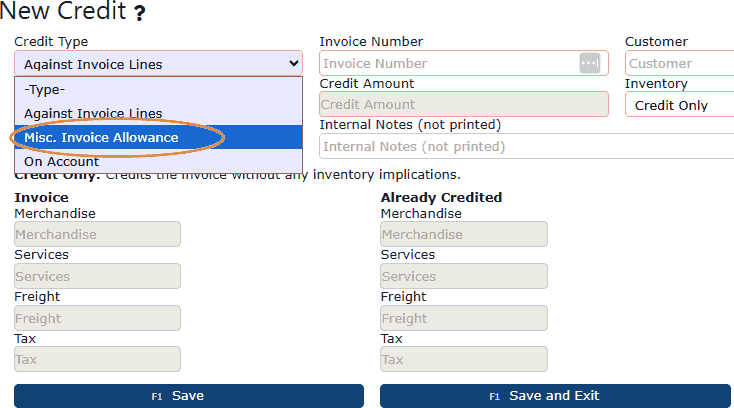
Once Misc. Invoice Allowance is selected:
• The system will display invoice totals directly on the credit screen
• There is no “Distribute $” button when using Misc. Invoice Allowance as the Credit Type
At the bottom of the screen, you will see fields such as:
• Merchandise
• Services
• Freight
• Tax
Important Behavior:
• Fields will only be editable if applicable to the invoice
—> If the invoice contains services, the Services field becomes editable
—> If the invoice contains merchandise, the Merchandise field becomes editable
• Enter the credit amount directly in the Credit Amount field
• The credit is applied at the invoice summary level only
• No line-level distribution is available when using this credit type alone
4. Enter the Invoice Number. Once entered, the Customer field will automatically populate.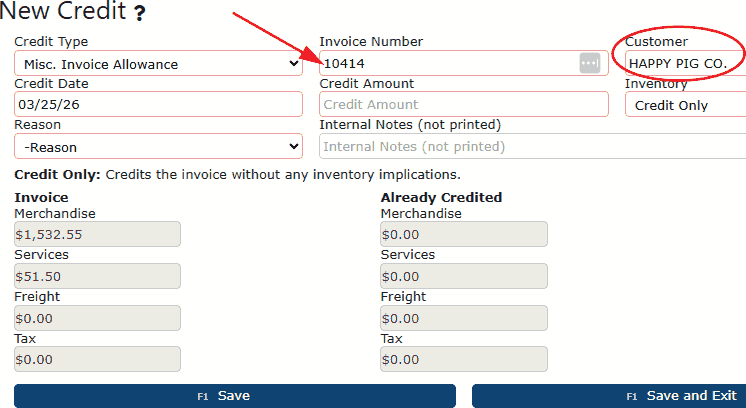
5. In the Credit Amount textbox, simply enter the total credit value being applied against the invoice.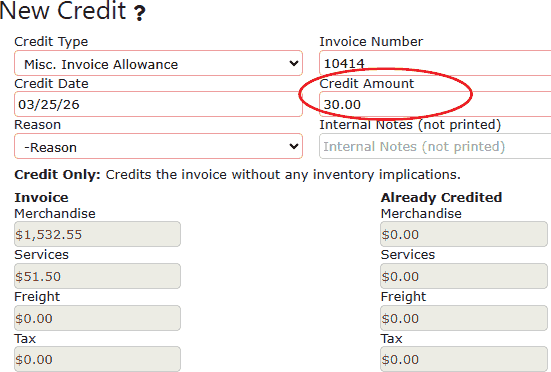
6. Choose a credit reason from the Reason dropdown box.
7. Review the This Credit section. Merchandise, services, freight, and tax textbox fields will open up depending on what is actually on the invoice. Enter the desired credit amount(s) here. For example, entering $10 in Merchandise applies a $10 credit toward item charges. Entering $20 in Services applies a $20 credit toward service charges.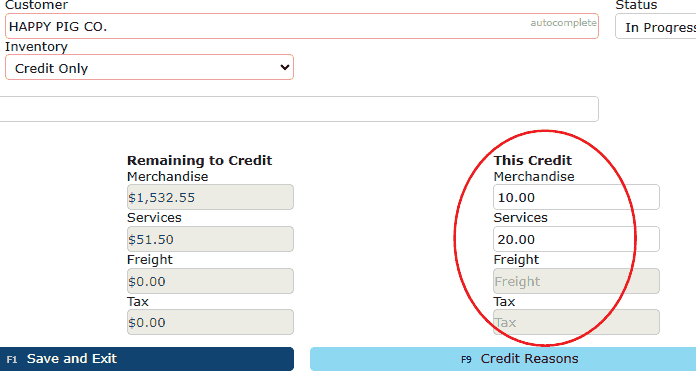
8. Now click either the Save & Exit button, or the Save + Back buttons. You will now see the credit in Ready to Post status; simply click the orange Post button to finalize this credit.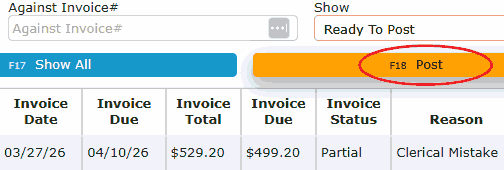
This miscellaneous invoice allowance, just like against invoice credits, will show up as a negative in the sales reports.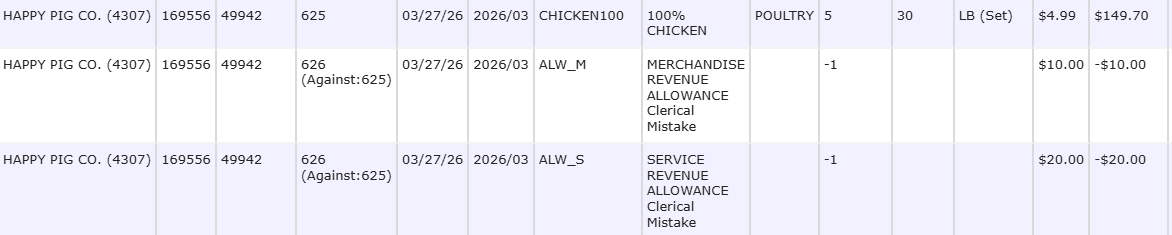
Combining Rebill/Return with Misc Allowance (FM Only)
In Factory Mode (FM), users can perform a Rebill or Return and apply a Miscellaneous Invoice Allowance within the same credit transaction. This is useful when both item-level corrections and additional financial adjustments are required.
How to Create a Rebill or Return + Misc Allowance (FM Only)
1. Navigate to Accounting → Accounts Receivable → AR Credits.
2. Click the Add New button near the top of the page.
3. In the Inventory dropdown, select credit rebill or credit return, depending on which one is being done.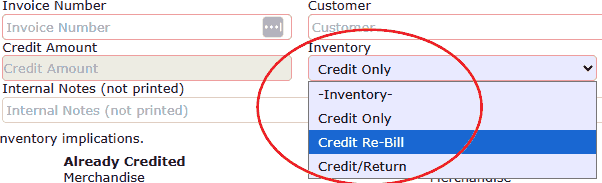
4. Enter the Invoice Number and the Customer field will auto-populate once done.
5. Select a reason from the reason dropdown box.
6. Type in the total credit amount being applied to this invoice, including for both the rebill/return and misc. invoice allowance.
7. Now that everything is properly filled out, click on the Distribute $ button.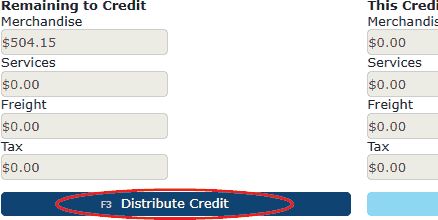
8. On the Distribution of Credit screen,
• If crediting a full line, click the dollar sign icon next to the line to apply the credit rebill/credit return to that line, and/or: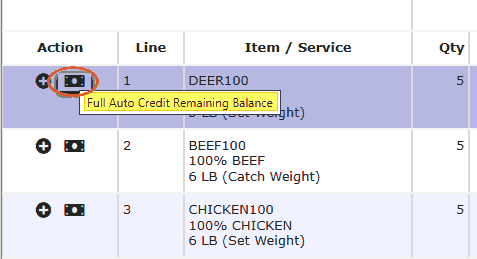
• Click the plus icon next to a line to rebill some of this item. Enter Inv. Qty, & Inv. Weight (if applicable; for catch weight items, this determines the dollar amount)
• Repeat for each line being rebilled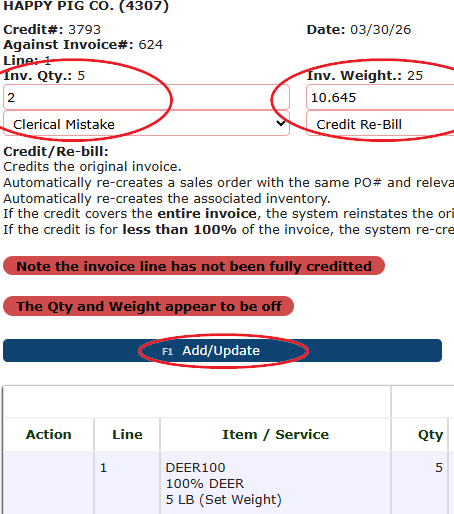
Adding a Misc. Invoice Allowance
Once line-level rebills/returns are entered:
1. Click the Merch. Allowance button.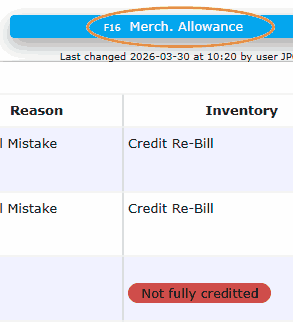
2. A screen similar to the credit header will appear, displaying fields for Merchandise, Services, Freight, and Tax. These fields will become editable based on the components present on the invoice.
3. Enter the desired miscellaneous credit amounts in the “This Credit” section for the applicable fields.
4. Click the Add/Update button to apply this miscellaneous credit. The system will add a new line labeled Credit Allowance.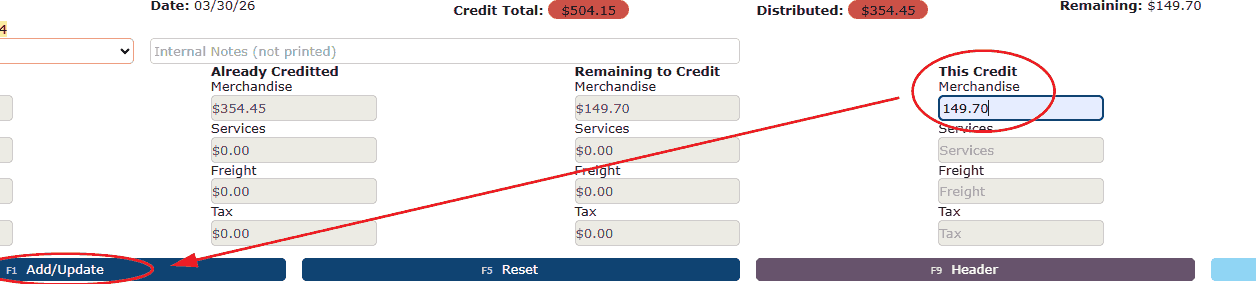
5. Simply click the purple Header button to go back to the main credit page and click the light blue Close Credit button to close out the credit. Make sure the credit is now in Ready to Post status.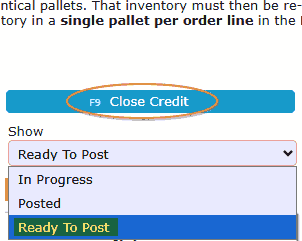
6. Click the orange Post button to finalize your credit.Partial Credit Requirement
When combining:
• Rebill or return
• AND a Misc. Invoice Allowance,
→ The system will always treat the rebill/return as partial
• Even if attempting to fully credit the invoice:
• Using Credit All or $ (sometimes) icon will not behave as expected
• The presence of a misc allowance forces partial distribution
Partial Rebill & Return + Misc Behaviors
When processing partial rebills or returns, the system will handle inventory and order status differently:
• Partial Rebill:
→ A new version of the order is automatically created with the rebilled items
→ The order remains in Open status since it is not a full rebill
→ Inventory is re-created and must be processed again through the outbound workflow
• Partial Return:
→ Returned inventory is placed into the Restock Queue
→ Accessible via RF → Restock
→ No new order is created
• Rebills and Returns (General):
→ Any inventory being returned—whether from a rebill or return—will appear in the Restock Queue
→ Items must be restocked before they can be picked and shipped againFor full details on rebill and return workflows, refer to the dedicated for Credit Rebills & Credit Returns articles.
Best Practices for Combined Credits
• Only use the dollar sign icon when you know the whole line needs to be credited.
• When adding a misc. invoice allowance to the same invoice, avoid the credit all button.
• Ensure all values are properly distributed.
• Ensure credit total matches the full intended amount.
Customer Portal Bill Pay
-
Portal Bill Pay
Portal Bill Pay - Customer Portal Guide
Customers can view and pay invoices, manage saved payment methods, and review payment activity directly within their secure Customer Portal. The Portal Bill Pay feature provides a streamlined way to review open balances, submit online payments, apply available credits, and track billing history without needing assistance from your accounting team. This self-service functionality improves transparency, speeds up payment processing, and gives customers full visibility into their accounts receivable activity.
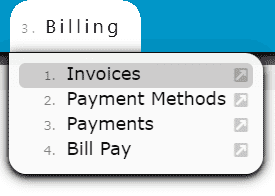
Portal Bill Pay:Manage Payment Methods
Pay Invoices
View Payments
View Open/Paid Invoices
Use CreditsManage Payment Methods:
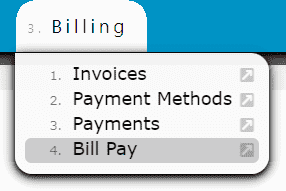
1. Navigate to the Billing menu and select the Payment Methods sub-menu. Alternatively, click the Payment Methods button from either the Open Invoices listing or the Payment Confirmation screen during checkout.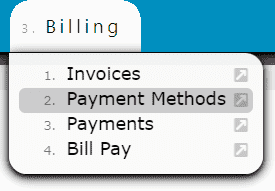
2. You will be taken to the Payment Methods Listing, which displays all saved payment methods currently available for use on your account.Add a New Payment Method: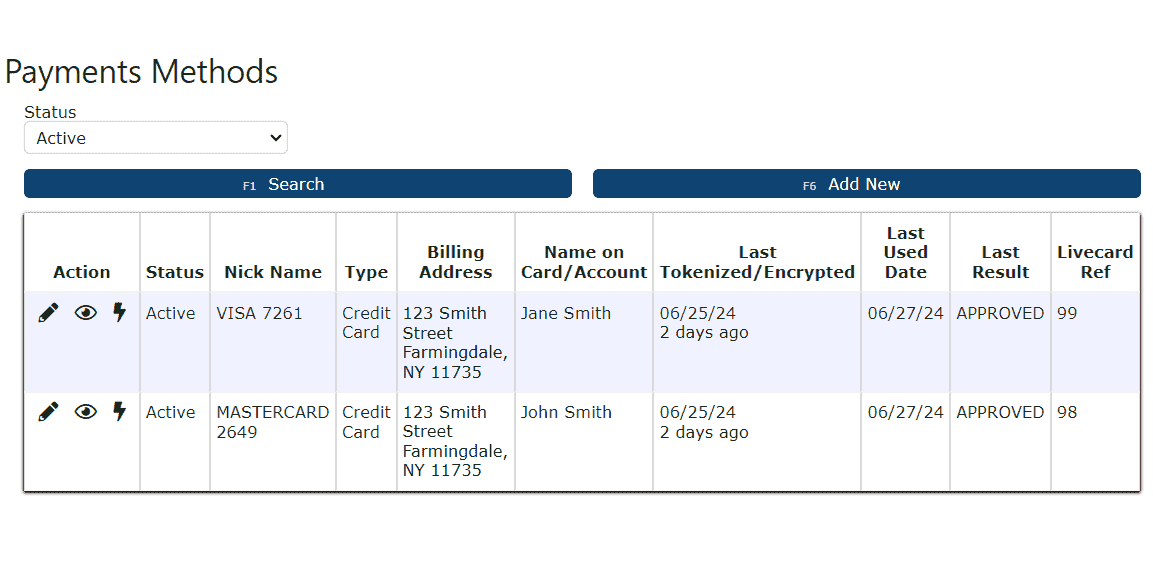
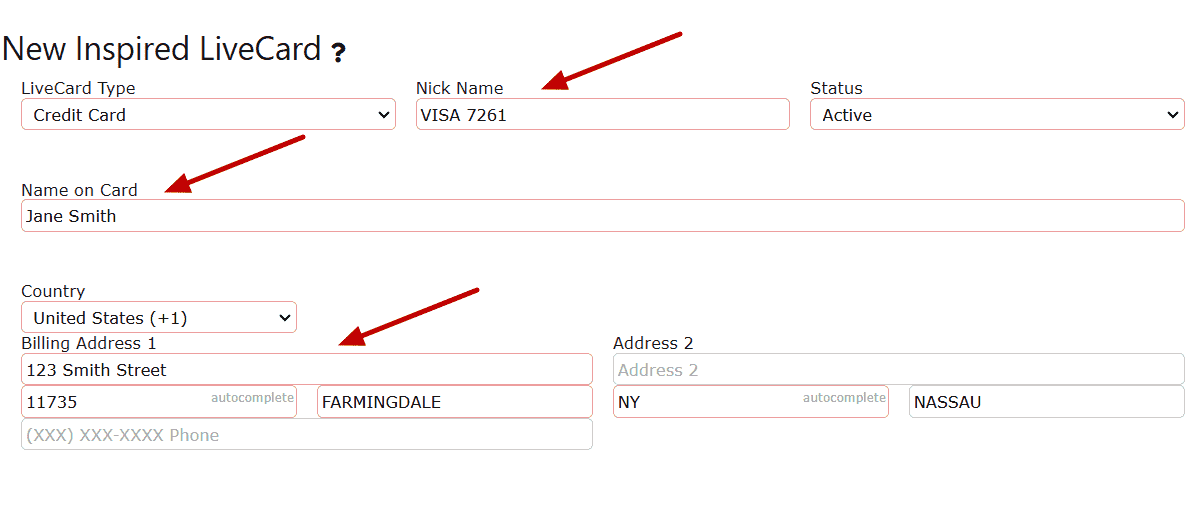
1. Click the Add New button to begin entering a new payment method.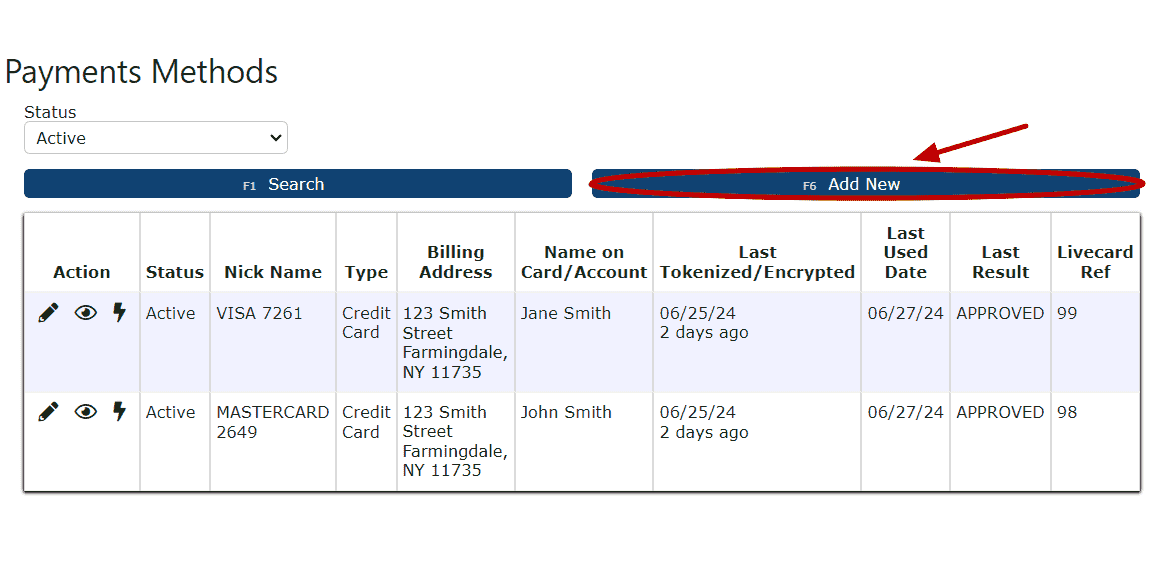 2. Open the LiveCard Type dropdown and select Credit Card as the payment type.
3. Enter the Nick Name, Name on Card, and Billing Address associated with the card. These details help identify the card for future payments.
 4. Use the Card Type dropdown to select the appropriate card brand (American Express, Discover, Mastercard, or Visa).
5. Enter the Card Number, Expiration Date, and Security Code exactly as they appear on the card.
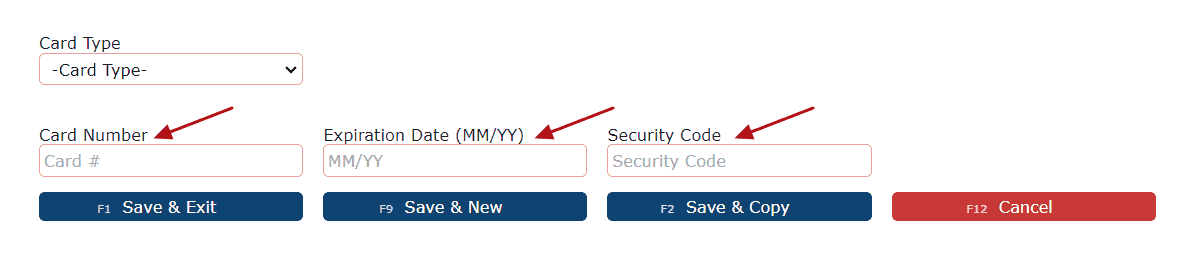 6. Click Save & Exit, Save & New, or Save & Copy to securely store the payment method.
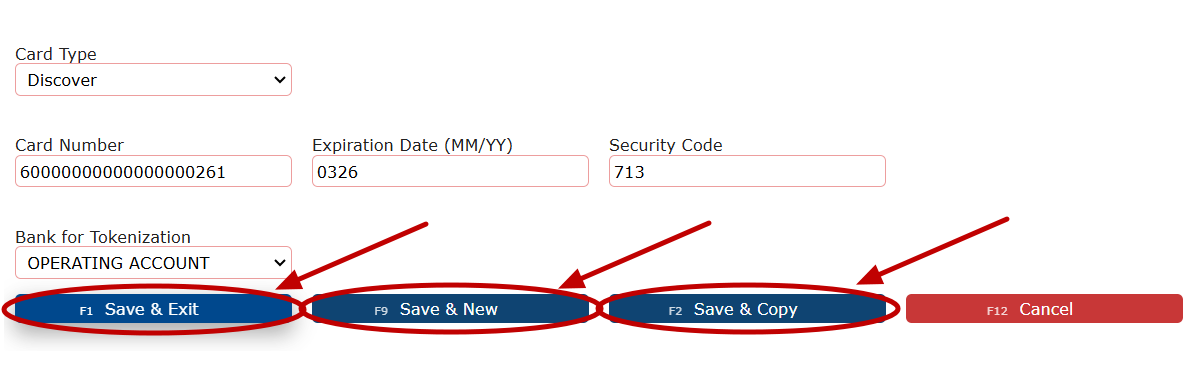
Note:Inspired Technology Systems does not store credit card numbers on its servers. All card information is securely tokenized using industry-standard encryption. Tokenization replaces sensitive card data with a secure token, ensuring compliance and protecting customer information.
Edit an Existing Payment Method:
1. Click the Carrot (arrow) icon next to an existing payment method, then select the Manage (pencil) icon. 2. Update the payment method details as needed.
  3. Click Save & Exit, Save & New, or Save & Copy to apply the changes.
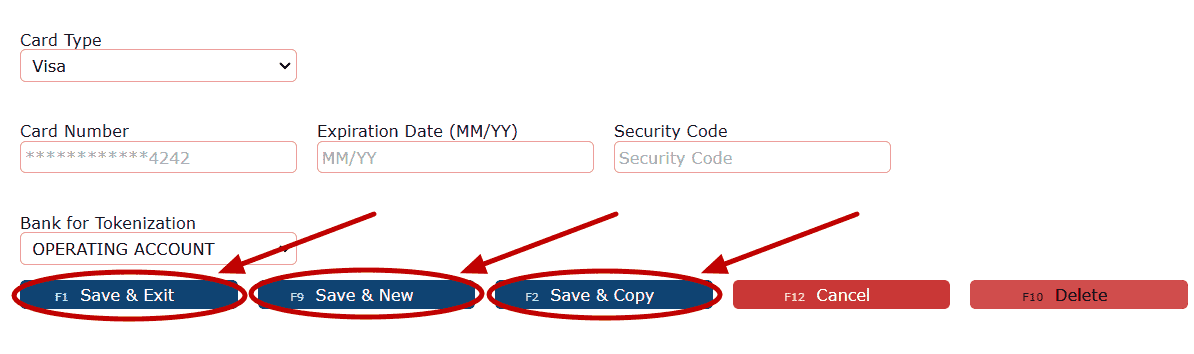 Note:If a payment method is currently Disabled and needs to be reactivated, the Card Number, Expiration Date, and Security Code must be re-entered before saving.
Pay Invoices:
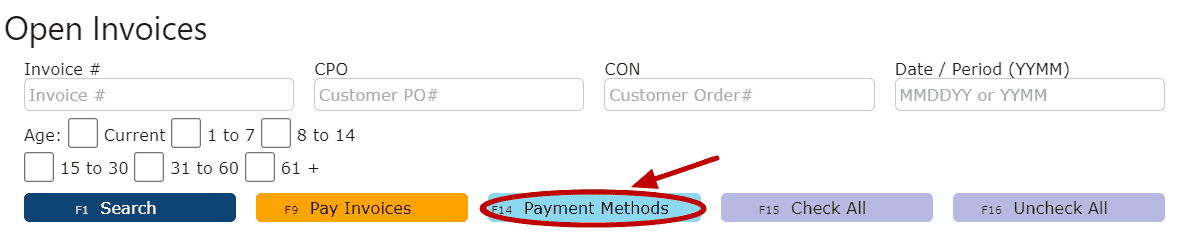
1. Navigate to Billing → Bill Pay to view all Open Invoices that are currently pending payment.
 2. Select the checkbox next to each invoice you wish to pay. Multiple invoices may be selected at the same time.
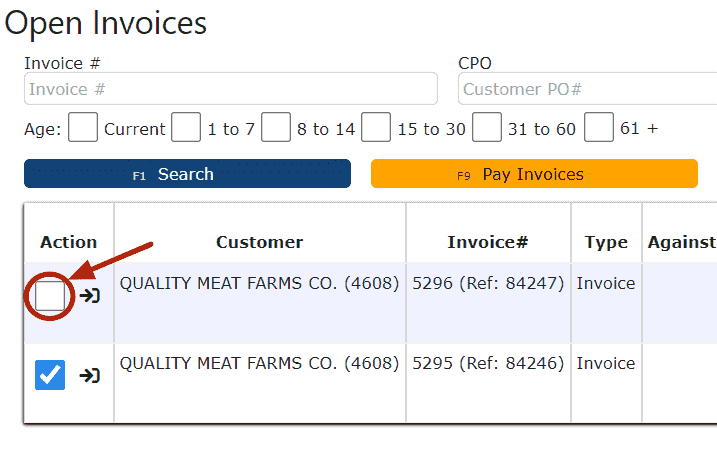 3. Click the Pay Invoices button to continue to the payment confirmation step.
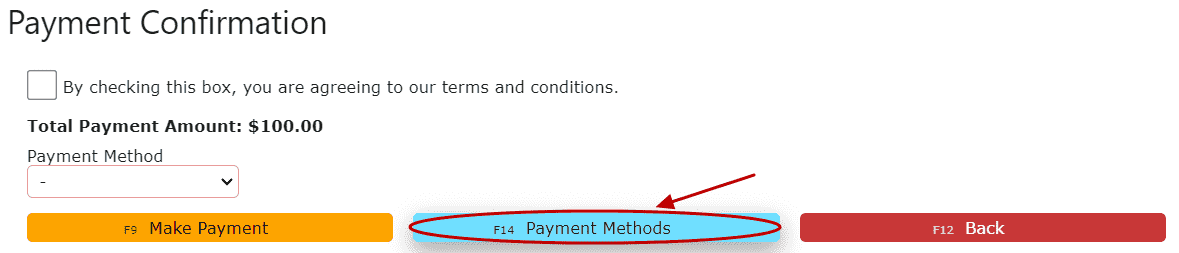
 4. On the Payment Confirmation screen, review the selected invoices and check the acknowledgment box to confirm acceptance of the terms and conditions.
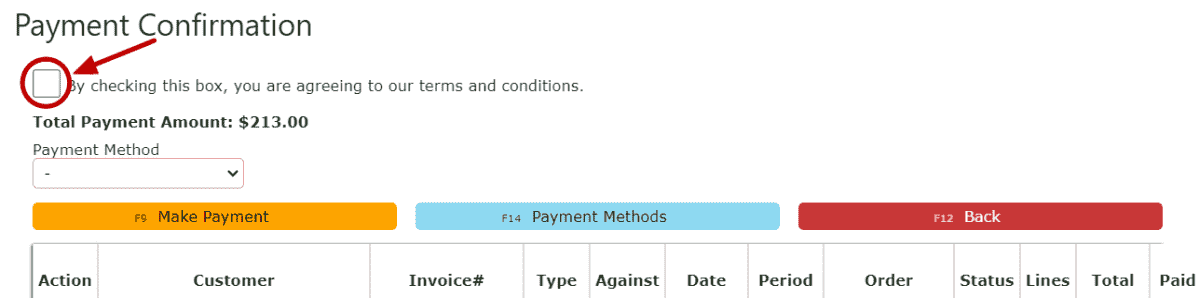
5. Use the Payment Method dropdown to select an eligible saved card.
6. Click the Make Payment button to securely submit the payment.
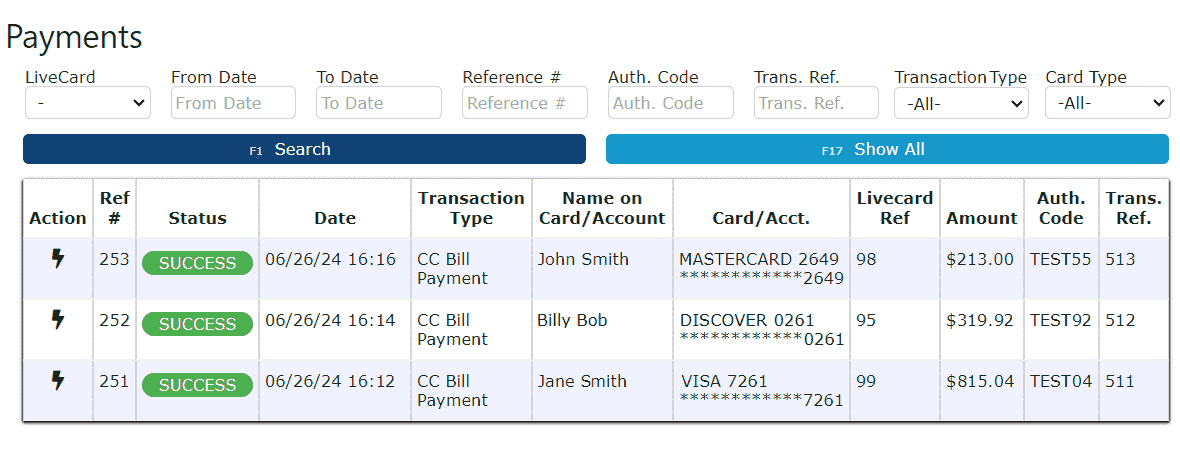
1. Navigate to Billing → Payments to review previously submitted payments. This page displays transaction details such as payment status, date, amount, authorization codes, and reference numbers for historical tracking and reconciliation.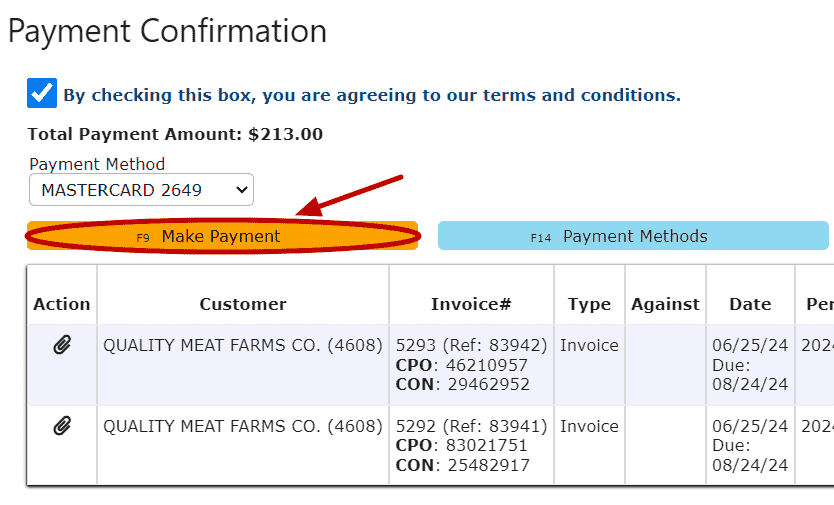 View Payments:
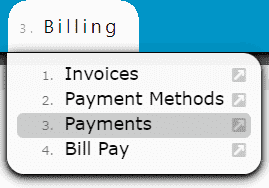
 View Open/Paid Invoices:
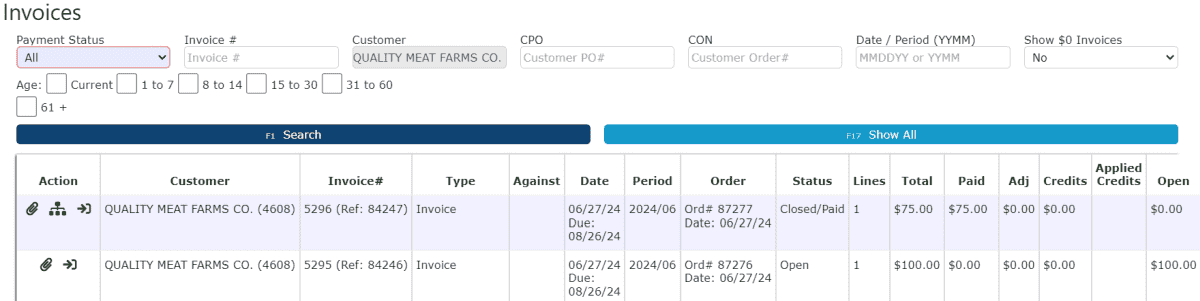
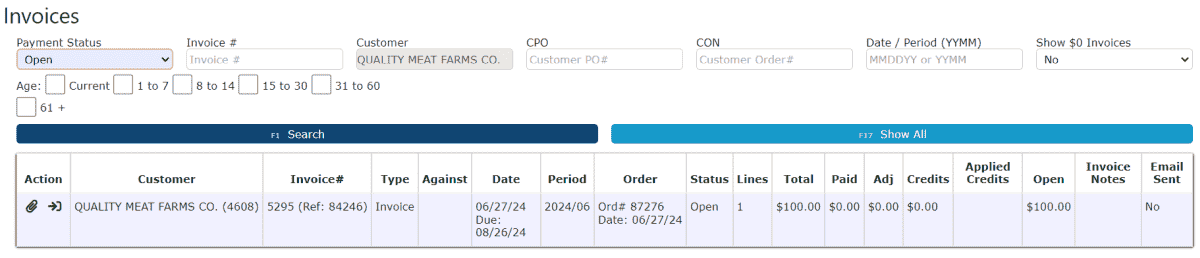
1. Navigate to Billing → Invoices to access your full invoice history.
 2. Use the Payment Status dropdown to filter invoices by All, Open, or Closed (Paid) status. This allows customers to quickly distinguish outstanding balances from fully paid invoices and supports easy recordkeeping.

Applying Credits to an Invoice(s)
Customers can apply available credits directly toward open invoices during the Bill Pay process. Credits may originate from overpayments, returns, adjustments, or credit memos and can be used to reduce the total amount due before submitting payment.
1. Navigate to Billing → Bill Pay to view all Open Invoices and any Unused Credits available on your account.
2. Review the list of unpaid invoices along with the any available credit balances displayed on the page.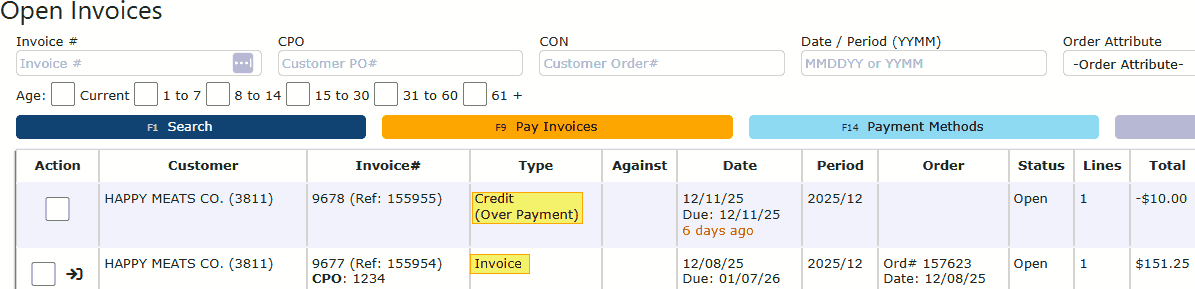
3. Select the checkbox next to the Invoice(s) you wish to pay.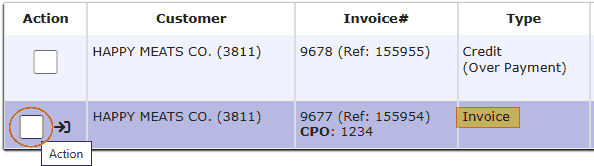
4. Select the checkbox next to one or more Credits you want to apply. The system will automatically apply the selected credit amount toward the chosen invoice(s).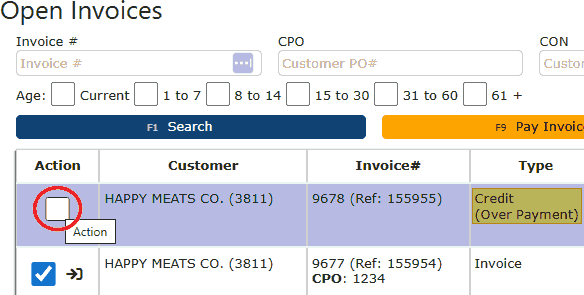
5. Click on the orange "Pay Invoices" button after you have finished choosing the invoices and credits you wish to use. The payment summary will recalculate in real time, showing:
• Original invoice amount
• Applied credit amount
• Remaining balance due
• Any applicable surcharge or processing fee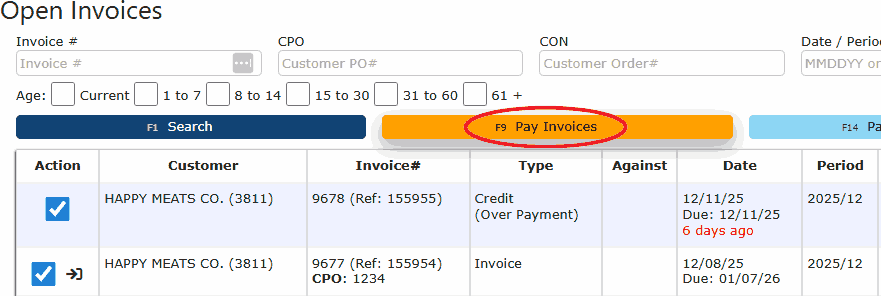
6. Select a payment method from the dropdown menu for any remaining balance.
7. Acknowledge the additional 2.5% surcharge as well as our terms and conditions. Once you understand, check the box at the top of the screen.
8. Review the final payment total, then click Make Payment to complete the transaction.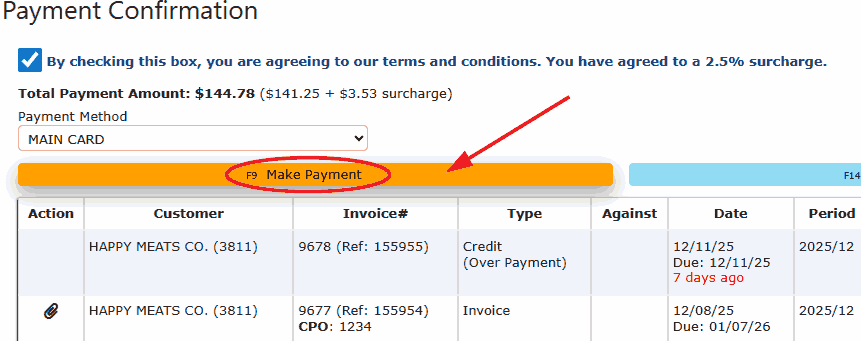
Important Notes:
• Credits are applied before the payment method is charged.
• If the selected credit fully covers the invoice amount, only applicable fees (if any) will remain due.
• If the credit amount exceeds the invoice balance, the remaining credit will stay available for future use.
• Applied credits and payment details are recorded for full visibility in both Payments and Invoice History.
Applying credits through Portal Bill Pay allows customers to quickly reconcile balances, reduce outstanding invoices, and ensure accurate account totals—all within a single, streamlined workflow.